background image

Antenna

RF coaxial wire
(75 ohm) 

Rf coaxial wire 
(75 ohm)

Cable box

In

Out

Cable TV
wall jack

Signal Splitter

VIDEO 2

INPUT

MONITOR

OUT

ANT/CABLE2

INPUT

ANT/CABLE1

INPUT

DTV/RF

ANTENNA

INPUT

R

L

S-VIDEO

OUT

 (MONO)

VIDEO

LOOP OUT

Cable Box

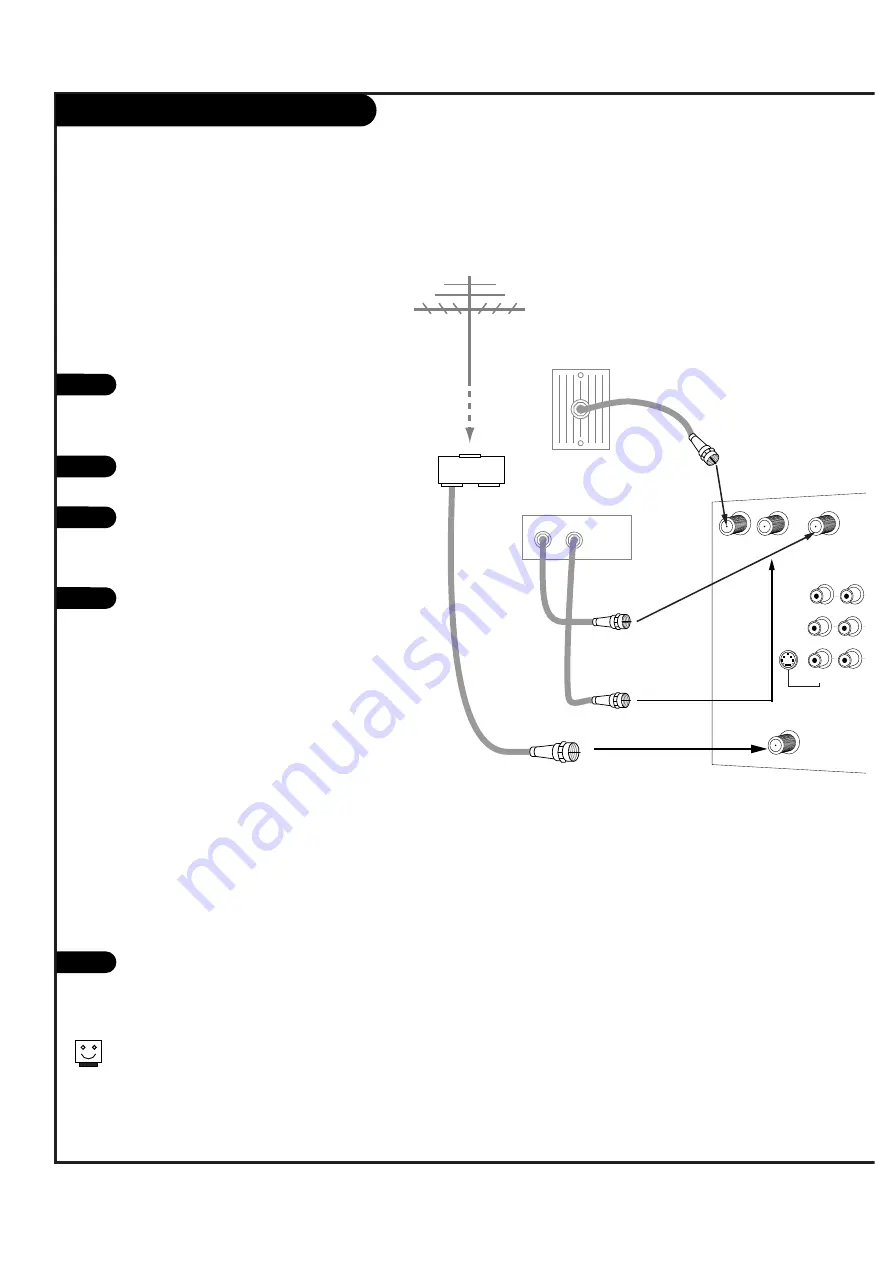
Locate the Antenna/Cable 2 jack on the
back of your TV. Connect the cable that
runs from the wall directly to the jack.
Now find the the Loop Out jack.

Connect the cable from this jack to the
Input jack on the back of your cable box.

Locate the Output jack on the back of
your cable box. Connect this to the
Antenna/Cable 1 jack on the back of your
TV. 

To view the premium stations, set the
channel number on your cable box to
HBO, CINEMAX, SHOWTIME, etc. Then
press the Antenna button on your remote
and select the other Cable source
(Ant/Cable 1).

To view the non premium channels press
the Antenna button and select Ant/Cable 2.
Then run Auto Program to check for all
available channels and store them in
memory. 

This can be combined with any other
equipment you may want 
to hook up. Hook cable directly into the
TV, then to the cable box. From there, the
cable box goes to the next device, down
the line, until the last piece, which con-
nects back to the TV in the
Antenna/Cable 1 jack.

Turn to pages 26-27 to activate EZ
Program for your analog signal and to
tune your DTV antenna.

1

2

3

4

Some cable services require the use of a cable box to decode pre-
mium channels and pay-per-view. Using the Loop Out to Decoder
option, and programming your remote, you can connect your cable
box so that you only need your MBR remote to control all the
channels. By connecting cable directly to your Entertainment
Machine, then running it out to the cable box and back, you make
the cable box another source to choose from in the Source selec-
tion on your remote. 

To receive premium channels, run
Auto Program on the second source
that is set to receive channels. 

P A G E   1 0

206-3583

5

Summary of Contents for IQB56W10G

Page 1: ...machine number IQB56W10G o p e r a t i n g g u i d e t a b l e o f c o n t e n t s p a g e 5 g l o s s a r y o f t e r m s p a g e 67 Toll Free Digital TV Hotline 1 877 939 6484 ...

Page 2: ...ntee that interference will not occur in a particular installation If this equipment does cause harmful interference to radio or television reception which can be determined by turning the equipment off and on the user is encouraged to try to correct the interference by one or more of the following measures Reorient or relocate the receiving antenna Increase the separation between the equipment an...

Page 3: ... manufac turer s instructions have been adhered to 11 Power Sources Operate product only from the type of power source indicated on marking label If you are not sure of the type of power supply to your home consult your prod uct dealer or local power company For products intended to operate from battery power or other sources refer to the operating guide 12 Power Cord Polarization This product is ...

Page 4: ... Unplug this product from the wall outlet and refer servicing to qualified service personnel under these conditions a If the power supply cord or plug is damaged b If liquid has been spilled or objects have fallen into the product c If the product has been exposed to rain or water d If the product doesn t operate normally by following the operating guide Adjust only those controls covered by the o...

Page 5: ...na Tune 27 Step 3 Customize your TV s Features Setup Menu Channel Add Delete Surf 28 Channel Labels 29 Screen Source 30 Digital VCR Mode 31 EZ Focus 32 Guide Plus 33 38 Video Menu 39 Audio Menu 40 Special Menu Aspect Ratio 41 PIP Size 42 Language 43 Captions Text 44 EZ Demo 45 Clock Menu Clock Set 46 EZ Timer 47 Daylight Savings 48 Time Zone 49 Lock Menu Parental Lock 50 51 Remote Control Programm...

Page 6: ...ough your cable box Left Right Audio Used for stereo sound from various types of equipment Video 1 or 2 Connects the video signals from various types of equipment Y Pb Pr DVD Component Video and HD Component Video Some top of the line DVD players use what is called component video for extremely accurate picture reproduction Refer to your DVD manual for further information Connecting cables to your...

Page 7: ...n page 30 They will be named Front Video in the Screen Source menu Video Connects the video signals from any piece of equipment S Video A feature available with some very high end equipment that provides even better picture quality When you choose Front Video or Front S Video the audio is automatically changed as well If you re connecting a video game unit make sure to change the picture settings ...

Page 8: ...activate EZ Program for your analog signal and to tune your DTV antenna For best performance have your Antenna professionally adjusted 2 If you receive your RF signal through an antenna that is several years old and connects with two small prongs you will need to pur chase a 300 to 75 Ohm adapter It should be available from your local electronics dealer Zenith recommends using a 75 ohm cable for y...

Page 9: ...up menu appears and then press ENTER Using the UP DOWN arrow on the remote control select EZ Program on your screen and then press ENTER Press UP DOWN button to select EZ Hookup then press ENTER Make your connections according to the diagram Press QUIT to exit the diagram Turn to pages 26 27 to activate EZ Scan for your analog signal and to tune your DTV antenna 3 4 5 6 7 8 back of remote 1 2 3 4 ...

Page 10: ...t Cable 2 Then run Auto Program to check for all available channels and store them in memory This can be combined with any other equipment you may want to hook up Hook cable directly into the TV then to the cable box From there the cable box goes to the next device down the line until the last piece which con nects back to the TV in the Antenna Cable 1 jack Turn to pages 26 27 to activate EZ Progr...

Page 11: ... installed check the signs With the remote control in hand press the POWER button to turn on your Entertainment Machine Press the MENU button so the Setup menu appears and then press ENTER Using the UP DOWN arrow on the remote control select EZ Program on your screen and then press ENTER Press UP DOWN button to select EZ Hookup then press ENTER Press an UP DOWN arrow on the remote to view the CABL...

Page 12: ...R and con nect them following the instructions provided with your equipment You may connect either the composite video or the S Video cables to your Entertainment Machine Do not con nect BOTH the composite and the S Video cables In the event that you connect both composite and the S Video cables only the S Video will work Turn to pages 26 27 to activate EZ Program for your analog signal and to tun...

Page 13: ...check the signs With the remote control in hand press the POWER button to turn on your Entertainment Machine Press the MENU button so the Setup menu appears and then press ENTER Using the UP DOWN arrow on the remote control select EZ Program on your screen and then press ENTER Press UP DOWN button to select EZ Hookup then press ENTER Press an UP DOWN arrow on the remote to view the ANT CABLE VCR o...

Page 14: ...D Player Back AV panel Dolby Digital Out Component Video OR Use shielded 75 Ω Video type cable CALIBRATION ANT CABLE2 INPUT ANT CABLE1 INPUT LOOP OUT VIDEO 2 INPUT VIDEO 1 INPUT S VIDEO IN MONITOR OUT DTV RF ANTENNA INPUT R L R L S VIDEO OUT VIDEO MONO MONO VIDEO Y DVD HI RES COMP VIDEO IN R L S VIDEO IN AUDIO IN AU CENTE R L HD DBS VGA IN R G B Sync AUD IN I DVD HI RES DVD Player Find the audio a...

Page 15: ...ur AAA batteries Make sure batteries are properly installed check the signs With the remote control in hand press the POWER button to turn on your Entertainment Machine Press the MENU button so the Setup menu appears and then press ENTER Using the UP DOWN arrow on the remote control select EZ Program on your screen and then press ENTER Press UP DOWN button to select EZ Hookup then press ENTER Pres...

Page 16: ...VIDEO OUT VIDEO MONO MONO VIDEO Y PB PR DVD HI RES COMP VIDEO IN R S VIDEO IN AUDIO IN VARIABLE AUDIO OUT DOLBY DIGITAL AUDIO CENTER MODE IN R L R L HD DBS VGA IN R G B Sync AUDIO IN G LINK IN DVD HI RES HD DBS VGA OUT Find the audio and VGA jacks on the back of your DBS receiver or Computer and connect them following the instructions provided with your equipment Connect these cables to your Enter...

Page 17: ... four AAA batteries Make sure batteries are properly installed check the signs With the remote control in hand press the POWER button to turn on your Entertainment Machine Press the MENU button so the Setup menu appears and then press ENTER Using the UP DOWN arrow on the remote control select EZ Program on your screen and then press ENTER Press UP DOWN button to select EZ Hookup then press ENTER P...

Page 18: ...N VARIABLE AUDIO OUT DOLBY DIGITAL AUDIO CENTER MODE IN R L R L HD DBS VGA IN R G B Sync AUDIO IN G LINK IN DVD HI RES HD DBS VGA OUT External Stereo 1 2 Locate the Variable Audio Out jacks on the back of your Entertainment Machine and the Input jacks on the back of your stereo s amplifier Connect the two jacks making sure that the right and left chan nels are placed correctly Set up your speakers...

Page 19: ... PR DVD HI RES COMP VIDEO IN R L S VIDEO IN AUDIO IN VARIABLE AUDIO OUT DOLBY DIGITAL AUDIO CENTER MODE IN R L R L HD DBS VGA IN R G B Sync AUDIO IN G LINK IN DVD HI RES HD DBS VGA OUT 1 2 Locate the Dolby Digital Output jacks on the back of your Entertainment Machine and the Input jacks on the back of your Dolby Digital Receiver Connect the two jacks as shown Set up your Dolby Digital Receiver ac...

Page 20: ...er side of the set enhances separation The Entertainment Machine center mode in makes the dialog sound as thought it s coming directly from the Entertainment Machine The rear surround sound speakers provide the majority of other sounds like those from special effects in movies Your sub woofer generates ultra low frequency sound for rumbling low end audio Sound is affected by speaker placement so m...

Page 21: ...VIDEO IN AUDIO IN VARIABLE AUDIO OUT DOLBY DIGITAL AUDIO CENTER MODE IN R L R L HD DBS VGA IN R G B Sync AUDIO IN G LINK IN DVD HI RES HD DBS VGA OUT Second TV Your Entertainment Machine has a special feature which allows you to hook up a second TV or monitor Just connect the second TV or monitor using the OUT Audio Video jacks located on the back of your Entertainment Machine See the Operating Ma...

Page 22: ...ctions on your VCR REW FFWD PLAY STOP Control the functions on your VCR MUTE Switches the sound on or off SURF Use the regular channel selec tion or your customized chan nel Surf lists VOLUME UP DOWN Increases decreases the sound level PICTURE This button automatically brings up the Video Menu also used to adjust picture settings as needed MENU Displays on screen menus ARROW KEYS Allows you to mov...

Page 23: ... power mute info clear vcr guide video dvd vcr cable audio aux tv sat vol ch pg up pg dwn antenna dbs freez MOVE Moves the PIP window on your screen PIP PIP Scroll through available channels through the PIP window PIP Activates the PIP screen FREEZ Freezes the PIP image TUNE Show the signal strength of your DTV SWAP Swaps the signal from your PIP window to the Main screen TIMER Activates Sleep Tim...

Page 24: ...log or D for digital Channel Display Displays current channel If you are in a digital channel then the sub channel is listed on the right side of the dash Channel Label If channel label has been set then it will appear here PIP Display This display appears only when PIP is active Volume Volume level is displayed here while adjusting the volume on your Entertainment Machine Mute Active when Enterta...

Page 25: ...r remote Use the ENTER buttons as the ENTER buttons on your remote Use the ADJUST LEFT RIGHT buttons as the LEFT RIGHT arrow buttons on your remote Use the OPEN button to open and close the front panel for connecting Audio Video devices to your Entertainment Machine 1 2 3 4 5 Refer to the various pages on how to use the on screen menus The POWER CHANNEL and VOLUME buttons work just as they do on y...

Page 26: ... MENU button so the Setup menu appears and then press ENTER Using the UP DOWN arrow on the remote control select EZ Program on your screen and then press ENTER Press UP DOWN button to select EZ Scan then press ENTER Press ENTER to begin EZ Scan Press ENTER to stop EZ Scan 3 4 Use EZ Scan to automatically find and store all of the stations available in your area 5 6 7 8 back of remote 1 2 3 4 5 6 7...

Page 27: ...enna if necessary Press ENTER to return to TV viewing 1 2 3 1 2 3 4 5 6 7 8 9 0 record pause chapter chapter play stop rewind fast fwd menu enter quit ratio surf flashbk picture power mute info clear vcr guide video dvd vcr cable audio aux tv sat vol ch pg up pg dwn antenna dbs 1 2 1 2 4 4 This feature lets you know how strong your DTV signal is and whether you need to adjust you antenna Not all a...

Page 28: ...filled with numbers and a preview screen Use the UP DOWN and LEFT RIGHT arrows to select any given channel Press ENTER to add or delete the channel from memory Press SURF on the remote control to add the channel to your Surf list a small Surfer icon will appear in front of the channel Press MENU to return to the Setup Menu 1 2 3 4 5 1 2 3 4 5 6 7 8 9 0 record pause chapter chapter play stop rewind...

Page 29: ...our channel Press Channel UP DOWN on your remote to select the next channel to label and press ENTER to set the label to the selected channel Repeat steps four and five until all chan nels are labeled Press QUIT to save and return to TV viewing or press MENU to save and return to the Setup Menu 1 2 3 4 5 1 2 3 4 5 6 7 8 9 0 record pause chapter chapter play stop rewind fast fwd menu enter quit rat...

Page 30: ...ave and return to the Setup Menu 1 2 3 4 5 1 2 3 4 5 6 7 8 9 0 record pause chapter chapter play stop rewind fast fwd menu enter quit ratio surf flashbk picture power mute info clear vcr guide video dvd vcr cable audio aux tv sat vol ch pg up pg dwn antenna dbs 2 4 6 1 3 5 7 6 7 1 Choose the sources for your main picture and PIP This menu is where you switch input source devices so you can watch y...

Page 31: ...ct DVCR Mode and then press ENTER Use the UP DOWN arrows to choose On or Off for the DVCR Mode Press ENTER to return 1 2 3 4 1 2 3 4 5 6 7 8 9 0 record pause chapter chapter play stop rewind fast fwd menu enter quit ratio surf flashbk picture power mute info clear vcr guide video dvd vcr cable audio aux tv sat vol ch pg up pg dwn antenna dbs 2 3 1 2 4 1 ...

Page 32: ...actory settings Press ENTER to save this position and continue to the next step Again press RATIO to toggle between Red and Blue Press ENTER to toggle convergence mode and the RIGHT LEFT and UP DOWN arrows to adjust and move the conver gence position Press FLASHBK on the remote to return to factory settings Press MENU to save and return to the Setup Menu 1 2 3 4 1 2 3 4 5 6 7 8 9 0 record pause ch...

Page 33: ...x in such a way as to allow for an unrestricted path for the IR signals to be able to reach the front pan els of the VCR and Cable Box If necessary peel off the green protective strips from the front and back of the IR emitter to hold emitter in proper location 1 2 IR emitter IR emitter IR receiver IR receiver VCR G LINK Cable Box 17 In order to receive the GUIDE Plus signal it is necessary to con...

Page 34: ...u want to watch record Watch Press Blue Action Button VIDEO to schedule the program to be watched Blue button Record Press Green Action Button DVD to schedule the program to be recorded Green Button Press VCR button to go to the VCR Plus PlusCode recording menu Press GUIDE to return to TV viewing 1 2 3 4 Note You must first set up the GUIDE Plus system before you can schedule programs to be watche...

Page 35: ...ow the on screen instructions to set up your VCR Once the tests are complete you can use the GUIDE Plus fea ture to view schedule to watch and schedule to record the pro grams listed in the Program Grid Guide Get Information Ready for the EZ Setup Prior to the GUIDE Plus feature setup and the VCR and Cable box tests you will need to have handy the following information Your Zip or Postal Code Whet...

Page 36: ...hin the Program Grid Guide MENU Provides direct access to the Menu bar with Grid on TV VCR Plus Enters the VCR Plus Recording mode One touch recording of program selected on Grid Note VCR Plus PlusCodes can be viewed by pressing INFO with the pro gram you want to record highlighted in the Program Grid Guide PlusCodes are also usually included with program listings in your local TV guide Number Key...

Page 37: ...re arranged in a predetermined order which can be edited by using the Editor option on the Menu Bar Explains program Grid menu features in GUIDE Plus mode Current Time Shows current time PIP Picture in Picture Live video of selected program while user is scrolling the Program Grid Click GUIDE to place this program on TV screen and exit Grid Guide Using PIP Lock Unlock button picture in window can ...

Page 38: ... of appearance Activate Deactivate Channels Active channels appear in Grid Not Active channels do not appear in Grid guide Menu Bar Additional options Grid Displays program listings by channel and time Sort Displays program listing by category and time for example Sports Movies etc Schedule Shows a list of programs set to be watched or recorded Edit the schedule to remove programs or change record...

Page 39: ... Cable 1 and 2 Video1 Video2 Front Video and Type 3 DVD VGA Component RGB Once you have selected your settings for each type of source Custom uses the settings you have manually chosen for each customized type of video source Normal The picture quality is pre optimized for all three types of video input sources out lined above Normal restores the levels to their original settings Settings may vary...

Page 40: ... commercials or a regular TV program Audio Mode If you want to change the sound from Mono SAP or Stereo in Analog channel or the language from English French or Spanish in digital channel select this mode Front Surround Gives a sense that the sound is open and expanded Internal Speaker Allows you to turn the regular speakers on STEREO or off Many people who use a home stereo system with their TV u...

Page 41: ...ight ratio for your viewing environment 4 3 A general TV format 16 9 A cinema screen picture for mat ZOOM A format with magnified upper lower sides The bottom and top of the picture may be lost Press QUIT to save and return to TV viewing or press ENTER to save and return to the Special Menu 1 2 3 4 1 2 3 4 5 6 7 8 9 0 record pause chapter chapter play stop rewind fast fwd menu enter quit ratio sur...

Page 42: ...size selection menu Use the UP DOWN arrow buttons to select Small or Large Press ENTER to save and return to TV viewing 1 2 3 4 tune timer swap move pip pip pip 1 2 3 4 5 6 7 8 9 0 record pause chapter chapter play stop rewind fast fwd menu enter quit ratio surf flashbk picture power mute info clear vcr guide video dvd vcr cable audio aux tv sat vol ch pg up pg dwn antenna dbs freez 1 3 4 2 4 5 1 ...

Page 43: ... menu Use the UP DOWN arrow buttons to select the language you wish to view your on screen menus Press QUIT to save and return to TV viewing or press ENTER to save and return to the Special Menu 1 2 3 4 1 2 3 4 5 6 7 8 9 0 record pause chapter chapter play stop rewind fast fwd menu enter quit ratio surf flashbk picture power mute info clear vcr guide video dvd vcr cable audio aux tv sat vol ch pg ...

Page 44: ...uttons to make your caption selection Your choices are Off Caption 1 Caption 2 Caption 3 Caption 4 Text 1 Text 2 Text 3 and Text 4 Press QUIT to save and return to TV viewing or press ENTER to save and return to the Special Menu 1 2 3 4 1 2 3 4 5 6 7 8 9 0 record pause chapter chapter play stop rewind fast fwd menu enter quit ratio surf flashbk picture power mute info clear vcr guide video dvd vcr...

Page 45: ...remote to stop EZ Demo 1 2 3 4 1 2 3 4 5 6 7 8 9 0 record pause chapter chapter play stop rewind fast fwd menu enter quit ratio surf flashbk picture power mute info clear vcr guide video dvd vcr cable audio aux tv sat vol ch pg up pg dwn antenna dbs 3 2 3 1 Your Entertainment Machine will show you all your menu options EZ Demo can be activated when Screen Source is in DTV ANT ANT CABLE 1 or ANT CA...

Page 46: ...ime on your Entertainment Machine If you choose Auto you will be prompt ed to enter the local PBS channel Use the UP DOWN arrows to set the PBS channel Press ENTER to return to TV viewing and activate correct time or press QUIT to save and return to TV viewing 1 2 3 4 1 2 3 4 5 6 7 8 9 0 record pause chapter chapter play stop rewind fast fwd menu enter quit ratio surf flashbk picture power mute in...

Page 47: ... select the Off Time repeat and step five to set the Off Time Instead of setting the Off Time you could simply select Duration Use the UP DOWN arrow buttons to select Duration and then press ENTER Select from the listed time lengths using the UP DOWN arrow buttons Press ENTER to save and return to the Time Menu or press QUIT to save and return to TV viewing 1 2 3 4 1 2 3 4 5 6 7 8 9 0 record pause...

Page 48: ...te Daylight savings Use the UP DOWN arrows to choose On or Off Press ENTER to save and return to the Time Menu or press QUIT to save and return to TV viewing 1 2 3 4 1 2 3 4 5 6 7 8 9 0 record pause chapter chapter play stop rewind fast fwd menu enter quit ratio surf flashbk picture power mute info clear vcr guide video dvd vcr cable audio aux tv sat vol ch pg up pg dwn antenna dbs 1 3 4 2 3 5 1 5...

Page 49: ... Use the UP DOWN arrows to choose your Time Zone Press ENTER to save and return to the Time Menu or press QUIT to save and return to TV viewing 1 2 3 4 1 2 3 4 5 6 7 8 9 0 record pause chapter chapter play stop rewind fast fwd menu enter quit ratio surf flashbk picture power mute info clear vcr guide video dvd vcr cable audio aux tv sat vol ch pg up pg dwn antenna dbs 1 3 4 2 3 5 1 5 5 Choose the ...

Page 50: ...ted to re confirm the password Re enter the password Next use the UP DOWN arrows to select Block Channel Press ENTER then use the UP DOWN arrows to select Analog or Digital For either case you will be presented with a splash screen of all the channels found in the system Use the UP DOWN and LEFT RIGHT arrows to select a chan nel Press the ENTER button to place a block on the channel See the next p...

Page 51: ...Press the UP DOWN arrow buttons to select TV PG Content Press ENTER to continue Press the UP DOWN arrow buttons to select Violence Sex Language Dialogue F Violence then press ENTER For each content press the UP DOWN arrow buttons to select the rating then press ENTER Select Block Source to block Video DVD or VGA inputs Press ENTER to activate Block Source and then use the UP DOWN arrows to set you...

Page 52: ... turns off press the cor responding DEVICE button again to store the code Note LCD will flash PASS indicating that the code has been stored Test the remote control functions with the code that was just stored If any of the buttons do not perform as they should please repeat from Step 2 using the next three digit code number for your brand of equipment 1 1 2 3 4 5 6 7 8 9 0 record pause chapter cha...

Page 53: ... it just sent out Press the device button to store the code Note PASS will flash in the LCD indicating that the code has been stored Test the remote control functions with the code that was just stored If any of the buttons do not preform as they should please repeat from Step 2 1 1 2 3 4 5 6 7 8 9 0 record pause chapter chapter play stop rewind fast fwd menu enter quit ratio surf flashbk picture ...

Page 54: ...nds before returning to its orig inal state 1 1 2 3 4 5 6 7 8 9 0 record pause chapter chapter play stop rewind fast fwd menu enter quit ratio surf flashbk picture power mute info clear vcr guide video dvd vcr cable audio aux tv sat vol ch pg up pg dwn antenna dbs 1 2 2 If you wish to find a code number that has been stored in your remote control please use the following steps P A G E 5 4 206 3583...

Page 55: ... select the second digit of channel 18 Note M____1 3 will appear in the LCD Press the TV DEVICE button to select the TV DEVICE mode Note M____1 4 will appear in the LCD Press the POWER button on the remote to turn on the TV Note M____1 5 will appear in the LCD Press the Channel UP button to store the above commands Note SAVE will flash and the current Device mode will appear Now anytime the memory...

Page 56: ...number has been select ed Press the DEVICE button selected in step 2 This will store the three digit code into that DEVICE button Note PASS will flash in the LCD 1 1 2 3 4 5 6 7 8 9 0 record pause chapter chapter play stop rewind fast fwd menu enter quit ratio surf flashbk picture power mute info clear vcr guide video dvd vcr cable audio aux tv sat vol ch pg up pg dwn antenna dbs 2 2 3 4 5 4 5 3 T...

Page 57: ...cr cable audio aux tv sat vol ch pg up pg dwn antenna dbs 1 2 2 After setting up the remote to work with your respective TV VCR CATV Satellite equipment etc the remote control can also be set up so that the TV volume and VCR controls will supersede respective equipment volume control even when the remote control is in a different Device mode Press the DEVICE button EXCEPT VCR TV CATV SAT etc and M...

Page 58: ... 146 028 042 MTC 101 004 062 NAD 015 025 NEC 132 130 134 001 040 016 024 056 007 019 Nikei 043 Onking 043 Onwa 043 Optonica 019 081 Panasonic 034 080 092 056 164 Philco 003 024 056 059 060 063 064 164 004 143 043 127 Philips 164 038 070 093 001 003 004 143 059 160 Pioneer 135 025 023 001 018 116 027 Portland 004 143 ProScan 144 Proton 116 131 143 058 171 Quasar 034 092 056 Radio Shack 019 043 047 ...

Page 59: ...142 013 020 045 049 MTC 034 040 Multi Tech 024 034 NEC 012 023 043 048 039 Nordmende 043 Optonica 053 054 Panasonic 066 070 083 145 133 140 074 Pentax 013 020 031 033 063 Philco 031 033 034 067 Philips 031 067 034 101 054 033 071 Pilot 101 Pioneer 021 048 013 Portland 108 Pulsar 072 Quartz 002 014 Quasar 033 066 075 145 RCA 013 020 033 041 062 063 107 109 140 144 145 147 Realistic 003 008 010 014 ...

Page 60: ...andy 017 Telecaption 021 Texscan 029 067 Tocom 039 040 056 Toshiba 052 Unika 007 014 024 United Cable 004 053 Universal 007 024 027 035 005 014 026 032 Viewstar 086 087 088 089 012 015 018 Zenith 052 060 Amplica 050 Birdview 051 113 BSR 053 Capetronics 053 Channel Master 013 014 015 018 036 055 Chaparral 008 009 012 077 Citoh 054 Curtis Mathes 050 Drake 005 006 007 010 052 112 116 DX Antenna 024 0...

Page 61: ... Mcintosh 238 MCS 009 079 Mitsubishi 242 243 NAD 029 048 Nakamichi 244 245 Niles 246 Onkyo 016 017 046 107 108 115 Optimus 022 026 041 054 055 Panasonic 007 032 088 195 Philips 027 037 087 249 250 251 Pioneer 014 033 039 044 045 047 050 066 069 090 098 222 Quasar 007 088 RCA 010 049 Realistic 001 004 019 023 073 075 078 080 081 095 Rotel 074 083 085 Sansui 027 040 110 113 119 224 Scientific Atlant...

Page 62: ...re 116 182 NAD 006 067 121 215 216 Nakamichi 217 218 219 NEC 014 062 Nikko 046 048 NSM 044 Onkyo 030 031 038 039 189 193 220 221 Optimus 001 013 029 049 050 057 058 082 083 084 085 090 093 Panasonic 008 068 103 113 172 201 222 Philips 032 044 132 149 227 Pioneer 010 029 064 088 090 094 106 117 121 125 174 175 176 Proton 044 228 Quasar 008 103 Radio Shack 116 120 RCA 017 042 074 087 150 RCX 185 Rea...

Page 63: ... quality wood cleaner and polish This will protect the Entertainment Machine from dirt and dust as well as keep the cabinet looking new If you leave your Entertainment Machine dormant for a long time such as a vacation it s a good idea to unplug the power to protect against possible damage from lightning or power surges If you use an off air antenna you may also want to disconnect it from the back...

Page 64: ...s such as a photo CD player you should avoid setting the Brightness level too high If static images like network identification patterns are left sitting for too long they can leave a permanent impression on the picture tube You can reduce the chance of this happening by limiting the amount of time you use the fixed image display and by reducing the contrast and brightness levels VIDEO GAMES AND O...

Page 65: ...the Audio A V cables properly installed Are the wires for external speakers if you have external speakers properly installed Make sure your speakers turned on under the Audio menu If your audio mode is set to SAP that channel may not have a SAP program Are you in TV or cable tuning mode and should be in the other Make sure output channels on all A V equipment are on the same channel 3 or 4 Check t...

Page 66: ...een turned on Make sure that the connections are secure on the back of your Entertainment Machine and on the source equipment Check to see if all the connections are secure Look in the Audio mode menu to see if all the settings are correct You are using channel 3 or 4 to view your VCR No stereo sound is present under that decision You might want to adjust the PIP picture settings under the PIP men...

Page 67: ... the U S today is generally transmitted and dis played in a 4 3 aspect ratio High Definition television will normally be formatted in a wider aspect ratio assumed to be 16 9 CAPTIONS A form of subtitling that writes out the dialog for your program CONVERGENCE This option lets you correct for color separation in your picture DELETE This function lets you remove channels that you don t watch from th...

Page 68: ...ogramming Choosing SAP often refers to listening to audio in another language such as Spanish or French SIGNAL Picture and sound traveling through cable or on the air to your television screen SOURCE The term for the equipment that provides audio and video information to your Entertainment Machine Antenna VCR DVD players or Cable Boxes are examples of sources STEREO SOUND Stereo stereophonic sound...

Page 69: ... kilohms Y PB PR for DVD 1 Y 1 0 Vp p 75 ohms w sync PB 0 7 Vp p 75 ohms PR 0 7 Vp p 75 ohms RGB Inputs VGA 1 15 pin Sub D Female Speaker output W 10W x2 Power consumption W In use max 360W In standby 16W TV Mass lbs 225 Television system American TV Standard NTSC ATSC Channel coverage DTV 1 99 VHF 2 13 UHF 14 69 CATV 1 125 Picture tubes 3 7 Liquid cooled Hi Resolution Antenna 75 ohm external term...

Page 70: ...Notes ...

Page 71: ...Notes ...

Page 72: ...imately be used in digital or high definition tele vision and which are still being established or refined by third parties The IQB64W10W may have limit ed capabilities with any such protocols designated after the date of its actual manufacture Effective Warranty Date Warranty begins on the date of sale of IQB64W10W For your convenience keep the dated bill of sale or delivery ticket as evidence of...

Reviews: