background image

Using a cable

box with 

the Loop

Out function.

Cable Box

I N S TA L L AT I O N           S TA N DA R D

P A G E   6

206-3360-O

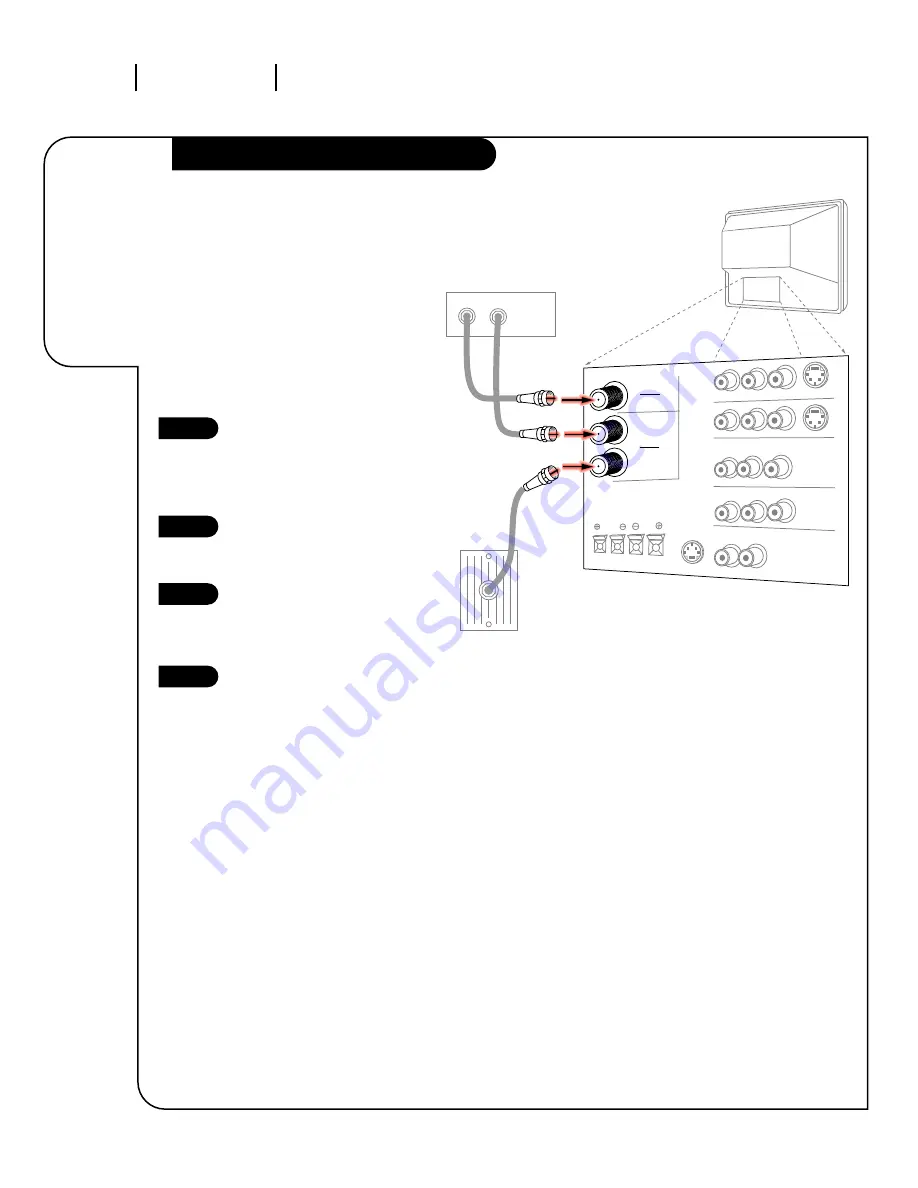
Locate the Antenna/Cable 2 jack on
the back of your TV. Connect the
cable that runs from the wall direct-
ly to the jack. Now find the the
Loop Out jack.

Connect the cable from this jack to
the Input jack on the back of your
cable box.

Locate the Output jack on the back
of your cable box. Connect this to
the Antenna/Cable 1 jack on the
back of your TV. 

To view the premium stations, set
the channel number on your cable
box to HBO®, CINEMAX®, SHOW-
TIME®, etc. Then go to the Source
menu and select the Antenna/Cable
1 source. See your Quick Setup
Sheet, included with this operating
guide for more information. See
page 20 for information regarding
Source Menus. 

To view the non premium channels
go to the Source Menu and select
Antenna/Cable 2. Then run Channel
Search to check for all available
channels and store them in its
memory.

This can be combined with any
other equipment you may want 
to hook up. Hook cable directly into
the TV, then to the cable box. From
there, the cable box goes to the
next device, down the line, until
the last piece, which connects back
to the TV in the Antenna/Cable 1
jack.

1

2

3

4

Some cable services require the use of a
cable box to decode premium channels and
pay-per-view. Using the Loop Out to
Decoder option, and programming your
remote, you can connect your cable box so
that you only need your MBR Trakball
remote to control all the channels. By 
connecting cable directly to your
Entertainment Machine, then running it out
to the cable box and back, you make the
cable box another source to choose from in
the Source menu (see page 20). 

ANTENNA

CABLE 1

LOOP OUT

VARIABLE OUT

MONITOR OUT

ANTENNA

CABLE 2

INPUT

Cable TV
wall jack

Cable box

In

Out

Rf coaxial wire 
(75 ohm)

TV back

Summary of Contents for A60M91W Series

Page 1: ...n t y Thanks for choosing Zenith h o o k u p d i r e c t o r y i n d e x a b o u t y o u r t r a k b a l l r e m o t e s p e c i a l f e a t u r e s y o u l l w a n t t o k n o w a b o u t y o u r o...

Page 2: ...ctric Code U S A The code provides guidelines for proper grounding and in particular specifies that the cable ground shall be connected to the grounding system of the building as close to the point of...

Page 3: ...go to page 10 To hook up your Entertainment Machine to an external stereo go to page 10 206 3360 O INSTALLATION GETTING STARTED P A G E 3 This page will help you hook up your Entertainment Machine pro...

Page 4: ...ts the video signals from various types of equipment S VIDEO 1 2 A feature available with some very high end equipment that provides even better picture quality Variable Out Used to connect either an...

Page 5: ...ertainment Machine Connect the cable that runs from the wall directly to this jack 1 2 Hooking up to Antenna Direct Cable If you receive antenna through a flat wire that is several years old and conne...

Page 6: ...ce Menu and select Antenna Cable 2 Then run Channel Search to check for all available channels and store them in its memory This can be combined with any other equipment you may want to hook up Hook c...

Page 7: ...ck of your VCR and connect them following the instructions provided with your equipment You may connect either the composite video or the S Video cables to your Entertainment Machine Do not connect bo...

Page 8: ...equipment You may connect either the composite video or the S Video cables to your Entertainment Machine Do not connect both the composite and the S Video 1 For several pieces of equipment edit the na...

Page 9: ...ng directly from the Entertainment Machine The rear surround sound speakers provide the majority of other sounds like those from special effects in movies Your sub woofer generates ultra low frequency...

Page 10: ...n to have Mini tower speakers these will be connected to the back of your sub woofer with the jack labeled Satellite Speaker Output Before you begin plugging in your speakers it s a good idea to put t...

Page 11: ...nd put in three AAA batteries Make sure batteries are properly installed check the signs Click ENTER on your remote to continue the setup process Your choice will be to pick 1 or 2 Antenna or Cable de...

Page 12: ...enter the Channel Search screen You will be prompted to determine if the signal is coming from an antenna or cable Select one or the other by pressing the correct number on the Number Keypad Press 3 o...

Page 13: ...e Up Down and Right Left arrows on the remote adjust the colors so the lines match on the screen and are completely white NOTE Due to the small adjustments it may be easier to use the arrow buttons on...

Page 14: ...in picture within large PIP frame Press a second time and receive PIP from another channel or source Press a third time to remove PIP QUIT Leaves programming menus and clears screen of displays and pr...

Page 15: ...y which lets you access the Source menu see page 20 the Setup menu see pages 11 13 the Special Features menu see pages 26 32 the Audio menu see page 33 the Video menu see page 34 and the Picture in pi...

Page 16: ...ows decrease and increase respectively moving the levels in small steps Just about everywhere you see text or an icon on your screen you can probably click there to make something happen For example o...

Page 17: ...to Ant Cable 1 or 2 For any other source such as a VCR or DVD player the Main Picture channel changing will be controlled by that equipment Click on any part of the Volume bar to jump to that sound l...

Page 18: ...achine is muted Captions Text Choose the captioning or text method for your Entertainment Machine Language Pick the language you want your on screen menus to appear in Background Turns the background...

Page 19: ...st your picture for any viewing situation Your options are Contrast Brightness Color Tint Sharpness Color Temp Video Filter Skin Tone Video Preset P I P M E N U Control the size and appearance of the...

Page 20: ...You cannot have the Main Source from Ant Cable 1 and the PIP source in Ant Cable 2 or vice versa PIP must be the same Ant Cable source as the main or one of the video sources Click on the regular scr...

Page 21: ...on channel number again to add or delete from your listing Click on the No Surfing text to change to a Surf channel listing Surf 1 Surf 2 etc Click on the channel number you wish to modify add surf to...

Page 22: ...f your screen Choose either Auto or Manual for clock mode Manual will let you set the time yourself while Auto will set it for you while your Entertainment Machine is off Manual Choose Manual then cli...

Page 23: ...on it Click again to choose which type of captioning or text you want Click on the regular screen to return to normal viewing 1 2 3 4 Choose Caption 1 to view traditional Closed Captioning With the T...

Page 24: ...nu icon in the menu display Select Language by clicking on it Click again to choose the lan guage you want by clicking on English Spanish or French Click on the regular screen to return to normal view...

Page 25: ...ect Background by clicking on it in the menu Choose whether you want an opaque background Off or On by clicking on it again Click on the screen for normal TV viewing Turning your Background On makes r...

Page 26: ...Select Timer Setup in the menu by clicking on it Click on it again and the Timer Menu will appear replacing the features Menu Click on Sleep Timer in the menu to highlight the feature Click it again...

Page 27: ...Special Features menu Click on On Time first to highlight the feature and a second time to set the time your Entertainment Machine turns itself on The num ber appears in the form HH MM AM Select the...

Page 28: ...ght side of your screen Choose a label for the channel by clicking on it NOTE The label indicates that your TV will accept the original broadcast label if sent by the broadcaster and None will block a...

Page 29: ...e name you want up to 10 characters Click on EXIT to return to the Source ID screen When you re done click on EXIT to return to the Special Features menu Click on another selection or on the regular s...

Page 30: ...screen Click on another Surf channel list to continue editing or click on EXIT to return to the Special Features Menu To program Surf 2 3 and 4 click on those specific options and repeat steps one thr...

Page 31: ...on the bottom of your screen prompting you to enter a four digit code Click on any four numbers from the list or enter a number using the NUMBER KEYPAD on your remote After you enter it once you must...

Page 32: ...o have the Auto Demo begin Auto Demo displays many of the menus and displays your Zenith Entertainment Machine has showing you the layout and location of your options To let you know it s running Auto...

Page 33: ...r Entertainment Machine on this setting Mini glossary STEREO SOUND Stereo stereophonic sound refers to audio that has right and left signals MONO SOUND Mono monaural sound is one channel of sound On m...

Page 34: ...olor making it more natural Video Preset Choose from a range of options depending on your viewing situation Custom uses the settings you have manually chosen while Preset restores the levels to their...

Page 35: ...ing page Just like your Entertainment Machine s main screen PIP will need a source to take its image from When you set the main screen source to Antenna Cable 1 or 2 the PIP source will automatically...

Page 36: ...on this to place the PIP anywhere Once you click you ll be moving the PIP around Click again to set the PIP at that location PIP Channel Switch between chan nel selection for the Main and PIP images P...

Page 37: ...on the Size item The inset will appear and change size to show you the difference even if the PIP has not been turned on To adjust the other options Contrast and Tint click on those items Click on th...

Page 38: ...main picture highlight the top half before changing channels Instead of going to the Audio Swap option in the PIP Features Menu simply click on the small musical note icon on the left of the Channel T...

Page 39: ...at your channel changing using the channel up or down will be limited to the channels that have been chosen for your Surf list When the list display reads No Surfing then all added channels will be av...

Page 40: ...ion you want to modify Press either Right or Left on the ADJUST button to modify the option you have chosen Push the ENTER button to return to normal TV viewing 1 2 3 4 5 Refer to the various pages on...

Page 41: ...re programming and press MUTE and FLSHBK at the same time Hold until one of the mode indicator LEDs lights Use the MODE Right Left button to select the appropriate mode for your equipment With the Nu...

Page 42: ...te Programming Codes 206 3360 O TVs VCRs TV VCRs Adventura 154 Broksonic 182 Emerson 158 Daewoo 148 Funai 154 Goldstar 153 Hitachi 154 LXI 154 Magnavox 173 181 Panasonic 174 RCA 179 Samsung 180 Sansui...

Page 43: ...Pioneer 402 403 Sanyo 401 Sony 404 Zenith 401 Akai 409 424 Carver 510 Crown 410 Denon 411 Fisher 412 438 Goldstar 460 Harman Kardon 413 JVC 415 Kenwood 412 416 417 441 Magnavox 421 422 433 434 Mitsubi...

Page 44: ...u re trying to program TV CABLE VCR AUX With the NUMBER keypad enter the code 0 0 0 zero zero zero then press the Enter key right away Aim the remote at the correct device and push the Power button Al...

Page 45: ...the procedure in the Programming Your Remote section Press and hold MUTE and FLSHBK on your remote until the indicator light stays lit Press MODE Left Right until the indicator light is under the same...

Page 46: ...hich means the quality of your picture may suffer due to other factors If there are problems with the image on your Entertainment Machine consult the Troubleshooting guide on the following pages VIDEO...

Page 47: ...nnel The problem may be the broadcast not your Entertainment Machine Are the Audio A V cables properly installed Are the wires for external speakers if you have external speakers properly installed Ma...

Page 48: ...back in Check to see if the source equipment has been turned on Make sure that the connections are secure on the back of your Entertainment Machine and on the source equipment Check to see if all the...

Page 49: ...channels HBO CNN ABC etc You can also let the Entertainment Machine use the labels that some stations broadcast themselves See Channel Labels page 28 SOURCE ID CUSTOMIZING If you have a number of othe...

Page 50: ...NA The physical receiver of television signals sent over the air A large metal piece of equipment does not always have to be visible for your home to be using an antenna BBE SOUND CONTROL Expands the...

Page 51: ...al PIP from another channel Press again to remove PIP from the screen POINTER The image of the hand that appears on screen and points to the option you want to work with SECOND AUDIO Second Audio Prog...

Page 52: ...ground 25 Basic Television Operation 17 Batteries 11 Button Functions 14 39 Cable 5 6 Cable Volume Override 45 Caption Text Menu 23 Channel Labels 28 Channel Search 12 Channel Time Display 38 Clock Se...

Page 53: ...43 Projo Setup 13 Quick Start 11 Remote Control Diagram 14 Safety Information 2 Serial Number 2 Sleep Timer 26 Source ID 29 Source Menu 20 Special Features 49 Surf ID 30 Surround Sound Speakers 10 Tr...

Page 54: ...e have your television s model number ready when you call For use with any Surround Sound compatible TV These speakers create a sound so real it s as if you were part of the action The convenient spac...

Page 55: ...te home antenna or faulty antenna connections are the owner s responsibility Important Product Registration Please fill out and mail your Product Registration Card It is imperative that Zenith know ho...

Reviews: