background image

See diagrams at right to hook up
your Entertainment Machine.

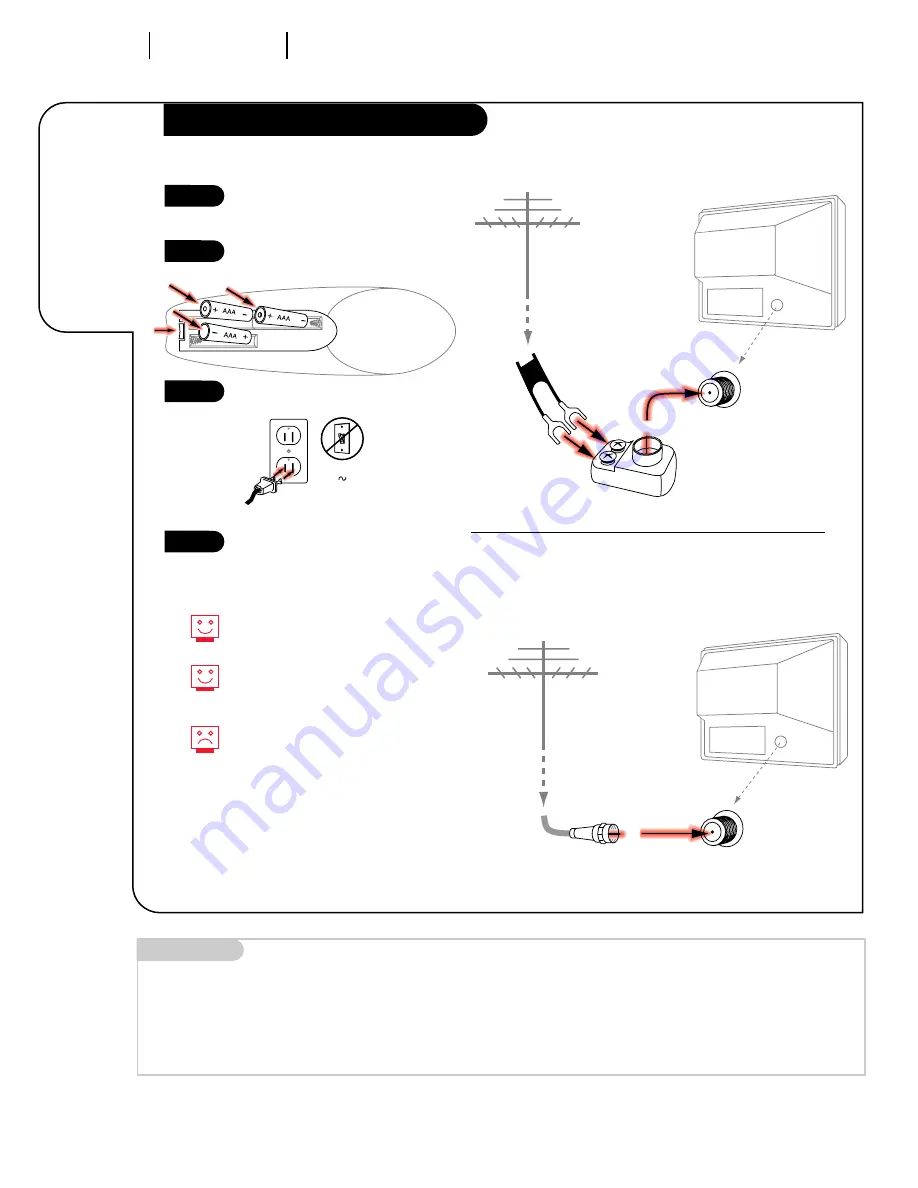
Remove the back of the remote
and put in three AAA batteries.

Plug in your TV. Do not plug it
into a switched outlet.

Go to page 13 to Auto Program
your Entertainment Machine.

3376-O

I N S TA L L AT I O N           S TA N DA R D

P A G E   6

Connect an

antenna 

to your

Entertainment

Machine.

Hook Up Your Antenna to the TV

Mini glossary 

75 OHM RF CABLE

The wire that comes from an off-air antenna or cable service provider. Each end looks like a hex shaped nut with a wire 

sticking through the middle, and it screws onto the threaded Antenna/Cable jack on the back of your TV.

300 TO 75 OHM ADAPTER

A small device that connects a two-wire 300 ohm antenna to a 75 ohm RF jack. They are usually about an 
inch long with two screws on one end and a round opening with a wire sticking out on the other end. 

RF coaxial wire
(75 ohm) 

Antenna

TV back

TV back panel
(expanded view)

Antenna
/ Cable

TV back

Flat wire
(300 ohm)

Antenna

300/75 ohm
Adapter

TV back panel
(expanded view)

Antenna
/ Cable

If you have a 75 ohm RF cable,
then you don’t need any adapters!

Remember, when screwing RF
cables onto jacks, clockwise tight-
ens, and counterclockwise loosens. 

A 300 to 75 ohm adapter is not
included with your Zenith
Entertainment Machine.

120V   
60Hz

1

2

3

4

back of remote

Flat-Wire Antenna to Adapter

Round Antenna Wire

Summary of Contents for A27B43

Page 1: ...numbers A27B43 A32B43 A36B43 o p e r a t i n g g u i d e w a r r a n t y Thanks for choosing Zenith h o o k u p d i r e c t o r y i n d e x y o u r o n s c r e e n m e n u s p a g e 50 p a g e 20 p a...

Page 2: ...nd found to comply with the limits for a Class B digital device pursuant to Part 15 of the FCC Rules These limits are designed to provide reasonable protection against harmful interference when the eq...

Page 3: ...rnal stereo go to page 11 3376 O INSTALLATION GETTING STARTED P A G E 3 This page will help you hook up your Entertainment Machine properly Hook Up Directory IMPORTANT Use this page to decide where yo...

Page 4: ...deo 2 A feature available with some very high end equipment that provides even better picture quality Variable Audio Out Used to connect a stereo system Data Port Reserved for future use Mini glossary...

Page 5: ...in front To use the front jacks as the signal source use the Source menu as described on page 21 The jacks are labeled Front Video and Front S Video Left Right Audio Used for stereo sound from various...

Page 6: ...d Antenna Cable jack on the back of your TV 300 TO 75 OHM ADAPTER A small device that connects a two wire 300 ohm antenna to a 75 ohm RF jack They are usually about an inch long with two screws on one...

Page 7: ...able TV wall jack Cable TV wall jack Cable box In Out RF coaxial wire 75ohm RF coaxial wire 75ohm 3 4 output switch TV back panel expanded view Antenna Cable TV back TV back panel expanded view Antenn...

Page 8: ...4 VCR back VCR back AV panel In Out 3 4 VCR back VCR back AV panel Flat wire 300 ohm Antenna 300 75 ohm Adapter Round wire 75ohm Antenna output switch output switch A V cables not included with TV A...

Page 9: ...s for better picture and sound No A V cables are included with your Zenith Entertainment Machine Without A V cables VCRs will not play videocassettes in stereo sound TV back panel expanded view TV bac...

Page 10: ...ment Machine Super VHS VCR 3374 O Use S Video or Video sources for better picture and sound To use with PIP go to the Source Menu page 21 and choose the jack you ve connected your S VHS VCR to S VHS 1...

Page 11: ...s the right channel white the left to these jacks 1 These cables should be included with your stereo system Before you begin plugging in your stereo sys tem it s a good idea to put it in its approxima...

Page 12: ...Trak at Entertainment Machine Press POWER to turn TV on Press trackball down and release to place selector arrow on TV screen Rotate trackball to move selector arrow around screen until menu selection...

Page 13: ...UP DOWN arrow keys to select Auto Program Press a LEFT RIGHT arrow Use the UP DOWN arrow keys to select Off Air Antenna or if you subscribe to cable service select Cable Note The flashing option is t...

Page 14: ...re in PIP inset 2nd push begins normal PIP operation 3rd push removes PIP inset QUIT Leaves programming menus and clears screen of displays Swaps PIP and Main audio sources with PIP on RECORD PAUSE Co...

Page 15: ...t and select the option you want to modify Press either Right or Left on the ADJUST key to modify the option you have chosen Press ENTER to return to normal TV viewing 1 2 3 4 Refer to the various men...

Page 16: ...or menus and click again 1 2 3 4 5 6 Ch 07 NBC 4 55 Mono Ch All Chan Flashback Surf Volume PIP FREEZ PIP CHANGE CC 123 Typical Icons Menu Selection Bar which lets you access the Source menu see page...

Page 17: ...es Source Time Audio Mode PIP Channel Label Musical Note Shows Source of sound XDS Extended Data Service Some public broadcasting stations are including on the signal they provide additional informati...

Page 18: ...SURF to turn surf On press again to turn surf mode Off This is while the source is set to Antenna Cable For any other source such as a VCR the Main Picture channel changing will be controlled by that...

Page 19: ...ifying the recording process If the VCR is tuned to channel seven then the VCR will record channel seven USING THE CABLE BOX if you have one to change the stations sometimes has an advantage too espec...

Page 20: ...turn itself on or off or to turn itself off after a certain amount of time Channel Labels Labels your channels with their network names ABC CBS HBO etc Parental Control Allows parents to block any cha...

Page 21: ...t provides audio and video information to your Entertainment Machine VCR DVD players or Cable Boxes are examples of sources This menu is where you choose to watch your VCR DVD S VHS VCR etc Press MENU...

Page 22: ...remote DELETE This function lets you remove channels that you don t watch from the list you ll scroll through SURF The surf function creates a special list of your favorite channels You can access th...

Page 23: ...select Clock Set on your screen Press a RIGHT or LEFT arrow to access the Clock Menu Use the RIGHT or LEFT arrows to adjust the time Press FLSHBK to select AM or PM Use the UP or DOWN arrow to select...

Page 24: ...want the cap tions On Off or Caption When Muted which sets captioning to come on automatically when you re Entertainment machine is Soft or Muted Press MENU repeatedly to select the Setup Menu again...

Page 25: ...the UP DOWN arrows select Language in the menu Press a RIGHT LEFT arrow to choose which language you prefer by selecting from English Spanish or French Press ENTER to return to normal TV viewing 1 2 3...

Page 26: ...ng the UP DOWN arrow keys select Background in the menu Press a RIGHT LEFT arrow to choose whether you want the opaque back ground On or Off Press ENTER to return to normal TV viewing 1 2 3 4 mode mut...

Page 27: ...then press a RIGHT LEFT arrow to enter the Timer menu With the UP DOWN arrows select Sleep Timer in the menu Using the RIGHT LEFT arrows adjust the amount of time before your Entertainment Machine shu...

Page 28: ...s ENTER Choose a label for the channel by press ing the LEFT RIGHT arrows repeatedly until the appropraite label appears next to the channel number Press ENTER to accept the label and return to regula...

Page 29: ...e UP DOWN arrows select Parental Ctl in the menu Press a RIGHT LEFT arrow to enter the parental controls Parental Ctl menu With the UP DOWN arrows select Block Ch to block individual channels Block Vi...

Page 30: ...me quit pip chan n e l 1 3 4 2 Note This feature is reserved for future use and will only appear in the Special Features Menu as an option if equip ment is connected to the Data Port Press MENU repeat...

Page 31: ...mo on your screen Press a RIGHT LEFT arrow to select whether you want Auto Demo on or off Press ENTER or QUIT to return to TV viewing Auto Demo will continually show you menus and displays your Zenith...

Page 32: ...it pip chan n e l 4 1 2 3 Bass Increase decrease lower end sounds Treble Increase decrease higher end sounds Balance Allows you to put the sound more to the left or right channel Audio Mode Choose fro...

Page 33: ...1 2 3 4 5 6 7 8 0 9 surf power tv vcr cable aux 1 aux 2 v o l ume quit pip chan n e l 4 1 2 3 Contrast Changes the amount of difference between black levels and white levels in your picture Brightnes...

Page 34: ...the PIP Menu appears Using the UP DOWN arrows select Color Tint or Size in the menu Press a RIGHT LEFT arrow to adjust the option Press ENTER to return to regular TV view ing or use UP Down arrows to...

Page 35: ...e to Antenna Cable as an example This can be adjusted under the Source menu see page 21 PIP can be used in any picture mode Put Antenna Cable in the inset while you watch a tape Attached to Video 1 ha...

Page 36: ...f Video 1 or Video 2 If no equipment is connected to a source you select for the PIP inset or if it is turned Off the PIP inset will be black Mini glossary SOURCE Equipment connected to the back conne...

Page 37: ...Move Click on this to place the PIP anywhere Once you click you ll be moving the PIP around Click again to set the PIP PIP Channel Switch between chan nel selection for the Main and PIP images PIP So...

Page 38: ...u re programming and press MUTE and FLSHBK at the same time Hold until one of the mode indicator LEDs lights Use the MODE Right Left button to select the appropriate mode for your equipment With the N...

Page 39: ...01 142 149 177 Zenith StarSight 175 Adventura 154 Broksonic 182 Emerson 158 Daewoo 148 Funai 154 Goldstar 153 Hitachi 154 LXI 154 Magnavox 173 181 Panasonic 174 RCA 179 Samsung 180 Sansui 182 Sharp 17...

Page 40: ...nic 405 Pioneer 402 403 Sanyo 401 Sony 404 Zenith 401 Denon 455 Harman Kardon 456 JVC 457 Kenwood 450 Onkyo 458 Philips DCC 454 Pioneer 451 478 Sony 452 Technics 497 Technics DCC 454 Yamaha 453 Akai 4...

Page 41: ...t 3 VCR Digit 3 Cable Digit 3 AUX Digit 3 N C Digit 3 4 TV Digit 4 VCR Digit 4 Cable Digit 4 AUX Digit 4 N C Digit 4 5 TV Digit 5 VCR Digit 5 Cable Digit 5 AUX Digit 5 N C Digit 5 6 TV Digit 6 VCR Dig...

Page 42: ...want Amplifier Volume to appear for example TV Enter the special code 4 9 9 then quickly press the ENTER button The indicator should blink and then turn off Find the code that operates your cable box...

Page 43: ...de 0 0 0 zero zero zero then press ENTER right away Aim the remote at the correct device and press POWER Allow a second to pass then press POWER again Repeat until the device turns off Press ENTER to...

Page 44: ...ength on the label 2 Rinse the cloth and wipe the cabinet again 3 Let the cabinet air dry before turning the Entertainment Machine on Use a quality wood cleaner and polish This will protect the Entert...

Page 45: ...eft sitting for too long they can leave a permanent impression on the picture tube You can reduce the chance of this happening by limiting the amount of time you use the fixed image display and by red...

Page 46: ...em may be the broadcast not your Entertainment Machine Are the Audio A V cables properly installed Are the wires for external speakers if you have external speakers properly installed Are you in TV or...

Page 47: ...d 4 30 pm Central Standard Time REFERENCE MAINTENANCE P A G E 4 7 Some quick and easy tips to fixing problems yourself Troubleshooting cont d 3357 o Try unplugging your Entertainment Machine for a few...

Page 48: ...er highs and lower lows CAPTIONS TEXT A form of subtitling that writes out the dialog for your program COMPONENT VIDEO Some video equipment uses three separate lines Y R Y B Y to more precisely reprod...

Page 49: ...er separate audio channel PROGRAMMING SAP available with some programming Choosing SAP often refers to listening to audio in another language such as Spanish or French SIGNAL Picture and sound traveli...

Page 50: ...on Operation 17 19 Batteries 6 Button Functions 14 15 Cable 7 9 Captions Text Menu 21 Channel Search 13 Clock Set 19 Data Port Reserved for future use 4 External Stereo 11 Front A V Panel 5 Front Pane...

Page 51: ...quickly Index 3357 o Remote Control Key Functions 14 Safety Information 2 Serial Number 2 Source Menu 21 Super VHS VCR 10 Surf 22 Timer 27 Trakball Remote MBR Z Trak 12 14 37 43 Troubleshooting 46 47...

Page 52: ......

Page 53: ...und Sound compatible TV These speakers create a sound so real it s as if you were part of the action The convenient space saving shelf design make these speakers an ideal addition to any Home Theater...

Page 54: ...nder 21 diagonal U S A screen size must be taken to a Zenith authorized service center for warranty service and must be picked up by the owner Antenna Reception problems caused by inadequate home ante...

Reviews: