background image

66

67

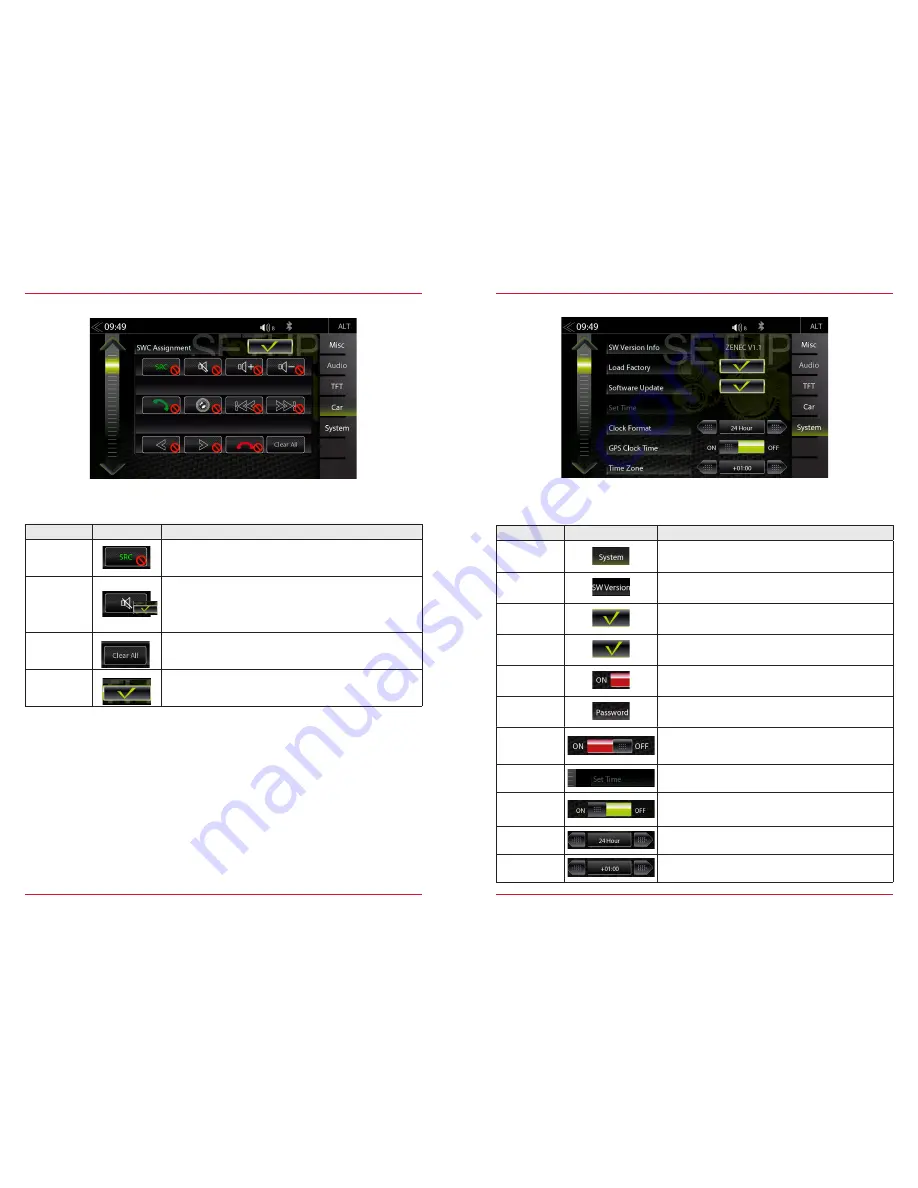
SWC ASSIGNMENT SETUP

Function

Icon

Operation

SWC Learning 

Key

Tap on a not assigned button and confirm value by pressing the 

matching button on the steering wheel

SWC 

Assigned

Key

Already assigned button

Delete

Tap to delete the complete SWC Assignment

Close SWC 

Assignment 

Setup

Tap to close the SWC Assignment

In the SWC menu, you can adjust settings around SWC Assignment. Note that device is properly set 

up for SWC buttons and compatible Toyota vehicles out of the box. Only re-assign if a given button 

shows no function.

SYSTEM SETUP

Function

Icon

Operation

System

Tap to access various system settings

SW Version 

Info

Tap to access detailed software version information

Load Factory

Tap and confirm to reset the ZENEC system to factory 

default

Software 

Update

Tap and confirm to initiate a software update. 

www.zenec.com → Support →  Softwareupdates

Password 

Function

OFF = password protection disabled

ON = password protection enabled

Password

Tap and confirm to store a password

In the System Setup menu page, you can make various system settings, such as: Adjust the Clock 

Time, Load Factory settings, Initiate Software Updates or set a Password.

Daylight/

Saving Time

Tap to change between summer and winter time

Set Time

Tap to change clock time

GPS 

Clock Time

ON / OFF

ON = use GPS time

OFF = use the internal system clock time

Clock

Format

Tap to select 12 H / 24 H

Time Zone

Tap, to change the time zone

Summary of Contents for Z-E6150

Page 1: ...Z E6150 INFOTAINER USER MANUAL EN ...

Page 2: ...EARCH 16 UKW STATION PRESET 17 FM SETUP 18 DAB RADIO SETUP 19 DAB ENSEMBLE AND STATION LIST 20 DAB SETUP 21 DAB STATION PRESETS 22 USB BT A2DP IPOD AUDIO MEDIA 23 USB BT A2DP IPOD AUDIO MEDIA CONTROL AND OPERATION BAR 24 BT MUSIC A2DP 25 iPOD AUDIO 26 PLAYLIST AUDIO 27 VIDEO MEDIA HARDDISK 28 PLAYLIST VIDEO 29 HDMI 30 CAMERA 31 SMARTLINK DIRECT 32 SMARTLINK DIRECT CONTROL INTERFACE 33 SMARTLINK DI...

Page 3: ...ot free Automatic On Off The device automatically switches on off by ignition signal Switching on the ignition will activate the ZENEC system The boot process can take up to 1 5 minutes This may result in some delay until the system is ready The ZENEC system is shut down by switching off the ignition or removing the ignition key SAFETY INSTRUCTIONS CAUTION If the driver of the vehicle is distracte...

Page 4: ...STEERING WHEEL Item Function Increase volume Reduce volume Radio source Press to choose the previous radio station Media source Press to choose the previous next track title Press and hold to fast rewind Radio source Press to choose the next radio station Media source Press to choose the next track title Press and hold to fast forward Change playback source Accept call End call Voice not supported...

Page 5: ... main menu page can be adjusted in the setup see page 51 Main Menu Style Function Icon Operation Navi Tap to open navigation App Bluetooth Tap to open the Bluetooth hands free page FM Tuner Tap to open FM radio source USB Tap to enter USB source iPod Tap to open audio playback source Apple BT Music Tap to open BT Music source DAB Tap to open DAB radio source MAIN MENU ICONS You can navigate throug...

Page 6: ...VD source You can access enter connected internal or external sources by tapping on the main icon according to the following list INPUT SOURCES Function Icon Operation HDMI Tap to open HDMI source Camera Tap to enter camera source Smartlink Tap to open Smartlink App AV IN Tap to open AV IN Input Sources NOTE Icons in the main menu remain greyed out for input source items not connected to device To...

Page 7: ...are button Screenshot fehlt STATUS BAR INFO BAR The info bar in the upper hand screen area shows TA volume and time but also contains two important controls for device operation BACK left side and ALT right side SEARCH AND INPUT FUNCTION The input keyboard for search and input is a simple standard numeric layout Function Icon Operation Search Input Field Input screen Delete Tap to delete a number ...

Page 8: ...rmation Frequency Scale Tap to open FM station frequency bar Preset Tap to show the stored FM station list Tuner Setup Tuner settings TA Tap to activate or de activate the auto switching of RDS based traffic announcements Control and Operating Section Center Section of Display FM BAR GRAPH MODE The FM setup mode press gear icon allows to assign two different operation modes to both station frequen...

Page 9: ...cy input option OK Touch to confirm frequency Hide Hide Keyboard Keypad When you tap to the frequency display area the numeric input keyboard opens for a direct input of the station frequency FM STATION PRESET Select a previously stored radio station by tapping on the station preset button Function Icon Operation Previous page Tap to switch to previous preset page Next page Tap to switch to next p...

Page 10: ...ation list Setup Tap to change settings for DAB functions Function Icon Operation Station up Tap to jump to next station Press and hold to jump to next Ensemble Station Station Name Ensemble Name Station down Tap to jump to previous station Press and hold to jump to previous Ensemble Slideshow Radio station artwork artist display MOT Slideshow Info Display Area Finger swiping left and right to swi...

Page 11: ...fficient signal strength The Ensemble list and its content is auto updated periodically by re scaning Function Icon Operation Ensemble list selection Tap to open an Ensemble showing the assigned DAB radio station list List scrolling Press and hold to move the slider of the Ensemble list up and down DAB SETUP Function Icon Operation DAB DAB Following Tap to turn DAB DAB station following ON or OFF ...

Page 12: ...r is stored on the music media it can be displayed This function is not supported for BT Audio playback Interpret Information about the artist Track Information about the track Album Information about the album Genre Information about the genre or any other special infos Back Tap to skip to the previous track Press and hold to start fast reverse Swipe to the left to skip forwards to the next track...

Page 13: ... jump to next available source Available sources USB iPod DVD and BT Music The control and operation bar on the right side of the audio playback media menu gives access to play lists favorites and external USB memory USB BT A2DP iPOD DVD AUDIO MEDIA CONTROL AND OPERATION BAR BT MUSIC A2DP NOTE The listed functions depend on the paired mobile phone installed software versions and the degree of comp...

Page 14: ...hold to move the slider up or down Tap and hold your finger on the list to move the list up or down Video Audio Source Tap to switch between audio or video playback This function is not supported for BT Audio iPod and DVD Back Tap to switch back to audio playback The playlist menu offers convenient navigation in your track list You can a search for an artist or a song by alphabet letter index Sele...

Page 15: ...older that is playing Repeat Tap to automatically repeat a film or complete video collection PLAYLIST VIDEO Function Icon Operation Folder Touch to show the hard disc file overview Back Tap to skip back to the previous section Play Pause Tap to play a film or a video Tap to pause a film or a video Forward Tap to skip forward to the next section Video Audio Source Tap to switch between audio or vid...

Page 16: ... HDMI source is connected for example a videogame smartphone tablet notebook Tapping the camera icon starts the manual camera mode if a CVBS capable camera is connected to the camera input of the unit Function Icon Operation Camera switching Tap to switch between the front and rear camera Camera Tap to open camera source CAMERA ...

Page 17: ...nected smartphone SMARTLINK DIRECT CONTROL INTERFACE Function Icon Operation Drive Mode Panel Back Icon Tap to exit Drive Mode panel Smartlink Control Bar Icon for menu control bar to access Version info and display setup Tap to display infos and open display setup See page 34 Drive Mode Home Icon Tap to jump back to main menu Smartlink Setup Icon Tap to open the Smartlink Direct setup page Smartp...

Page 18: ...ed function on the ZENEC device Tap on the respective function field in the Drive Mode panel where you want to assign a specific function With the linked smartphone app you can operate the app control functions directly via Zenec device Android OS SMARTPHONE APP LINKING NOTE When a main system software update is installed on the device the Smartlink Direct license will get overwritten erased The S...

Page 19: ...UTION Using the mobile phone with the hand while driving is not permitted Only enter data or make changes via ZENEC system when car is not moving or when the traffic situation allows such actions Function Icon Operation Device manager Tap to access the device manager view Phonebook Tap to access the phonebook of the currently paired mobile phone Favorites Tap to access the stored favorites Call lo...

Page 20: ... want to synchronize with the ZENEC system Once device is selected follow the instructions Code Standard Code 0000 PAIRING Code can be changed in Bluetooth Settings Set Pin see Page 40 Via the mobile device Function Icon Operation Search Make sure that the ZENEC system is in Device Manager view otherwise the ZENEC system will not be visible to others Follow the instructions of the device manufactu...

Page 21: ...dard code 0000 Microphone Gain Fine adjustment of microphone gain ACCEPTING ENDING INCOMING CALLS VIA DEVICE In the control operation panel touch the numeric pad Key in the desired phone number in full using the numeric pad To set up the connection touch The display now changes to the call connection view DIAL A CALL USING NUMERIC PAD Function Icon Operation Accept Tap the green handset to accept ...

Page 22: ... in the list Touch and hold to move the slider up or down showing letters by the alphabet Phonebook Contacts Tap to jump to the contact list Up to 1000 contacts per paired mobile phone can be synchronized it makes no difference whether the contacts are stored in the phonebook or on the SIM card Favorites Tap to to show phone numbers of the respective contact entry Call Accept Tap the green handset...

Page 23: ...e number of contacts Once sync process has completed you will be able to access the following logs FAVORITES On this page you can link eight or more phone numbers to become favorites You can select any of the phone numbers in the phonebook and save them as Favorites exceptions are e mails and addresses NOTE All Favorites are visible to every user of the device as they are saved in device memory NO...

Page 24: ...ows 7 operating system or higher an SD card reader together with broadband Internet access Apple OS not supported 2 An activated navigation map microSD card set content 3 Latest Naviextras Toolbox software installed on your computer Download Link https zenec naviextras com shop portal downloads To be able to update your ZENEC device with new maps proceed as follows 1 Go to https zenec naviextras c...

Page 25: ...ftware updates applicable to this device except navigation engine map updates are free of charge Download here www zenec com support software updates Function Icon Operation Setup Tap to access the setup mode Function Icon Operation Disp Tap to dim or brighten up TFT screen 100 50 0 standby DISPLAY ICON With the display icon the LCD TFT screen picture brightness can be dimmed or switched off stand...

Page 26: ... Mute NAVI Tuner EQ Setup BT Music BT DISP iPod USB HDMI Smartlink Button sounds ON OFF Off acoustic acknowledgment disabled On acoustic acknowledgment enabled OSD Language Tap to change the menu language Button Color Tap to adjust hard key or sensor field illumination see page 52 Wallpapers Tap to change the background image Volume Pop Up ON OFF Off visual volume pop up disabled On visual volume ...

Page 27: ...e levels Audio Control Tap to access quick audio settings Loudness Subwoofer etc This can also open by long pressing of the Home button In the Audio menu page you can adjust settings around the sound e g Volume of the sources loudness bass and treble etc The Expert Mode view extends the setting options by few points BUTTON ILLUMINATION COLOR SETUP Function Icon Operation Predefined Colors Tap to s...

Page 28: ...setting position set to Select Setting manually adjusted volume Last last volume set before switching off In the Audio menu Media Volume you can customize the basic settings of each source individually QUICK AUDIO SETUP BAL FAD SUBWOOFER LOUDNESS In this menu you can adjust the Balance Fader Loudness and Subwoofer level of the speakers in the vehicle Function Icon Operation Left Right 20L 0 20R Fr...

Page 29: ...ap to set subwoofer settings Navi Mixer Tap to set navi voice output configuration Audio Control Touch to make general quick audio settings Loudness Suboofer etc Can be accessed by long press of the Home button AUDIO VOLUME BASE LEVEL SETUP Function Icon Operation Media Volume Tap to set the media playback volume Navi Volume Tap to set the volume of the Navi voice BT Call Volume Tap to set the vol...

Page 30: ...nce and fader Press and hold the green dot of the crosshair to move sound center position into any desired position EQUALIZER SETUP In this Expert Mode menu page you can set the 10 band graphical equalizer Press and hold the indi vidual band level sliders to move it up or down for a level change Function Icon Operation Band Tap to set the desired Band Touch and hold to change the setting of the se...

Page 31: ...derably due to the given arrangement of the installed speakers This menu gives you the option to delay the audio signal at each of the speakers so that you have a center stage effect Set your central listening position Measure the distance from this position to each speaker Now you need to add the corresponding delay to move the speakers to same distance from selected position Enter these distance...

Page 32: ...subwoofer The default settings are Gain 0 LPF 100 Hz NAVI MIXER SETUP Function Icon Operation Mute Media Sources for Navi Voice Announcement ON OFF OFF Ducking of media playback during route guidance voice announcements ON Media playback is fully muted during route guidance announcements In this Expert Mode menu page you can adjust audio ducking or mute of audio and video source playback by nav ro...

Page 33: ...by Tap to enable or disable TFT Auto Standby function and Auto Screen shutdown TFT goes into standby after selected time NOTE Using the DISP button you can set the display brightness to three levels 100 50 0 CAR VEHICLE SETUP Function Icon Operation Car vehicle Tap to access vehicle configurations Park Assist CAM OFF CAM Camera On OFF Camera Off Reverse Audio Assist OFF MUTE Reduced CAM auto switc...

Page 34: ...ystem settings SW Version Info Tap to access detailed software version information Load Factory Tap and confirm to reset the ZENEC system to factory default Software Update Tap and confirm to initiate a software update www zenec com Support Softwareupdates Password Function OFF password protection disabled ON password protection enabled Password Tap and confirm to store a password In the System Se...

Page 35: ... Function Icon Operation Password Function OFF password protection disabled ON password protection enabled Password Tap and confirm to store a password Standard code 12345 Input Keypad Enter the desired password In the System Setup menu page under Password function you can activate and deactivate the pass word protection CAUTION If you protect you ZENEC system with a Passwort make sure you have ac...

Page 36: ...B connection of the ZENEC system will still be accessible later installation of USB extension cable If you have questions or problems relating to the ZENEC system please contact the dealer from whom you purchased it REMOVAL WORK AND PREPARATION NOTE Make sure that all connectors at the rear of the ZENEC system have sufficient room and are not bent Connectors without a retaining mechanism must be a...

Page 37: ... Wheel KEY 1 A7 Speaker Rear Left A8 Speaker Rear Left A9 Speaker Front Left A10 Speaker Front Left 300mA max current C1 Speaker Rear Right C2 Speaker Rear Left C3 Speaker Rear Right C4 N A C5 N A C6 Speaker Rear Left Deployment of either 20 Pin or 28 Pin connectors depends on vehicle model 20 PIN CONNECTOR DEVICE BACKSIDE A1 A11 A10 A20 D20 D11 D10 D1 E14 E1 E28 E15 B B4 B1 B10 B5 C6 C3 C2 C1 A C...

Page 38: ...the retailer from whom it was purchased or the distributor of your country Do not send any product to ZENEC directly This ZENEC product is protected against defective materials and or improper workmanship by a factory warranty for the period of two years from date of purchase at retail to the original buyer For warranty work to be carried out an RMA number must be generated which requires a valid ...

Page 39: ... Copyright 2017 RevA copy deadline Q3 2017 English Manufacturer ACR AG Bohrturmweg 1 CH 5330 Bad Zurzach Switzerland EU Legal Representative ACR S V GmbH Industriestraße 35 D 79787 Lauchringen Germany ...

Reviews: