background image

27

HDS4x2 User Guide, Rev 1.1, 08-31-07

Warranty

Warranty Policy

ZEKTOR

 warrants this product against defects in material and workmanship under normal use and service for 

two years from the original date of purchase. 

ZEKTOR

, at its option, shall repair or replace the defective unit 

covered by this warranty.
In order to keep this warranty in effect, the product must have been handled and used as prescribed in 

the instructions accompanying this warranty. This warranty does not cover any damage due to accident, 

misuse, abuse, or negligence. This warranty is valid only if the product is used as specified in the product 

documentation.
Repair or replacement, as provided under this warranty, is your exclusive remedy. 

ZEKTOR

 shall not be liable 

for any incidental or consequential damages. Implied warranties of merchantability and fitness for a particular 

purpose on this product are limited in duration to the duration of this warranty.
Some states/countries do not allow the exclusion or limitation of incidental or consequential damages, so the 

above limitation or exclusion may not apply to you. Some states/countries do not allow limitations on how long 

an implied warranty lasts, so the above limitation may not apply to you. This warranty gives you specific legal 

rights, and you may also have other rights that vary from state to state and country to country.

Return & Exchange

Shipment of product is as advertised by product. Upon receipt of merchandise inspect product carefully, 

should you find that the product does not meet your expectations, or satisfaction, contact us at once and tell 

us your concerns, so we may make every effort to satisfy your purchase.

Instructions for Returning Items

Please retain the dated sales receipt as evidence of the date of purchase. You will need it for any warranty 

service. If you bought the product through a dealer, installer, or reseller, you will need to return the product to 

the point of sale.
E-mail or call us, using the information listed under “Customer Service Contact Information”, for a Return to 

Manufacturer Authorization (RMA) number. Describe briefly the reasons for your requested return.

You must receive an RMA # before you return any goods to us. The RMA # must appear on your return pack-

ing label or on the outside of the box. Merchandise without an RMA # will be refused. RMA’s are valid for 

twenty (20) days from date of issuance. 
All returned merchandise must be shipped in the original packaging. If it is not in the original packaging, 

ZEKTOR

 will not be held liable for damage during shipment. Shipments of returns must be prepaid, and we will 

not accept COD returns.

Customer Service Contact Information

Address:  

ZEKTOR

                    Email:   

customerservice@zektor .com

          12675 Danielson Ct .

            Website: 

www .zektor .com

          Suite 401

                     Phone:   

858-748-8250

          Poway, CA 92064

              Fax:     

858-748-8224

Summary of Contents for HDS4x2

Page 1: ...Home Theater Solutions HDS4x2 Component Video Audio Matrix Switch...

Page 2: ...8 Changing the initial power on settings 8 Advanced Control Features 9 Setup mode overview read this first 9 Front panel display intensity and modes 10 Control settings 11 Disabling front panel butto...

Page 3: ...ser s Manual If anything is missing please get in touch with us as soon as possible so that we can correct the situation Features 4x2 active matrix switch Ultrawide video bandwidth 400MHz Switches com...

Page 4: ...ANALOG AUDIO INPUT ANALOG AUDIO OUTPUT DIGITAL AUDIO OUT 2 RS232 9VDC IR IN Y G Pb B Pr R Y G Pb B Pr R Y G Pb B Pr R Y G Pb B Pr R Y G Pb B Pr R Y G Pb B Pr R IN 1 R IN 1 L R IN 2 L R IN 3 L R IN 4 L...

Page 5: ...Battery Turn over the remote control the battery compartment is on the bottom Press the small tab towards the center of the remote to unlatch the bat tery compartment Pull the battery holder downward...

Page 6: ...ed pressing an input button 2 or pressing the buttons 1 4 on the remote control maps the chosen input to the selected zone s The zone LED s will stop flashing but will remain selected the decimal poin...

Page 7: ...hrough inputs To sequence a zone through its inputs you must use the remote control Press the SQ1 button to sequence Zone 1 through the four inputs Press the SQ2 button to sequence Zone 2 through the...

Page 8: ...d the zones to be saved as part of the preset press the SET button the zones you have selected the ones that were flashing will display v s those that were not selected will display o s If only dashes...

Page 9: ...y s should now be displaying v s Press the A preset button the display will flash quickly three times To test the newly programmed preset setup the HDS4x2 to anything but the above setup Now press the...

Page 10: ...th Zone 1 selected and mapped to Input 1 and Zone 2 unselected and mapped to Input 4 Once you ve set the HDS4x2 into the power on state of choice you can save these settings as the new power on defaul...

Page 11: ...imply a short description of each of the available control modes but not how to use them Control modes are entered by pressing one of the input select buttons 2 or 1 3 on the remote control the modes...

Page 12: ...ttons 4 or O1 O2 on the remote to raise and lower the intensity of the display The HDS4x2 can be setup to operate in four different display modes OFF LOW HIGH AUTODIM 1 2 3 4 B A HDS4x2 To change mode...

Page 13: ...ng see the section entitled Disabling the remote IR buttons on page 13 03 Enable Disable front panel IR sensor hardware When disabled no IR can be received through the front panel IR sensor the IR jac...

Page 14: ...uttons start by disabling all the front panel buttons by performing 1 through 4 of the above steps Then proceed After the front panel is disabled you can now re enable individual buttons by selecting...

Page 15: ...rforming 1 through 4 of the above steps After the front panel is disabled you can now re enable individual buttons by selecting the IR button enable disable mode by pressing the 4 button 5 The decimal...

Page 16: ...e being sent Make sure the remote s batteries are fresh The HDS4x2 will work with most remotes however there are a few exceptions Some of the technical reasons for not working with some remotes are Th...

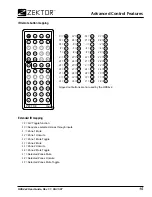
Page 17: ...nputs 51 Zone 1 Mute 52 Zone 1 Unmute 53 Zone 1 Mute Toggle 54 Zone 2 Mute 55 Zone 2 Unmute 56 Zone 2 Mute Toggle 57 Selected Zones Mute 58 Selected Zones Unmute 59 Selected Zones Mute Toggle ZEKTOR Z...

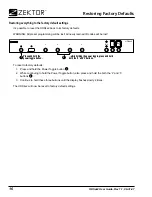
Page 18: ...s Press and hold the Power Toggle button 1 While continuing to hold the Power Toggle button also press and hold the both the 2 and 3 buttons 2 Continue to hold these three buttons until the display fl...

Page 19: ...17 HDS4x2 User Guide Rev 1 1 08 31 07...

Page 20: ...l Mo dem cable The HDS4x2 can also be used with any USB to RS 232 conversion cable these are all typically straight through cables The RS 232 port is a female type DE 9 connector sometimes mistakenly...

Page 21: ...eout states as part of the protocol A timeout will always indicate some type of physical connection error loose cable extreme noise etc Commands and responses have been designed for simple parsing in...

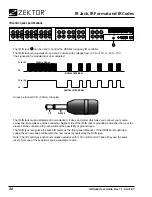
Page 22: ...be modulated or un modulated 30KHz to 500KHz 3V to 15V 0V MODULATED SIGNAL UNMODULATED SIGNAL 3V to 15V 0V It uses a standard 1 8 3 5mm mini plug SLEEVE TIP The IR IN jack is opto isolated and non po...

Page 23: ...nsmission protocol and use a carrier frequency of 38KHz Typical IR Code Example Code 807D08F7 hex 108 mS 108 mS 8 0 7 D 0 8 F 7 Stop Bit Leader Data Bits Repeat Code A magnified view of the Leader and...

Page 24: ...2 the remote control supplied with the HDS4x2 these codes are the factory default codes used by the HDS4x2 Index Hex Code Key Function 01 807E00FF Power toggle 02 807E20DF ON Discrete power on 03 807E...

Page 25: ...2 34 807E22DD 2 2 Map input 2 to zone 2 35 807E12ED 3 2 Map input 3 to zone 2 36 807E32CD 4 2 Map input 4 to zone 2 37 807E0AF5 5 2 Map input 1 to Zones 1 2 38 807E2AD5 6 2 Map input 2 to Zones 1 2 3...

Page 26: ...mmed Index Hex Code Function 49 807E04FB A V Toggle acts the same as the breakaway button on the front panel 50 807E14EB Sequence selected zones through inputs 51 807E24DB Zone 1 Mute 52 807E34CB Zone...

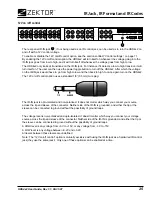
Page 27: ...use the power toggle button to turn off the HDS4x2 After which the voltage on the IR IN jack would have to go from high to low and then back to high to once again turn on the HDS4x2 The 12V on off co...

Page 28: ...uts 4 Coax 4 Optical w auto conversion between formats S PDIF outputs 2 Coax 2 Optical coax mirrors optical for each zone Transfer rates Optical 13 2Mb S Coax 50Mb S Digital audio modes PCM DD5 1 DTS...

Page 29: ...rights that vary from state to state and country to country Return Exchange Shipment of product is as advertised by product Upon receipt of merchandise inspect product carefully should you find that t...

Page 30: ...ZEKTOR 12675 Danielson Ct Suite 401 Poway CA 92064 858 748 8250 www zektor com...

Reviews: