Preparation
16
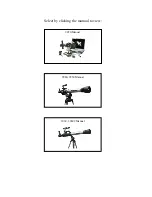
Observation with and without glasses
When observing without glasses, use the PhotoScope with the eyecup (Fig. 1/5) extended.
To do this, twist the eyecup (Fig. 1/5) upwards by turning to the left.
When observing with glasses twist the eyecup right down. Intermediate stages are also
available for individual adjustment.
Diopter compensation and image definition
Fine segments of a double circle are arranged around the centre of the field of view.
The sharpness of these sectors appears greater or less depending on the adjustment of
the diopter compensation.
By turning the diopter compensation (Fig. 1/6), adjust these markings so they appear
absolutely in focus. Take a few seconds to do this and take a relaxed look through the
eyepiece. To check the correct diopter setting, select a subject and use the focusing ring
(Fig. 1/2) to focus on it. To check the definition, use the monitor rather than the eyepiece.
For precise adjustment, use the ZOOM PLUS button (Fig. 2/5) on the remote control.
Nearby vertical lines e.g. window frames are ideal. Now look through the eyepiece and
check the image definition here too. If the subject appears out of focus, correct the
diopter compensation on the eyepiece until the definition effect is correct.
After diopter compensation, the image on the monitor, the image in the eyepiece and the
circle segments should all appear in focus at the same time.
The diopter compensation requires adjusting only once. Before each use, read off the set
diopter value on the scale (Fig. 1/6) and check that the value has not been adjusted
accidentally. Readjustment is required only if someone else has used the unit or if the set
value is no longer correct for you. New diopter compensation is also required when
changing from observation with glasses to observation without glasses or vice versa.