background image

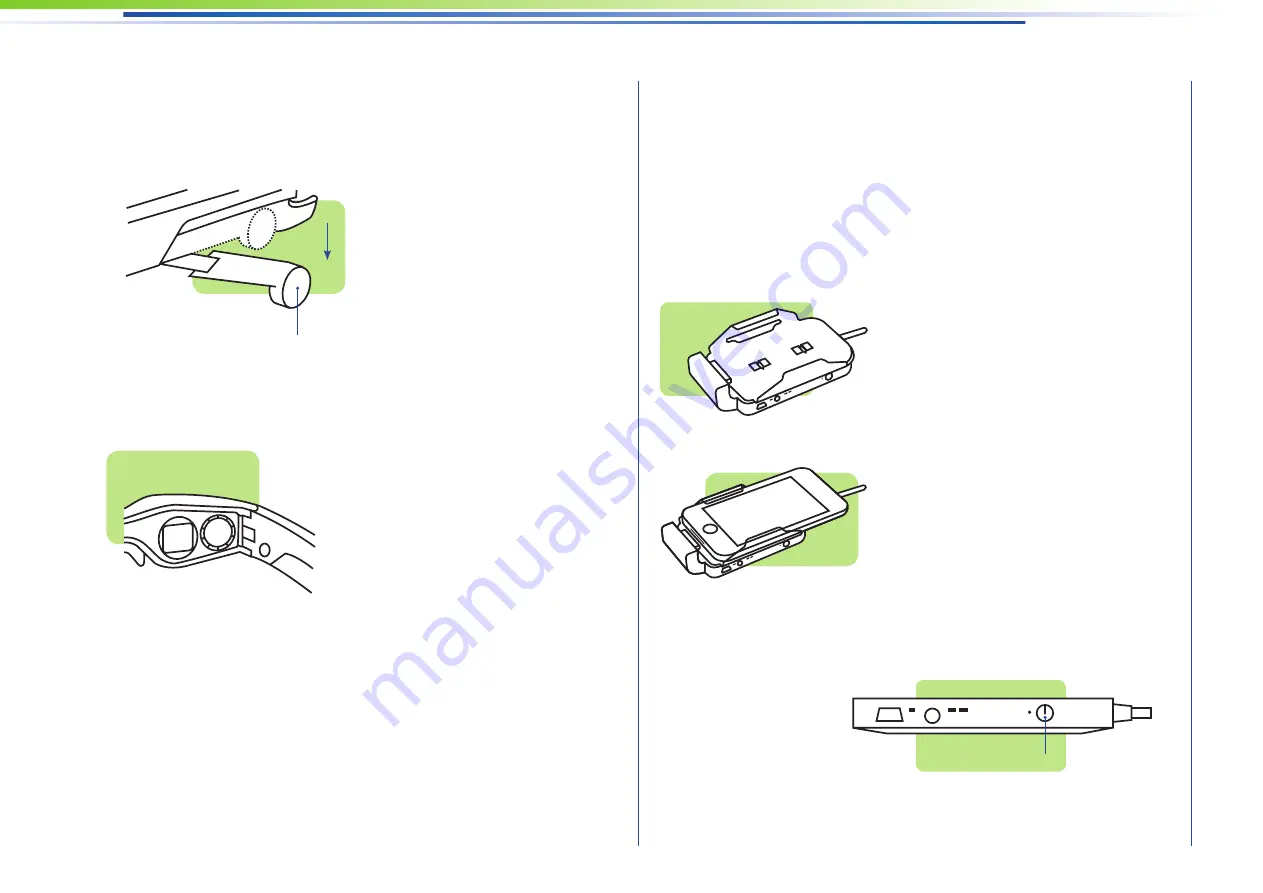
Using the cinemizer with 
an iPod

cinemizer is compatible with iPod touch, iPod clas-

sic, iPod with video, and iPod nano (3rd genera-

tion).

Step 1

Fit the appropriate iPod Clip for your iPod onto the 

battery box of the video glasses.


Step 2

Latch your iPod onto the iPod connector of the 

battery box.


Step 3

Turn on the video glasses by pressing the Power 

On/Off button on the battery box. 


Adjusting the Earphones and 
Earpieces

You can adjust each earphone‘s inclination and 

length individually to fi t each ear. Put on the video 

glasses with retracted earpiece ends and then 

adjust these individually to fi t your head. A locking 

mechanism holds them in the selected position. 

The earpiece ends can be adjusted further to 

achieve the most comfortable position on your 

nose (further up or down).

Adjusting the Diopter Settings

The video glasses feature a diopter setting of 

+/–3.5 D for each eye to accommodate wearers 

of glasses and contact lens. To adjust, turn on the 

video glasses and press and hold the Play/Pause 

button for 5 seconds until the test picture appears. 

This function is only available without an iPod 

connected. Then turn the small wheel until the 

picture is sharply focused. While adjusting the 

settings for one eye, keep the other eye closed to 

ensure correct adjustment.


9

Earphone

On/Off Switch

Summary of Contents for Cinemizer

Page 1: ...User Guide looking for adventure...

Page 2: ...4 Approval Regulations for Europe 4 Approval Regulations for the USA and Canada 4 Disposal 4 cinemizer Overview 6 Using the Remote Control 6 Operating the Battery Box 7 iPod Connector 8 iPod Clips 8 C...

Page 3: ...e in your surroundings and do not have to react to external in uences Never wear the video glasses in situations which require your attention e g walking riding a bike or driving a motorcycle automobi...

Page 4: ...an open re or under strong solar radiation Only use a charger that meets the device speci cations Cleaning the cinemizer Before cleaning the video glasses be sure to turn off the video glasses complet...

Page 5: ...ician for help Carl Zeiss AG is not responsible for any radio or television interference caused by unauthorized modi cations of this devise or the substitution or attachment of connecting cables and e...

Page 6: ...e Fast forward Rewind buttons on the remote control Volume You can adjust the volume of the video using the volume control buttons on the side of the remote control The last active volume setting is s...

Page 7: ...f the available power adapters for the iPod with video can generally also be used to charge the video glasses Reset Button If the glasses do not function as described in this manual you can reset them...

Page 8: ...is no charging activity Charging status low LED blinks rapidly two times per second Battery is charging LED blinks slowly once every 2 seconds iPod Connector The iPod Connector is a special adapter w...

Page 9: ...iece ends and then adjust these individually to t your head A locking mechanism holds them in the selected position The earpiece ends can be adjusted further to achieve the most comfortable position o...

Page 10: ...5 Put the video glasses on Step 6 Adjust the diopter setting to your vision if you wear glasses or contact lenses Step 7 Adjust the earphones and the earpieces and replace the nose piece if necessary...

Page 11: ...on the required cables please refer to the technical speci cations or visit the cinemizer website at www zeiss com cinemizer Support Tips and Troubleshooting Support An overview of dealers authorized...

Page 12: ...C Relative humidity 10 90 non condensing Warranty This product is subject to the legal warranty requirements of 24 months applicable in the EU There is a 6 month warranty on the battery This can vary...

Reviews: