background image

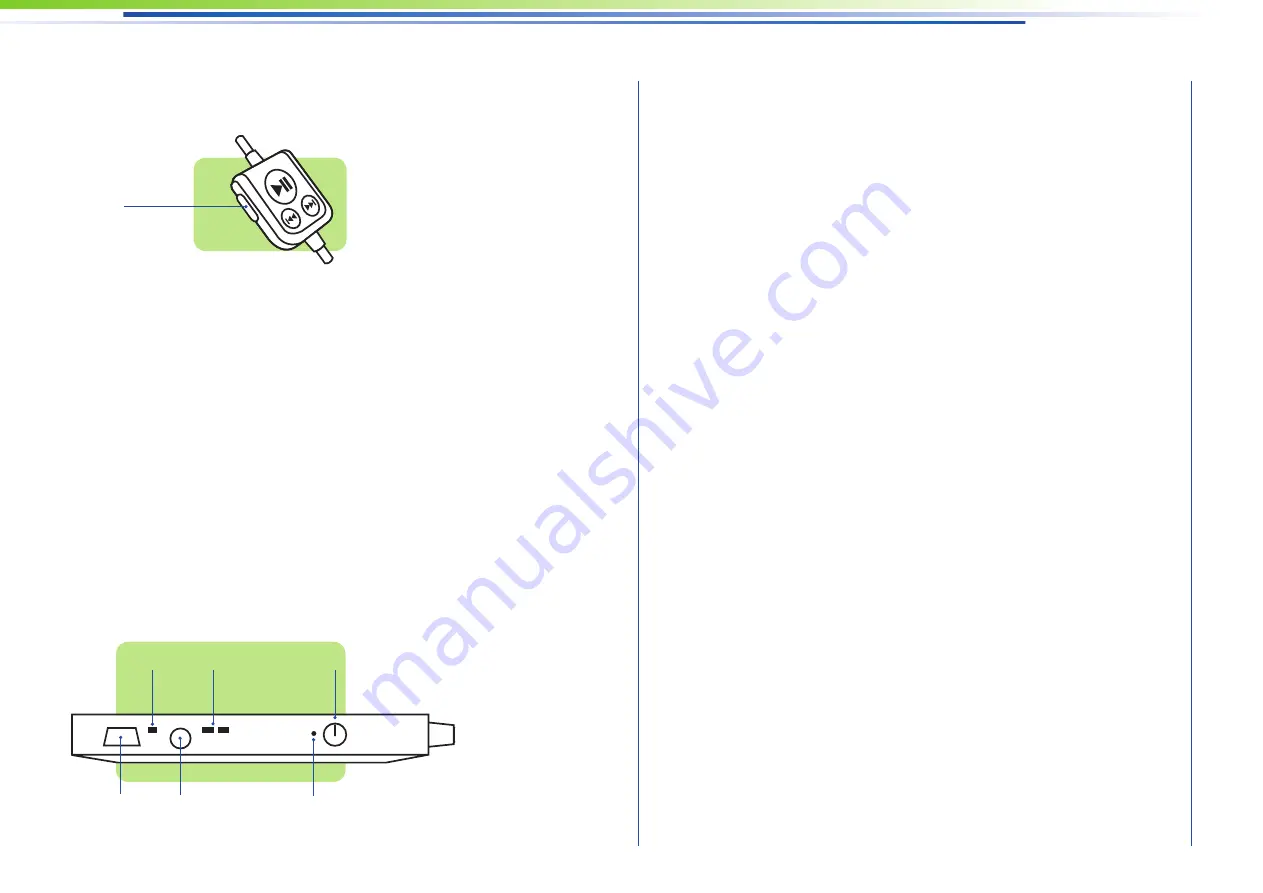
Mode LEDs

These display whether 2D or 3D mode is currently 

activated.

Video In

The video glasses can also be operated with other 

devices via the PAL/NTSC Video Out port (e.g. 

multimedia player, DVD player or game console) 

using a video cable which is not included. You can 

purchase the appropriate video cable from your 

specialist shop. If another device is connected via 

the Video Out port, an iPod with video must not be 

connected.  A separately available 4-pin, 3.5 mm 

A/V phone jack, which is connected to Video In, is 

required to connect the device to the battery box. 

(For detailed information on the required cables, 

please refer to the technical specifi cations or visit 

the cinemizer website at 

www.zeiss.com/cinemizer)

Mini USB Port

You can charge the battery of the video glasses 

and the battery of an iPod with video connected to 

the video glasses on the computer using the Mini 

USB cable. An additional USB power adapter (not 

supplied) allows charging without a computer. 

Most of the available power adapters for the iPod 

with video can generally also be used to charge 

the video glasses.

Reset Button

If the glasses do not function as described in this 

manual, you can reset them by pressing the Reset 

button. Use the end of a bent-open paper clip or 

Video Mode

Use the Video Mode button to adjust the bright-

ness and contrast to ambient lighting levels or 

video content. Select from three different preset 

brightness/contrast settings by quickly pressing 

the button repeatedly. 

You can switch between 2D and 3D mode using 

the second assignment of the video mode button 

by pressing and holding it. The active mode is 

indicated by the corresponding LED on the battery 

box. Special 3D videos are required for the 3D 

mode. For detailed information, please visit the 

cinemizer website at www.zeiss.com/cinemizer.


Operating the Battery Box

On/Off Switch and Automatic Shutoff

Switch the video glasses on or off by pressing and 

holding the Power On/Off button for approx. 

2 seconds. The video glasses shut-off automati-

cally after two minutes if a video signal is not 

detected.

7

Reset button

Video In

Mini USB

Mode LED

Charging status LED

Video mode

On/Off Switch

Summary of Contents for Cinemizer

Page 1: ...User Guide looking for adventure...

Page 2: ...4 Approval Regulations for Europe 4 Approval Regulations for the USA and Canada 4 Disposal 4 cinemizer Overview 6 Using the Remote Control 6 Operating the Battery Box 7 iPod Connector 8 iPod Clips 8 C...

Page 3: ...e in your surroundings and do not have to react to external in uences Never wear the video glasses in situations which require your attention e g walking riding a bike or driving a motorcycle automobi...

Page 4: ...an open re or under strong solar radiation Only use a charger that meets the device speci cations Cleaning the cinemizer Before cleaning the video glasses be sure to turn off the video glasses complet...

Page 5: ...ician for help Carl Zeiss AG is not responsible for any radio or television interference caused by unauthorized modi cations of this devise or the substitution or attachment of connecting cables and e...

Page 6: ...e Fast forward Rewind buttons on the remote control Volume You can adjust the volume of the video using the volume control buttons on the side of the remote control The last active volume setting is s...

Page 7: ...f the available power adapters for the iPod with video can generally also be used to charge the video glasses Reset Button If the glasses do not function as described in this manual you can reset them...

Page 8: ...is no charging activity Charging status low LED blinks rapidly two times per second Battery is charging LED blinks slowly once every 2 seconds iPod Connector The iPod Connector is a special adapter w...

Page 9: ...iece ends and then adjust these individually to t your head A locking mechanism holds them in the selected position The earpiece ends can be adjusted further to achieve the most comfortable position o...

Page 10: ...5 Put the video glasses on Step 6 Adjust the diopter setting to your vision if you wear glasses or contact lenses Step 7 Adjust the earphones and the earpieces and replace the nose piece if necessary...

Page 11: ...on the required cables please refer to the technical speci cations or visit the cinemizer website at www zeiss com cinemizer Support Tips and Troubleshooting Support An overview of dealers authorized...

Page 12: ...C Relative humidity 10 90 non condensing Warranty This product is subject to the legal warranty requirements of 24 months applicable in the EU There is a 6 month warranty on the battery This can vary...

Reviews: