Zeeko Notus User Manual Download Page 10


WARRANTY POLICY 


Notwithstanding  legal  warranty  conditions  of  the  product’s  defects  (French  civil 
code, art. 1642 and followings), ZEEKO PRODUCTS ARE WARRANTIED to be free 
of defects from manufacture in material and or workmanship to the original owner 
for 6 months, starting from the date of purchase. 
French law applies to all disputes concerning this product.  
The  warranty  subscriber  declares  to  have  read  and  understood  the  terms  and 
conditions of use set out in the user or instruction manual and to abide by these. 
I. Warranty extent 
1.  This  warranty  is  valid  only  when  this  product  is  used  for  normal  recreational 
activities. Teaching and renting are not included. 
2. This warranty doesn’t cover damage caused by misuse or abuse, damage due 
to  over-inflation  in  the  sun,  damage  caused  by  improper  handling  and  storage, 
damage caused by use in shore break or on a rocky spot, damage resulting from 
improper maintenance, from normal wear and tear or caused by anything other 
than defects in material and workmanship. 
3.  This  warranty  is  null  and  void  if  any  unauthorized  repair,  change  or 
modification has been made to any part of the equipment. 
II. Warranty procedure 
If  you  are  faced  with  any  problem  which  comes  within  the  framework  of  the 
warranty,  you  should  bring  the  defective  product  back  to  your  ZEEKO  retailer 
with the following documents and information: 
-  A  copy  of  the  kite/board  user’s  invoice  which  indicates  the  purchase  date  (if  it 
does not clearly figure on the invoice, the sale date to the retailer will be chosen 
as the beginning of the warranty) 
-  The  type  of  the  board/kite  and  the  serial  number  (located  on  a  tip  for  the  kites 
and on the deck of the boards) 
- A precise description of the defect 
- A good picture of the defect (no POLAROID) 
- Your name and address 
Your retailer will communicate you claim to ZEEKO (exclusive ZEEKO distributor) 
and, if necessary will send the product to an official ZEEKO repair centre. You will 
have  to  pay  the  carriage  costs.  Only  ZEEKO  is  entitled  to  take  the final decision 
about  the  warranty.  If  a  product  is  deemed  to  be  defective  by  ZEEKO,  it  will  be 
repaired  or  replaced  by  the  official  ZEEKO  repair  centre  in  the  shortest  possible 
time and will be sent back to your ZEEKO dealer at your costs. 
 
It  is  the  user’s  responsibility  to  careful  read  this  user’s  guide  and  instructs  all 
users on the safe operation of this product. 
 
Contact Zeeko company  at zeeko-kites.com for more details.  


Summary of Contents for Notus

Page 1: ...ouveau produit ZEEKO ainsi que ZEEKO vous remercie pour l achat de votre nouveau produit ZEEKO ainsi que de la confiance que vous avez bien voulu nous porter Avant to de la confiance que vous avez bie...

Page 2: ...the bridles or flying lines while they are under tension If your kite is not in use but is inflated it must be secured in the neutral position using sand or heavy objects It must be secured and the c...

Page 3: ...direction Make sure the wind direction is suited to the spot you have chosen for sailing The ideal wind is a side shore wind that is blowing parallel to the beach NEVER launch your kite with an off sh...

Page 4: ...kite 1 Left front lines connections a less power b more power Red to Red 2 Left back line connections Red to Red 3 Right front lines connections a less power b more power Black to Black 4 Right back l...

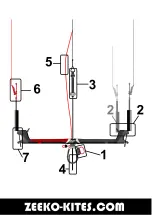
Page 5: ...How to release and reload the quick release...

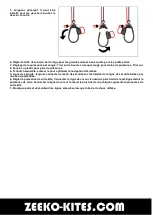
Page 6: ...How to connect the safety leash for the bar...

Page 7: ...eash You can connect the safety leash to a metal ring on the harness but you should be able to grab the safety handle in all critical situations Use the leash quick release only in critical situation...

Page 8: ......

Page 9: ...wer and grab the black plastic loop for more power 4 Chicken loop stick it is removable for unhooked style 5 Safety line always connect the safety leash to the loop of this safety line 6 Tune the powe...

Page 10: ...any part of the equipment II Warranty procedure If you are faced with any problem which comes within the framework of the warranty you should bring the defective product back to your ZEEKO retailer w...

Page 11: ...g e d obstacles sous le vent et d gag e d l ments pouvant perturber l coulement de l air au vent de la zone Maintenez une zone de s curit libre sous le vent adapt e aux conditions m t orologiques et l...

Page 12: ...de l aile et de d collage adapt es V rifiez votre mat riel avant tout d collage coh rence du montage lignes connect es correctement tat des lignes usure noeuds Testez le bon fonctionnement du syst me...

Page 13: ...ne avant gauche a moins de puissance b plus de puissance Rouge sur rouge 2 Connection ligne arri re gauche Rouge sur rouge 3 Connection ligne avant droite a moins de puissance b plus de puissance Noir...

Page 14: ...os largueurs leash et largueur principal V rifiez aussi qu il fonctionne avec votre boucle de harnais Le syst me doit pouvoir glisser librement dans votre boucle de harnais Si ce n est pas le cas chan...

Page 15: ...Comment connecter votre leash votre barre...

Page 16: ...ez connecter votre leash d aile sur votre harnais un endroit accessible en toute circonstance Attention lorsque vous larguez votre leash d aile cette derni re peut devenir incontr lable et partir sur...

Page 17: ......

Page 18: ...puissance 4 Tchoutch amovible enlever le pour optimiser la navigation d croch e 5 Ligne de s curit toujours connecter le leash de s curit sur l extr mit de la ligne de s curit form e par une boucle p...

Page 19: ...dans le cadre de la garantie ramenez le produit d fectueux votre revendeur ZEEKO accompagn des documents et informations suivants Une copie de la facture du produit indiquant la date d achat d faut c...

Page 20: ......

Reviews: