background image


Function 

Key Action 

Beep Sound


Power On 

Long press Power 

Button for 3 seconds 

Power Off 

Long press Power 

button for 3 seconds 

Forward 

Long press Forward Key 

Backward 

Long press Backward 

Key 

Speed Adjustment 

Press Power Button 

once 

Set Waypoints 

Press Power Button 

twice 

Set point 1: Beep sound voice 
Set point 2: Beep sound twice 

Delete All Waypoints 

Long press left+right key 

Long beep sound 

Start Running 

Double press power 

button 

Starts/Pauses circulation 

Press the left/Right Key 

and Power button at the 

same time 

Rings once 


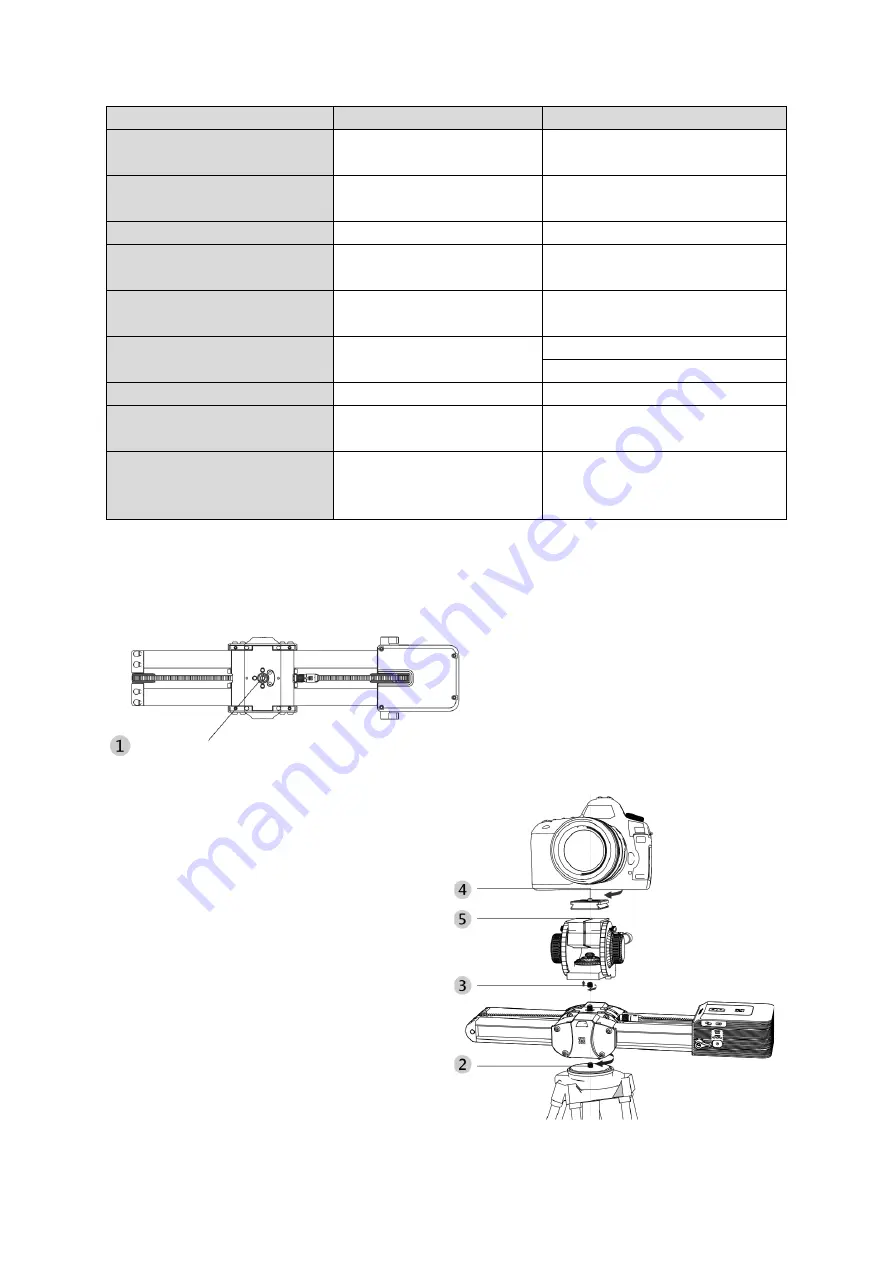
Installation on single pan & tilt


1. Unscrew the 1/4” -to-3/8” screw 
adapter from the bottom. 
2. Mount Micro 2 to the tripod tight and 
secure. 
3. Screw the unscrewed adapter (1/4” to 
3/8) into the pan&tilt; Then mount the 
pan & tilt to Micro2 
4. Attach the quick release plate to the 
camera. 
5. Mount the camera (with quick release 
plate) to the pan & tilt. 


Summary of Contents for Motorized Micro2

Page 1: ...Motorized Micro2 User Manual U ivatelsk manu l U vate sk manu l Haszn lati utas t s Benutzerhandbuch...

Page 2: ...st use and keep this user manual for future reference Pay particular attention to the safety instructions If you have any questions or comments about the device please contact the customer line www al...

Page 3: ...ke Motorized Micro 2 Diagram Upper Slider Quick Locking Buttons Following Dust Sweeper 2 5mm Shutter Trigger Port USB Type C Port Forward Key Backward Key Power Indicator Speed Indicator Power Button...

Page 4: ...amera via shutter trigger cable to control camera shutter USB Type C Port Can be charged and firmware upgraded with external PD USB C power adapter or PD power bank Power Indicator Green Yellow Red Gr...

Page 5: ...elete All Waypoints Long press left right key Long beep sound Start Running Double press power button Starts Pauses circulation Press the left Right Key and Power button at the same time Rings once In...

Page 6: ...e Upper Slider sideways then tighten the dual positioning screws with the Allen key Make sure there are at least two screws tightened to ensure precise positioning and stable installation 3 Attach the...

Page 7: ...7 Press Quick Locking buttons again to unlick the slider to slide left right Position the slider to different angles to simulate rockerarm movements...

Page 8: ...e tripod 4 Connect Micro 2 with Easylock by fitting the positioning bean into the positioning groove U shaped then tighten the screw from the bottom of Easylock and the dual positioning screws inside...

Page 9: ...n the belt tension screw and detach the Slider Motor 2 Loosen the belt fixing screw on upper lower slider and detach the rail band belt base 3 Mount the rail band belt assembly to the rail slider Note...

Page 10: ...duct by a natural disaster the intervention of an unauthorized person or mechanically through the fault of the buyer e g during transport cleaning by inappropriate means etc Natural wear and aging of...

Page 11: ...a 1522 53 Hole ovice 170 00 Prague 7 I O 27082440 Subject of the declaration Title Motorized Micro 2 Model Type The above product has been tested in accordance with the standard s used to demonstrate...

Page 12: ...ic collection point for the recyclable waste By ensuring this product is disposed of correctly you will help prevent potential negative consequences for the environment and human health which could ot...

Page 13: ...uj c pokyny a uschovejte si tento n vod k pou it pro budouc pou it Zvl tn pozornost v nujte bezpe nostn m pokyn m Pokud m te k p stroji jak koli dotazy nebo p ipom nky obra te se na z kaznickou linku...

Page 14: ...am motorizovan ho za zen Micro 2 Horn jezdec Tla tka rychl ho uzam en N sleduj c zameta prachu 2 5mm port spou t spou t Port USB typu C P edn tla tko Zadn tla tko Indik tor nap jen Ukazatel rychlosti...

Page 15: ...spou t pro ovl d n z v rky fotoapar tu Port USB typu C Mo nost nab jen a aktualizace firmwaru pomoc extern ho nap jec ho adapt ru PD USB C nebo powerbanky PD Indik tor nap jen Zelen lut erven zelen do...

Page 16: ...isknut tla tka Zp t Nastaven rychlosti Jednou stiskn te tla tko nap jen Nastaven bod trasy Stiskn te dvakr t tla tko nap jen Nastaven bodu 1 zvukov sign l Nastaven bod 2 Dvakr t p pne Odstran n v ech...

Page 17: ...podn sti 2 Mikro 2 pevn a bezpe n p ipevn te ke stativu 3 Na roubujte od roubovan adapt r z 1 4 na 3 8 do oto n ho adapt ru pot p ipevn te oto n adapt r na Micro2 4 P ipevn te rychloup nac desti ku k...

Page 18: ...strany a pot ut hn te dvojit polohovac roub imbusov m kl em Ujist te se e jsou uta eny alespo dva rouby aby bylo zaji t no p esn polohov n a stabiln instalace 3 P ipevn te rychloup nac desti ku k foto...

Page 19: ...19 Op tovn m stisknut m tla tek rychl ho uzam en se posuvn k rozblik a posune se doleva doprava Nastavte posuvn k do r zn ch hl abyste simulovali pohyby vahadla...

Page 20: ...e desti ku kter je na stativu 4 P ipojte Micro 2 k Easylocku nasazen m polohovac ho roubu do polohovac dr ky ve tvaru U a pot ut hn te roub ze spodn sti Easylocku a dvojit polohovac rouby uvnit Micro...

Page 21: ...ub napnut emene a odpojte motor posuvn ku 2 Povolte upev ovac roub p su na horn m a doln m jezdci a odpojte z kladnu p su kolejnice 3 Namontujte sestavu kolejnicov ho p su na jezdce kolejnice Pozn mka...

Page 22: ...robku ivelnou pohromou z sahem neopr vn n osoby nebo mechanicky vinou kupuj c ho nap p i p eprav i t n nevhodn mi prost edky apod p irozen opot eben a st rnut spot ebn ho materi lu nebo sou st b hem...

Page 23: ...1522 53 Hole ovice 170 00 Praha 7 I O 27082440 P edm t prohl en N zev Motorizovan Micro 2 Model typ V e uveden v robek byl testov n v souladu s normou normami pou itou pou it mi k prok z n shody se z...

Page 24: ...ejn sb rn m sto recyklovateln ho odpadu T m e zajist te spr vnou likvidaci tohoto v robku pom ete p edej t mo n m negativn m d sledk m pro ivotn prost ed a lidsk zdrav kter by jinak mohly b t zp soben...

Page 25: ...ce pokyny a uschovajte si tento n vod na pou itie Venujte osobitn pozornos bezpe nostn m pokynom Ak m te ak ko vek ot zky alebo pripomienky k pr stroju obr te sa na linku slu ieb z kazn kom www alza...

Page 26: ...ou Sch ma motorizovan ho zariadenia Micro 2 Horn jazdec Tla idl r chleho uzamknutia Nasleduj ci zameta prachu 2 5 mm sp ac port Port USB typu C Predn tla idlo Reverzn k Indik tor nap jania Indik tor r...

Page 27: ...ierky fotoapar tu Port USB typu C Nab janie a aktualiz cie firmwaru prostredn ctvom extern ho nap jacieho adapt ra PD USB C alebo powerbanky PD Indik tor nap jania Zelen lt erven zelen dostato n lt st...

Page 28: ...nie tla idla Sp Nastavenia r chlosti Stla te raz tla idlo nap jania Nastavenie bodov trasy Stla te dvakr t tla idlo nap jania Bod nastavenia 1 zvukov sign l Nastaven bod 2 dvakr t p pne Odstr nenie v...

Page 29: ...2 Micro 2 pevne a bezpe ne pripevnite k stat vu 3 Odskrutkovan adapt r 1 4 a 3 8 naskrutkujte do oto n ho adapt ra potom pripojte oto n adapt r k zariadeniu Micro2 4 Pripevnite r chloup naciu do ti k...

Page 30: ...strany a potom utiahnite dvojit polohovate n skrutku pomocou imbusov ho k a Uistite sa e s dotiahnut aspo dve skrutky aby sa zabezpe ila presn poloha a stabiln in tal cia 3 Pripevnite r chloup naciu d...

Page 31: ...31 Op tovne stla te tla idl r chleho uzamknutia a posuvn k za ne blika a pohybova sa do ava doprava Nastavte posuvn k do r znych uhlov aby ste simulovali pohyby kyvadla...

Page 32: ...je na stat ve 4 Pripevnite zariadenie Micro 2 k z mku Easylock vlo en m polohovacej fazu ky do polohovacej dr ky v tvare p smena U a potom pomocou r chloup nacieho k a utiahnite skrutku zo spodnej ast...

Page 33: ...nt e a demont e 1 Uvo nite skrutku nap nania reme a a odpojte motor pos va a 2 Uvo nite upev ovaciu skrutku p su na hornom a dolnom jazdcovi a odpojte z klad u ko ajnicov ho p su 3 Namontujte zostavu...

Page 34: ...soby alebo mechanick ho zavinenia kupuj ceho napr po as prepravy istenia nespr vnymi prostriedkami at Prirodzen opotrebovanie a starnutie spotrebn ho materi lu alebo komponentov po as pou vania napr b...

Page 35: ...Hole ovice 170 00 Praha 7 ID 27082440 Predmet vyhl senia N zov Motorizovan Micro 2 Model typ Uveden v robok bol testovan v s lade s normou normami pou itou na preuk zanie zhody so z kladn mi po iadav...

Page 36: ...n zbern miesto recyklovate n ho odpadu Zabezpe en m spr vnej likvid cie tohto v robku pom ete pred s mo n m negat vnym n sledkom na ivotn prostredie a udsk zdravie ktor by inak mohli by sp soben nespr...

Page 37: ...kat s rizze meg ezt a haszn lati tmutat t a k s bbi haszn latra Ford tson k l n s figyelmet a biztons gi utas t sokra Ha b rmilyen k rd se vagy szrev tele van a k sz l kkel kapcsolatban k rj k fordulj...

Page 38: ...hib s m k d sb l ered k rokat Motoriz lt Micro 2 diagram Fels cs szka Gyors reteszel gombok K vetkez Porsepr 2 5 mm es z rkiold port USB Type C port El re billenty Visszafel kulcs T pjelz Sebess gjelz...

Page 39: ...rkiold k belen kereszt l csatlakozik a f nyk pez g p z rj nak vez rl s hez USB Type C port K ls PD USB C h l zati adapterrel vagy PD t pegys ggel t lthet s friss thet a firmware T pjelz Z ld s rga pir...

Page 40: ...meg a Vissza gombot Sebess g be ll t sa Nyomja meg egyszer a bekapcsol gombot tic lok be ll t sa Nyomja meg k tszer a bekapcsol gombot Be ll t si pont 1 S pol hang Be ll t si pont 2 k tszeres hangjelz...

Page 41: ...l 2 Szerelje a Micro 2 t szorosan s biztons gosan az llv nyra 3 Csavarozza a kicsavart adaptert 1 4 r l 3 8 ra a pan tiltbe Ezut n szerelje a pan tiltet a Micro2 re 4 Csatlakoztassa a gyorskiold lemez...

Page 42: ...majd a kett s pozicion l csavarokat h zza meg a bels hatlapos kulccsal Gy z dj n meg r la hogy legal bb k t csavar van megh zva a pontos pozicion l s s a stabil telep t s rdek ben 3 Csatlakoztassa a...

Page 43: ...43 Nyomja meg jra a gyorsz r gombokat a cs szka balra jobbra cs sztat s nak felold s hoz ll tsa a cs szk t k l nb z sz gekbe hogy szimul lja a leng kar mozg s t...

Page 44: ...z llv nyon van 4 Csatlakoztassa a Micro 2 t az Easylockhoz gy hogy a pozicion l babot a pozicion l horonyba illeszti U alak majd az Easylock alj n l v csavart s a Micro 2 belsej ben l v kett s pozicio...

Page 45: ...z tsa meg a sz jfesz t csavart s vegye le a cs sz motort 2 Laz tsa meg a fels s als cs szka sz jr gz t csavarj t s vegye le a s nszalag sz jtalp t 3 Szerelje fel a s nszalag sz jegys get a s ncs sz ra...

Page 46: ...em ly beavatkoz sa vagy a vev hib j b l bek vetkezett mechanikai s r l s pl sz ll t s sor n nem megfelel eszk z kkel t rt n tiszt t s stb A fogy eszk z k vagy alkatr szek term szetes elhaszn l d sa s...

Page 47: ...3 Hole ovice 170 00 Pr ga 7 I O 27082440 A nyilatkozat t rgya C m Motoriz lt Micro 2 Modell t pus A fenti term ket az ir nyelv ek ben meghat rozott alapvet k vetelm nyeknek val megfelel s igazol s hoz...

Page 48: ...hullad kok nyilv nos gy jt hely n Azzal hogy gondoskodik a term k megfelel rtalmatlan t s r l seg t megel zni a k rnyezetre s az emberi eg szs gre gyakorolt esetleges negat v k vetkezm nyeket amelyek...

Page 49: ...ahren Sie diese Bedienungsanleitung zum sp teren Nachschlagen auf Beachten Sie insbesondere die Sicherheitshinweise Wenn Sie Fragen oder Kommentare zum Ger t haben wenden Sie sich bitte an den Kundens...

Page 50: ...tes Micro 2 Diagramm Oberer Schieberegler Schnellverriegelungstasten Folgende Staubkehrer 2 5 mm Ausl seranschluss USB Typ C Anschluss Vorw rts Taste R ckw rts Taste Energie Anzeige Geschwindigkeitsan...

Page 51: ...iten 2 5 mm Ausl seranschluss Schieberegler wird ber ein Ausl sekabel an die Kamera angeschlossen um den Kameraverschluss zu steuern USB Typ C Anschluss Kann ber einem externen PD USB C Netzteil oder...

Page 52: ...s Dr cken der Vorw rts Taste R ckw rts Langes Dr cken der R ckw rtstaste Geschwindigkeitsanpassung Einschalttaste einmal dr cken Wegpunkte setzen Dr cken Sie zweimal die Power Taste Einstellpunkt 1 Pi...

Page 53: ...ie den ungeschraubten Adapter 1 4 auf 3 8 in den Schwenk Neigekopf dann montieren Sie den Schwenk Neigekopf am Micro2 4 Bringen Sie die Schnellwechselplatte an der Kamera an 5 Befestigen Sie die Kamer...

Page 54: ...zise Positionierung und eine stabile Installation zu gew hrleisten 3 Bringen Sie die Schnellwechselplatte an der Kamera an 4 Montieren Sie die Schwenk und Neigevorrichtung an Micro 2 5 Befestigen Sie...

Page 55: ...n der Wippe zu simulieren Verbindungsmodus mit EASYLOCK 1 L sen Sie die Sicherungsschraube am Easylock 2 Klappen Sie den St tzfu aus und bringen Sie ihn in die gew nschte Position 3 Montage auf dem St...

Page 56: ...spannschl ssel festziehen Achten Sie bitte darauf dass mindestens zwei Schrauben angezogen werden um eine pr zise und stabile Installation zu gew hrleisten 5 Montieren Sie die Schwenk und Neigevorrich...

Page 57: ...ts Besch digung des Produkts durch eine Naturkatastrophe das Eingreifen einer unbefugten Person oder mechanisch durch Verschulden des K ufers z B beim Transport bei der Reinigung durch unsachgem e Mit...

Page 58: ...le ovice 170 00 Prag 7 ID Nummer 27082440 Gegenstand der Erkl rung Titel Motorisiertes Micro 2 Modell Typ Das oben genannte Produkt wurde nach der den Norm en gepr ft die zum Nachweis der Einhaltung d...

Page 59: ...ndem Sie sicherstellen dass dieses Produkt ordnungsgem entsorgt wird tragen Sie dazu bei m gliche negative Folgen f r die Umwelt und die menschliche Gesundheit zu vermeiden die andernfalls durch eine...

Reviews: