Page 59
After changing a parameter, press ENTER to confirm data when requested by the mes-
sage on the console. Parameters modified and optimized on one unit can be stored by the
Zapi Pc-console (SAVE) and then downloaded (RESTORE) to another controller, thus
allowing fast and standardized settings (see Pc-console manual for details).
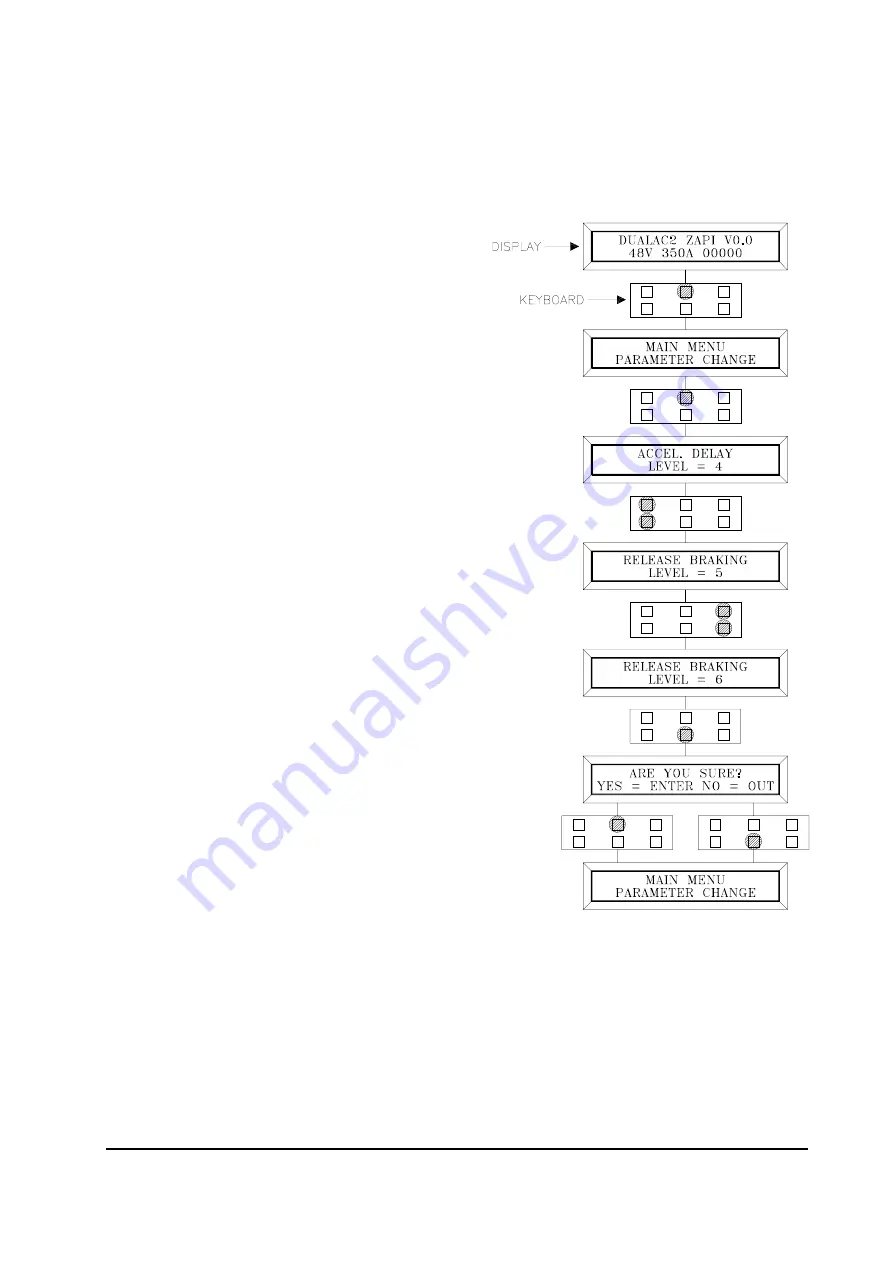
Flow Chart showing how to make Parameter changes using Digital Console fitted with
Eprom CK ULTRA.
1) Opening Zapi Display.
2) Press ENTER to go into the General
Menu.
3) The Display will show :
4) Press ENTER to go into the
Parameter Change facility.
5) The Display will show the first
parameter.
6) Press either ROLL UP and ROLL DOWN
to display the next parameter.
7) The names of the Parameters appear
on the Display.
8) When the desired Parameter appears, the
Display will show a Level Number that will
be between 0 and 9. Press either PARAM
(Top Right) or SET (Bottom Right)buttons
to change the Level value.
9) The Display will show the New Level.
10) When you are satisfied with the results of
the changes you have made, Press OUT.
11) The Display asks “ ARE YOU SURE"?
12) Press ENTER to accept the changes, or
press OUT if you do not wish to accept the
changes and wish to make further
modifications to the parameters.
13) The Display will show :
Summary of Contents for DUALAC2
Page 32: ...Page 32 4 9 MECHANICAL DRAWING Dimensions of Dualac2...
Page 33: ...Page 33 Dimensions of Dualac2 Power...
Page 34: ...Page 34 Dimensions of Dualac2 hp...
Page 35: ...Page 35 Dimensions of Dualac2 hp Power...
Page 36: ...Page 36 4 10 CONNECTION DRAWING DUALAC2 AND DUALAC2 POWER STANDALONE...
Page 37: ...Page 37 4 11 CONNECTION DRAWING DUALAC2 HP AND DUALAC2 HP POWER STANDALONE...
Page 40: ...Page 40 5 3 1 b Slave...
Page 41: ...Page 41 5 3 2 Dualac2 hp and Dualac2 hp Power menu configuration 5 3 2 a Master...
Page 42: ...Page 42 5 3 2 b Slave...


