


At this point you should have:
• Secure power and ground connections to all system components with fuses at each component and
a fuse or fuses at the main feed close to the battery.
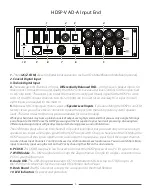
• The main input at either the RCA or Spk level input connected, and the input switches are set accordingly.
• Any Auxiliary input cables (RCA or Digital) are run and connected.
• The dash remote cable is run and connected.
• All amplifiers cables and turn-on wires are run and connected. All the amplifier gain controls should
be set to minimum at this time but the amplifier signal cables should not be plugged into the HDSP.
You can now re-connect the negative battery terminal and prepare for system set-up.
First: Input Sensitivity for Radio/CD Head Unit
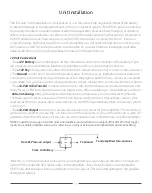
To get the best possible signal to noise ratio and the widest dynamic range, you want the HDSP to
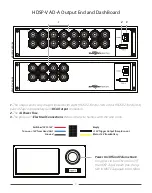
receive the strongest undistorted signal it can accept. To aid in this, Zapco provides a gain pot and Clip
LED for each channel accessed under the top cover as seen earlier in the manual. The first step is to
ensure that the Input switch is in the correct position for either MAIN (RCA) or OEM (Speaker level).
Check that all tone controls are off and balance controls, and fader controls are set "0" or Center. To set
the gains you will turn the system on and watch the LEDs in the gain panel on the top of the DSP.
Remember: the amplifier RCAs are not plugged in yet, so there will be no sound. You're just watching the LEDs
To properly set the gains you want to play the most dynamic (usually the loudest) piece of music you are
likely to listen to and play it at the highest volume your head unit can play cleanly. If you are unsure about
what that volume is, you can consider that most modern head units will play cleanly to about 80% of the
volume control, so a little over 3/4 volume. With the volume at this level you can begin adjusting the gain
pots up starting with Channels 1/2. Slowly turn the gain pots up until the red LED just flashes and then
back off just slightly. The red LED tells you the signal is in the distorted area. At the final position you want
the level as high as it can be without flashing the red LED. Of course you need to adjust only those channels
you are actually using for input. Most systems with aftermarket head units will only use the inputs Ch1/2.
After you have set the input for the active input channels, be sure to turn the head unit volume back to minimum to
avoid bad surprises later, and then turn the system off.
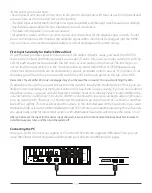
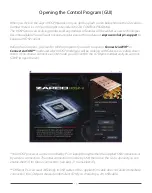
Connecting the PC
Now you should connect your Laptop or PC to the HDSP with the supplied USB cable. Then you can
open the Digital Control Program and familiarize yourself with the different GUI pages.
14