background image

3

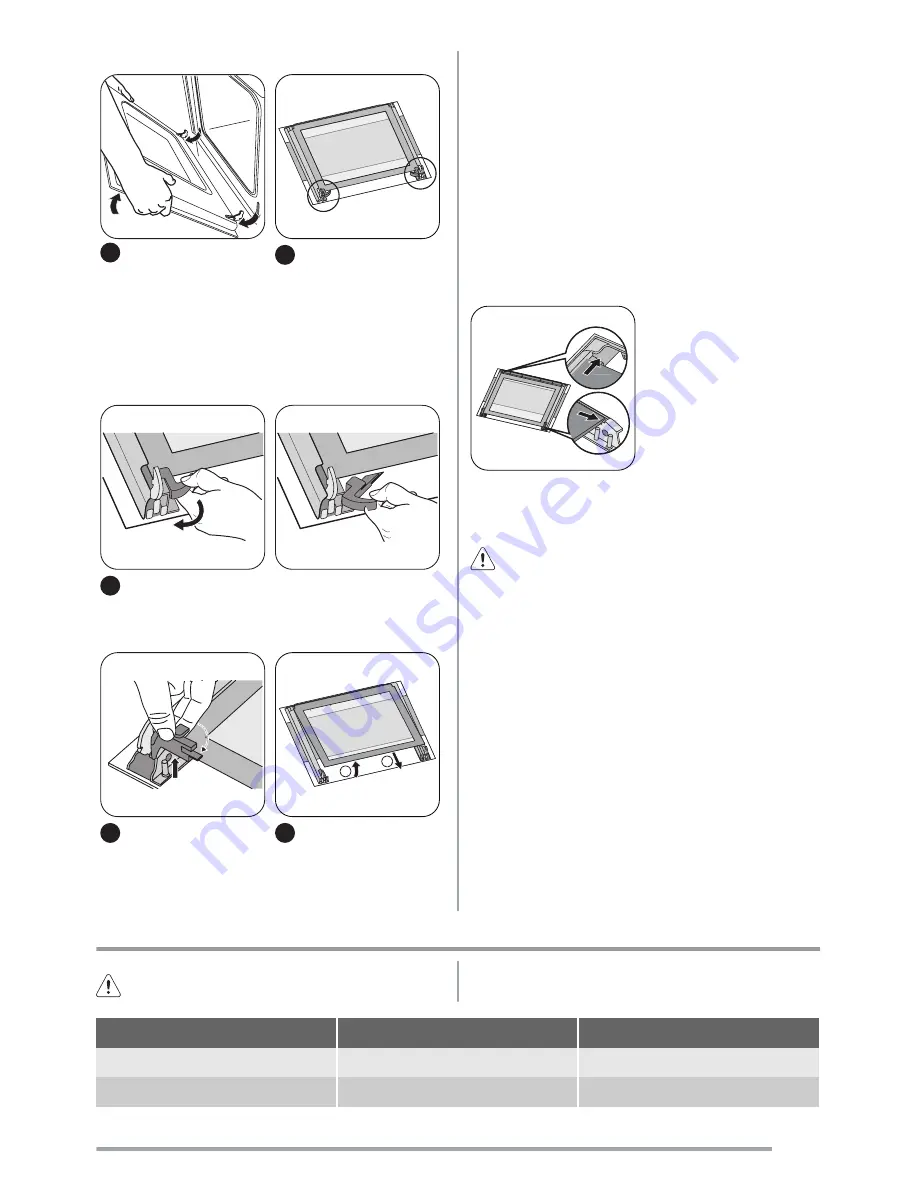
 Close the oven door to

the first opening position

(halfway). Then pull for-

ward and remove it from

its seat. Place the door on

a stable surface protected

by a soft cloth.

4

 Place the door on a

stable surface protected

by a soft cloth.

5

 Release the locking

system to remove the in-

ternal panel of glass.

90°

6

 Turn 2 fasteners by

90° and remove them from

their seats.

1

2

7

 Carefully lift and re-

move the panel of glass.

Clean the glass panel with water and soap. Dry the glass

panel carefully.

Installing the door and the glass panel
After cleaning, install the glass panel in opposite order.

Make sure that when you install the internal panel with a

decorative frame, the screen-printing is on the outer side.

Make sure that the surface of the glass panel frame is not

rough when you touch it.

Make sure that you put the internal panel of glass to the

correct seats (refer to the picture).

Replacing the oven light bulb/cleaning the glass

cover

Warning!  Be careful! There is the risk of electrical

shock!

1. Turn the glass cover anti-clockwise to remove it.
2. Clean the glass cover.
3. Replace the oven light bulb with applicable 300°C

heat-resistant oven light bulb. New oven light bulb

must have the same parameters as your previous one.

4. Install the glass cover.

What to do if…

Warning!  Refer to "Safety information" chapter.

Problem

Possible cause

Remedy

The oven does not heat up

The oven is not switched on

Switch on the oven

The oven does not heat up

The clock is not set

Set the clock


11

Summary of Contents for ZOB 343

Page 1: ...EN User manual Oven ZOB 343 ...

Page 2: ...pliance There is the risk of injury and damage to the appliance Do not let the appliance stay unattended during oper ation Switch off the appliance after each use Installation Only an approved electrician can install and connect theappliance Contactanapprovedservicecentre This is to prevent the risks of structural damage or physical injury Make sure that the appliance is not damaged because of tra...

Page 3: ... or install the accessories to prevent damage to the oven enamel Always stay away from the appliance when you open the door while the appliance is in operation Hot steam can release There is the risk of skin burns To prevent damage or discoloration to the enamel donotputanyobjectsdirectlyontheappliancefloor and do not cover it with aluminium foil do not put hot water directly into the appliance do...

Page 4: ... This prevents children or small animals from being closed inside of the ap pliance There is the risk of suffocation Product description General overview 1 2 3 5 6 7 8 9 10 4 1 Control panel 2 Temperature indicator 3 Temperature control knob 4 Display 5 Oven function control knob 6 Air vents for the cooling fan 7 Heating element 8 Oven lamp 9 Rating plate 10 Fan Oven accessories Oven shelf For coo...

Page 5: ...e Clean the appliance before first use Caution Do not use abrasive cleaning agents This can damage the surface Refer to chapter Care and Cleaning Daily use Warning Refer to Safety information chapter Switching the Oven On and Off 1 Turn the oven functions control knob to an oven function 2 Turn the temperature control knob to a temperature The temperature indicator comes on while the oven temperat...

Page 6: ...il nec essary function indicator flashes 2 To set the time for Minute minder Duration or End press or button The related function indicator comes on When the time period ends the function indicator flashes and an acoustic signal sounds for 2 minutes With the functions Duration and End the oven switches off automatically 3 Press any button to stop the signal 4 Turn the oven function control knob an...

Page 7: ...use of the appliance Do not put the objects directly on the appliance floor and do not cover the components with aluminium foil whenyoucook Thiscanchangethebakingresultsand damage the enamel coating Baking cakes The best temperature for baking cakes is between 150 C and 200 C Preheat the oven for approximately 10 minutes before baking Donotopentheovendoorbefore3 4ofthesetcooking time is up If you ...

Page 8: ...60 50 60 In bread tin 1 Small cakes 3 1 and 3 160 20 30 On flat baking tray Biscuits 3 150 20 30 On flat baking tray1 Meringues 3 100 90 120 On flat baking tray Buns 3 180 15 20 On flat baking tray1 Choux 3 180 25 35 On flat baking tray1 Plate tarts 2 170 45 70 In cake mould 20 cm Victoria sandwich 2 170 40 55 Left right in cake mould 20 cm 1 Preheat for 10 minutes BREAD AND PIZZA TYPE OF DISH Fan...

Page 9: ...oven shelf and deep roasting pan English roast beef me dium 2 200 51 55 On oven shelf and deep roasting pan English roast beef well done 2 200 55 60 On oven shelf and deep roasting pan Shoulder of pork 2 170 120 150 On deep roasting pan Shin of pork 2 160 100 120 2 pieces on deep roasting pan Lamb 2 190 110 130 Leg Chicken 2 200 70 85 Whole on deep roasting pan Turkey 1 160 210 240 Whole on deep r...

Page 10: ... 2 2 1000 3 250 30 35 25 30 Kebabs 4 3 250 10 15 10 12 Breast of chicken 4 400 3 250 12 15 12 14 Hamburger 6 600 3 250 20 30 Fish Fillet 4 400 3 250 12 14 10 12 Toasted sandwiches 4 6 3 250 5 7 Toast 4 6 3 250 2 4 2 3 Care and cleaning Warning Refer to Safety information chapter Cleaning the oven door The oven door has two panels of glass installed one be hind the other You can remove the glass pa...

Page 11: ...el with a decorative frame the screen printing is on the outer side Make sure that the surface of the glass panel frame is not rough when you touch it Make sure that you put the internal panel of glass to the correct seats refer to the picture Replacing the oven light bulb cleaning the glass cover Warning Be careful There is the risk of electrical shock 1 Turn the glass cover anti clockwise to rem...

Page 12: ...ws 12 00 A power cut Reset the clock If you cannot find a solution to the problem yourself contact your dealer or the service centre The necessary data for the service centre is on the rating plate The rating plate is on the front frame of the oven cavity We recommend that you write the data here Model MOD Product number PNC Serial number S N Installation Warning Refer to Safety information chapte...

Page 13: ...c equipment By ensuring this product is disposed of correctly you will help prevent potential negative consequences for the environment and human health which could otherwise be caused by inappropriate waste handling of this product For more detailed information about recycling of this product please contactyourlocalcouncil yourhouseholdwastedisposal service or the shop where you purchased the pro...

Page 14: ...14 ...

Page 15: ...15 ...

Page 16: ...www zanussi com shop 397152701 C 032010 ...

Reviews: