background image

REPLACEMENT OF THE CONNECTION

CABLE

The replacement of electric cable must

be carried out exclusively by the

service force centre or by personnel

with similar competencies, in

accordance with the current

regulations.

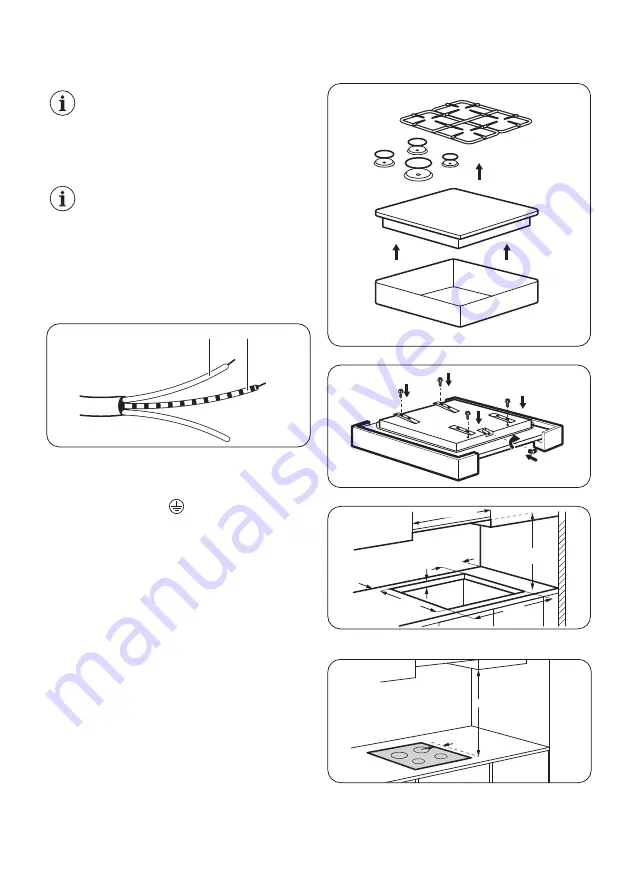
To replace the connection cable use

only H03V2V2-F T90 or equivalent

type. Make sure that the cable section

is applicable to the voltage load and

the working temperature. The yellow/

green earth wire (B) must be

approximately 2 cm longer than the

live and neutral wire (A).

A

B

1. Connect the green and yellow (earth) wire to

the terminal which is marked with the letter 'E',
or the earth symbol  , or coloured green and

yellow.

2. Connect the blue (neutral) wire to the terminal

which is marked with the letter 'N' or coloured

blue.

3. Connect the brown (live) wire to the terminal

which is marked with the letter 'L'. It must

always be connected to the network phase.

There must be no cut or stray strands of wire

present. The cord clamp must be correctly

attached to the outer sheath.

ASSEMBLY
1.

2.

3.

min. 55 mm

min. 650 mm

560 mm

min. 100 mm

30 mm

480 mm

min. 600 mm

4.

50 mm

400 mm

13

Summary of Contents for ZGX65414

Page 1: ...GETTING STARTED EASY User Manual ZGX65414 EN User Manual Hob GB ...

Page 2: ...y Keep children and pets away from the appliance when it operates or when it cools down Accessible parts are hot If the appliance has a child safety device this should be activated Children shall not carry out cleaning and user maintenance of the appliance without supervision Children aged 3 years and under must be kept away from this appliance when it is in operation at all times GENERAL SAFETY W...

Page 3: ...milarly qualified persons in order to avoid a hazard Where the appliance is directly connected to the power supply an all pole isolating switch with a contact gap is required Complete disconnection in compliance with the conditions specified in overvoltage category III must be guaranteed The earth cable is excluded from this When you route the mains cable make sure that the cable doesn t come into...

Page 4: ...le Make sure that a shock protection is installed Use the strain relief clamp on the cable Make sure the mains cable or plug if applicable does not touch the hot appliance or hot cookware when you connect the appliance to the near sockets Do not use multi plug adapters and extension cables Make sure not to cause damage to the mains plug if applicable or to the mains cable Contact our Authorised Se...

Page 5: ...rs Make sure the flame does not go out when you quickly turn the knob from the maximum to the minimum position Use only the accessories supplied with the appliance Do not install a flame diffuser on the burner The use of a gas cooking appliance results in the production of heat and moisture Provide good ventilation in the room where the appliance is installed Prolonged intensive use of the applian...

Page 6: ...4 1 Semi rapid burner 2 Rapid burner 3 Auxiliary burner 4 Control knobs CONTROL KNOB Symbol Description no gas supply off position ignition position maximum gas supply Symbol Description minimum gas supply DAILY USE WARNING Refer to Safety chapters 6 ...

Page 7: ...s release the control knob turn it into off position and try to light the burner again after minimum 1 minute CAUTION In the absence of electricity you can ignite the burner without electrical device in this case approach the burner with a flame turn the control knob counter clockwise to maximum gas supply position and push it down Keep the control knob pushed for equal or less than 10 seconds to ...

Page 8: ...and the frame if applicable Wash stainless steel parts with water and then dry them with a soft cloth PAN SUPPORTS The pan supports are not resistant to washing in a dishwasher They must be washed by hand 1 Remove the pan supports to easily clean the hob Be very careful when you replace the pan supports to prevent the hob top from damage 2 The enamel coating occasionally can have rough edges so be...

Page 9: ...in and again contact a qualified electrician Burner cap and crown are placed incorrectly Place the burner cap and crown correctly The flame extinguishes immedi ately after ignition Thermocouple is not heated up sufficiently After lightning the flame keep the knob pushed for equal or less than 10 seconds The flame ring is uneven Burner crown is blocked with food residues Make sure that the injector...

Page 10: ...urrent Edition and the IEE Wiring Regulations Current Edition For appliances installed in the Republic of Ireland please refer to NSAI Domestic Gas Installation I S 813 Current Editions and the ETCI Rules for Electrical Installations Provision for ventilation Detailed recommendations are contained in the following British Standards Codes Of Practice B S 6172 B S 5440 Par 2 and B S 6891 Current Edi...

Page 11: ...id pipe i e steel or copper The connection should be suitable for connecting to R 1 2 1 2 BSP male thread When the final connection has been made it is essential that a thorough leak test is carried out on the hob and installation Make sure that the main connection pipe does not exert any strain on the hob If you use flexible metal pipes make sure that they agree to ISO 10380 and ISO 10807 standar...

Page 12: ...n e g your local Electricity Board or a contractor who is on the roll of the National Inspection Council for Electrical Installation Contracting NICEIC The manufacturer refuses to be held responsible if these safety measures are not abided by Supply connections This hob has to be connected to 220 240 V 50 60 Hz electricity supply The hob has a terminal block which is marked as follows L Live termi...

Page 13: ...ely 2 cm longer than the live and neutral wire A A B 1 Connect the green and yellow earth wire to the terminal which is marked with the letter E or the earth symbol or coloured green and yellow 2 Connect the blue neutral wire to the terminal which is marked with the letter N or coloured blue 3 Connect the brown live wire to the terminal which is marked with the letter L It must always be connected...

Page 14: ...OR INSERTION The panel installed below the hob must be easy to remove and let an easy access in case a technical assistance intervention is necessary Kitchen unit with door or drawer min 6 mm min 5 mm max 150 mm min 30 mm 60 mm B A A Removable panel B Space for connections Kitchen unit with oven The electrical connection of the hob and the oven must be installed separately for safety reasons and t...

Page 15: ...g fitted with a 3 amp car tridge fuse Appliance category II2H3 Gas connection R 1 2 Appliance class 3 GAS BURNERS FOR NATURAL GAS G20 20 MBAR BURNER NORMAL POWER kW MINIMUM POWER kW INJECTOR MARK Rapid 2 9 0 75 119 Semi rapid 1 9 0 45 96 Auxiliary 1 0 0 33 70 GAS BURNERS FOR LPG G30 G31 28 30 37 MBAR BURNER NORMAL POWER kW MINIMUM POWER kW INJECTOR MARK NOMINAL GAS FLOW g h G30 28 30 mbar G31 37 m...

Page 16: ...rrectly Use cookware with diameters applicable to the size of burners Center the pot on the burner When you heat up water use only the amount you need If it is possible always put the lids on the cookware When the liquid starts to boil turn down the flame to barely simmer the liquid If it is possible use a pressure cooker Refer to its user manual ENVIRONMENTAL CONCERNS Recycle the materials with t...

Page 17: ...17 ...

Page 18: ...18 ...

Page 19: ...19 ...

Page 20: ...WWW ZANUSSI COM SHOP 867321990 C 012017 ...

Reviews: