


How to apply
• Before attaching this product, carefully read the “Precautions for use - Be sure to read this” section. Then follow the steps provided to ensure the
product is correctly attached.
• The steps below use the right leg for reference. Follow the same steps for the left leg.
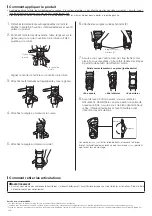
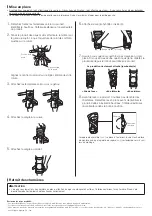
1.
Unfasten all the hook-and-loop fasteners of the product.
Confirm the top/bottom, inside/outside, and front/back of
the product.
2.
Hold the product with both hands and slide it up to your
knee until the patella opening fits the patella.
Position of patella
Center line of patella
Align the center of the product with the center line of your
patella.
3.
Fasten the hook-and-loop fasteners below the knee.
4.
Fasten the strap at the thigh.
5.
Fasten the strap at the calf.
6.
Fasten the hybrid-cross (X) strap.
Hybrid-cross (X) strap
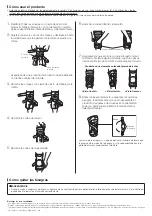
7.
Make sure that the product is not loose or out of place.
If you feel any discomfort, repeat the steps from the
beginning to reattach the product.
<Front view>
<Side view>
<Back view>
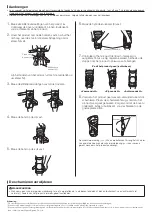
8.
Before washing this product, be sure to remove the
hinges. Insert them before using again. Be sure to insert
the top/bottom, inside/outside, front/back in the correct
position.
Hinge
Hinge Mark
The hinge mark (>>>) comes outside. Insert it so that the corner of
hinge mark (>>>) faces the front when mounting.
How to remove the hinges
WARNING
• When reattaching a hinge, be sure top/bottom, inside/outside, front/back are not mistaken. Otherwise, the product may not function properly.
Disclaimer:
* The product specifications and appearance are subject to change without notice for the purpose of improvement.
* When disposing of this product, be sure to follow all disposal ordinances and regulations as specified by the local government.
* We take all possible measures to ensure product quality, however, if you find any defects, etc. in our products, please contact Nippon Sigmax Co., Ltd.
“ZAMST” and “ZAMST logo” are trademarks or registered trademarks of Nippon Sigmax Co., Ltd in Japan, the United States and other countries.
The product correctly fastened (right leg)


