background image


DOC-USR-0151-01 


___________________________________________________________________________________________ 

Z3 Technology, LLC 

 100 N 8

th

 ST, STE 250 

 Lincoln, NE 68508-1369 USA 

 +1.402.323.0702 

33 

6.14


Recording to USB 

The DME-05 supports writing encoded video to a storage device connected to the USB port in .ts file 

format. 


(1)


Verify the encoder is connected to an SDI or an HDMI video source. 

(2)


Open the user interface (See Section 6.3). 

(3)


Connect a USB flash drive or other USB storage device to “USB” on the back of the encoder. 

*Note: 

The USB drive must be formatted in either FAT32, VFAT, EXT3, or EXT4 format.


(4)


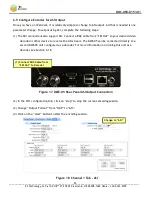
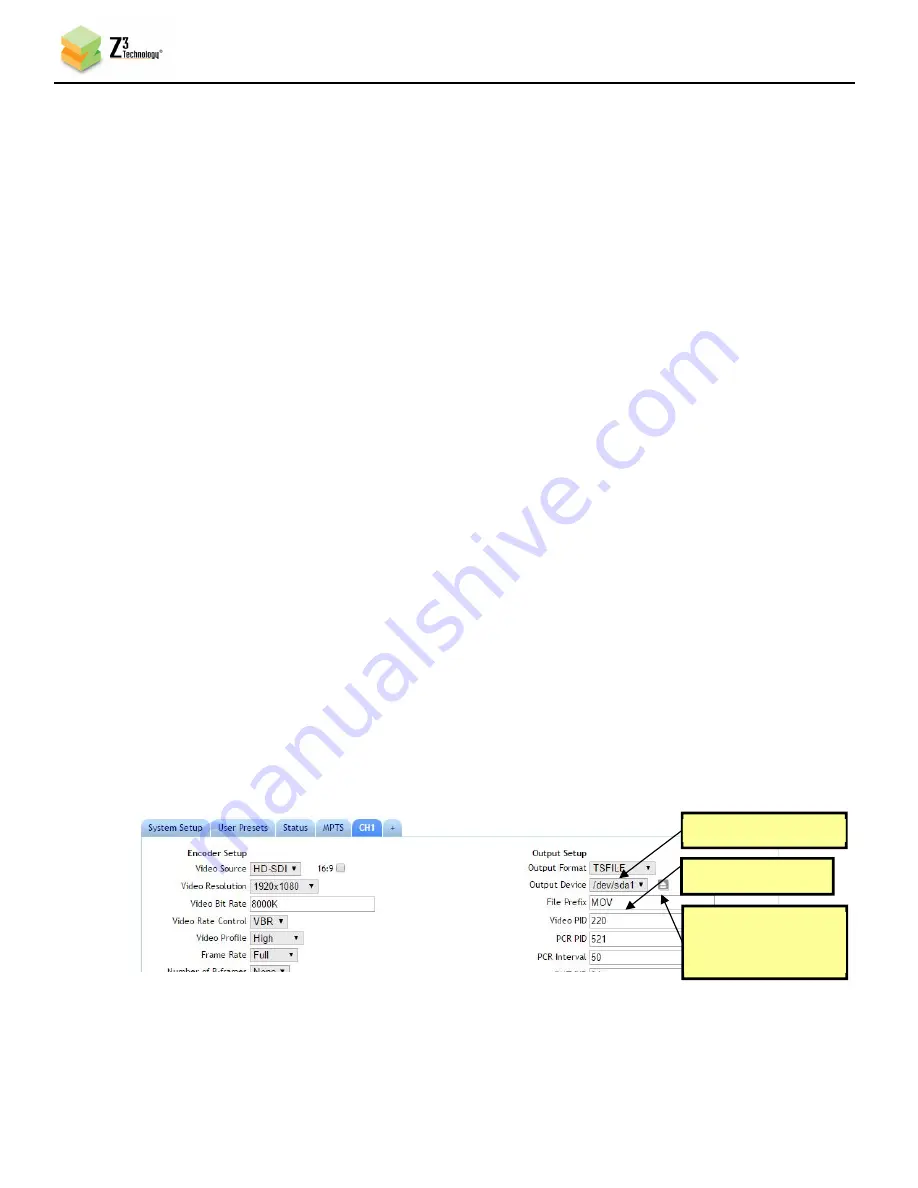
Return to the user interface channel tab and select “TSFILE” from the “Output Format” dropdown 

menu. 

(5)


The “Output Device” and “File Prefix” fields appear.  Click on the “Output Device” field to select 

your USB storage location. This will automatically populate if a USB is detected. 


If one USB device is connected, “/dev/sda1” corresponds to either USB port. If two USB devices are 

connected, “/dev/sda1” corresponds to USB device that was connected first and “/dev/sdb1” 

corresponds to the USB device that was connected second. Only one device can be selected at a time for 

each channel. 


(6)


In the “File Prefix” textbox, enter the desired prefix for your .ts file name.  

(a)


When saved, a number will be automatically generated and added to the end of the file prefix, 

starting with zero. If subsequent recordings are made to the same USB device, existing files with 

the same prefix will be detected and the new recordings will auto-increment to the next number. 

(b)


For example, by default, the prefix “MOV” is provided. This will result in a file entitled 

“MOV0.ts” on the USB. Subsequent recordings will be entitled “MOV1.ts”, “MOV2.ts”, etc. 


(7)


When finished, click the eject button next to the “Output Device” field. An alert will appear when 

the USB is able to be removed safely. 


Figure 29  CH1 Tab Configuration – TSFILE 

(4) Set to “TSFILE” 

(7) When finished,  
      click the eject  
      button 

(5) Set File Prefix 

Summary of Contents for DME-05

Page 1: ...y LLC Z3 This document may not be used reproduced disclosed or disseminated to anyone without the prior written approval of an authorized representative of Z3 Z3 reserves the right to change this prod...

Page 2: ...______________________________________________________________________ Z3 Technology LLC 100 N 8th ST STE 250 Lincoln NE 68508 1369 USA 1 402 323 0702 2 Revision History Version Date Change Note Autho...

Page 3: ...nd Power up the DME 05 12 6 3 Find the Encoder Using ZFinder 13 6 4 Configure Encoder for UDP Streaming 14 6 5 View a UDP Stream in VLC 16 6 6 Configure Encoder for RTP RTSP Streaming 17 6 7 View an R...

Page 4: ...Settings 47 8 2 Using a Static IP Address 48 8 3 Advanced Settings Mode 51 8 4 Making a Firmware Update 53 8 5 Using the Password Feature 55 9 0 SUMMARY OF OPTIONS 56 9 1 The System Setup Tab 56 9 2 T...

Page 5: ...Engine 20 Figure 13 Getting to the Wowza Test Player 21 Figure 14 Viewing Content on Wowza 22 Figure 15 YouTube Live Dashboard Encoder Setup 23 Figure 16 Channel 1 Tab RTMP Streaming to YouTube Live 2...

Page 6: ...udio for HDMI Output 44 Figure 47 DME 05 SDI Output Connection for Decode 44 Figure 48 Set Display for SDI Output 45 Figure 49 Set Audio for SDI Output 45 Figure 50 Enabling Pro MPEG FEC Decode for TS...

Page 7: ...deo up to 1080p at 60 frames per second The DME 05 is a cost effective system suitable for broadcast encoders and IP streaming The DME 05 provides immediate access to multi format HD video integrated...

Page 8: ...e an ASI stream Information is also provided on how to change bitrate dynamically how to adjust the UDP TS rate tuning for latency streaming in multiple resolutions recording to USB and utilizing vari...

Page 9: ...100 N 8th ST STE 250 Lincoln NE 68508 1369 USA 1 402 323 0702 9 3 0 PACKAGE CONTENTS DME 05 12V2 5A Power Adapter BNC to BNC Cable HDMI Cable Serial Cable Gender Changer Note The serial cable is inclu...

Page 10: ...to 1Gb Ethernet USB 2 0 x2 RS 232 Outputs MPEG 2 Transport Stream RTP RTMP TSRTP or TS File HTTP based configuration software for user friendly configuration and control RS 232 serial port for techni...

Page 11: ...____________________________ Z3 Technology LLC 100 N 8th ST STE 250 Lincoln NE 68508 1369 USA 1 402 323 0702 11 RS 232 Serial 3G SDI ASI Output1 3G SDI ASI Input 12V Power HDMI Input2 HDMI Output 2x U...

Page 12: ...se pictured in this document 6 1 Set up the SDI Video Source 1 Select an HD source with SDI output a Power on the HD source b Connect the HD source via SDI to a monitor c Set the HD Source to 1080p60...

Page 13: ...you will be unable to proceed further 2 Run the ZFinder PC Utility on your Windows PC The ZFinder window appears ZFinder then completes a scan of the network and lists the location of all Z3 systems...

Page 14: ...tion supports HD SDI resolutions and 3G SDI resolutions 3 Set the Video Resolution to 1920x1080 or Follow Input 4 Set Output Format to UDP 5 You can set the Dest Address to a the IP address of your PC...

Page 15: ...creen If the encoder is already running click on stop and then start to confirm the specified values are in effect Note By default a limited selection of video encoding settings are available in the u...

Page 16: ...ia player on your PC version used by Z3 2 1 5 2 Select Media Open Network Stream In the box type udp 192 168 0 6 5004 where 192 168 0 6 matches the values of the computer IP address or multicast addre...

Page 17: ...hange Output Format from UDP to RTP RTSP When RTP RTSP is selected the encoder will send an RTP stream using the Dest Address and Dest Port listed in the user interface If RTSP will be used exclusivel...

Page 18: ...your encoder to a static IP address this should match the Local IP Address field in the System Setup tab In the example pictured the encoder was assigned 192 168 1 102 at start up b ch corresponds to...

Page 19: ...configuration tab click on stop to stop the current encoding session 2 Set Output Format to RTMP 3 For Dest Address type IP_Address port app stream_name a IP_Address will be the IP address of the PC w...

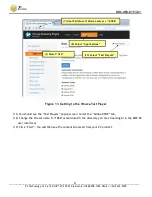
Page 20: ...network as the Wowza server and open a web browser in this example FireFox is used Type in the URL of the Wowza server with the port 8088 in this example 192 168 0 4 8088 This will bring up the Wowza...

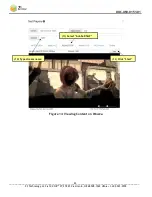
Page 21: ...ou should see the Test Players popup screen Select the Adobe RTMP tab 12 Change the Stream name to 1080 should match the directory you are streaming to in the DME 05 user interface 13 Click Start You...

Page 22: ...__________________________________________________________________ Z3 Technology LLC 100 N 8th ST STE 250 Lincoln NE 68508 1369 USA 1 402 323 0702 22 Figure 14 Viewing Content on Wowza 11 Select Adobe...

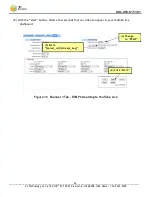
Page 23: ...Set Output Format to RTMP 5 For Dest Address type server_url stream_key a server_url will be the value specified in your YouTube Live dashboard b stream_key will be the value specified in your YouTub...

Page 24: ...___ Z3 Technology LLC 100 N 8th ST STE 250 Lincoln NE 68508 1369 USA 1 402 323 0702 24 9 Click the start button Allow a few seconds for your video to appear in your YouTube live dashboard Figure 16 Ch...

Page 25: ...connections also support ASI Connect a BNC cable from SDI Out to your desired video decoder or other device to receive the ASI stream The DME 05 can be connected directly to a second DME 05 unit confi...

Page 26: ...button to stop any current encoding At the CH1 tab change the Video Source to HDMI1 using the dropdown menu Verify your remaining settings are as desired See Section 9 0 for a detailed list of all opt...

Page 27: ...trate or frame rate without stopping and restarting the encoder To observe this feature complete the following steps 1 In VLC click on Tools and select Codec Information This brings up a window with f...

Page 28: ...and the quality of the picture in VLC change If you click on the Status tab and click Refresh you will also see the updated bitrate reflected The parameter Frame Rate can also be updated dynamically...

Page 29: ...wever when it is desirable to make this value higher For example if the encoder bitrate is very low below 1Mbps it is advisable to allow more leeway in the event there are some challenging scenes to e...

Page 30: ...Media Information Statistics tab see Section 6 8 You will see a lower value for the overall input rate and for the content rate The value of TS Rate must be higher than video bitrate audio bitrate 1...

Page 31: ...causes latency to increase accordingly To minimize latency this value should be set to the lowest possible value The lowest value Z3 recommends is 100 Note that lowering this value will also cause qua...

Page 32: ...expense of increased network burstiness set TS Lowlat Mode to True This is enabled by default To ensure smoothest playback and reduce loading on network set TS Lowlat Mode to False This must be set t...

Page 33: ...d If one USB device is connected dev sda1 corresponds to either USB port If two USB devices are connected dev sda1 corresponds to USB device that was connected first and dev sdb1 corresponds to the US...

Page 34: ...encoder is connected to an SDI or an HDMI video source 2 Open the user interface See Section 6 3 3 Connect a USB flash drive or other USB storage device to USB on the back of the encoder Note The USB...

Page 35: ...e settings 1 Verify the encoder is connected to an SDI and an HDMI video source 2 Open the user interface See Section 6 3 3 The SDI connections also support ASI Connect a BNC cable from SDI Out to you...

Page 36: ...player 10 Run VLC on your PC version used by Z3 2 1 5 11 Select Media Open Network Stream In the box type udp 225 1 2 3 6000 where 225 1 2 3 matches the values of the computer IP address or multicast...

Page 37: ...n data included is used To utilize this feature complete the following 1 Connect an SDI signal with closed caption data to the SDI Input see Section 5 0 2 Configure the encoder to output UDP See Secti...

Page 38: ...or FEC Enable to True This will allow for setting the number of FEC columns and rows The default setting is 5x5 This is a medium level of coverage that will work in many situations The number of colum...

Page 39: ...our Windows PC You will use this PC to control the DME 05 and to decode the output stream 2 Connect the AC power supply It will take 45 60 seconds to boot 3 Follow the steps in Sections 6 3 to access...

Page 40: ...ect a BNC cable from your video encoder or other device streaming encoded ASI content to SDI In on the decoder unit 2 Return to the user interface CH1 tab 3 Set the Input Interface to ASI using the dr...

Page 41: ...onds to the destination address entered in the encoder In the pictured example the decoder is accepting content being streamed to the multicast address 225 1 2 3 4 If the address is a multicast addres...

Page 42: ...H1 tab and change the Input Interface to TSFILE using the dropdown menu 4 In the Location text box enter media sda1 MOV1 ts where MOV1 ts matches the name of the file to be decoded 5 If desired set Fi...

Page 43: ...r monitor 2 Return to the user interface System Setup tab In decoder mode settings for Display Setup appear 3 Select hdmi for the Display Mode using the dropdown menu 4 Verify the Resolution and Layou...

Page 44: ...er 5 10 seconds 7 6 Output SDI 1 Connect a BNC cable from SDI Out on the decoder unit to an HD TV or monitor 2 Return to the user interface System Setup tab In decoder mode settings for Display Setup...

Page 45: ...E 68508 1369 USA 1 402 323 0702 45 5 Navigate to the CH1 tab and if audio is needed select SDI from the Output Port dropdown menu 6 Click the start button to begin decoding Video will appear on the mo...

Page 46: ...the CH1 tab select select TSRTP as the Input Interface This will cause the FEC Mode dropdown to appear 3 Select AUTO in the FEC Mode dropdown menu 4 Set the remaining settings to those corresponding...

Page 47: ...off and back on it automatically uses those settings 1 Click on the User Presets tab 2 Click on the new button 3 This brings up a new text box to enter the preset name For this example type z3_config...

Page 48: ...ically receive an IP address at startup The IP address that is assigned can be seen through using ZFinder If you prefer you can set your encoder to a static IP address If you would like to have your P...

Page 49: ...do this a pop up window appears reminding the user that for changes to IP Address Local Netmask Default Gateway to take effect a reboot is required and asking if a reboot is desired Click OK and then...

Page 50: ...n Device Note You may need to also update the network settings on the PC running ZFinder so that the encoder is discoverable If the unit appears in red your computer s IP address or Network Mask may n...

Page 51: ...ings will remain visible To do this see Section 8 1 2 Return to the System Setup tab 3 Select your newly created configuration from the preset dropdown menu at the bottom of the screen 4 As soon as yo...

Page 52: ...______ Z3 Technology LLC 100 N 8th ST STE 250 Lincoln NE 68508 1369 USA 1 402 323 0702 52 9 You can return to the use of limited settings by un checking the Advanced Settings box in the System Setup t...

Page 53: ...A 1 402 323 0702 53 8 4 Making a Firmware Update 1 Open the user interface Section 6 3 2 Select Update device firmware from the System Setup tab under the Device Management section 3 This brings you t...

Page 54: ...le selection screen From here select the name of the img file to update with and click Open Figure 62 File Selection Screen The image file to be used will typically have the word UPD in the name 5 Cli...

Page 55: ...e undone 1 In the System Setup tab click on go next to Set Password 2 The change password options appear Enter the new password twice and click the change button 3 Wait for the password options to dis...

Page 56: ...lue to take effect When in DHCP mode this field is not applicable Default Gateway 192 168 a b 192 168 0 1 Sets the network gateway to use for the DME 05 Note that a save of these settings and reboot i...

Page 57: ...et of diagnostic logs that can be provided to Z3 in the event of an issue to be reported The resulting file is saved on the PC with the user interface open View logs Button Can be used to view system...

Page 58: ..._______________________________ Z3 Technology LLC 100 N 8th ST STE 250 Lincoln NE 68508 1369 USA 1 402 323 0702 58 1080i30 1080i29 97 1080i25 1080p60 1080p59 94 1080p50 720p60 720p59 94 720p50 480p60...

Page 59: ...meter Notes new Define a new configuration file Up to nine configurations can be created rename Rename a configuration file delete Delete a configuration file export Export current settings to a file...

Page 60: ...encoded picture A small i will appear if interlaced is being encoded Audio Status Channel The channel number 1 or 2 Subchannel Always 1 in this release Codec The codec being used to encode audio for...

Page 61: ...ple if two 10Mbps channels are being packed into the MPTS stream the recommended Rate is at least 22Mbps Destination 1 NONE ASI UDP Used to define where the multiple channels will be routed to after b...

Page 62: ...the output otherwise a default value of 4 3 is used This value is ignored for HD resolutions Video Resolution Follow Input 176x144 1920x1080 The encode resolution for channel 1 If this resolution is...

Page 63: ...ut Progressive Progressive HQ Interlace This allows the user to specially handle interlaced input Follow input is the default option it will leave interlaced input as is Progressive will convert the i...

Page 64: ...trate range for AACLC is 32Kbps 384Kbps though staying above 64Kbps is recommended for best results The bitrate range for AACHE and AACHE V2 is 32Kbps 64Kbps Bitrate 12 384 Kbps 320 Kbps Sub Channel 1...

Page 65: ...r to set the number of audio Access Units AU per transport stream Packetized Elementary Stream PES packet Output Setup Output Format RTP RTSP UDP RTMP TSRTP TSFILE FILE MPTS ASI Output format of encod...

Page 66: ...er port If two USB devices are connected dev sda1 corresponds to USB device that was connected first and dev sdb1 corresponds to the USB device that was connected second Only one of the two USB ports...

Page 67: ...for ensuring smooth playback at lower bitrates see Section 6 12 Adjusting the UDP TS Rate TS Lowlat Mode UDP TSRTP Only True False Selecting True causes the TS muxer to instead send packets out as soo...

Page 68: ...stop Stop current encode session start Start encode session update Can be used to change the bit rate without stopping restarting an encode session see Section 6 8 Changing the Bitrate and Frame Rate...

Page 69: ...s for a reduction in bits needed processing power without introducing extra jerkiness when there is motion in the video For example if the input is 1080i at 60 fields per second 30 frames per second F...

Page 70: ...a detailed explanation The CH2 tab will be identical to CH1 except for the default values of various parameters as shown below A third channel can only be created in the Encoder 1 to 3 CH operating mo...

Page 71: ...the user can type the multicast address the decoder should connect to Address Multicast Only x y z w 225 1 2 3 The multicast IP address that the decoder retrieves data from used when RTP or UDP is se...

Page 72: ...de session clone Duplicate CH tab can be used to quickly copy CH1 values to CH2 for example delete Used to delete excess tabs created by clone status IDLE STOPPED RUNNING POLLING Current status of the...

Page 73: ...factory settings Can also add more profiles by clicking on new in the User Presets tab New Preset Button Click to create a new user preset Save Button Click to save value that was selected Operating...

Page 74: ...om your encoder the following steps are needed 1 Log in to the Wowza Streaming Engine Manager Home page by typing http localhost 8088 where localhost is the IP address of the server in this User s Gui...

Page 75: ...g and RTSP Publishing are both set to Open and Client Restrictions is set to No client restrictions Then click Save The Wowza server is now configured to work with your ZEUS encoder Note You can also...

Page 76: ...dress of the PC running VLC Does the port number in Dest Port equal the value entered in the URL for VLC Does the video coming out of the source match the resolution in the encoder settings Is the PC...

Reviews: