background image

05

06

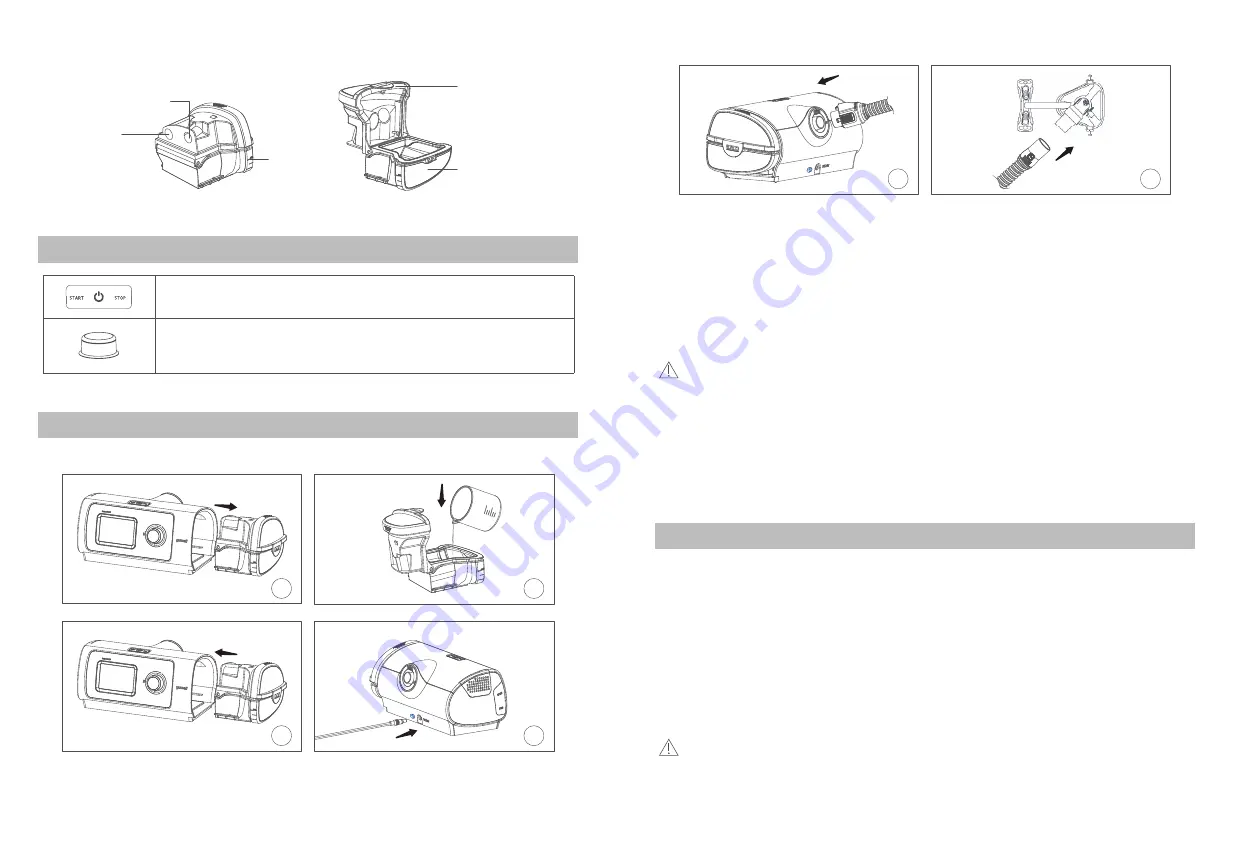
Air outlet of 

water tank

Air inlet of water tank

Water line

Cover of 

water tank

Container of 

water tank

7. Explanation of button

START/ STOP button: press to start /stop therapy.

Dial: turn to navigate the menu and press to select an option. Turn to 
adjust the options and press to save your choice.

8. Installation

The following section will help you install your device by yourself   

2

1

4

3

6

5

1. Place the device on a stable level surface; Hold the water tank at the top and bottom, press it 

gently and pull it away from the device;

2. 

Open the water tank and fill it with distilled water up to the maximum water level mark. Do not fill 

the water tank with hot water;

3. Close the water tank and insert it into the side of the device;
4. Plug the power connector into the rear of the device;
5. 

Connect the heated tubing firmly to the air outlet located on the rear of the device;

6. Fit your mask correctly (refer to the mask manual) and connect the free end of the heated tubing 

firmly onto the mask and press the start button to begin treatment.

Caution

•  Please change the distilled water in the water tank every day.
•  Do not add the distilled water above the maximum water level mark, in case the water may enter 

the heated tubing and the device.

•  Appliance coupler or mains plug is used as the isolation means from mains supply, not to 

position the equipment so that it is difficult to operate the disconnection device.

•  When the humidity level is 6 and the therapy pressure is 20 cmH

2

O, 8 hours is an expected 

duration of operation before refills.

9. Therapy


f

9.1 Start therapy

1. Power on your device;
2. Fit your mask;
3. Press Start / Stop button or breathe normally if Smart Start / Stop is enabled, therapy will start. 

During the therapy, the real-time average pressure, the set pressure, the ramp time (min), and 
the humidity level will all be displayed on the screen;

4. During the ramp time, the pressure increased gradually until the setting pressure has been 

reached;

5. The screen will go black automatically after about one minute. You can press any button to turn 

it back on. 

Caution:

•  When the level of the humidity is 1-6 and the device is delivering gas pressure, the heating plate 

will heat (including the situations that the screen shows “Large Leakage” and the backlight of the 
screen is off). 

Summary of Contents for YH-480A

Page 1: ...ay Pressure Units Suzhou Yuyue Medical Technology Co Ltd No 9 Jinfeng Road Suzhou Science Technology Town 215163 Suzhou Jiangsu PRC TEL 86 0512 67373001 web address www yuyue com cn IFU V 68 version 0...

Page 2: ...uction 03 3 Scope of application 03 4 Contraindications and adverse effects 03 5 Package table 04 6 Picture and explanation for product 04 7 Explanation of button 05 8 Installation 05 9 Therapy 06 10...

Page 3: ...ified or provided by the manufacturer of this equipment could result in increased electromagnetic emissions or decreased electromagnetic immunity of this equipment and result in improper operation Por...

Page 4: ...al institutional use The YH 480A consists of main device water tank power adapter and cable Mask and heated tubing are purchased 3 Scope of application BreathCare PAP is a kind of the device which pro...

Page 5: ...t Caution Please change the distilled water in the water tank every day Do not add the distilled water above the maximum water level mark in case the water may enter the heated tubing and the device A...

Page 6: ...the highest heating level The heated tubing is used to heat the air so that the treatment will become more comfortable The heating level of the heated tubing 0 5 level equivalent to the following temp...

Page 7: ...Initial Pressure Therapy Pressure Pressure Unit FPS Level Ramp minutes CPAP 4 0 10 0 cmH2O 2 30 Clinical Menu Picture 5 1 Clinical menu CPAP Picture 5 2 Clinical menu APAP 10 2 1 Set Mode CPAP or APAP...

Page 8: ...e device has been disconnected from the power supply whether the power cord has been unplugged and whether the water tank of the device has cooled down Make sure the plate has cooled down to room temp...

Page 9: ...d fill it with distilled room temperature water up to the maximum water level mark Close the water tank and insert it into the side of the device Connect the heated tubing firmly to the air outlet loc...

Page 10: ...Press dial to turn on the screen light Check the connection of power ensure it connect with device firmly My water tank is leaking Water tank assemble incorrectly or it is broken Check the water asse...

Page 11: ...g Heated tubing Plastic hose about 1 8 m Maximum volume of water tank 260 10 mL Air outlet 22 mm complies with ISO 5356 1 2015 Temperature Maximum temperature of heater plate 55 4 131 14 4 Cut out 11...

Page 12: ...rning hot surface Class ii equipment Use by date Batch code Temperature limitation for storage and transport CN Country of manufacture china Date of manufacture is on the right side of the symbol or b...

Page 13: ...y test Compliance level Electrostatic discharge ESD IEC 61000 4 2 8kV contact 15kV air Electrical fast transient burst IEC 61000 4 4 2kV for power supply lines Surge IEC 61000 4 5 1kV differential mod...

Page 14: ...The 1 m test distance is permitted by IEC 61000 4 3 a For some services only the uplink frequencies are included b The carrier shall be modulated using a 50 duty cycle square wave signal c As an alter...

Page 15: ...any service organization that has not been expressly authorized by Yuwell to perform such repairs Any damage caused as accident Act of God or human factor Product which is not involved in Quality warr...

Page 16: ......

Reviews: