YSI Pro30 User Manual Download Page 11

14

15

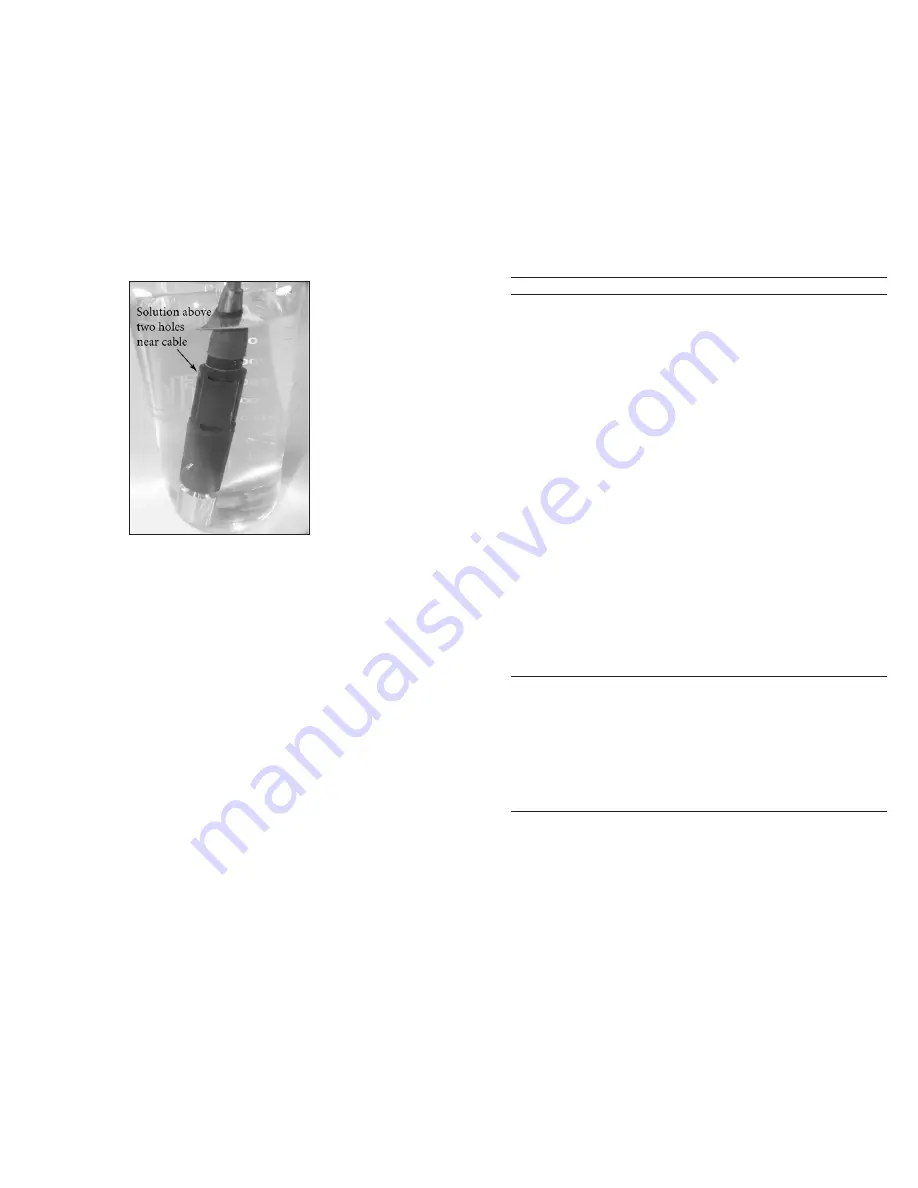
Figure 7, solution above two holes near cable. 

Turn the instrument on and allow the conductivity and temperature 

2. 

readings to stabilize. Press and hold the Cal key for 3 seconds. Highlight 

Conductivity  and  press  enter.  Next,  highlight  the  desired  calibration 

method, Sp. Conductance or Conductivity, and press enter. 

Highlight the units you wish to calibrate, either uS/cm or mS/cm, and

3.

press enter. 1 mS = 1,000 uS. Next, use the up or down arrow key to

adjust the value on the display to match the value of the conductivity

calibration solution. If calibrating conductivity, it is necessary to look

up the value of the solution at the current temperature and enter that

value  into  the  Pro30.  Most  conductivity  solutions  are  labeled  with  a

value at 25°C. If calibrating specific conductance, enter the value listed

for 25°C. Depressing either the up or down arrow key for 5 seconds will

move the changing digit one place to the left. The Pro30 will remember

the entered calibration value and display it the next time a conductivity

calibration is performed.

Press  enter  to  complete  the  calibration.  or,  press  Cal  to  cancel  the

4.

calibration and return to the Run screen.

‘Calibration  Successful’  will  display  for  a  few  seconds  to  indicate  a

5.

successful calibration and then the instrument will return to the Run

screen.

If the calibration is unsuccessful, an error message will display on the

6.

screen.  Press  the  Cal  key  to  exit  the  calibration  error  message  and

return to the Run screen.  See the Troubleshooting guide for possible

solutions.

CALIBRATING IN SALINITY

Fill a clean container (i.e. plastic cup or glass beaker) with fresh, traceable

1.

salinity  calibration  solution  and  place  the  sensor  into  the  solution.

The solution must cover the holes of the conductivity sensor that are

closest to the cable (figure 7). Ensure the entire conductivity sensor is

submerged in the solution or the instrument will read approximately

half the expected value. Gently move the probe up and down to remove

any air bubbles from the conductivity sensor.

Turn the instrument on and allow the conductivity and temperature

2.

readings to stabilize. Press and hold the Cal key for 3 seconds. Highlight

Conductivity and press enter. Next, highlight Salinity and press enter.

Use  the  up  or  down  arrow  key  to  adjust  the  value  on  the  display  to

3.

match the value of the salinity solution. Depressing either the up or

down arrow key for 5 seconds will move the changing digit one place

to the left. The Pro30 will remember the entered calibration value and

display it the next time a salinity calibration is performed.

Press  enter  to  complete  the  calibration.  or,  press  Cal  to  cancel  the

4.

calibration and return to the Run screen.

‘Calibration  Successful’  will  display  for  a  few  seconds  to  indicate  a

5.

successful calibration and then the instrument will return to the Run

screen.

If the calibration is unsuccessful, an error message will display on the

6.

screen.  Press  the  Cal  key  to  exit  the  calibration  error  message  and

return to the Run screen. See the Troubleshooting guide for possible

solutions.

T A K I N G   M E A S U R E M E N T S

Before taking measurements, be sure the instrument has been calibrated to ensure 

the most accurate readings. Place the probe in the sample to be measured and 

give the probe a quick shake to release any air bubbles. Be sure the conductivity 

sensor  is  completely  submerged  in  the  sample.  The  two  holes  near  the  cable 

should be covered by the sample for accurate conductivity readings (figure 7).   

Allow the temperature readings to stabilize. 

S AV I N G   A N D   V I E W I N G   D A T A

The Pro30 can store 50 data sets in non-volatile memory for later viewing.  A 

data set includes the values currently on the display, i.e. temperature, dissolved 

oxygen and two conductivity parameters. Each data point is referenced with a 

data set number, 01 through 50.

Summary of Contents for Pro30

Page 1: ...USER MANUAL English Pro30 ...

Page 2: ...er On 5 System Setup Menu 6 Audio 7 Contrast 7 Conductivity Units Cond Units 8 Conductivity Auto Stable Cond Auto Stable 9 Temperature Units 9 Specific Conductance Reference Temperature SPC Ref Temp 10 Specific Conductance Temperature Coefficient SPC C 10 TDS Constant 10 Language 11 Auto Shutoff 11 Cell Constant 11 Resetting the System Setup Menu to Factory Default 12 Calibration 12 Temperature 12...

Page 3: ...1 937 767 7241 800 897 4151 or visit www YSI com for a Product Return Form Send the product and proof of purchase transportation prepaid to the Authorized Service Center selected by YSI Repair or replacement will be made and the product returned transportation prepaid Repaired or replaced products are warranted for the balance of the original warranty period or at least 90 days from date of repair...

Page 4: ...parts with items on the packing list If any parts or materials are damaged or missing contact YSI Customer Service at 800 897 4151 1 937 767 7241 or the authorized YSI distributor from whom the instrument was purchased Battery Installation The instrument requires 2 alkaline C cell batteries Under normal conditions the average battery life is 425 hours at room temperature without using the back lig...

Page 5: ...long the bottom of the Run screen and to increase numerical inputs 3 Power and Backlight Press once to turn instrument on Press a second time to turn backlight on Press a third time to turn backlight off Press and hold for 3 seconds to turn instrument off 4 Menu Use to enter the System Setup menu from the Run screen 5 Enter Press to confirm entries and selections 6 Down Arrow Use to navigate throu...

Page 6: ... for three seconds Navigation The up and down arrow keys allow you to navigate through the functions of the Pro30 Navigating the Run Screen When in the Run screen the up and down arrow keys will move the highlighted box along the bottom options Once a box is highlighted press enter to access the highlighted option Description of Run screen box functions from left to right Option Description SAVE H...

Page 7: ... select Language Press to confirm Figure 6 page 1 of System Setup menu Audio is enabled Audio Audio can be enabled or disabled by using the up or down arrow keys to highlight Audio and pressing enter When enabled there will be an X in the box next to Audio When Audio is enabled the Pro30 will beep twice to indicate stability when Auto Stable is enabled The instrument will also beep when a key is p...

Page 8: ...ro30 can display non temperature compensated conductivity as well as temperature compensated Specific Conductance If Specific Conductance is selected the Pro30 uses the temperature and conductivity values associated with each measurement to calculate a specific conductance value compensated to a user selected reference temperature see below Additionally the user can select the temperature coeffici...

Page 9: ...he remaining solid 4 Divide the weight of the solid in grams by the volume of water used 5 in liters to yield the TDS value in g L for this site Divide the TDS value in g L by the specific conductance of the water in 6 mS cm to yield the conversion multiplier Be certain to use the correct units If the nature of the ionic species at the site changes between sampling studies the TDS values will be i...

Page 10: ...e When calibrating Specific Conductance the Pro30 uses the factory default values for the Specific Conductance Reference Temperature and the Specific Conductance Temperature Coefficient regardless of what is configured in the System Setup Menu The default value for the Reference Temperature is 25 C and the default value for the Temperature Coefficient is 1 91 C It is important to note that the Tem...

Page 11: ...nsure the entire conductivity sensor is submerged in the solution or the instrument will read approximately half the expected value Gently move the probe up and down to remove any air bubbles from the conductivity sensor Turn the instrument on and allow the conductivity and temperature 2 readings to stabilize Press and hold the Cal key for 3 seconds Highlight Conductivity and press enter Next high...

Page 12: ... display are different in Data mode figure 9 ThePro30cannotcommunicatetoaPCviaaProSeriescommunications saddle Connecting the Pro30 to a communication saddle may cause erratic instrument behavior i Figure 9 Data mode Viewing Data Once in Data mode use the up and down arrow keys to view saved data sets in sequential order or press enter to access the bottom functions After accessing the bottom funct...

Page 13: ...instrument utilizes a gasket as a seal to prevent water from entering the battery compartment Following the recommended procedures will help keep the instrument functioning properly If the gasket and sealing surfaces are not maintained properly it is possible that water can enter the battery compartment If water enters this area it can severely damage the battery terminals causing loss of battery ...

Page 14: ...les near the cable see figure 8 Verify the calibration solution 3 is not expired or contaminated Try a new bottle of solution Ensure you are entering in the correct 4 value for the solution according to the measurement units 1 mS 1 000 uS Allow sufficient stabilization time 5 for conductivity and temperature AND wait at least 3 seconds before confirming a calibration Contact YSI Tech Support 6 Sym...

Page 15: ...ranging 0 0001 to 0 1 mS cm 0 1 to 0 uS cm range dependent Instrument only 0 5 of the reading or 1 uS cm whichever is greater Instrument with 1 or 4 meter cables 1 0 of the reading or 1 uS cm whichever is greater Instrument with 10 20 or 30 meter cables 2 0 of the reading or 1 uS cm whichever is greater Salinity 0 to 70 ppt 0 1 ppt 1 0 of the reading or 0 1 ppt whichever is greater Total Dissolved...

Reviews: