


www.yorkfitness.com
14
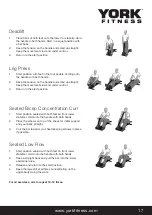
Exercising with your rower
Rowing is an extremely e ective form of exercise. It strengthens the heart, improves circulation, as well as
exercising all the major muscle groups - back, waist, arms, shoulders, hips & legs.
How to row:
1. Take up the initial position leaning forward, knee
bent and arms straight.
2. Push yourself backwards, straightening your back
and legs at the same time.
3. Continue movement until you are leaning slightly
backwards, bending return to Step 1 and repeat.
Please ensure that ingers are not placed inside of the runner assembly when moving the product. When adjusting
your exercise position and you need to steady yourself by holding onto the rower, ensure that it is the underside of
the seat upholstery that you are grasping.
Alternative exercise - leg only rowing:
This exercise will help tone and strengthen the
muscles in your legs and back. With your back straight
and arms outstretched, bend your legs until the row
arms are in the starting position. Use your legs to push
your body back whilst keeping your arms and back
straight, slowly return to start position and repeat.
Suggested Stretches
The correct form for several basic stretches is shown at the right. Move slowly as you stretch—never bounce.
1. Hamstring Stretch
Sit with one leg extended. Bring
the sole of the opposite foot
toward you and rest it against
the inner thigh of your extended
leg. Reach toward your toes
as far as possible. Hold for 15
counts, then relax. Repeat 3
times for each leg. Stretches:
Hamstrings, lower back and
groin.
2. Calf/Achilles Stretch
With one leg in front of the
other, reach forward and place
your hands against a wall.
Keep your back leg straight
and your back foot lat on the
loor. Bend your front leg, lean
forward and move your hips
toward the wall. Hold for 15
counts, then relax. Repeat 3
times for each leg. To cause
further stretching of the achilles
tendons, bend your back leg as
well. Stretches: Calves, achilles
tendons and ankles.
3. Quadriceps Stretch
With one hand against a wall
for balance, reach back and
grasp one foot with your other
hand. Bring your heel as close
to your buttocks as possible.
Hold for 15 counts, then relax.
Repeat 3 times for each leg.
Stretches: Quadriceps and hip
muscles.
4. Inner Thigh Stretch
Sit with the soles of your
feet together and your knees
outward. Pull your feet toward
your groin area as far as
possible. Hold for 15 counts,
then relax. Repeat 3 times.
Stretches: Quadriceps and hip
muscles.
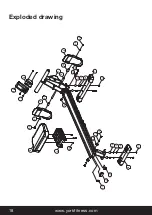
Fitness guide
Summary of Contents for 56020
Page 1: ...Owner s Manual Quest Rower 56020 April 8 2014 www yorkfitness com ...
Page 21: ...www yorkfitness com 21 ...
Page 22: ...www yorkfitness com 22 Notes ...
Page 23: ...www yorkfitness com 23 ...
Page 24: ...www yorkfitness com ...