background image

26

25

21

22

Battery lock

16

17

18

19

20

10

通用热靴接口

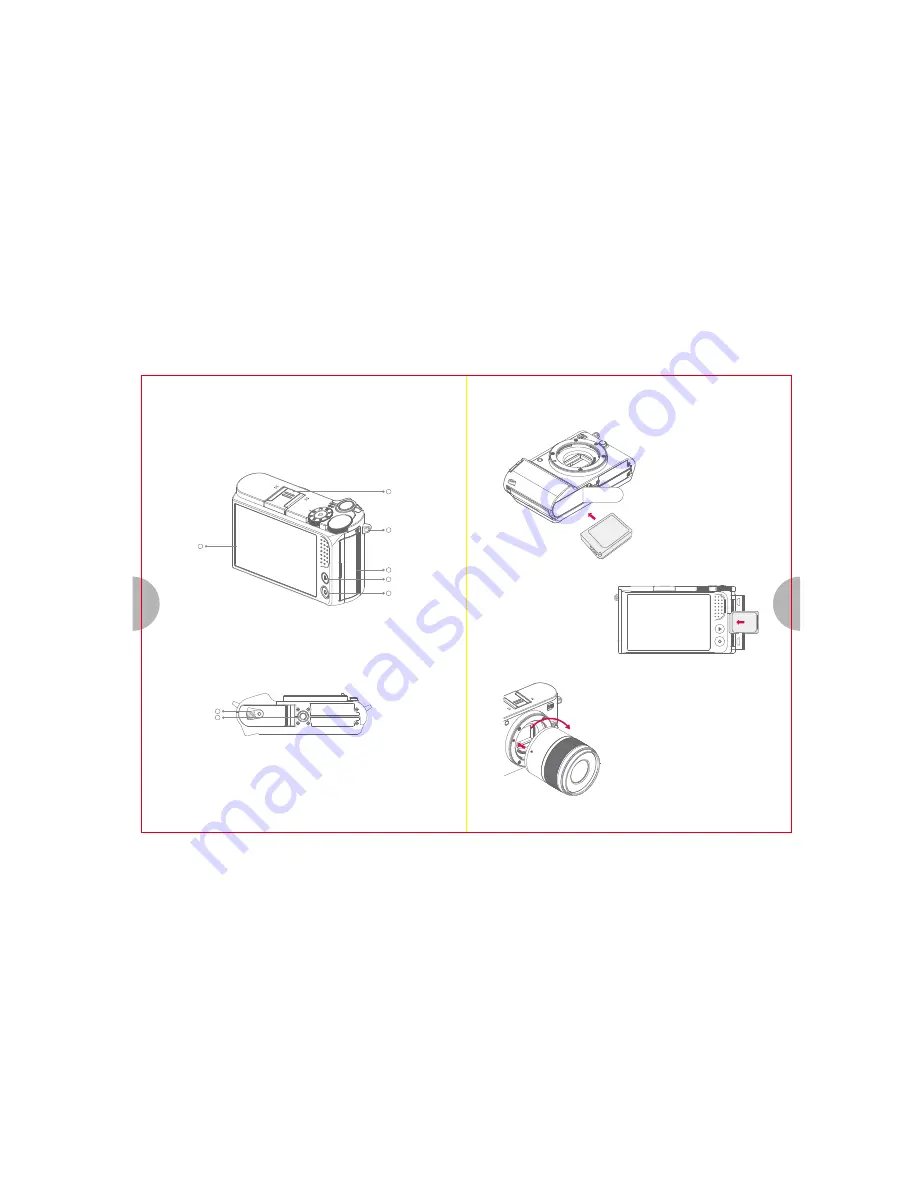
1. Insert the battery

3.Place/remove the lens

USB

LCD screen

Strap eyelet

USB/card cover
Playback button

Function button

Tripod mount hole

3.Preparation

Please gently tip open the battery cover with the 
side of battery that has connector, then place the 
battery in horizontally and close the cover. 

2.  Insert the memory card

Please align the side of memory card with 
label  to  LCD  screen,  then  place  the 
memory  card  vertically  into  the  socket 
until its locked.  If you wish to remove the 
memory card, please tap the bottom of the 
memory  card  gently,  wait  until  it  gets 
unlocked and then slowly take it out.

1). attaching a lens to the camera
Align the lens attachment mark(red) on the camera with 
the alignmaent mark(red) on the lens, then insert the lens 
into the camera's body. 
Rotate the lens clockwise until you hear it click(direction 
indicated by arrow).
Attach the lens to the camera
Align the marker of the lens to the marker of the camera 
body, then place the lens vertically into the camera body, 
rotate lens clock-wise until you hear a click sound 
(indicates that the lens is placed correctly). 

Summary of Contents for YI-M1

Page 1: ...19 20 YI M1 mirrorless camera instruction manual...

Page 2: ...s Auto On Off Slow sync Red eyereduction 1 250s Driver modes Driver modes Continuous speed Single Continuous Timer 2s 10s 5fps Color Color modes White balance WB bracketing Color space Auto Portrait V...

Page 3: ...lens may be different Already attached to camera 1 2 3 4 5 6 7 8 10 11 12 13 14 9 10 5 2 1 2 Parts and instructions Control dial Mode dial ON OFF button Strap eyelet Shutter button AF Assistant illumi...

Page 4: ...y into the socket until its locked If you wish to remove the memory card please tap the bottom of the memory card gently wait until it gets unlocked and then slowly take it out 1 attaching a lens to t...

Page 5: ...harging with charger takes about 2 5 hours Charging time would depend on battery lifetime and environment conditions Also if the battery has not been used for a long time it would take longer to charg...

Page 6: ...ect Basic settings Select Date and time sub menu Date and time language Shutter sound System operation sound Date and time Time Month Day Basic settings Auto power off ON Color space Brightness adjust...

Page 7: ...mode where the camera automatically sets the optimal aperture and shutter speed to get the best result You can choose a scene that goes well with current shooting environment to get the optimal shoot...

Page 8: ...video will be displayed 1 During the display of Live View screen tap on the video button on mode dial to record video To ensure recording results match your expectations you can set the parameters in...

Page 9: ...with gesture on picture is supported in single viewing mode enlarged mode In playback mode turn control dial to the right to enlarged view In Enlarged viewing mode you can single tap on the LCD screen...

Page 10: ...part the camera expose it in water or high humidity environment 1 Handling the camera 9 Safety precautions 1 Do not use the camera near flammable or explosive gases 2 Do not use or store the camera in...

Page 11: ...ard s Operation is subject to the following two conditions 1 this device may not cause harmful interference and 2 this device must accept any interference received including interference that may caus...

Reviews: