background image

3


2) Tap 

Settings

->

Basic

->

Wi-Fi

.


4) Select an available wireless network from the list of networks.

5) If the network is secure, enter its password in the 

Password

 field.

6) Tap

 Connect 

to connect to the wireless network.

b) Connect to the wireless network:

 The phone will automatically search for available wireless networks in your area.

3) Tap the 

On

 radio box in the 

Wi-Fi 

field.


You have two options for network connection. You can select one of them according to the current office 

 environment.

7. Connect to the network, as shown below:

 a) Connect to the wired network:

1) Swipe down from the top of the screen to enter the control center.

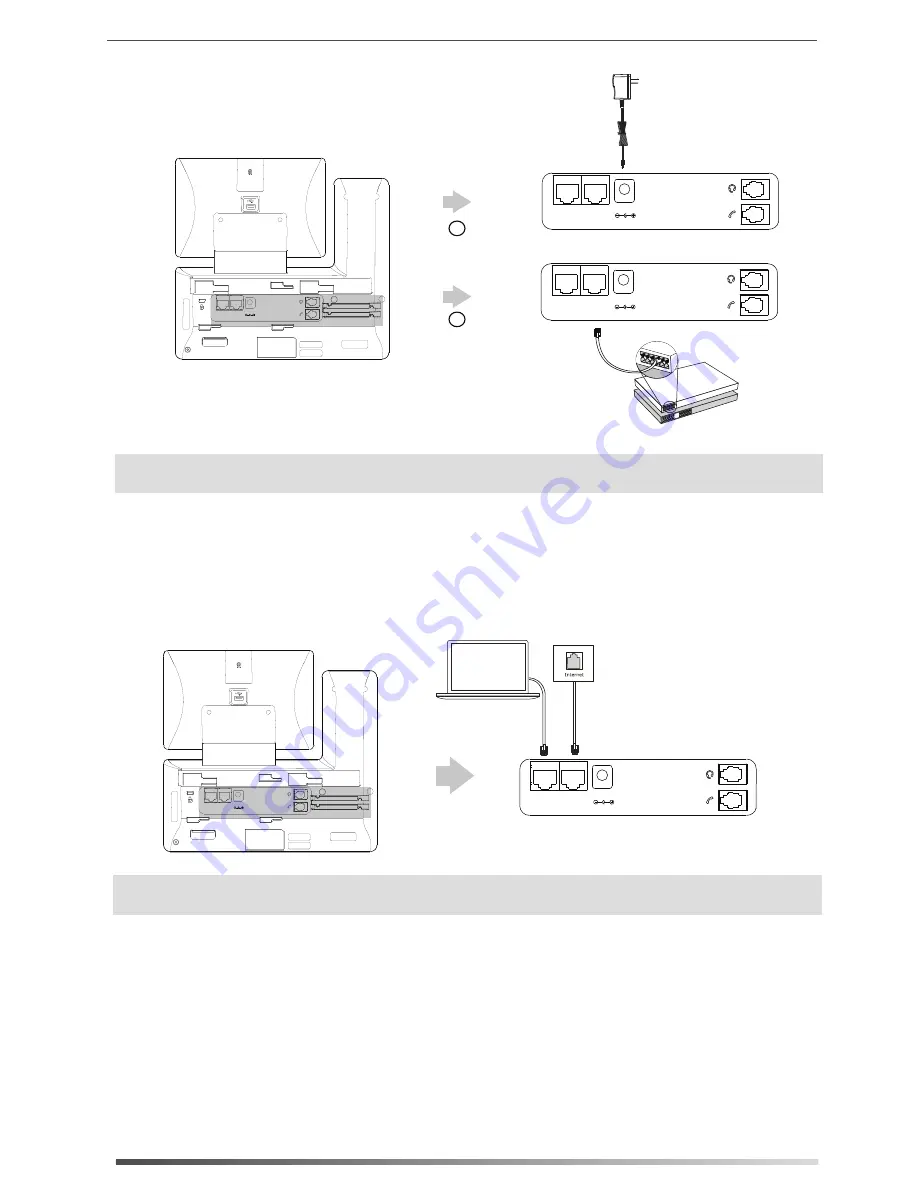
6. Connect the AC power or PoE, as shown below:

Note: The IP phone should be used with Yealink original power adapter (5V/2A) only. The use of the third-party 

          power adapter may cause the damage to the phone.   

Note: If you are connecting a PC to your phone, we recommend that you use the Ethernet cable provided by

          Yealink.

A

B

AC Power Option

PoE ( Power over 

Ethernet ) Option

Power Adapter

      (DC 5V)

IEEE 802.3af compliant

     PoE Hub/Switch

PC

Internet

DC5V

PC

Internet

DC5V

PC

Internet

DC5V

PC Connection

    (Optional)

PC

PC

Internet

DC5V

PC

Internet

DC5V

Summary of Contents for SIP-T58A

Page 1: ...Smart Media Phone SIP T58V SIP T58A Quick Start Guide V80 10 www yealink com Applies to firmware version 58 80 0 10 or later SIP T58V...

Page 2: ...the accessories provided or approved by Yealink The use of unapproved third party accessories may result in reduced performance CAM50 Quick Start Guide Stand Handset Cord Handset IP Phone Ethernet Cab...

Page 3: ...ote 4 Connect the handset and optional headset as shown below 3 Attach the optional wall mount bracket as shown below The headset should be purchased separately Note The USB port on the rear of the ph...

Page 4: ...them according to the current office environment 7 Connect to the network as shown below a Connect to the wired network 1 Swipe down from the top of the screen to enter the control center 6 Connect th...

Page 5: ...7 MESSAGE Key Volume Key Speakerphone Key REDIAL Key Camera Item Item 10 11 12 Power Indicator LED Touch Screen HEADSET Key TRANSFER Key MUTE Key HOLD Key 2 3 4 5 6 8 Item Shutter Switch 15 Hookswitch...

Page 6: ...lity of your phone and may have an impact on the network performance Contact your system administrator for more information Configuring Your Phone 2 Tap Settings Status to obtain the IP address of the...

Page 7: ...nter the control center 2 Tap Settings Advanced default password admin Accounts to configure the account 1 Swipe down from the top of the screen to enter the control center Icons Description Shows tha...

Page 8: ...e idle screens The home screen displays as below Status Bar Digital Clock Widget Tap to add DSS keys Screen Indicator Android Keys Phone Dialer Directory History To add a widget to the idle screen 3 D...

Page 9: ...nguages or Android Keyboard Settings AOSP Label automatically to identify the context sensitive features Controlling Video During a Call Tap Full Screen to display the video in full screen Swipe down...

Page 10: ...during a call The call is placed on hold 1 Press or tap the Transfer soft key during a call The call is placed on hold 2 Enter the number you want to transfer to and then press 3 Press or tap the Tran...

Page 11: ...esired group on the left 2 Tap after the desired contact and then tap Delete 2 Tap to add a contact 3 Enter a unique contact name in the Name field and contact numbers in the corresponding fields 4 Ta...

Page 12: ...class international service network Our priorities are quality functionality ease of use customer support and competitive pricing To provide new solutions for the future in this fast evolving sector...

Reviews: