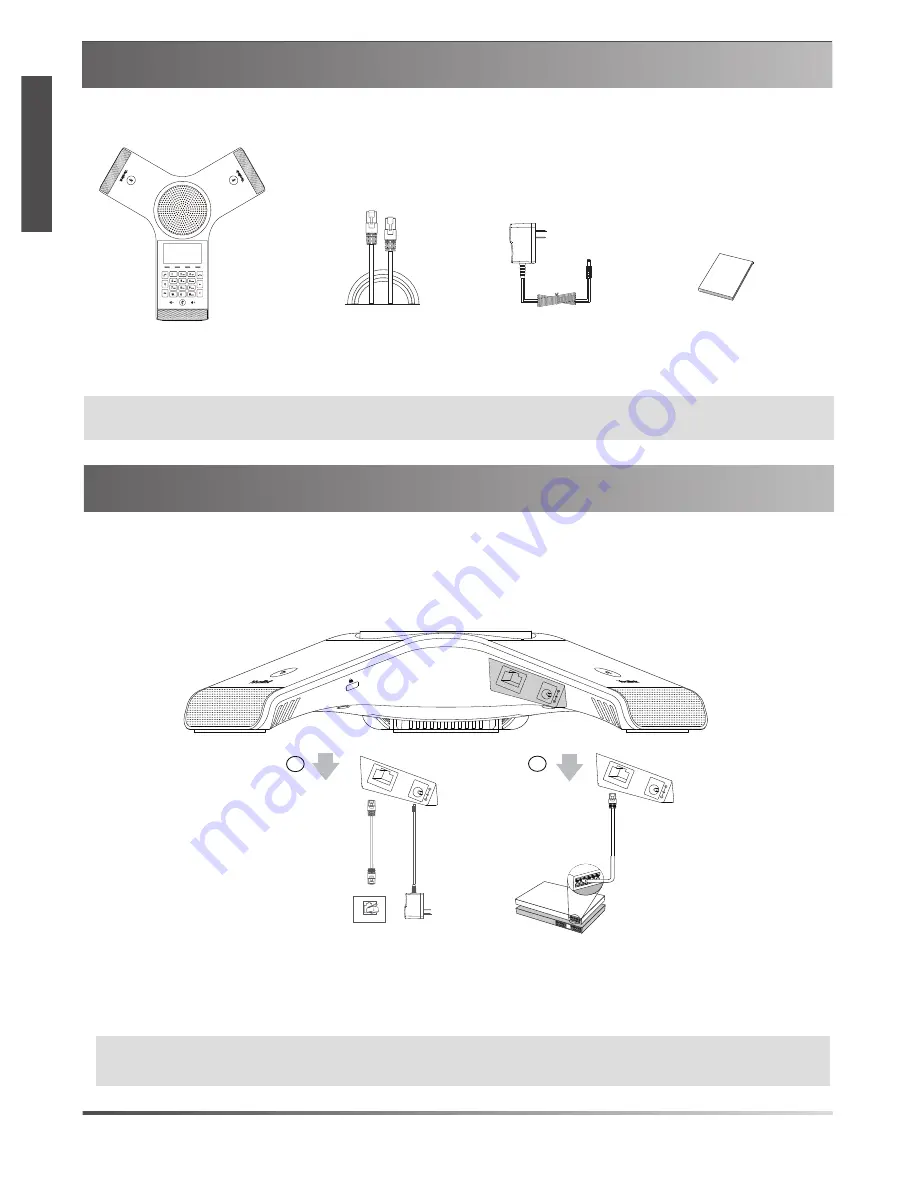
background image

Packaging Contents

Note: 

We recommend that you use the accessories provided or approved by Yealink. The use of unapproved third-party accessories may 

           result in reduced performance.   

1. Connect the power and wired network.

Assembling the Phone 

You can also connect to the wireless network after startup. Refer to Wireless Network Connection mentioned 
below in Configuring Your Phone for more information.

Note: 

The IP phone should be used with Yealink original power adapter (12V/1A) only.


If inline power (PoE) is provided, you don’t need to connect the 

           power adapter. Make sure the hub/switch is PoE-compliant. 

E

N

G

L

I

S

H

IP Conference Phone

Ethernet Cable

(7.5m CAT5E UTP cable)

Power Adapter

Quick Start Guide

Internet DC12V

B

PoE ( Power over

Ethernet )  Option  

Internet DC12V

Internet

A

Internet DC12V

  You have two options for network and power connections. Your system administrator will advise you which one to use.

1

AC 

Power Option 

Power Adapter

IEEE 802.3af compliant

PoE Hub/Switch

Summary of Contents for CP920

Page 1: ...CP920 Quick Start Guide V81 11 www yealink com HD IP Conference Phone English Applies to firmware version 78 81 0 10 or later...

Page 2: ......

Page 3: ...Table of Contents English 1 7...

Page 4: ...ote The IP phone should be used with Yealink original power adapter 12V 1A only If inline power PoE is provided you don t need to connect the power adapter Make sure the hub switch is PoE compliant E...

Page 5: ...t Keys Welcome Initializing Please wait After the IP phone is connected to the network and supplied with power it automatically begins the initialization process After startup the phone is ready for u...

Page 6: ...ork Settings Click on Network Basic IPv4 Config You can configure the network settings in the following ways DHCP By default the phone attempts to contact a DHCP server in your network to obtain its v...

Page 7: ...ties To create a five way local conference 1 Tap the Conf soft key during a active call The call is placed on hold 2 Enter the number of the second party and then tap the Send soft key You can also se...

Page 8: ...time 4 Turn on the desired forwarding type 5 Enter the number you want to forward to in the Forward To field 6 For No Answer Forward select a desired ring time to wait before forwarding from the After...

Page 9: ...call history easily For more information refer to Call History 6 E N G L I S H Call History 1 Tap the History soft key from the Idle screen 2 Select All Calls 3 Select an entry from the list you can d...

Page 10: ...IP Yealink Yealink 1 Wi Fi 7 5 UTP 5 Yealink 12V 1A POE POE In te rn e t D C 1 2 V B PoE In te rn e t D C 1 2 V AC Internet A In te rn e t D C 1 2 V 7 IEEE 802 3af PoE...

Page 11: ...2 U Web 10 10 8 Welcome Initializing Please wait Welcome Initializing Please wait 1 2 3 4 5 7 8 9 1 1 2 10 2 11 12 6 13 14 LCD OK...

Page 12: ...Web Web 1 OK IP 2 IP http 192 168 0 10 192 168 0 10 Enter 3 admin admin IPv4 DHCP DHCP IP DNS IP DHCP IP DNS DNS 9 IPv6 IPv6 SIP LCD admin WAN VLAN 802 1x VPN LLDP CDP NAT 1 2 Wi Fi 3 N Wi Fi Wi Fi...

Page 13: ...4 5 OK admin 10 LED LED 1 2 3 4 2 3 1 2...

Page 14: ...U 1 2 3 1 2 3 11 1 2 3 4 5 6 7 1 2 3 1 2 3 4 1 2 3 4...

Page 15: ...1 2 3 1 2 3 4 12 1 2 3 4 5 1 2 3 4 5 1 2 3 4...

Page 16: ...tion solutions Founded in 2001 Yealink leverages its independent research and development and innovation to pursue its core mission Easy collaboration high productivity The company s high quality UC t...

Reviews: