44
EN
SAFETY INSTRUCTIONS
• Switch on the motor according to
instructions and with feet well
away from the blade(s).
• Do not tilt the appliance when
switching on the motor, except if
the appliance has to be tilted for
starting. In this case, do not tilt it
more than absolutely necessary
and lift only the part which is
away from the operator. Always
ensure that both hands are in
the operating position before
returning the appliance to the
ground.
• Do not put hands or feet near
or under rotating parts. For
rotary mowers, keep clear of the
discharge opening at all times.
• Never pick up or carry an appliance
while the motor is running.
• Pull the plug from the socket:
- Whenever you leave the machine;
- Before clearing a blockage;
-
Before checking, cleaning or
working on the appliance; after
striking a foreign object. Inspect
the appliance for damage and
make repairs as necessary;
- If the appliance starts to vibrate
abnormally (check immediately).
Maintenance and storage
• Keep all nuts, bolts, and screws
tight to be sure the appliance is in
• Be careful during adjustment of
the machine to prevent the fingers
from getting trapped between
moving blades and fixed parts of
the machine.
Operation
• Mow only in daylight or in good
artificial light.
• Ideally, avoid operating the
appliance on wet grass.
• Always be sure of your footing on
slopes.
• Walk, never run.
• For wheeled rotary mowers, mow
across the face of slopes, never up
and down.
• Exercise extreme caution when
changing direction on slopes.
• Do not over mow steep slopes.
• Use extreme caution when
reversing or pulling the appliance
towards you.
• Stop the blade(s) if the appliance
has to be tilted for transportation
when crossing surfaces other than
grass, and when transporting the
appliance to and from the area to
be mowed.
• Never operate the appliance
with defective guards or shields,
or without safety devices, for
example deflectors and/or grass
catchers, in place.
Summary of Contents for YT5139
Page 3: ......
Page 4: ...3 A x1 B x1 C x1 D x1 E x2 F x2 G x2 H x2 I x1 30 PH 3 EN Assembly IT Montaggio EL...
Page 6: ...5 E x2 G x2 I 1 2 5 EN Assembly IT Montaggio EL...
Page 7: ...6 F 3 4 6 EN Assembly IT Montaggio EL...
Page 8: ...7 H x2 PH 1 2 Click Click B C 5 6 7 EN Assembly IT Montaggio EL...
Page 9: ...8 2 3 1 Click Click D 1 2 3 7 8 8 EN Assembly IT Montaggio EL...
Page 10: ...9 3 2 1 20mm 40mm 60mm A 1 B 1 A 2 B 2 A 3 B 3 A B 1 2 3 1 2 3 1 2 9 IT EL EN Uso Use...
Page 11: ...10 3 1 2 2 1 3 4 10 IT EL EN Uso Use...
Page 12: ...11 1 2 3 1 2 5 6 11 IT EL EN Uso Use...
Page 13: ...12 1 2 7 8 12 IT EL EN Uso Use...
Page 14: ...13 1 3 2 1 2 13 IT EL EN Manutenzione Maintenance...
Page 15: ...14 3 4 14 IT EL EN Manutenzione Maintenance...
Page 16: ...15 BYT5139 8231 513901 25 30N m 5 6 15 IT EL EN Manutenzione Maintenance...
Page 17: ...16 1 2 16 IT Rimessaggio EL EN Winter storage...
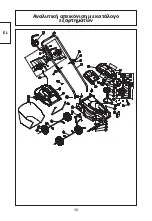
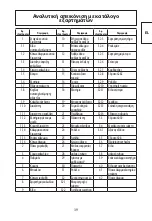
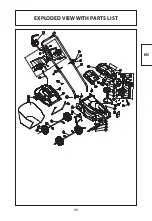
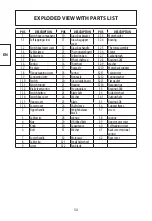
Page 27: ...26 IT VISTA ESPLOS A ED ELENCO DELEPARTI...
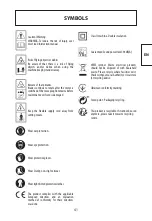
Page 30: ...29 EL II 96dB A WEEE...
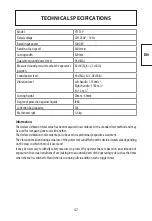
Page 31: ...30 EL 1 YT5139 1000W 2 3...
Page 32: ...31 EL ISTRUZIONI DI SICUREZZA ON...
Page 33: ...32 EL ISTRUZIONI DI SICUREZZA 30 mA...
Page 34: ...33 EL ISTRUZIONI DI SICUREZZA...
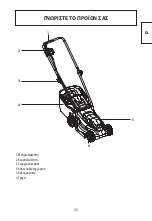
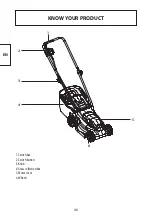
Page 36: ...35 EL 1 6 5 2 3 4 1 2 3 4 5 6...
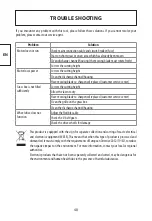
Page 38: ...37 EL 2012 19 Soluci n...
Page 39: ...38 EL...

