background image

5

GENERAL SAFETY RULES

FOLLOW THESE RULES WHILE OPERATING THE SNOW THROWER

• Walk. Do not run.

• Verify that the Snow Thrower is not in contact with anything before turning it on.

• Stay away from the discharge opening at all times. Keep face, hands, and feet away from concealed, moving, or 

rotating parts.

• Be attentive when using the Snow Thrower, and stay alert for holes in the terrain and other hidden hazards or 

traffic.

• Do not use the Snow Thrower on a gravel or crushed rock surface. Use extreme caution when crossing 

gravel/crushed rock drives, walks, or roads.

• Move up and down slopes when clearing snow. Do not go across a slope. Use caution when changing direction. 

Do not use this Snow Thrower to clear snow from steep slopes.

• Do not attempt to use the Snow Thrower on a roof or on any steeply inclined slippery surface.

• Do not operate the Snow Thrower if the guards, plates, and other safety protective devices are not in place.

• Do not operate the Snow Thrower near glass enclosures, automobiles, trucks, window wells, drop-offs, etc. 

without properly adjusting the angle of the snow discharge. Keep children and pets away from the work area.

• Do not force or overload the Snow Thrower. The Snow Thrower will perform better and safer when it is used at 

the rate that it was designed to work at.

• Do not operate the Snow Thrower at high speeds on slippery surfaces. Look behind, and exercise caution when 

backing up.

• Do not direct the discharge toward people, and do not allow anyone to move in front of the Snow Thrower while it 

is in use.

• Wear safety glasses or goggles that meet ANSI Z87.1 standards, and wear ear/hearing protection when using 

this Snow Thrower.

• Use the Snow Thrower in daylight or in good artificial light.

• Avoid accidental start-ups. Remain in the starting position when turning the Snow Thrower on. The operator and 

the Snow Thrower must be in a stable position during start-up. See the section entitled Starting/Stopping Instruc-

tions.

• Use the proper tool. Only use this Snow Thrower for the purpose that it was designed for.

• Do not overreach. Always keep proper footing and balance.

• Hold the Snow Thrower with both hands while it is in use. Keep a firm grip on the handles or the grips.

• Keep hands, face, and feet away from all moving parts. Do not touch or try to stop the impeller while it is rotating.

• If the impeller does not rotate freely due to frozen ice, thaw the Snow Thrower thoroughly before attempting to 

use it.

• Keep the impeller clear of debris.

• Do not attempt to clear the impeller while the motor running or while the Snow Thrower is plugged it. Turn the 

motor off and unplug the Snow Thrower from the extension cord or the outlet.

• Keep clothing and body parts away from the rotor.

• Do not operate the motor at a faster speed than necessary. Do not run the motor at high speed while not clearing 

snow.

• Stop the motor when snow clearing is delayed or when moving from one location to another.

• Unplug the Snow Thrower when it is being transported and when it is not in use.

• After striking a foreign object, turn the Snow Thrower off and unplug it, and then inspect it for damage. Repair 

any damage before restarting and using the Snow Thrower.

• If the Snow Thrower starts to vibrate abnormally, stop the Snow Thrower immediately and attempt to determine 

the cause. Vibration is generally an indication of danger.

• Stop the motor and unplug the Snow Thrower whenever the operator is not in the operating position, before 

unclogging the impeller, and before making any repairs, adjustments, or inspections.

• Do not discharge snow onto public roads or near moving traffic.

• Allow the Snow Thrower to run for a few minutes after clearing snow in order to prevent moving parts from 

freezing.

Summary of Contents for 60-3982-0

Page 1: ...Electric Snow Thrower 60 3982 0 Owner s Manual TOLL FREE HELPLINE 1 866 523 5218 IMPORTANT Read all safety rules and instructions carefully before using this product ...

Page 2: ... 14 Troubleshooting 15 Warranty 16 Exploded View 17 Parts list 18 2 TABLE OF CONTENTS SPECIFICATIONS Motor 120 V 60 Hz 10 A Blade Speed Up to 2 600 RPM Clearing width 16 40 6 cm Clearing depth 6 15 2 cm Discharge distance Up to 25 7 6 m Impeller size 14 35 6 cm Wheels 6 15 2 cm Handle height 33 to 38 83 8 to 96 5 cm Weight 24 5 lbs 11 1 kg ...

Page 3: ...ow Thrower 120 V 60 Hz 10 A 60 3982 0 Made in China Fabrique en Chine Serial N de serie CTxx xxxxxx 1 Read the instructions carefully Become familiar with the controls and the proper use of the Snow Thrower 2 Do not operate this Snow Thrower when tired ill or under the influence of alcohol drugs or medication 3 Do not allow children under the age of 14 to operate this Snow Thrower Children who are...

Page 4: ...e Snow Thrower indicates the voltage used Do not connect the Snow Thrower to an AC circuit that provides a different voltage from the voltage that is indicated on the nameplate WARNING In order to prevent electric shock use an extension cord that is suitable for outdoor use Inspect the extension cord and the power cord on a regular basis Look for deterioration cuts or cracks in the insulation Insp...

Page 5: ...ain in the starting position when turning the Snow Thrower on The operator and the Snow Thrower must be in a stable position during start up See the section entitled Starting Stopping Instruc tions Use the proper tool Only use this Snow Thrower for the purpose that it was designed for Do not overreach Always keep proper footing and balance Hold the Snow Thrower with both hands while it is in use K...

Page 6: ...r in a dry area locked up or high enough to prevent unauthorized use or damage and out of the reach of children Do not douse or squirt the unit with water or any other liquid Keep handles dry clean and free of debris Clean the Snow Thrower after each use See the section entitled Cleaning and Storage If the labels on the Snow Thrower become defaced or start to lift off contact the Toll Free Helplin...

Page 7: ...oles on the middle handle 2 Insert the bolts 5 and use the wing nuts 6 to tighten them 3 Align the holes 7 on the middle handle 2 and the lower handle 3 Insert the bolts 5 and tighten them using the wing nuts 6 provided Assembling the Discharge Directional Control Fig 1 1 Align the holes 11 on the upper tubing 8 with the holes on the lower tubing 9 Insert the hitch pin 10 Fig 1 1 2 10 11 8 8 5 4 6...

Page 8: ... Diagram and Location of Parts Diagram and Location of Parts Fig 2 Upper Handle Middle Handle Lower Handle Wheels Cover Screws Scraper Belt Cover Discharge Directional Control Impeller Vanes Fig 2 Switch ...

Page 9: ...st be in a stable position when starting the Snow Thrower Using the Switch Caution Do no attempt to override the operation of this safety switch This Snow Thrower is equipped with a special safety switch In order to operate the switch insert one finger into the opening and push the lever out so that it can be grasped along with the upper handle Pull the lever back in order to turn the Snow Thrower...

Page 10: ...trol turns approximately 360 in either direction clockwise or counter clockwise Do not force it 2 Turn the discharge directional control clockwise 360 The vanes will turn approximately 45 to the left 3 Turn the discharge directional control counter clockwise 360 The vanes will turn approximately 45 to the right Tips for Best Snow Throwing Results For the most efficient snow throwing keep the vanes...

Page 11: ...ken belt from the impeller pulley and the drive pulley inside the housing Discard the belt in the proper manner Fig 7 5 Loop the new belt around the drive pulley and the impeller pulley Fig 7 Pull the belt tensioner idler arm away from the drive pulley in order to install the belt around the drive pulley NOTE Verify that the washer is still in place on the impeller pulley shaft before reinstalling...

Page 12: ...pellor and place the 2 washers on the right hand side 12 Place the impellor and shaft back into the front scoop 8 Remove the impellor shaft nut from the right hand side 9 Withdraw the impellor shaft from the left hand side 2 Remove the 10 screws from the side cover 3 Be sure not to lose the 2 springs 5 Remove the nut from the impellor shaft Remove the 3 screws holding the pulley support plate 6 Re...

Page 13: ...sher and nut 19 Place the lower spring into position and slide the side cover up using slight pressure to hold the spring in place 20 Replace and tighten the remaining screws and the nut and washer 21 Re install the impellor shaft nut and washer on the right hand side and tighten 14 Be sure to route the belt correctly as shown 15 Replace the 2 spacer washers on the impellor shaft 13 14 15 16 17 18...

Page 14: ...14 Fig 8 Fig 8 Fig 8 ...

Page 15: ...e the belt see the section entitled Inspecting Replacing the Drive Belt Replace the scraper see the section entitled Replacing the Scraper The carriage bolts are not properly seated The Snow Thrower is unplugged The lock out button or trigger switch were not used properly The belt is damaged The scraper is worn Then handle is not in position The Snow Thrower does not start The motor is on but the ...

Page 16: ...0 days from the date of retail purchase How to Obtain Service Warranty service is available with proof of purchase through your local authorized service dealer or distributor If you do not know the dealer or distributor in your area please call toll free 1 866 523 5218 The factory will not accept the return of a complete unit unless prior written permission has been extended by YARDWORKS CANADA Tr...

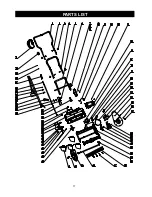
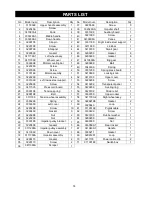
Page 17: ...17 PARTS LIST ...

Page 18: ...9 2 Right wheel assy 1 23 59 32262198 2 24 60 3420102 Strain relief 1 25 61 31100199 Pigtail cable 3320640 Loop Loop 1 26 62 1 27 63 Gasket Gasket 1 28 64 3290299 Gasket 3330211 3420199 Rubber washer 1 29 65 3330499 Screw 1 30 66 3330599 1 3290599 Nut 1 31 67 3410499 1 Handle 1 32 68 1 33 69 32901251 1 34 70 35 71 36 37 38 3411799 1 Left wheel assy 1 3411799C Wheel cover 2 3330398 Motor mounting b...

Reviews: