


Figure 8
Figure 9
Figure 10
2
M8×12
(×6)
1
12
M8
(×3)
1
16
mm
13
mm
18
mm
19
mm
30
mm
32
mm
16
mm
13
mm
18
mm
19
mm
30
mm
32
mm
KNIFE INSPECTION
Checking the sharpness of the knives routinely (See
Figure 10
)
will keep your chipper operating normally. Using dull knives will
decrease performance and cause excessive vibration, which may
damage the machine and make chipping difficult.
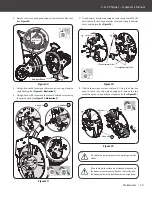
HAMMER SLICE CHECK
Remove the rotor housing cover and cover plate shown in
Figure
8
. Check the triangle hammer slicer and J-type hammer slicer. If
one or both are damaged, replacement is recommended.
KNIFE CHECK
Remove the chipper cone from the unit and rotate the cutting disc
to inspect the sharpness of the knives. (See
Figure 9
)
2
1
M8×20
(×2)
Figure 11
16
mm
13
mm
18
mm
19
mm
30
mm
32
mm
×
2
KNIFE REMOVAL AND REPLACEMENT
This chipper is equipped with two chipper knives that are mounted
on the cutting disk. When the knives are dulling or show nicks, the
machine will lose the self-feeding action. Material will have to be
pushed in. Another indication that the knives will need to be inspected
is the debris that is discharged will come out in long strips. below are
the instructions to replace the knives.
1. Remove the deflector bracket. (See
Figure 11
)
2. Remove the M8×16 bolts and nuts that connect the rotor
housing and rotor disc seat.
3. Put one support block under engine.
17
|
Maintenance
36060US25M100_KOHLER.indd 17
2017/10/17 11:06:15


