background image

CH1900 Series Electronic Control Installation Manual 

Page  10

CH1900 Setup & Operation

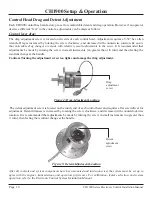
Figure 4: Drag Adjustment Location

Control Head Drag and Detent Adjustment

 The detent adjustment screw is located on the inside end of each control head and requires a flat screwdriver for 

adjustment. Detent firmness is increased by rotating the screw clockwise, and decreased with counterclockwise 

rotation. It is recommended that adjustments be made by turning the screw in small increments (no greater than 

½ turn), then feeling the resultant change at the handle.

After all controls and system components have been mounted and interconnected, the system must be set up to 

agree with the engines, transmissions, and operators preferences. For calibration, feature selection, and system 

operation, refer to the Electronic Control System Installation Manual.

Each CH1900 control has been factory pre-set for comfortable detent and drag operation. However, if an operator 

desires a different “feel” to the controls, adjustments can be made as follows:

Control lever drag:

The drag adjustment screw is located on the side of each control head. Adjustment requires a 5/32” hex allen 

wrench. Drag is increased by rotating the screw clockwise, and decreased with counterwise rotation. 

Be aware 

that noticeable drag changes are made with relatively small adjustments to the screw.

 It is recommended that 

adjustments be made by turning the screw in small increments (no greater than 1/4 turn) and then feeling the 

resultant change at the handle.

Caution: Turning the adjustment screw too tight can damage the drag adjustment.

Figure 5: Detent Adjustment Location

Drag  
adjustment
screw

Detent 
adjustment 
screw

Summary of Contents for CH1900 Series

Page 1: ...CH1900 Series CAN Bus Control Installation Manual includes CP1200 Operator Panel MANINPBYM01 Revision 2 0 ...

Page 2: ...dividuals will void the warranty Handling and or opening this unit may result in exposure to lead in the form of solder This product contains lead a chemical known to the State of California to cause cancer birth defects and other reproductive harm This product has been designed to be compliant with the above Directive Maximum performance and compliance with the EMC Directive can only be ensured b...

Page 3: ...ew 4 Parts Supplied 4 Special Tools Required 4 Mounting Instructions 5 Control Head 5 Operator Panel 8 Connecting the Components 9 CH1900 Set up Operation 10 CP1200 Operator Panel Template 11 CH67600 Control Interface Template 12 Contents ...

Page 4: ... electronic components calibration operation and other technical information refer to the Electronic Control System Installation and or Operation Manual that is provided with each system The CH1900 series control consists of individual port and starboard single lever control heads a CP1200 Operator Panel CE41400 interface harness and mounting hardware Each CH1900 control is provided with individua...

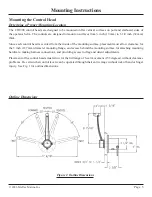
Page 5: ... the inside of the mounting surface placement must allow clearance for the 5 inch 127 mm diameter mounting flange and access behind the mounting surface for attaching mounting hardware making harness connections and providing access to drag and detent adjustments Placement of the control heads must allow for the full range of lever movement 156 degrees without clearance problems Be certain that co...

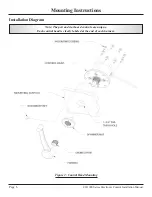
Page 6: ...nic Control Installation Manual Page Figure 2 Control Head Mounting Mounting Instructions Installation Diagram Note The port and starboard controls are unique Each control head is clearly labeled at the end of each harness ...

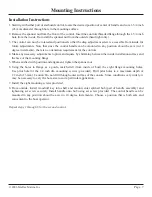
Page 7: ...quare by shimming between the inside installation surface and the face of the mounting flange 5 When satisfied with position and alignment tighten the spanner nut 6 Using the holes in flange as a guide match drill from inside of boat the eight flange mounting holes Use pilot hole for the 1 4 inch dia mounting screws provided Drill pilot holes to a maximum depth of 1 2 inch 13 mm Caution Do not dri...

Page 8: ...the CP1200 Operator Panel Template from the back of this manual to the chosen mounting surface Caution Before using a template from this manual measure it to be certain it is to scale 1 Mark the mounting surface for hole placement using the template Drill four mounting holes and switch center hole 2 Secure operator panel to the mounting surface with four 10 x 1 1 2 inch 38 mm long mounting screws ...

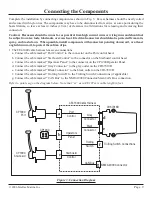
Page 9: ...arness has seven connections a Connect the cable marked Port Control to the connector on the Port control head b Connect the cable marked Starboard Control to the connector on the Starboard control head c Connect the cable marked Operators Panel to the connector on the CP1200 Operator Panel d Connect the cable marked Gray Connector to the gray outlet on the CH67019D e Connect the cable marked Blac...

Page 10: ...ion feature selection and system operation refer to the Electronic Control System Installation Manual Each CH1900 control has been factory pre set for comfortable detent and drag operation However if an operator desires a different feel to the controls adjustments can be made as follows Control lever drag The drag adjustment screw is located on the side of each control head Adjustment requires a 5...

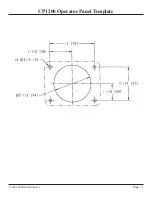
Page 11: ... 2006 Teleflex Marine Inc Page 11 CP1200 Operator Panel Template ...

Page 12: ...ronic Control Installation Manual Page 12 CH67600 Control Interface U S to Metric 4 inches 101 6 mm 1 535 inches 39 mm 5 217 inches 132 5 mm 610 inches 15 5 mm 4 677 inches 118 8 mm 1 441 inches 36 mm Drawing not to scale ...

Reviews: