background image


27

Menu Settings 

5. 


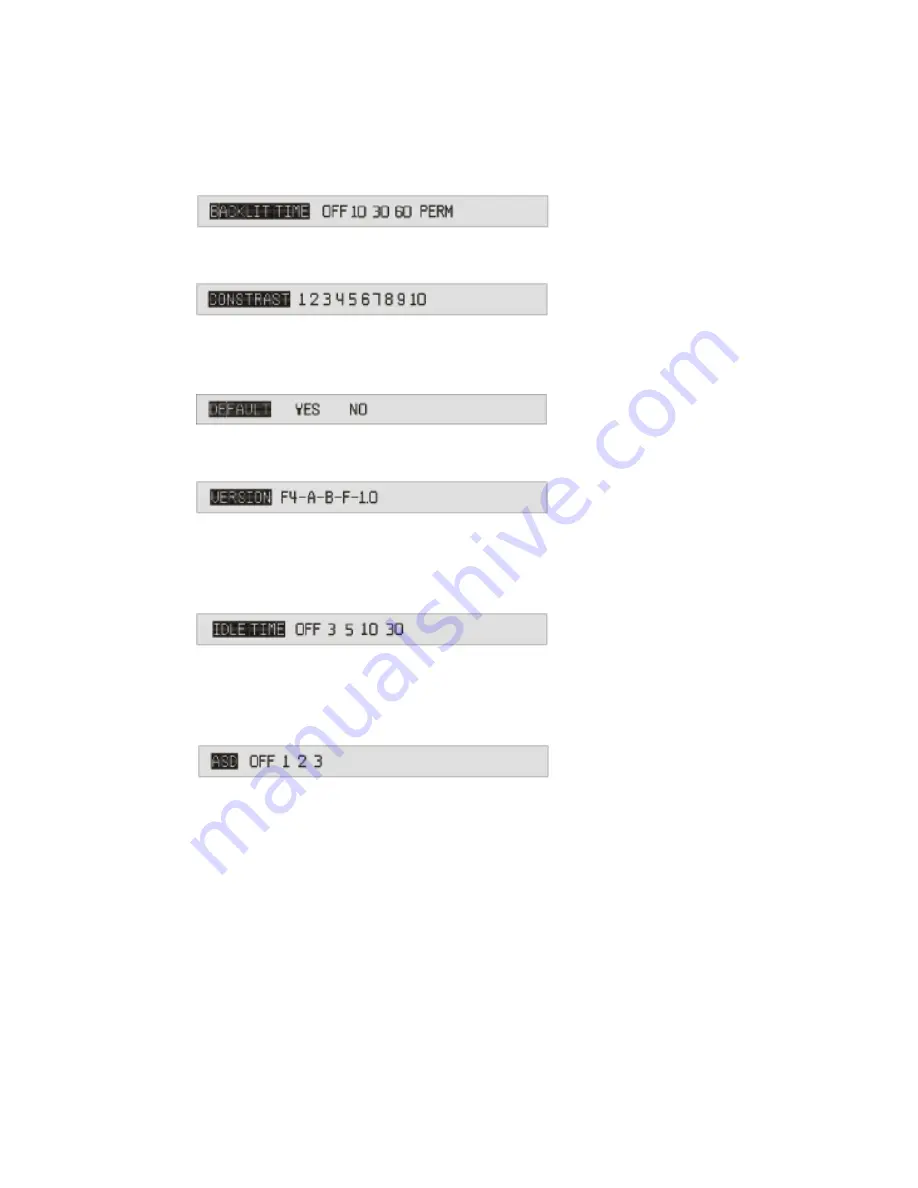
Backlit time: There are 4 backlit time levels; 10, 30, 60, and permanent. 

These refer to the length of time in seconds the backlight will remain on 
after pressing a button. 


6.    Contrast level: Set the display contrast from level 1 to 10. 


7.


Default setting: You may choose to resume your settings to default by 

pressing either "Yes" or "No." 


8.


Version number: For checking the firmware version of this player. 


9.


Idle time: The device will automatically power off when it is left for a 

specified idle time. For example, you can set it at 3 seconds and the 
device will turn off when it is left idle for this length of time. 


10.


ASD (Audio Silence Detection): This menu allows you to choose the 

length of silence before ending the current line-in recording and starting a 
new file. You can also turn the silence detection feature off with this menu. 


Summary of Contents for MR-240

Page 1: ...er 10 Turn off MP3 player 10 System Requirement 11 Mass Storage PC Connection 12 Mass Storage PC Connection 12 How to format the player 14 Firmware Upgrade 14 Detailed Controls 15 Selecting modes 15 Playing music or voice files 15 Recording 17 Menu Settings 19 Menu settings in Music mode 19 Menu settings in Radio mode 21 Menu settings in Voice mode 25 System Settings 26 Troubleshooting 28 Company ...

Page 2: ...ly functional Begin to enjoy the various features of your player by following this user manual To familiarize yourself with your player here are some function highlights Built in USB jack Direct line in encoding to MP3 or voice format 128MB 256MB or 512MB internal memory depending on version of the player MP3 WMA and ADPCM playback 30 FM radio preset channels Enhanced Feature FM recording in MP3 q...

Page 3: ...pressly by the party responsible for compliance could void the user 抯 authority to operate the equipment Modifications not authorized by the manufacturer may void users authority to operate this device This equipment has been tested and found to comply with limits for class B digital device pursuant to part 15 of the FCC rules These limits are designed to provide reasonable protection against harm...

Page 4: ...the receiving antenna Increase the separation between the equipment and receiver Connect the equipment into an outlet on a circuit different from that to which the receiver is connected Consult the dealer or an experienced radio TV technician for help Keep in mind modifications not authorized by the manufacturer may void users authority to operate this device If the product suddenly has no respons...

Page 5: ...5 Introduction ...

Page 6: ...6 In the Package ...

Page 7: ...7 Specifications ...

Page 8: ...8 Knowing your Portable MP3 Player ...

Page 9: ...9 Knowing your Portable MP3 Player ...

Page 10: ...your Portable MP3 Player Turn on MP3 player Press and hold Make sure the HOLD button is switched off If not LOCKED will be displayed Turn off MP3 player Press and hold except when your player is connected to a PC ...

Page 11: ...river installation is not essential unless your PC is running Windows 98 SE Multiple Language Support When the player is in stop mode pressing the Vol and Vol buttons will change the song name display language By using these buttons you can convert the song titles through a series of different languages listed below Western European Language Korean Hangeul Japanese Hiragana Katakana and Kanzi Chin...

Page 12: ...ows 98 SE users you can use the Windows 98 SE driver CD if your retailer has bundled it in the package Transfer files from PC to player 1 Switch on the player and connect it securely to the PC with the USB cable 2 Double click on My Computer on the desktop of windows there will be an additional drive created 3 If the player is connected to your PC you will see USB Connected on the player s screen ...

Page 13: ...PLETED Do not unplug the USB cable when the LCD is still displaying USB writing as doing so may corrupt the files stored in the player and you will need to re format the MP3 player If the player encounters abnormal interruption during recording such as battery removal you may also need to re format it ...

Page 14: ...is to try to restore the player to normal operation This is for when the player is not able to function properly or in cases where you player is unable to power on Keep in mind that the content of the player will be removed once being formatted 1 Connect the player to the PC 2 Right click the additional drive and click Format 3 Click Yes to confirm The player only supports FAT FAT16 file system Do...

Page 15: ... MP3 player into music or voice file Press to start playback While the MP3 player is playing press to pause The default status of the track is 2 Selecting Tracks 2 1 When the MP3 player is stopped paused use either the or the control to browse through the tracks 2 2 While the MP3 player is playing use the control to skip to the next track and the control to play the previous one 3 Fast Forward Fas...

Page 16: ...A Press REC A B again where you want the section to end B The marked section will start to repeat Press REC A B one more time to cancel the loop 5 Deleting Files Press the control and use the or the control to select DELETE Press to enter Use the or the control to select the file to be deleted Press to delete the track To exit press the control ...

Page 17: ...s you to record any audio source to MP3 Simply connect the audio source to line in jack by using a stereo cable Navigate your player into music mode Press the REC button to start recording in music mode To stop recording press REC again Note In Music mode the default recording source is Line In ...

Page 18: ...ss to pause or resume recording Note The default recording source in Voice mode is the internal microphone MIC IN ou can record audio files line in in voice mode The quality of the audio file will be in voice quality but the file size will be smaller Please refer to the System Settings section to find out how to do this 3 Radio recording in radio mode First navigate your player into radio mode Pre...

Page 19: ...on Press the button to enter into the sub menu and use the jog dial to choose the desired settings Press the button to confirm your choice Press the button to exit to the sub menu The following table shows all key responses for menu settings in different modes Menu settings in Music Mode ...

Page 20: ...aymode Equalizers Select Normal Rock Classic Jazz Pop and User default Bass Set bass from levels 1 to 4 1 is the weakest and 4 is the strongest Treble Set treble from levels 1 to 4 1 is the weakest and 4 is the strongest ...

Page 21: ...e various choices of recording bit rates in MP3 recording 48kbps 96kbps and 128kbps Deleting File Go to file you want to delete Press Press button to confirm deletion Press to Exit Delete Menu Menu setting in Radio Mode Normal Mode Channel Preset ...

Page 22: ... The next section explains how to enter the PRESET MODE and retrieve a preset programme 1 Enter the RADIO mode as described previously 2 In NORMAL MODE tune the radio to the programme you wish to preset 3 Press the button 4 Use the or controls to select CH PRESET 5 Press 6 Use the or controls to select the preset number 7 Press to confirm Using the preset mode Mono Stereo Mode Set FM radio output ...

Page 23: ...e RADIO mode as described previously 2 Press the button 3 Use the or controls to select PRESET MODE 4 Press The radio is now operating in preset mode 5 Use the or controls to select the preset programmes until the one you require is selected ...

Page 24: ...ram Preset Deleting programme presets 1 Enter the RADIO PRESET MODE as described above 2 Press the button 3 Use the or controls to select DELETE 4 Press 5 Use the or controls to select the preset programme you wish to delete 6 Press ...

Page 25: ...gs Menu setting in Voice Mode MUSIC Switch to music mode FM Switch to radio mode VOICE Switch to voice mode Deleting File Go to file you want to delete Press Press button to confirm deletion Press to Exit Delete Menu ...

Page 26: ...ing from line in and selecting MIC IN means you will be recording from the internal microphone 2 Sleep preset Choose the time in minutes that you want the device to automatically power off 3 Resume Use the to switch between On and Off This will enable or disable the resume function This function allows you to return to a track when you power on the device again 4 Scrolling Speed of song 抯 name Cho...

Page 27: ...pressing either Yes or No 8 Version number For checking the firmware version of this player 9 Idle time The device will automatically power off when it is left for a specified idle time For example you can set it at 3 seconds and the device will turn off when it is left idle for this length of time 10 ASD Audio Silence Detection This menu allows you to choose the length of silence before ending th...

Page 28: ...will have no response 3 Unable to play MP3 file Check if the memory contains any MP3 files Check if the player is in Music Mode Check if the MP3 player supports the format of the stored files 4 Unable to play ADPCM Check if the memory contains any VOC files Check if the player is in Voice Mode 5 Unable to record via line in Check if there is enough space in the selected memory Check if cable is st...

Page 29: ...Unable to find the mass storage device after connecting to the PC Make sure your device is powered on and ready 9 How to reset MP3 Player to factory settings Choose default setting in system settings Choosing YES allows you to reset the player to factory default settings 10 Backlight does not turn on Check if the backlight is disabled in the system setting This is for power saving purposes ...

Reviews: