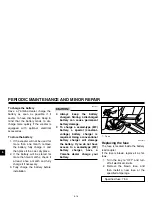
background image

7-2

SCOOTER CARE AND STORAGE

7

8

Do not use any harsh chemical
products on plastic parts. Be
sure to avoid using cloths or
sponges which have been in
contact with strong or abra-
sive cleaning products, sol-
vent or thinner, fuel (gasoline),
rust removers or inhibitors,
brake fluid, antifreeze or elec-
trolyte.

8

Do not use high-pressure
washers or steam-jet cleaners
since they cause water seep-
age and deterioration in the
following areas: seals (of
wheel and swingarm bearings,
fork and brakes), electric com-
ponents (couplers, connec-
tors, instruments, switches
and lights), breather hoses
and vents.

8

For scooters equipped with a
windshield: Do not use strong
cleaners or hard sponges as
they will cause dulling or
scratching. Some cleaning
compounds for plastic may
leave scratches on the wind-
shield. Test the product on a
small hidden part of the wind-
shield to make sure that it
does not leave any marks. If
the windshield is scratched,
use a quality plastic polishing
compound after washing.

After normal use
Remove dirt with warm water, a mild
detergent, and a soft, clean sponge,
and then rinse thoroughly with clean
water. Use a toothbrush or bottle-
brush for hard-to-reach areas.
Stubborn dirt and insects will come
off more easily if the area is covered
with a wet cloth for a few minutes
before cleaning.

After riding in the rain, near the sea
or on salt-sprayed roads
Since sea salt or salt sprayed on the
roads during winter are extremely
corrosive in combination with water,
carry out the following steps after
each ride in the rain, near the sea or
on salt-sprayed roads.

NOTE:

Salt sprayed on roads in the winter
may remain well into spring.

1. Clean the scooter with cold water

and a mild detergent after the
engine has cooled down.

ECA00012

c

C

Do not use warm water since it
increases the corrosive action of
the salt.

2. Apply a corrosion protection

spray on all metal, including
chrome- and nickel-plated, sur-
faces to prevent corrosion.

Summary of Contents for VINO YJ50RP

Page 1: ...OWNER S MANUAL YJ50RP ...

Page 2: ...EAU03438 ...

Page 3: ...ring and pacesetting racing machines It represents the high degree of craftsmanship and reliability that have made Yamaha a leader in these fields This manual will give you an understanding of the operation inspection and basic maintenance of this scooter If you have any questions concerning the operation or maintenance of your scooter please consult a Yamaha dealer ...

Page 4: ...ions that must be taken to avoid damage to the scooter A NOTE provides key information to make procedures easier or clearer Q w cC NOTE NOTE 8 This manual should be considered a permanent part of this scooter and should remain with it even if the scooter is subsequently sold 8 Yamaha continually seeks advancements in product design and quality Therefore while this manual contains the most current ...

Page 5: ...S SCOOTER DO NOT ATTEMPT TO OPERATE THIS SCOOTER UNTIL YOU HAVE ATTAINED ADEQUATE KNOWL EDGE OF ITS CONTROLS AND OPERATING FEATURES AND UNTIL YOU HAVE BEEN TRAINED IN SAFE AND PROPER RIDING TECHNIQUES REGULAR INSPECTIONS AND CARE FUL MAINTENANCE ALONG WITH GOOD RIDING SKILLS WILL ENSURE THAT YOU SAFELY ENJOY THE CAPABILITIES AND THE RELIABILITY OF THIS SCOOTER ...

Page 6: ...oration U S A 1st edition June 2001 All rights reserved Any reprinting or unauthorized use without the written permission of Yamaha Motor Corporation U S A is expressly prohibited Printed in Japan P N LIT 11626 15 34 EAU04247 AFFIX DEALER LABEL HERE ...

Page 7: ...rake lever 3 5 Fuel tank cap 3 6 Fuel 3 7 2 stroke engine oil 3 8 Kickstarter 3 9 Seat 3 9 Helmet holder 3 9 Storage compartment 3 10 Carrier 3 11 PRE OPERATION CHECKS 4 1 Pre operation check list 4 1 OPERATION AND IMPORTANT RIDING POINTS 5 1 Starting and warming up a cold engine 5 1 Starting off 5 2 Acceleration and deceleration 5 3 Braking 5 3 Engine break in 5 4 Parking 5 5 PERIODIC MAINTENANCE...

Page 8: ...er 6 14 Battery 6 14 Replacing the fuse 6 16 Troubleshooting 6 17 Troubleshooting chart 6 18 SCOOTER CARE AND STORAGE 7 1 Care 7 1 Storage 7 4 SPECIFICATIONS 8 1 CONSUMER INFORMATION 9 1 Identification numbers 9 1 Key identification number 9 1 Vehicle identification number 9 1 Model label 9 2 Reporting safety defects 9 3 Scooter noise regulation 9 4 Riva limited warranty 9 6 Yamaha extended servic...

Page 9: ...R WHEN MADE NECESSARY BY MECHANICAL CONDITIONS Safe riding 1 Always make pre operation checks Careful checks may help prevent an accident 2 This scooter is designed to carry the operator only No passengers 3 The failure of motorists to detect and recognize scooters in traffic is the predominating cause of automobile scooter accidents Many accidents have been caused by an automobile driver who did ...

Page 10: ... the speed a Always obey the speed limit and never travel faster than warranted by road and traffic condi tions b Always signal before turning or changing lanes Make sure that other motorists can see you 6 The posture of the operator is important for proper control The operator should keep both hands on the handlebar and both feet on the footboard during operation to maintain control of the scoot ...

Page 11: ...your scooter illegal to use Loading and accessories Adding accessories or cargo to your scooter can adversely affect stability and handling if the weight distribution of the scooter is changed To avoid the possibility of an accident use extreme caution when adding cargo or accessories to your scooter Use extra care when riding a scooter that has added cargo or accessories Here are some general gui...

Page 12: ... well as those provided under Loading when mounting accessories 1 Never install accessories or carry cargo that would impair the performance of your scooter Carefully inspect the accessory before using it to make sure that it does not in any way reduce ground clearance or cornering clearance limit suspension travel steering travel or control opera tion or obscure lights or reflectors a Accessories...

Page 13: ...for any length of time in a closed area The exhaust fumes are poisonous and may cause loss of consciousness and death within a short time Always operate your scooter in an area that has adequate ventilation 3 Always turn the engine off before leaving the scooter unattended and remove the key from the main switch When parking the scooter note the following a The engine and exhaust system may be hot...

Page 14: ...tes and manhole covers become extremely slippery when wet Slow down and cross them with caution Keep the scooter upright otherwise it could slide out from under you 6 The brake lining could get wet when you wash the scooter After washing the scooter check the brakes before riding 7 Always wear a helmet gloves trousers tapered around the cuff and ankle so they do not flap and a bright colored jacke...

Page 15: ...Q SAFETY INFORMATION 1 EAU02977 Location of important labels Please read the following important labels carefully before operating this scooter 1 2 3 5 4 ...

Page 16: ...your risk of losing control if you carry a passenger 3SL 2118K A0 3LD 24877 A0 LOAD LIMIT 5 kg 11 lbs 3 4 q WARNING Improper loading can cause loss of control Read owner s manual for proper loading 3JJ 28446 A0 TIRE INFORMATION follows FRONT REAR 5LY 21668 A0 Cold tire normal pressure should be set as 150 kPa 1 50 kgf cm2 22 psi 175 kPa 1 75 kgf cm2 25 psi q WARNING NEVER sit on carrier 3kg CARRIE...

Page 17: ...Q SAFETY INFORMATION 1 ...

Page 18: ...26 DESCRIPTION 2 1 Front wheel 2 Front fender 3 Front turn signal light 4 Rear turn signal light 5 Rear wheel 6 Kickstarter page 3 9 7 Air filter element page 6 8 8 Battery page 6 14 1 2 3 4 5 6 7 8 Left view ...

Page 19: ...PTION 2 9 Tail brake light 10 Carrier page 3 11 11 2 stroke engine oil tank cap cover page 3 8 12 Seat page 3 9 13 Headlight 14 Spark plug page 6 5 15 Centerstand 16 Muffler 13 12 10 9 16 15 11 14 Right view ...

Page 20: ...t handlebar switches page 3 4 3 Fuel gauge page 3 4 4 Speedometer unit page 3 3 5 Main switch steering lock page 3 1 6 Right handlebar switches page 3 4 7 Front brake lever page 3 5 8 Throttle grip page 6 10 1 2 3 4 5 6 7 8 Controls and instruments ...

Page 21: ...s are supplied with power the taillight and meter lighting come on and the engine can be started The key cannot be removed NOTE The headlight comes on as soon as the engine is started EAU00038 OFF All electrical systems are off The key can be removed EAU02954 The engine oil level warning light should come on See page 3 2 for an explanation of the engine oil level warning light EAU00040 LOCK The st...

Page 22: ...an accident Make sure that the scoot er is stopped before turning the key to OFF or LOCK 1 2 1 Push 2 Turn EAU03034 Indicator and warning lights EAU04355 2 stroke engine oil level warning light 7 The warning light comes on when the key is in the position or when the engine oil level in the 2 stroke engine oil tank is low during operation If the warning light comes on during opera tion stop immedia...

Page 23: ... the left or right EAU00063 High beam indicator light This indicator light comes on when the high beam of the headlight is switched on EAU00095 Speedometer unit The speedometer unit is equipped with a speedometer an odometer and a tripmeter The speedometer shows riding speed The odometer shows the total distance traveled The tripmeter shows the distance traveled since it was last set to zero with ...

Page 24: ...osition To cancel the turn signal lights push the switch in after it has returned to the center position EAU00129 Horn switch Press this switch to sound the horn EAU03890 Engine stop switch Set this switch to before starting the engine Set this switch to to stop the engine in case of an emer gency such as when the scooter overturns or when the throttle cable is stuck INSTRUMENT AND CONTROL FUNCTIO...

Page 25: ...rting the engine EAU03882 Front brake lever The front brake lever is located on the right handlebar grip To apply the front brake pull this lever toward the handlebar grip 1 1 Front brake lever EAU00163 Rear brake lever The rear brake lever is located on the left handlebar grip To apply the rear brake pull this lever toward the han dlebar grip 1 1 Rear brake lever FRONT REAR ...

Page 26: ... AND CONTROL FUNCTIONS 3 a 1 1 Fuel tank cap lock cover a Unlock To install the fuel tank cap 1 Insert the fuel tank cap into the tank opening with the key insert ed in the lock and with the marks on the cap and tank aligned 2 Turn the key counterclockwise to the original position remove it and then close the lock cover NOTE The fuel tank cap cannot be installed unless the key is in the lock In ad...

Page 27: ...ine with a pump octane number R M 2 of 86 or higher or a research octane number of 91 or higher If knocking or pinging occurs use a gasoline of a different brand or premium unleaded fuel Use of unleaded fuel will extend spark plug life and reduce maintenance costs Gasohol There are two types of gasohol gasohol containing ethanol and that containing methanol Gasohol con taining ethanol can be used ...

Page 28: ...2 stroke engine oil tank cap cover as shown 2 Remove the 2 stroke engine oil tank cap and add the recom mended oil 3 Install the 2 stroke engine oil tank cap and tank cap cover NOTE Make sure that the 2 stroke engine oil tank cap is properly installed 2 a b 1 1 2 stroke engine oil tank cap 2 2 stroke engine oil tank cap cover a Unlock b Lock Recommended oil See page 8 1 Oil quantity 1 4 L 1 23 Imp...

Page 29: ...t 1 Insert the key in the lock and then turn it as shown 2 Fold the seat up To close the seat 1 Fold the seat down and then push it down to lock it in place 2 Remove the key NOTE Make sure that the seat is properly secured before riding a a Open EAU00262 Helmet holder The helmet holder is located under the seat To secure a helmet to the helmet holder 1 Open the seat 2 Attach the helmet to the helm...

Page 30: ... avoid humidity from spreading through the storage compartment wrap wet arti cles in a plastic bag before storing them in the compart ment 8 Since the storage compart ment may get wet while the scooter is being washed wrap any articles stored in the com partment in a plastic bag 8 Do not keep anything valuable or breakable in the storage compartment INSTRUMENT AND CONTROL FUNCTIONS 3 EAU03450 Stor...

Page 31: ...ing forward NOTE 8 Some helmets cannot be stored in the storage compartment because of their size or shape 8 Do not leave your scooter unat tended with the seat open EAU00320 Carrier EW000032 w 8 Do not exceed the load limit of 3 kg 7 lb for the carrier 8 Do not exceed the maximum load of 75 kg 165 lb for the vehicle 1 1 Carrier ...

Page 32: ...n check list ITEM CHECKS PAGE Fuel Check fuel level in fuel tank Refuel if necessary Check fuel line for leakage 3 6 3 7 2 stroke engine oil Check oil level in oil tank If necessary add recommended oil to specified level Check vehicle for oil leakage 3 8 Final transmission oil Check vehicle for oil leakage 6 7 Front brake Check operation Lubricate cable if necessary Check lever free play Adjust if...

Page 33: ...re operat ing the scooter Wheels and tires Check for damage Check tire condition and tread depth Check air pressure Correct if necessary 6 10 6 12 Brake levers Make sure that operation is smooth Lubricate lever pivoting points if necessary 3 5 6 12 6 13 6 14 Centerstand Make sure that operation is smooth Lubricate pivot if necessary Chassis fasteners Make sure that all nuts bolts and screws are pr...

Page 34: ...ure that there is adequate ventila tion 8 For safety always start the engine with the centerstand down EAU00376 cC 8 Make sure not to store person al items near the air cleaner intake otherwise air intake will be blocked and performance will suffer 8 Make sure not to put anything near the battery and its termi nals otherwise electrical fail ure and acid corrosion may result EAU03967 Starting and w...

Page 35: ...ld be as short as possible to preserve the battery Do not crank the engine more than 5 seconds on any one attempt If the engine does not start with the starter motor try using the kickstarter ECA00055 cC For maximum engine life always warm the engine up before starting off Never accelerate hard when the engine is cold 2 1 1 Start switch 2 Kickstarter EAU00433 Starting off NOTE Before starting off ...

Page 36: ...by open ing and closing the throttle To increase the speed turn the throttle grip in direction a To reduce the speed turn the throttle grip in direc tion b a a b b EAU00435 Braking 1 Close the throttle completely 2 Apply both front and rear brakes simultaneously while gradually increasing the pressure EW000057 w 8 Avoid braking hard or sudden ly especially when leaning over to one side otherwise t...

Page 37: ...ine is brand new do not put an excessive load on it for the first 1 000 km 600 mi The various parts in the engine wear and polish themselves to the correct operating clearances During this period pro longed full throttle operation or any condition that might result in engine overheating must be avoided EAU04385 0 150 km 0 90 mi 8 Avoid prolonged operation above 1 3 throttle 8 After every hour of o...

Page 38: ... check the vehicle EW000058 w 8 Since the engine and exhaust system can become very hot park in a place where pedestri ans or children are not likely to touch them 8 Do not park on a slope or on soft ground otherwise the scooter may overturn EC000062 cC Never park in an area where there are fire hazards such as grass or other flammable materials Incorrect EAU00461 Parking When parking stop the eng...

Page 39: ...adjust ment and lubrication are explained on the following pages EW000060 w If you are not familiar with scooter maintenance work have a Yamaha dealer do it for you EAU00466 w This scooter is designed for use on paved roads only If this scoot er is operated in abnormally dusty muddy or wet conditions the air filter element should be cleaned or replaced more frequently other wise rapid engine wear ...

Page 40: ...Replace if necessary 5 Final transmission oil Check oil leakage Correct if necessary Replace every 8 000 mi 12 000 km or 24 months Ride scooter a few minutes before draining REPLACE 6 Autolube pump Check operation Correct if necessary Bleed 7 Brakes Check operation Adjust if necessary 8 Wheels Check damage runout Replace if necessary 9 Wheel bearings Check bearing assembly for looseness damage Rep...

Page 41: ... From 6 000 mi 9 000 km or 18 months repeat the maintenance intervals starting from 2 000 mi 3 000 km or 6 months 12 V belt Check damage and wear Replace if necessary Replace every 6 000 mi 9 000 km 13 Chassis fasteners Check all chassis fittings and fasteners Correct if necessary 14 Control and meter cables Apply chain lube thoroughly 15 Centerstand Check operation Repair if necessary NO ITEM ROU...

Page 42: ...chapter Refer to this section each time the panel needs to be removed and installed 1 1 Panel A 2 Remove the screws and then pull the panel off as shown To install the panel Place the panel in the original posi tion and then install the screws 2 1 1 Panel A 2 Screw EAU03971 Panel A To remove the panel 1 Open the seat See page 3 9 for seat opening and closing proce dures 1 1 Screw 2 ...

Page 43: ...ug to slowly erode the spark plug should be removed and checked in accordance with the periodic maintenance and lubrication chart In addition the condition of the spark plug can reveal the condition of the engine 2 Remove the spark plug as shown with a spark plug wrench available at a Yamaha dealer 1 1 Spark plug wrench To remove the spark plug 1 Remove the spark plug cap 1 1 Spark plug cap ...

Page 44: ...spark plug 1 Measure the spark plug gap with a wire thickness gauge and if necessary adjust the gap to specification 2 Clean the surface of the spark plug gasket and its mating sur face and then wipe off any grime from the spark plug threads 3 Install the spark plug with the spark plug wrench and then tighten it to the specified torque NOTE If a torque wrench is not available when installing a spa...

Page 45: ...used oil 4 Remove the oil filler cap and drain bolt to drain the oil from the final transmission case 5 Install the final transmission oil drain bolt and then tighten it to the specified torque 6 Add the specified amount of the recommended final transmission oil and then install and tighten the oil filler cap EWA00062 w 8 Make sure that no foreign material enters the final trans mission case 8 Mak...

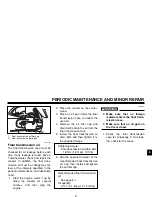
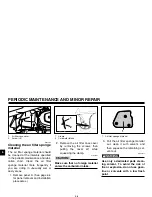
Page 46: ... installation procedures 1 2 1 Air filter case cover 2 Screw 3 3 Pull the air filter sponge material out clean it with solvent and then squeeze the remaining sol vent out EW000075 w Use only a dedicated parts clean ing solvent To avoid the risk of fire or explosion do not use gaso line or solvents with a low flash point 1 1 Air filter sponge material 2 Remove the air filter case cover by removing ...

Page 47: ...is properly seated in the air filter case 8 The engine should never be operated without the air filter sponge material installed oth erwise the piston and or cylin der may become excessively worn 6 Install the air filter case cover by placing it in the original position fastening it with the clamp then installing the screws 7 Install the panel EAU00631 Adjusting the carburetor The carburetor is an...

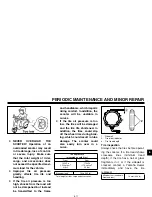
Page 48: ...adjust it a a Throttle cable free play Tire air pressure The tire air pressure should be checked and if necessary adjusted before each ride EW000089 w Because loading has an enormous impact on the handling braking performance and safety character istics of your scooter you should keep the following precautions in mind EAU03991 Tires To maximize the performance dura bility and safe operation of you...

Page 49: ...ir pressure is too low the tires will be damaged and the tire life shortened In addition the tires could slip off the wheel rims during brak ing which could result in tube damage The scooter could also easily turn over in a curve Tire inspection Always check the tires before operat ing the scooter If a tire tread shows crosswise lines minimum tread depth if the tire has a nail or glass fragments i...

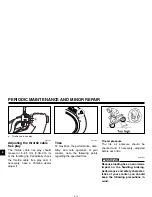
Page 50: ... worn out tire When a tire tread begins to show cross wise lines have a Yamaha dealer replace the tire immedi ately 8 The replacement of all wheel and brake related parts including the tires should be left to a Yamaha dealer who has the necessary profession al knowledge and experience EAU00702 Adjusting the front and rear brake lever free play The front and rear brake lever free play should measur...

Page 51: ...ance and lubrication chart Each brake is provided with a wear indicator which allows you to check the brake shoe wear without having to disassemble the brake To check the brake shoe wear check the position of the wear indicator while applying the brake If a brake shoe has worn to the point that the wear indicator reaches the wear limit line have a Yamaha dealer replace the brake shoes as a set 2 1...

Page 52: ... which causes severe burns Avoid any con tact with skin eyes or clothing and always shield your eyes when working near batteries In case of contact administer the following FIRST AID 9 EXTERNAL Flush with plen ty of water 9 INTERNAL Drink large quan tities of water or milk and immediately call a physician 9 EYES Flush with water for 15 minutes and seek prompt medical attention Recommended lubrican...

Page 53: ... Battery box cover 2 Screw 8 Batteries produce explosive hydrogen gas Therefore keep sparks flames cigarettes etc away from the battery and provide sufficient ventilation when charging it in an enclosed space 8 KEEP THIS AND ALL BATTER IES OUT OF THE REACH OF CHILDREN To install the battery 1 Connect the battery coupler and then place the battery in the orig inal position 2 Install the battery box...

Page 54: ...ws 1 Turn the key to OFF and turn off all electrical circuits 2 Remove the blown fuse and then install a new fuse of the specified amperage 1 1 Fuse Specified fuse 7 5 A To charge the battery Have a Yamaha dealer charge the battery as soon as possible if it seems to have discharged Keep in mind that the battery tends to dis charge more quickly if the scooter is equipped with optional electrical ac...

Page 55: ...ny repair take it to a Yamaha dealer whose skilled techni cians have the necessary tools experience and know how to service the scooter properly Use only genuine Yamaha replace ment parts Imitation parts may look like Yamaha parts but they are often inferior have a shorter service life and can lead to expensive repair bills EC000103 cC Do not use a fuse of a higher amperage rating than recommend e...

Page 56: ...pression Check the ignition Have a Yamaha dealer check the vehicle Remove the spark plug and check the electrodes 3 Ignition Wipe off with a dry cloth and correct the spark plug gap or replace the spark plug Have a Yamaha dealer check the vehicle The engine does not start Have a Yamaha dealer check the vehicle The engine does not start Check the battery Operate the electric starter 4 Battery The e...

Page 57: ...ps and cov ers as well as all electrical cou plers and connectors including the spark plug cap are tightly installed 3 Remove extremely stubborn dirt like oil burnt onto the crankcase with a degreasing agent and a brush but never apply such products onto seals gaskets and wheel axles Always rinse the dirt and degreaser off with water Cleaning ECA00011 cC 8 Avoid using strong acidic wheel cleaners ...

Page 58: ...at it does not leave any marks If the windshield is scratched use a quality plastic polishing compound after washing After normal use Remove dirt with warm water a mild detergent and a soft clean sponge and then rinse thoroughly with clean water Use a toothbrush or bottle brush for hard to reach areas Stubborn dirt and insects will come off more easily if the area is covered with a wet cloth for a...

Page 59: ...used by stones etc 6 Wax all painted surfaces 7 Let the scooter dry completely before storing or covering it EWA00002 w 8 Make sure that there is no oil or wax on the brakes or tires If necessary clean the brake discs and brake linings with a regular brake disc cleaner or acetone and wash the tires with warm water and a mild detergent 8 Before operating the scooter test its braking performance and...

Page 60: ...ilding up Pour the drained fuel into the fuel tank 3 Fill up the fuel tank and add fuel stabilizer if available to prevent the fuel tank from rusting and the fuel from deteriorating 4 Perform the following steps to protect the cylinder piston rings etc from corrosion a Remove the spark plug cap and spark plug b Pour a teaspoonful of engine oil into the spark plug bore c Install the spark plug cap ...

Page 61: ...e wheels a little every month in order to pre vent the tires from becoming degraded in one spot 7 Cover the muffler outlet with a plastic bag to prevent moisture from entering it 8 Remove the battery and fully charge it Store it in a cool dry place and charge it once a month Do not store the battery in an excessively cold or warm place less than 0 C 30 F or more than 30 C 90 F For more information...

Page 62: ...m 1 57 1 54 in Compression ratio 7 3 1 Starting system Electric and kick starter Lubrication system Separate lubrication Yamaha autolube Engine oil Type YAMALUBE 2 or 2 stroke engine oil Quantity Total amount 1 4 L 1 23 Imp qt 1 48 US qt Final transmission oil Type Yamalube 4 SAE10W30SE or GL gear oil Quantity Periodic oil change 0 1 L 0 09 Imp qt 0 11 US qt Total amount 0 11 L 0 1 Imp qt 0 12 US ...

Page 63: ... Manufacturer IRC MB38 model CHENG SHIN C 922 Rear Type Tubeless tire Size 80 90 10 34J Manufacturer IRC MB38 model CHENG SHIN C 922 Maximum load 75 kg 165 lb Tire air pressure measured on cold tires Front 150 kPa 1 50 kgf cm2 21 psi Rear 175 kPa 1 75 kgf cm2 25 psi Wheels Front Type Panel wheel Size 10 2 15 Rear Type Panel wheel Size 10 2 15 Brakes Front Type Drum brake Operation Right hand Rear ...

Page 64: ...odel GT4B 5 Voltage capacity 12 V 2 5 Ah Headlight type Halogen bulb Bulb voltage wattage quantity Headlight 12 V 35 35 W 1 Tail brake light 12 V 8 27 W 1 Front turn signal light 12 V 10 W 2 Rear turn signal light 12 V 10 W 2 Meter lighting 12 V 1 7 W 1 High beam indicator light 12 V 1 7 W 1 2 stroke engine oil level warning light 12 V 1 7 W 1 Turn signal indicator light 14 V 3 W 1 Fuse 7 5 A ...

Page 65: ...FICATION NUMBER 3 MODEL LABEL INFORMATION EAU01044 Vehicle identification number The vehicle identification number is stamped into the frame NOTE The vehicle identification number is used to identify your scooter and may be used to register your scooter with the licensing authority in your area 1 1 Vehicle identification number EAU01042 Key identification number The key identification number is st...

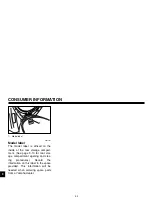
Page 66: ... the inside of the rear storage compart ment See page 3 10 for rear stor age compartment opening and clos ing procedures Record the information on this label in the space provided This information will be needed when ordering spare parts from a Yamaha dealer 1 1 Model label ...

Page 67: ...ints it may open an investigation and if it finds that a safety defect exists in a group of vehicles it may order a recall and remedy campaign However NHTSA cannot become involved in individual problems between you your dealer or Yamaha Motor Corporation U S A To contact NHTSA you may either call the Auto Safety Hotline toll free at 1 800 424 9393 or 366 0123 in Washington D C area or write to NHT...

Page 68: ...ted into any new vehicle for the purpose of noise control prior to its sale or delivery to the ultimate purchaser or while it is in use or 2 the use of the vehicle after such device or ele ment of design has been removed or rendered inoperative by any person AMONG THOSE ACTS PRESUMED TO CONSTITUTE TAMPERING ARE THE ACTS LISTED BELOW These acts include tampering with the following systems i e modif...

Page 69: ...CONSUMER INFORMATION 9 ...

Page 70: ...CONSUMER INFORMATION 9 EAU02919 YAMAHA MOTOR CORPORATION U S A RIVA LIMITED WARRANTY ...

Page 71: ...CONSUMER INFORMATION 9 ...

Page 72: ...CONSUMER INFORMATION 9 EAU01063 YAMAHA EXTENDED SERVICE Y E S ...

Page 73: ...CONSUMER INFORMATION 9 ...

Page 74: ...PRINTED IN JAPAN See your Authorized YAMAHA Dealer for a Genuine YAMAHA Service Manual PROTECT YOUR INVESTMENT Use Genuine YAMAHA Parts And Accessories PRINTED ON RECYCLED PAPER YAMAHA MOTOR CO LTD ...

Reviews: