


–11–
1
3
5
4
2
A
B
C
A
2
3
1
3
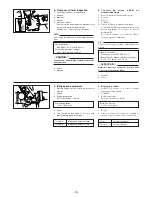
8. Battery/
Batterie
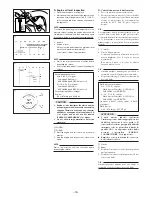
7. Front panel/
Capot avant
Front panel
Hexagon bolt
Spring nut
1
2
3
1
2
2
4
- C
1
- C
1
- C
A: Tighten the bolt to the specified
torque.
Tighten torque:
3 Nm (0.3 m • kg, 2.2 ft • lb)
d = 5 (0.20),
R
= 12 (0.47)
A: Serrer le boulon au couple
spécifié.
Couple de serrage:
3 Nm (0,3 m • kg, 2,2 ft • lb)
A:
N.B.:
Avant de monter la batterie. Voir
“RÉGLAGES ET ENTRETIEN
AVANT LIVRAISON”.
Retirer la clé de contact avant de
brancher les câbles de batterie.
B: Raccorder d’abord le câble
+
(câble de couleur rouge) à la
borne
+
.
C: Raccorder ensuite câble
-
(câble de couleur noire) à la
borne
-
.
A:
NOTE:
Before installing the battery, refer
to
“ADJUSTMENTS AND
PREDELIVERY SERVICE”.
Before connecting the battery
leads, remove the key from the
main switch.
B: First, connect the
+
lead (red
lead) to the
+
terminal.
C: Next, connect the
-
lead (black
lead) to the
-
terminal.
1
2
3
4
5
Battery band
Battery breather hose
Battery
Bolt
Nut
1
1
1
2
2
*
*
*
*
*
d = 6 (0.24),
R
= 10 (0.40)
d = 6 (0.24)
2
3
1
A
9. Owner’s manual/
Manuel du propriétaire
A:
N.B.:
Insérer le manuel du propriétaire
de la machine dans le sac en
plastique et le placer dans le
compartiment sous la selle.
Celui-ci doit toujours être
conservé dans ce compartiment.
A:
NOTE:
Put this owner’s manual in the
vinyl bag and always carry them in
the rear fender.
Owner’s manual
Band
Owner’s tool kit
1
2
3
1
1
1
1
- C
1
- C
1
- C
Summary of Contents for RAPTOR YFM80WP
Page 1: ...YFM80WP ASSEMBLY MANUAL MANUEL D ASSEMBLAGE 5TH 28107 70...
Page 29: ......


