15
R-N402/R-N402D
R-N402/R-N402D
■
UPDATING FIRMWARE
When the following parts are replaced, the firmware must be updated to the latest version.
D
I
G
I
TA
L
P
.C.
B
.
N
etwork module
●
Confirmation of firmware version
B
efore and after updating the firmware, check the firmware version by using the self-diagnostic function menu.
S
tart up the self-diagnostic function and select
“
S
2.
R
OM V
ERS
IO
N
/C
HE
C
KSU
M
”
menu.
U
sing the sub-menu, have the firmware version displayed, and note them down.
(For details, refer to
“
SE
LF-
D
I
AGN
O
ST
IC F
UN
C
T
IO
N
”
)
* When the firmware version is different from written one after updating, perform the updating procedure again from
the beginning.
●
Initializing the back-up IC (EEPROM: IC301 on DIGITAL P.C.B.)
A
fter updating the firmware, the back-up IC M
UST
be initialized by the following procedure store the setting
information (soundfield parameters, system memory and tuner presetting, etc.) properly.be initialized by the following
procedure store the setting information (soundfield parameters, system memory and tuner presetting, etc.) properly.
S
tart up the self-diagnostic function and select
“
S
1. F
A
C
T
O
RY
PRESET
”
menu.
(For details, refer to
“
SE
LF-
D
I
AGN
O
ST
IC F
UN
C
T
IO
N
”
)
S
elect
“
PRESET
RSR
V
”
, press the
“
z
”
(
P
ower) key to turn off the power once and turn on the power again.
T
hen the
back-up IC is initialized.
●
Required Tools
•
USB
storage device
•
Latest firmware
D
ownload the latest firmware from the specified download source to the
P
C.
A
nd then, copy the firmware to the root folder of the
USB
storage device.
If the firmware is copied to a subfolder of the
USB
storage device, the update will not proceed.
●
Operation Procedures
*
D
isconnect the power cable of this unit from the
A
C outlet.
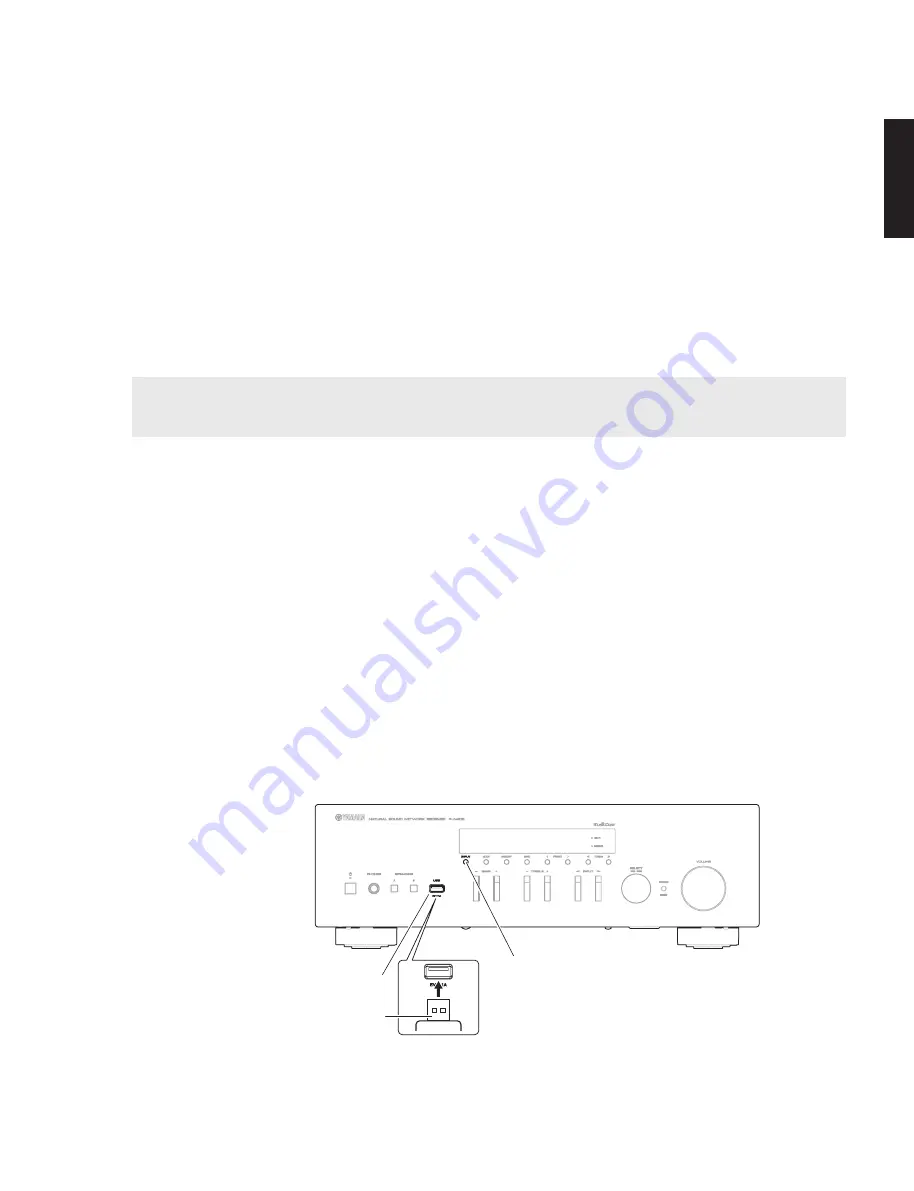
1. Insert the
USB
storage device to the
USB
jack. (Fig. 1)
2. While pressing the
“
D
I
SP
L
AY
”
key, connect the power cable to the
A
C outlet. (Fig. 1)
USB jack
USB storage device
“DISPLAY” key
Fig.1
Summary of Contents for R-N402
Page 3: ...3 R N402 R N402D R N402 R N402D FRONT PANELS R N402 R N402D ...
Page 4: ...4 R N402 R N402D R N402 R N402D REAR PANELS R N402 U model R N402 R model R N402 T model ...
Page 5: ...5 R N402 R N402D R N402 R N402D R N402 K model R N402 A model R N402 B G models ...
Page 6: ...6 R N402 R N402D R N402 R N402D R N402 L model R N402 S model R N402D B G models ...
Page 51: ...51 R N402 R N402D J I H G F E D C B A 1 2 3 4 5 6 7 Side B DIGITAL 1 Side B DIGITAL 2 ...
Page 60: ...60 R N402 R N402D MEMO MEMO ...
Page 82: ...83 R N402 R N402D R N402 R N402D MEMO ...
Page 83: ...R N402 R N402D ...


