background image

Using, Creating and Editing 

V

oices

Editing the Volume and Tonal Balance (MIXING CONSOLE)

PSR-S900/S700 Owner’s Manual

98

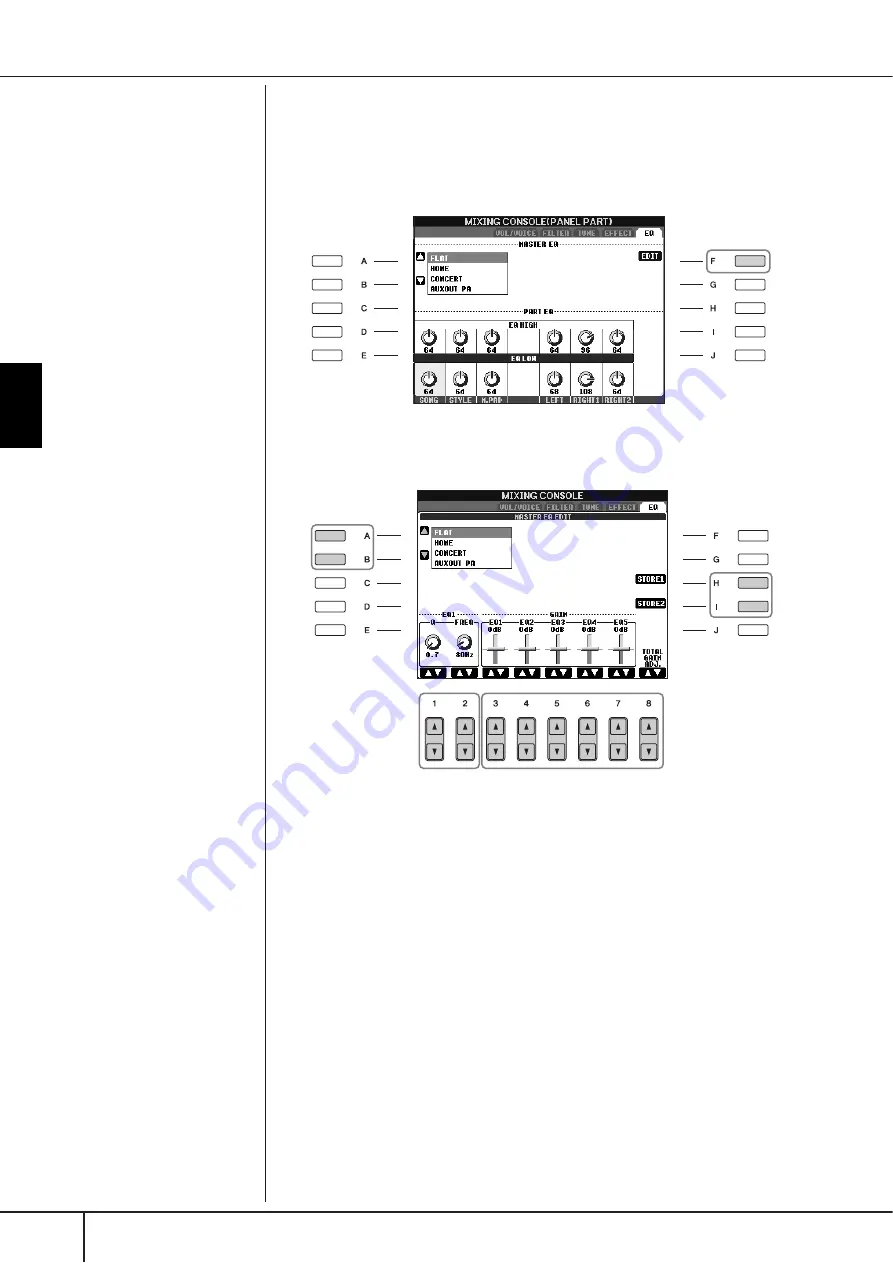
If you want to edit the EQ parameters, go on to the next operation.

Editing and Saving the selected EQ

5

Press the [F] (EDIT) button to call up the MASTER EQ EDIT display.

6

Use the [A]/[B] buttons to select a preset EQ type.

7

Use the [3

π

π

π

π†

]–[7

π

π

π

π†

] buttons to boost or cut each of the five 

bands.

Use the [8

π†

] button to boost or cut all the five bands at the same time.

8

Adjust the Q (bandwidth) and the FREQ (center frequency) of the 
band selected in step 7.

• Bandwidth (also called “Shape” or “Q”)

Use the [1

π†

]button. The higher the value of Q, the narrower the band 

width. 

• FREQ (center frequency)

Use the [2

π†

]button. The available FREQ range is different for each 

band.

9

Press the [H] or [I] (STORE 1 or 2) button to save the edited EQ type 
(page 73).

Up to two types of EQ can be created and saved. When recalling the saved 
EQ type, use the same procedure as in step 6.

6

9

8

7

Summary of Contents for Portatone PSR-S700

Page 1: ...EN O W N E R S M A N U A L ...

Page 2: ...ion or effect works when the unit is operating as designed are not covered by the manufacturer s warranty and are therefore the owners responsibility Please study this manual carefully and consult your dealer before requesting service ENVIRONMENTAL ISSUES Yamaha strives to produce products that are both user safe and environ mentally friendly We sincerely believe that our products and the produc t...

Page 3: ...switch disconnect the adaptor plug from the outlet and have the instrument inspected by qualified Yamaha service personnel CAUTION Always follow the basic precautions listed below to avoid the possibility of physical injury to you or others or damage to the instrument or other property These precautions include but are not limited to the following When removing the electric plug from the instrumen...

Page 4: ...ging in the ears consult a physician Saving and backing up your data The data of the types listed below are lost when you turn off the power to the instrument Save the data to the USER tab display page 27 or USB storage device USB flash memory floppy disk etc Recorded Edited Songs page 43 147 162 Created Edited Styles page 118 Edited Voices page 99 Memorized One Touch Settings page 51 Edited MIDI ...

Page 5: ... your personal use This device is capable of using various types formats of music data by optimizing them to the proper format music data for use with the device in advance As a result this device may not play them back precisely as their producers or composers originally intended Some of the preset songs have been edited for length or arrangement and may not be exactly the same as the original Th...

Page 6: ...an t Help Falling In Love from the Paramount Picture BLUE HAWAII Words and Music by George David Weiss Hugo Peretti and Luigi Creatore Copyright 1961 Renewed 1989 Gladys Music ASCAP Worldwide Rights for Gladys Music Administered by Cherry Lane Music Publishing Company Inc International Copyright Secured All Rights Reserved PSR S700 The followings are the titles credits and copyright notices for tw...

Page 7: ...g Along with Song Playback Karaoke or Your Own Performance 57 Connecting a Microphone PSR S900 only 57 Singing with the Lyrics Display 58 Convenient Functions for Karaoke 59 Convenient Functions for Singing Along with Your Own Performance 61 Recording Your Performance as Audio USB Audio Recorder PSR S900 63 Recording Your Performance as Audio 63 Playing Back the Recorded Performance 65 Basic Opera...

Page 8: ...1 Accessing the Special Website 172 Operations in the Special Website 172 Scrolling the Display 172 Following Links 173 Entering Characters 173 Return to the Previous Web Page 173 Refreshing a Web Page Canceling Loading of a Web Page 174 Purchasing and Downloading Data 174 Registering Bookmarks of Your Favorite Pages 175 Opening a Bookmarked Page 176 About the Internet Settings Display 178 Changin...

Page 9: ...ent Styles The Multi Pads Using Creating and Editing Songs Using a Microphone PSR S900 Connecting the PSR S900 S700 Directly to the Internet Appendix Registering and Recalling Custom Panel Setups Reference Using Creating and Editing Voices Using Your Instrument with Other Devices Appendix Troubleshooting 210 Specifications 215 Index 217 Panel Button Chart 220 ...

Page 10: ...h on or off for each keyboard part RIGHT1 2 LEFT page 53 Setting the Modulation wheel for each keyboard part RIGHT 1 2 LEFT page 33 Practicing the keyboard performance Using the Metronome page 34 Displaying and playing along with the music notation of the song during playback page 39 Selecting the programs of the PSR S900 S700 Voices page 83 Styles page 106 Multi Pad banks page 132 Songs page 140 ...

Page 11: ...nspose Keyboard Transpose Song Transpose page 61 Setting TRANSPOSE button to independently control separate parts page 93 Using the PITCH BEND wheel page 33 Using the MODULATION wheel page 33 Singing with a connected microphone PSR S900 Connecting a microphone to the instrument pages 57 194 Automatically applying vocal harmonies to your voice Vocal Harmony page 60 Singing while following along wit...

Page 12: ...ic vocal backing to your singing page 184 The amazing Vocal Harmony feature on the PSR S900 automatically produces backup vocal harmonies for lead vocals that you sing into a microphone You can even change the gender of the harmony voices for example letting you add female backup to your own male voice or vice versa LCD The large LCD together with the various panel buttons provides comprehensive a...

Page 13: ...an sounds it also lets you create your own original organ voices just as on a traditional organ by increasing and decreasing the flute footages and adding percussive sounds USB TO HOST terminal Make music with a computer quickly and easily page 198 Dive in and take advantage of the wide world of computer music software Connections and setup are exceptionally easy and you can play back your compute...

Page 14: ...42 E TR 1 button P 40 F REC button P 43 G J STOP button P 37 H F K PLAY PAUSE button P 36 I G H REW FF buttons P 142 STYLE J STYLE buttons P 46 TRANSPOSE K buttons P 59 METORONOME L METRONOME button P 34 TAP TEMPO M TAP TEMPO button P 48 TEMPO N buttons P 34 FADE IN OUT O FADE IN OUT button P 48 STYLE CONTROL P OTS LINK button P 51 Q AUTO FILL IN button P 49 R ACMP button P 47 S INTRO I II III but...

Page 15: ...ANK buttons P 136 n FREEZE button P 138 o MEMORY button P 135 p 1 8 buttons P 135 MULTI PAD CONTROL q SELECT button P 134 r 1 4 buttons P 134 s STOP button P 132 ONE TOUCH SETTING t 1 4 buttons P 51 VOICE CONTROL u HARMONY ECHO button P 53 89 v TOUCH button P 53 w SUSTAIN button P 53 x MONO button P 53 y DSP button P 53 z VARI button P 53 UPPER OCTAVE UPPER OCTAVE buttons P 68 Drum Kit icons Data ...

Page 16: ...A 300B PA 300 or an equiva lent recommended by Yamaha only PSR S900 S700 The use of an incompatible adaptor may cause irreparable dam age to the PSR S900 S700 and may even pose a seri ous shock hazard ALWAYS UNPLUG THE AC ADAPTOR FROM THE AC POWER OUT LET WHEN THE PSR S900 S700 IS NOT IN USE CAUTION Never interrupt the power sup ply e g unplug the AC adap tor during any PSR S900 S700 record operat...

Page 17: ...id possible damage to the speakers or other connected electronic equipment always switch on the power of the PSR S900 S700 before switching on the power of the amplified speak ers or mixer and amplifier Likewise always switch off the power of the PSR S900 S700 after switching off the power of the amplified speak ers or mixer and amplifier Air Vents CAUTION This instrument has special air vents in ...

Page 18: ...inserting it into the slot at the rear of the control panel Using Headphones Connect a pair of headphones to the PHONES jack The internal stereo speaker system is automatically shut off when a pair of head phones is plugged into the PHONES jack CAUTION Do not listen with the head phones at high volume for long periods of time Doing so may cause hearing loss ...

Page 19: ...or messages file names and character input 1 Call up the operation display FUNCTION J UTILITY TAB OWNER 2 Press the 4π π π π 5π π π π button to select a language Display Settings Adjusting the Contrast of the Display You can adjust the contrast of the display by turning the LCD CONTRAST knob located to the left of the display ...

Page 20: ...al 20 Introduction Adjusting the Brightness of the Display Adjust the brightness of the display 1 Call up the operation display FUNCTION J UTILITY TAB CONFIG 2 2 Press the 2π π π π button to adjust the brightness of the display ...

Page 21: ...Call up the operation display FUNCTION J UTILITY TAB OWNER 2 Press the I OWNER NAME button and call up the Owner Name dis play Refer to page 77 for character entry details Example display from PSR S900 Displaying the version number To check the version number of this instrument press the 7π 8π VERSION buttons in the display in step 1 above Press the EXIT or 8π button to return to the original disp...

Page 22: ...ile the power is on the disk is automatically accessed since the instrument checks whether the disk has data Be sure to remove the floppy disk from the disk drive before turning off the power A floppy disk left in the drive for extended periods can easily pick up dust and dirt that can cause data read and write errors Cleaning the Disk Drive Read Write Head Clean the read write head regularly This...

Page 23: ...e device media If so execute the Format operation Using USB Storage Devices When connecting a USB storage device to the USB TO DEVICE make sure that the connector on the device is appropriate and that it is connected in the proper direc tion Before removing the media from the device make sure that the instrument is not accessing data such as in the Save Copy and Delete operations If you are connec...

Page 24: ...eractive mini man ual complete with sound demonstrations and text showing what it can do for you 1 Call up the operation display FUNCTION J UTILITY TAB OWNER 2 Press the 4π π π π 5π π π π buttons to select the desired language Demos will play back continuously until stopped When the Demo stops the display returns to the MAIN display 1 Select the desired Language 2 Press the DEMO button to start th...

Page 25: ...he J Play Overview Demo but ton When the Demo has more than one screen Press 1π 8π but tons corresponding to the screen number 1 Press the 7π π π π 8π π π π buttons in the Demo display to call up the specific Demo menu 2 Press one of the A H buttons to show a specific Demo 3 Press the EXIT button to exit from the Demos ...

Page 26: ...ll up display pages related to the displayed function from the Main display n About information in the Main display See page 68 1 A J buttons The A J buttons correspond to the settings indicated next to the buttons For example press the F button and the Voice RIGHT 1 selection display will appear in the display 2 1π π π π 8π π π π buttons The 1π 8π buttons corre spond to the parameters which are i...

Page 27: ...ll appear in the display see the illustration at right Press one of the A J buttons to select a folder Press the 8π UP button to call up the next highest level folder When the drive contains more than ten Songs the display is divided up into several pages The page indica tions are shown at the bottom of the display Press one of the 1π 7π buttons to select a page n The number of pages shown varies ...

Page 28: ...settings are shown When the selected category is further divided into sub categories the tab s will be shown in the display n On the PSR S700 2 S ART shown in the illustration at right is displayed as 2 VOLUME When the setting is further divided into additional settings a list will be shown in the display 1 Press the FUNCTION button 2 Press the D button to select the category CONTROLLER 3 Press th...

Page 29: ... 4 5 5 Press the 1π π π π 2π π π π button to select touch sensitivity for the keyboard Throughout this manual arrows are used in the instructions indicating in shorthand the process of calling up certain displays and functions For example the instructions above can be indicated in shorthand as FUNCTION D CONTROLLER TAB KEYBOARD PANEL A 1 INITIAL TOUCH ...

Page 30: ...nd METRONOME button page 34 VOICE buttons page 30 1 Press the PART SELECT RIGHT1 button to call up the Voice selection display Determining how the Voice selection display is opened when one of the VOICE category selection buttons is pressed You can select how the Voice selection display is opened when one of the VOICE category selection buttons is pressed 1 Call up the operation display FUNCTION J...

Page 31: ... a huge amount of high quality Voices covering an exceptionally broad range of instrument sounds making it perfect for virtually every musical application However the sheer number of Voices may seem overwhelming at first To easily recall your favorite Voice there are two methods Save your favorite Voice to the USER display in the Voice Selection display and recall it by using the VOICE USER button...

Page 32: ...ss the PART SELECT RIGHT 1 button to call up the Voice selection display 2 Press the 8π UP button to call up the Voice categories 3 Press the 2π button to display page 2 4 Press the E F button to select GM XG GM2 5 Press the 2π button to display page 2 6 Press the F button to select SoundEffect 7 Press one of the A J buttons to select the desired sound effect 8 Play the keyboard Selecting GM XG GM...

Page 33: ...keys The touch sensitivity type becomes the common setting for all Voices 1 Call up the operation display FUNCTION D CONTROLLER TAB KEYBOARD PANEL A 1 INITIAL TOUCH 2 Press the 1π 2π buttons to specify the touch response HARD 2 Requires strong playing to produce high volume Best for players with a heavy touch HARD 1 Requires moderately strong playing for high volume NORMAL Standard touch response ...

Page 34: ...o adjust the value To reset the tempo press the TEMPO but tons simultaneously n About the Tempo display The number in the display indicates how many quarter note beats there are in one minute The range is between 5 and 500 The higher the value the faster the tempo 3 Press the EXIT button to close the Tempo display n You can set whether the effects caused by the MODULATION Wheel will be applied or ...

Page 35: ...LUME Determines the level of the metronome sound SOUND Determines which sound is used for the met ronome Bell Off Conventional metronome sound with no bell Bell On Conventional metronome sound with bell TIME SIGNATURE Determines the time signature of the metro nome sound Set the Popup Display Time 1 Call up the operation display FUNCTION J UTILITY TAB CONFIG 2 2 Select the B 2 POPUP DISPLAY TIME b...

Page 36: ...tion on playing back the preset Songs You can also select the file by using the DATA ENTRY dial then press the ENTER button to execute n You can instantly jump back to the Main display by double clicking on one of the A E buttons 1 Press the SONG SELECT button to call up the Song selection display 2 Press the A button to select the Sample Song category 3 2 3 Press one of the A E buttons to select ...

Page 37: ...e TAB buttons to select the USB tab USB1 USB2 corresponding to the USB storage device you inserted in Step 1 The indication USB1 USB2 will be displayed depending on the number of the connected devices 4 Use the A J buttons to select a Song n You can also select a specified file in the USB storage device by pressing the USB button USB A SONG A J Playing Songs in sequence You can play all Songs in a...

Page 38: ...AB buttons to select the VOL VOICE tab 4 Press the MIXING CONSOLE button until MIXING CONSOLE SONG CH1 8 is shown at the top of the dis play 5 Press the E J button to select VOLUME 6 To raise the level of the desired channel s press the appropriate buttons 1π 8π If the desired channel is not shown in the MIXING CONSOLE SONG CH1 8 display press the MIXING CON SOLE button to call up the MIXING CONSO...

Page 39: ... instructional purposes only and the song depicted is not one of the preset Songs on your instrument 2 Change the following settings as desired Changing the size of the music notation Press the 7π button to change the size of the music notation Displaying only right hand part left hand part notation Press the 1π 2π button to disable display of the left hand part right hand part Customizing the not...

Page 40: ... OFF LEFT CH only No channel assignment This disables display of the left hand key range KEY SIGNATURE This lets you enter key signature changes in the middle of a song at the stopped position This menu is useful when the selected Song contains no key signature settings for displaying notation QUANTIZE This gives you control over the note resolution in the notation letting you shift or correct the...

Page 41: ...o call up the volume balance display 2 To adjust the Song volume press the 1π button To adjust the keyboard RIGHT 1 volume press the 6π button 3 Press the EXIT button to close the volume balance display n About keyboard parts Right 1 Right 2 Left See page 84 2 2 1 3 Other guide functions The initial setting Follow Lights was used in the instructions Muting the Right or Left hand Part Viewing the S...

Page 42: ...ifying a Range of Measures and Playing them Back Repeat edly A B Repeat 1 Select a Song page 36 2 Press the SONG F K PLAY PAUSE button to start playback 3 Specify the repeat range Press the REPEAT button at the starting point A of the range to be repeated Press the REPEAT button again at the ending point B After an automatic lead in to help guide you into the phrase the range from Point A to Point...

Page 43: ...using the Quick Recording feature This is an effective practice tool allowing you to easily compare your own performance to the original song you are practicing You can also use it to practice duet pieces by yourself if you have your teacher or partner record his or her part beforehand A blank Song for recording is automatically set Recording begins automatically as soon as you play a note on the ...

Page 44: ...eptionally easy to play the backing parts along with Song playback n Before using performance assistant technology To use the performance assistant technology the Song must contain chord data If the Song contains this data the current chord name will be displayed in the Main display during Song playback letting you easily check whether the Song contains chord data or not In these example instructi...

Page 45: ...nt on 4 Press the SONG F K PLAY PAUSE button to start playback 5 Play the keyboard Playing the left and right hand together method 1 Playing the left and right hand together method 2 Playing the left hand and right hand alternately Play three notes at the same time with your right hand Play several notes one after the other with different fin gers of your right hand Play three notes at the same ti...

Page 46: ...und of a full band or orchestra even if you re playing by yourself The Auto Accompaniment sound is made up of the rhythm patterns of the Styles The Styles of the instrument cover a wide range of different musical genres including pop jazz and many others Playing Mary Had a Little Lamb with the Auto Accompaniment Feature 1 2 2 2 3 3 3 5 1 1 1 3 2 1 2 3 2 3 2 1 1 1 4 1 4 C C G C C G C C MARY HAD A L...

Page 47: ...ith your right hand n Chord Fingerings There are seven different fingering methods you can use to specify chords page 106 Enabling tempo display above Style name You can select whether the tempo is displayed above the Style name or not 1 Call up the operation display FUNCTION J UTILITY TAB CONFIG 2 2 Select the B 2 DISPLAY STYLE TEMPO button and use the 5π 6π buttons to switch the tempo dis play o...

Page 48: ...ss one of the INTRO I III buttons before starting Style playback and press the STYLE CONTROL START STOP button to start Style playback Synchro Start This lets you start playback as soon as you play the keyboard Press the SYNC START button when Style playback is stopped and play a chord in the chord section of the keyboard to start Style playback Fade In The Fade In produces smooth fade ins when st...

Page 49: ...To Finish Playing Start stop Styles stop as soon as the STYLE CONTROL START STOP button is pressed Ending This is used for the ending of the Song Each preset Style features three different endings When the ending is finished the Style stops automatically Press one of the ENDING rit I III buttons during Style playback You can have the ending gradually slow down ritardando by pressing the same ENDIN...

Page 50: ... About the section button INTRO MAIN ENDING etc lamps Green The section is not selected Red The section is currently selected Off The section contains no data and cannot be played Holding the LEFT part Voice Left Hold This function causes the LEFT part Voice to be held even when the keys are released Non decaying voices such as strings are held continuously while decay type voices such as piano de...

Page 51: ...ints for using One Touch Setting Automatically changing One Touch Settings with the Main sections OTS Link The convenient OTS One Touch Setting Link function lets you automatically have One Touch Settings change when you select a different Main section A D To use the OTS Link function press the OTS LINK button n Setting the timing for OTS changes The One Touch Settings can be set to change with th...

Page 52: ... the corresponding phrase at the currently set tempo You can even play two three or four Multi Pads at the same time Pressing the pad during its play back will stop playing and begin playing from the top again 1 Press the MULTI PAD CONTROL SELECT button to call up the Multi Pad Bank selection display then select the desired Bank 2 Press any of the MULTI PAD CONTROL 1 4 buttons to play the Multi Pa...

Page 53: ...ly only one note at a time Using the MONO mode lets you play single lead sounds such as brass instruments more realistically It also lets you expressively control the Portamento effect depending on the selected Voice by playing legato When this button is off the part s Voice played polyphonically n Portamento Portamento is a function that creates a smooth transition in pitch from the first note pl...

Page 54: ... button and SYNC START button page 47 and make sure that the RIGHT 1 part is on page 30 3 Play a chord with your left hand to start the style page 47 and play some notes in the right hand range of the keyboard Split Point Chord section In this example harmony notes in the scale of C major the chord played in the left hand are automatically added to the notes played in the Chord section right hand ...

Page 55: ...ord and instantly call up all the records that match your search criteria page 111 MUSIC Contains the song title or music genre that describes each record letting you easily find the desired music style n Skipping up or down through the song alphabetically When sorting records by song title use the 1π button to skip up or down through the songs alphabetically Simultaneously press the π buttons to ...

Page 56: ...saved to a USB storage device To use the Repertoire function save the desired Style in USER tab The panel settings that match the Style under selection is searched according to the record group of the Music Finder The list of the search results is shown on the SEARCH 2 display of the Music Finder CAUTION When the result of searching the record in the SEARCH 2 display has already been shown the sea...

Page 57: ...TING VOCAL HARMONY button at the left side of the top panel This lamp lights to indicate that an audio signal is being received Make sure to adjust the control so the lamp lights in green Make sure that the lamp does not light in red since this indicates that the input level is too high Disconnecting the microphone 1 Set the INPUT VOLUME knob on the rear panel of the instrument to the minimum posi...

Page 58: ... instrument enabling various useful possibilities such as the showing of lyrics chord names and text notes 1 Connect the USB storage device containing the text file to USB TO DEVICE terminal 2 Press the LYRICS TEXT button to display the text When the lyrics are displayed press the 1 TEXT button to display the text 3 Press the 5π 6π TEXT FILE buttons to call up the Text selection display 4 Press th...

Page 59: ... S900 Adding Harmony Vocals to Your Voice page 60 Practicing Singing with Proper Pitch Vocal CueTIME page 146 FOOT PEDAL 1 2 VIDEO OUT Displaying the lyrics text on an external TV monitor PSR S900 The lyrics indicated on the display can also be output via the VIDEO OUT terminal 1 Use an appropriate video cable to connect the VIDEO OUT connec tor of the PSR S900 to the VIDEO INPUT connector on the ...

Page 60: ... available at the Yamaha website See page 5 The harmony is applied to your voice according to the chord data 1 Select a Song which contains chord data page 36 2 Press the MIC SETTING VOCAL HARMONY button to call up the harmony vocals Vocal Harmony Setting display 2 3 4 3 Press the 6π π π π 7π π π π buttons to turn the harmony vocals Vocal Harmony on 4 Press the H button to call up the Vocal Harmon...

Page 61: ...ard SONG Transposes the pitch of Song playback MASTER Transpose the overall pitch of the instrument You can set the value in semitone steps To reset the transpose value press the buttons simultaneously Changing the Key Transpose See below PSR S900 S700 Displaying the Music Score on the Instrument and the Lyrics on TV page 62 PSR S900 Making Announcements Between Songs page 62 Controlling Playback ...

Page 62: ...n your singing performances When singing a song several effects are usually assigned to the MIC Setup When speaking to your audience however these effects may sound dis turbing or unnatural Whenever the TALK function is turned on effects are automatically turned off n Talk settings can be customized as well allowing you to add any desired effects to your voice as you speak to your audi ence page 1...

Page 63: ...enough to be sent The following sounds can be recorded Internal tone generator of the instrument Keyboard parts Right 1 Right 2 Left Song parts Style parts Input from a microphone guitar or other instrument via the MIC LINE IN jack Input from another audio device such as a CD player MP3 player or the like via the MIC LINE IN jack n Songs protected by copyright such as preset songs and the metronom...

Page 64: ...ay changes to red PSR S900 and the elapsed recording time is displayed CAUTION Avoid frequently connecting disconnecting the USB storage device or turning the power on off too often Doing so may corrupt the USB storage device data or the recording data The file name is automatically named and is always given a new unique name and a message indicating the file name is displayed n The recording oper...

Page 65: ... disconnecting the USB storage device or turning the power on off too often Doing so may corrupt the USB storage device data or the auditioning data n Audio recording is processed internally so auditioning volume will be appropriate when played on a computer There fore the playback sound might be distorted if you record at too high a volume In this case lower and adjust the volume of each part wit...

Page 66: ... language 3 Press the EXIT button to return to the previous display The Messages Shown in the Display A message information or confirmation dialog sometimes appears on the screen to facilitate operation When the message appears simply press the appropriate button The language selected here is also used for various Mes sages shown during operations 2 3 In this example press the F YES button to star...

Page 67: ...s the appropriate button 2 Press the button corresponding to the desired setting display to instantly call up that display Refer to the Data List for a list of the displays that can be called up with the Direct Access function The Data List is available at the Yamaha website See page 5 Example of calling up the Guide function display Press the DIRECT ACCESS button then press the GUIDE button 1 2 R...

Page 68: ... the Song or Style 4 Style name and related information Displays the currently selected Style name time signature and tempo Pressing the D button calls up the Style Selection display page 46 5 Current chord name If the ACMP button is set to On the chord specified in the chord section of the key board will be displayed 6 Transpose Displays the amount of transposition in semitone units page 59 7 Oct...

Page 69: ...icates the names of the selected Multi Pad Banks page 132 Pressing the I button calls up the Multi Pad Bank Selection display page 133 Registration Memory Bank name Displays the currently selected Registration Memory Bank name Pressing the J button calls up the Registration Memory Bank Selection display page 136 When the Freeze function is ON an F indication appears page 138 Volume Balance Display...

Page 70: ...own original are saved as files You can drop files into a folder Preset Location where pre programmed preset data is stored User Location where recorded or edited data is saved USB Location where data on USB storage device USB flash memory floppy disk etc is saved Hereafter in this manual any USB storage device such as USB flash memory floppy disk drive etc will be referred to as USB storage devic...

Page 71: ...SB storage device by pressing the USB button USB A SONG B STYLE F VOICE G MULTI PAD A J The number of pages shown var ies depending on the selection display of the Voices Songs Styles Press the corresponding button to P1 P2 in the dis play When other pages follow the NEXT button appears and for the previous page the PREV button appears 2 4 1 3 3 3 This display shows the Voice files in a folder The...

Page 72: ...the number of the connected devices 3 4 Formatting USB storage media When a USB storage device is connected or media is inserted a message may appear prompting you to format the device media If so execute the format operation CAUTION The format operation deletes any previously existing data Make sure that the media you are formatting does not contain important data Proceed with caution especially ...

Page 73: ...Selection display 2 Select the appropriate tab USER USB etc to which you want to save the data by using the TAB buttons 3 Press the 6 SAVE button to call up the file naming display 4 Enter the file name page 77 5 Press the 8π π π π OK button to save the file If you want to cancel the Save operation press the 8 CANCEL button The saved file will be automatically located at the appropriate position a...

Page 74: ...at the appropriate position among the files in alphabetical order Restrictions for protected Songs Commercially available song data may be copy protected to prevent illegal copying or accidental erasure They are marked by the indications at the upper left side of the file names The indications and relevant restrictions are detailed below Note for Prot 2 Orig and Prot 2 Edit Song file operation Mak...

Page 75: ...he file moved and pasted appears on the display at the appropriate position among the files in alphabetical order Deleting Files Folders This operation lets you delete a file folder 1 Call up the display containing the file folder you want to delete 2 Press the 5 DELETE button The pop up window for the Delete operation appears at the bottom of the display 3 Press one of the A J buttons correspondi...

Page 76: ...e or folder page 77 The renamed folder file appears on the display at the appropriate position among the files in alphabetical order 6 Press the 8π π π π OK button to actually enter the new name Selecting Custom Icons for Files Shown at the Left of File Name You can select custom icons for files shown at the left of file name 1 4 Operations are the same as the above Renaming Files Folders section ...

Page 77: ...full size num bers full size marks full size ABC Alphabet capital and small letters half size num bers half size marks half size 2 Use the DATA ENTRY dial to move the cursor to the desired position 3 Press the 2π π π π 6π π π π and 7π π π π buttons corresponding to the character you wish to enter Entering letters numerals and symbols can be done by moving the cursor or pressing one of the characte...

Page 78: ... above 2 Press the 2π 6π or 7π buttons to enter numbers and symbols 3 Press the 8π OK button to enter characters Entering a Space 1 Move the cursor to the desired position Use the same operation as in Deleting Characters above 2 Press 6 button to call up the mark list 3 Make sure the cursor is at the beginning space blank of the mark list and press the 8π OK button Converting into Kanji Japanese l...

Page 79: ...net Set tings refer to page 182 CAUTION This operation deletes all your original data for the respec tive item MIDI SETUP USER EFFECT MUSIC FINDER and FILES FOLDERS SYSTEM SETUP Restores the System Setup parameters to the original factory settings Refer to the Data List for details about which parameters belong to the System Setup The Data List is available at the Yamaha website See page 5 MIDI SE...

Page 80: ...ing the Factory programmed Settings Independently by Item 5 Save your file page 73 6 To recall your file select the tab and page to which you ve saved the file same tab and page as specified in step 4 and press the corre sponding A J button SYSTEM SETUP Parameters set on the various displays such as the FUNCTION UTILITY and microphone setting display are handled as a single System Setup file Refer...

Page 81: ...he file folder is to be copied by using the TAB buttons 8 Press the 4 PASTE button to paste the file folder 1 Insert connect the backup USB storage device destination 2 Call up the operation display FUNCTION J UTILITY TAB SYSTEM RESET 3 Press one of the F I buttons to call up the relevant display for saving your data 4 Select the appropriate USB tab to which you want to save the data by using the ...

Page 82: ...the data to the USB storage device To restore the data press the E RESTORE button in step 3 above It takes a few minutes to complete the backup restore operation Backup data which has not been created on the PSR S900 S700 cannot be restored CAUTION Move the Protected Songs which are saved to the USER dis play before restoring If the songs are not moved the oper ation deletes the data 3 All data li...

Page 83: ...und quality and or level of a Voice according to how strongly or softly you play it This makes the instrument s Voices sound authentic and natural However with Mega Voices each velocity range the measure of your playing strength has a completely different sound For example a Mega guitar Voice includes the sounds of various perfor mance techniques In conventional instruments different Voices having...

Page 84: ...r nor mal performance for example with the piano Voice Playing two Voices simultaneously Right 1 and 2 parts You can simulate a melody duet or combine two similarVoices to create a thicker sound Refer to page 85 for Voice selection operations for the Right 2 part Playing different Voices with the left and right Hands Right 1 and Left parts You can play different Voices with the left and right hand...

Page 85: ...oard 7 Press the PART ON OFF RIGHT 2 button again to turn it off For the selected part the name of the currently selected Voice is highlighted reverse display in the Main display Quickly selecting Voices for Right 1 and 2 parts You can quickly select the Right 1 and 2 partVoices just from the Voice buttons Press and hold one Voice button then press another The Voice of the first pressed button is ...

Page 86: ...tion display for the Left part 4 Press the TAB button to select the PRESET display 5 Press one of the A J buttons to select a Voice 6 Play the keyboard 7 Press the PART ON OFF LEFT button again to turn it off For the selected part the name of the currently selected Voice is highlighted reverse display in the Main display 4 5 5 Switching the Left part on off with a pedal You can use a pedal to swit...

Page 87: ...instruments or CD music 1 Call up the operation display FUNCTION A MASTER TUNE SCALE TUNE TAB MASTER TUNE 2 Use the 4π π π π 5π π π π buttons to set the tuning Press the 4 or 5 s π and buttons simultaneously to reset the value to the factory setting of 440 0 Hz Scale Tuning You can select various scales for playing in custom tunings for specific historical periods or music genres 1 Call up the ope...

Page 88: ...nging PYTHAGOREAN This scale was devised by the famous Greek philosopher and is created from a series of perfect fifths which are collapsed into a single octave The 3rd in this tuning are slightly unstable but the 4th and 5th are beautiful and suitable for some leads MEAN TONE This scale was created as an improvement on the Pythagorean scale by making the major third interval more in tune It was e...

Page 89: ... keyboard shown below Echo Types These types apply echo effects to notes played in the right hand section of the keyboard in time with the currently set tempo Harmony Types These types apply the harmony effect to notes played in the right hand section of the key board according to the chord specified in the left hand sec tion of the keyboard Note that the 1 5 and Octave settings are not affected b...

Page 90: ... is available for all types with the exception of Multi Assign It determines the level of the harmony echo notes generated by the Harmony Echo effect SPEED This parameter is only available when Echo Tremolo or Trill is selected in Type above It determines the speed of the Echo Tremolo and Trill effects ASSIGN This parameter is available for all types with the exception of Multi Assign This lets yo...

Page 91: ...eters see the section Adjustable items parameters in the MIXING CONSOLE displays on page 92 3 Press the MIXING CONSOLE button repeatedly to call up the MIX ING CONSOLE display for the relevant parts The MIXING CONSOLE displays actually consist of several different part displays The part name is indicated at the top of the display The various MIXING CONSOLE displays alternate among the following PA...

Page 92: ...E MULTI PAD and MIC parts PSR S900 The part components are the same as those that appear in the display when you press the panel BALANCE button STYLE PART A Style consists of eight separate channels Here you can adjust the level balance among these eight channels or parts These part components are the same as those that appear in the display when you press the panel CHAN NEL ON OFF button to call ...

Page 93: ...is function OCTAVE Determines the range of the pitch change in octaves for each keyboard part TUNING Determines the pitch of each keyboard part TRANSPOSE Allows you to set the transposition for the keyboard pitch KEY BOARD Song playback SONG or overall sound of the instru ment MASTER respectively TYPE Select the desired effect type page 95 After editing various parameters for the selected effect t...

Page 94: ... to call up the AUTO REVOICE SETUP dis play 5 Use the 1π π π π 3π π π π buttons to select the Voice to be replaced 6 Use the 4π π π π 6π π π π buttons to select the Voice for replacing the XG selected in step 5 Several different Revoice settings are available by using the F I J but tons for conveniently calling up the recommended Revoice settings in one action ALL REVOICE Replaces all of the repla...

Page 95: ...d enhances the audio signal in the digital realm to produce a wide range of effects Effect Block Effect applicable parts Effect characteristics REVERB All parts Reproduces the warm ambience of playing in a concert hall or jazz club CHORUS All parts Produces a rich fat sound as if several parts are being played simultaneously DSP1 STYLE PART SONG CHANNNEL 1 16 In addition to the Reverb and Chorus t...

Page 96: ...meters press the B button To select its variation parameter press the E button 11 Select one of the parameters you want to edit by using the 4π π π π 5π π π π buttons Available parameters differ depending on the selected Effect type 12 Adjust the value for the selected parameter by using the 6π π π π 7π π π π buttons If you have selected the REVERB CHORUS or DSP1 effect block in step 5 Adjust the ...

Page 97: ...om For example you can cut some of the low range frequencies when playing in large spaces where the sound is too boomy or boost the high frequencies in rooms and close spaces where the sound is relatively dead and free of echoes The instrument possesses a high grade five band digital EQ With this function a final effect tone control can be added to the output of your instrument You can select one ...

Page 98: ...r cut each of the five bands Use the 8π button to boost or cut all the five bands at the same time 8 Adjust the Q bandwidth and the FREQ center frequency of the band selected in step 7 Bandwidth also called Shape or Q Use the 1π button The higher the value of Q the narrower the band width FREQ center frequency Use the 2π button The available FREQ range is different for each band 9 Press the H or I...

Page 99: ...o call up the VOICE SET display 3 Use the TAB buttons to call up the relevant setting display For information on the available parameters see the Editable Parameters in the VOICE SET Displays on page 100 4 As necessary use the A B buttons to select the item parameter to be edited 5 Use the 1π π π π 8π π π π buttons to edit the Voice Editing the ORGAN FLUTES Voices The editing method is different f...

Page 100: ...yOn speed Offset 0 127 Depends on offset Depends on offset VOLUME Adjusts the volume of the current edited Voice TOUCH SENSE Adjusts the touch sensitivity velocity sensitivity or how greatly the volume responds to your playing strength DEPTH Determines the velocity sensitivity or how much the level of the voice changes in response to your playing strength velocity OFFSET Determines the amount by w...

Page 101: ...a sustained piano tone BRIGHTNESS Determines the cutoff frequency or effective frequency range of the filter see diagram Higher values result in a brighter sound HARMONIC CONTENT Determines the emphasis given to the cutoff frequency resonance set in BRIGHTNESS above see diagram Higher values result in a more pronounced effect ATTACK Determines how quickly the sound reaches its maximum level after ...

Page 102: ... in the DSP menu explained below DSP ON OFF Determines whether the DSP is on or off This setting can also be made from the VOICE CONTROL DSP button on the panel page 53 PANEL SUSTAIN Determines the sustain level applied to the edited voice when the VOICE CONTROL SUSTAIN button on the panel is turned on page 53 DSP TYPE Selects the DSP effect category and type Select a type after select ing a categ...

Page 103: ...our own sounds by adjusting the levels of the flute footages Basic Procedure 1 Select the desired Organ Flutes Voice to be edited page 31 2 In the ORGAN FLUTES Voice Selection display press the 6π π π π FOOT AGE button to call up the VOICE SET ORGAN FLUTES display 3 Use the TAB buttons to call up the relevant setting display For information on the available parameters see the Editable Parameters i...

Page 104: ...to be simulated Sine or Vintage ROTARY SP SPEED Alternately switches between the slow and fast rotary speaker speeds when a rotary speaker effect is selected for the Organ Flutes see EFFECT EQ DSP TYPE parameter on page 102 and the Voice Effect DSP page 102 is turned on this parameter has the same effect as the Voice Effect VARIATION ON OFF parameter VIBRATO ON OFF Alternately turns the vibrato ef...

Page 105: ...e volume of attack sound at the corresponding footages The longer the graphic bar the greater the attack sound volume LENG Affects the attack portion of the sound producing a longer or shorter decay immediately after the initial attack The longer the graphic bar the longer the decay Disabling automatic selection of Voice Sets effects etc Each Voice is linked to its related parameter settings that ...

Page 106: ... Panel Settings for the Selected Style One Touch Setting page 51 Pro These Styles provide professional and exciting arrangements combined with perfect playability The resulting accompaniment exactly follows the chords of the player As a result your chord changes and colorful harmo nies are instantly transformed into lifelike musical accompaniment Session These Styles provide even greater realism a...

Page 107: ...d Tutor function page 50 FINGERED ON BASS Accepts the same fingerings as the Fingered but the lowest note played in the Chord section of the keyboard is used as the bass note allowing you to play on bass chords in the Fingered mode the root of the chord is always used as the bass note FULL KEYBOARD Detects chords in the entire key range Chords are detected in a way similar to Fingered even if you ...

Page 108: ...ly press the appropriate channel button again Playing the chords in free tempo without Style playback You can have the accompaniment chords sound without playing back the Style by setting ACMP to on see page 109 Stop Accompaniment and SYNC START to off For example if MULTI FINGER is selected page 107 you can perform with your own pace while sounding the chord by pressing the chord section of the k...

Page 109: ...ink Timing This applies to the OTS Link function page 51 This parameter determines the timing in which the One Touch Settings change with the MAIN VARIATION A D change The OTS LINK button must be on Real Time One Touch Setting is immediately called up when you press a MAIN VARIATION button Next Bar One Touch Setting is called up at the next measure after you press a MAIN VARIATION button Synchro S...

Page 110: ...hanges to that of the initial default tempo for the selected Style Part On Off This determines whether the Style Channel On Off status changes or not when you change Styles during Style playback HOLD The Style Channel On Off status of the previous Style is maintained RESET All Style Channels are set to On Split Point Settings These are the settings there are two Split Points that separate the diff...

Page 111: ...sic Finder can be searched and edited Searching the Records You can search the records by specifying a song name or keyword using the Search function of the Music Finder You can also save your favorite records in the FAVORITE display 1 Press the MUSIC FINDER button to call up the MUSIC FINDER dis play 2 Press the TAB buttons to select the ALL tab The ALL tab display contains all the preset Records...

Page 112: ...riteria You can specify other search criteria in addition to the song name keyword Style name BEAT Select the beat time signature you want to use in your performance by pressing the D button All beat settings are included in the search if you select ANY SEARCH AREA Select the pages to be included in the search by pressing the E button These correspond to the tabs at the top of the Music Finder dis...

Page 113: ... desired record from the Music Finder display 2 Press the H ADD TO FAVORITE button to add the selected record to the FAVORITE display 3 Call up the FAVORITE display by using the TAB buttons and check to see if the record has been added Deleting Records from the FAVORITE Display 1 Select the record you want to delete from the FAVORITE display 2 Press the H DELETE FROM FAVORITE button Searching othe...

Page 114: ...e genre name page 77 Deleting the Currently Selected Record Press the I DELETE RECORD button Canceling and Quitting the Edit functions Press the 8 CANCEL button 4 To enter the edited record to the FAVORITE display press the E FAVORITE button to turn on the FAVORITE 5 Enter the edits you ve made to the record as described below Creating a new record Press the J NEW RECORD button The record is added...

Page 115: ...ecords including the presets and addi tionally created records as a single file Keep in mind that individual records panel setups cannot be handled as separate files 1 Call up the Save display MUSIC FINDER TAB ALL 7π FILES 2 Press the TAB buttons to select the location for saving USER USB 3 Press the 6 button to save the file page 73 All records are saved together as a single file ...

Page 116: ...Finder Records Saved to USER USB To call up the Music Finder records you ve saved to USER USB follow the instructions below 1 Call up the MUSIC FINDER display MUSIC FINDER TAB ALL 2 Press the 7π π π π FILES button to open the File selection display of the Music Finder 3 Use the TAB buttons to select USER USB 4 Press the A J buttons to select the desired Music Finder file When the file is selected ...

Page 117: ...Music Finder records you can load to your instrument For more details about this service go to the following website http music yamaha com idc 1 Make sure that you re connected to the Internet page 174 and press the MUSIC FINDER button to call up the MUSIC FINDER dis play 2 Use the 1π π π π 5π π π π buttons in the display to select the record whose information you want to view on the Web You can a...

Page 118: ...e as desired or you can create a new Style from scratch Step Recording See page 122 This method is like writing music notation on paper since it allows you to enter each note or individually and specify its length This allows you to create a Style without having to play the parts on the instrument since you can enter each event manually Style Assembly See page 123 This convenient feature lets you ...

Page 119: ...back from the next repetition letting you overdub new material to the loop while hearing previously recorded material When creating a Style based on an existing internal Style overdub recording is applied only to the rhythm channels For all other channels except rhythm delete the original data before recording When using realtime recording based on the internal Styles 1 Select the desired Style to...

Page 120: ...y hold down the J DELETE but ton and press the appropriate numbered button 1π π π π 8π π π π You can cancel the deletion by pressing the same numbered button again before releasing your finger from the J button Specifying sections from the panel buttons You can specify the sections to be recorded by using the Section buttons INTRO MAIN END ING etc on the panel Pressing one of the Section buttons c...

Page 121: ...ded channels are shown and press the appropriate key CAUTION The recorded Style will be lost if you change to another Style or you turn the power off without executing the Save operation page 73 Any desired chord or chord pro gression can be used for the INTRO and ENDING sections Changing the Source Chord If you want to record the pattern with a Source Chord other than CM7 set the PLAY ROOT and PL...

Page 122: ... be changed This is because the length of the Style is automatically fixed depending on the selected section For example if you create a Style based on a section of four measures length the End Mark position is automatically set to the end of the fourth measure and cannot be changed in the Step Recording display Recording channels can be changed in the Song Creator 1 16 tab display how ever they c...

Page 123: ...the A D and F I buttons Call up the Style Selection display by pressing the same button again Select the Style containing the pat tern you want to replace in the Style Selection display To return to the previous screen press the EXIT button after selecting the Style 4 Select the desired section of the newly imported Style chosen in step 3 above by using the 2π π π π 3π π π π SECTION buttons 5 Sele...

Page 124: ...t Settings PARAMETER See page 128 For playback of your created Style you can decide how notes will be con verted and sounded for the accompaniment when changing chords in the chord section of the keyboard 5 Edit the selected Style Playing the Style During Style Assembly While you are assembling a Style you can play back the Style and select the method of playback Use the 6π 7π PLAY TYPE buttons in...

Page 125: ... the D EXECUTE button to actually enter the edits for each display After the operation is completed you can execute the edition and this but ton changes to UNDO letting you restore the original data if you re not satisfied with the Groove or Dynamics results The Undo function only has one level only the previous operation can be undone 4 Press the I SAVE button to call up the Style Selection displ...

Page 126: ...he specified ORIGINAL BEAT value is 8 Beat the Swing parameter will selectively delay the 2nd 4th 6th and 8th beats of each measure to create a swing feel The settings A through E produce different degrees of swing with A being the most subtle and E being the most pronounced FINE Selects a variety of Groove templates to be applied to the selected section The PUSH settings cause certain beats to be...

Page 127: ...n be undone 5 Press the I SAVE button to call up the Style Selection display to save your data Save the data in the Style Selection display page 73 3 1 2 4 5 CAUTION The edited Style will be lost if you change to another Style or you turn the power off without executing the save operation QUANTIZE Same as in the Song Creator page 165 with the exception of the two additional available parameters be...

Page 128: ...ed depending on the chord changes you make during your performance This basic Style data that you create with the Style Creator is referred to as the Source Pat tern Note Transposition This parameter group features two parameters that deter mine how the notes of the Source Pattern are to be con verted in response to chord changes Other Settings Using the parameters of this group you can fine tune ...

Page 129: ...hord Normally in the Style Creator you can hear your original Style in process with the Source Pat tern However there is a way to hear it played by a specific chord and root To do this set NTR to Root Fixed NTT to Bypass and NTT BASS to OFF then change the newly displayed Play Root and Play Chord parameters to the desired set tings ROOT TRANS Root Transpose When the root note is transposed the pit...

Page 130: ...rn HARMONIC MINOR When the played chord changes from a major to a minor chord this table lowers the third and sixth intervals in the scale by a semitone When the chord changes from a minor to a major chord the minor third and flatted sixth intervals are raised by a semitone Other notes are not changed Use this for chord channels of Sections which respond only to major minor chords such as Intros a...

Page 131: ...termine whether notes stop sounding or not and how they change pitch in response to chord changes STOP The notes stop sounding PITCH SHIFT The pitch of the note will bend without a new attack to match the type of the new chord PITCH SHIFT TO ROOT The pitch of the note will bend without a new attack to match the root of the new chord RETRIGGER The note is retriggered with a new attack at a new pitc...

Page 132: ...cted in step 5 7 Start recording Recording begins automatically as soon as you play the keyboard You can also start recording by pressing the STYLE CONTROL START STOP button This lets you record as much silence as you want before the start of the Multi Pad phrase If Chord Match is set to on for the Multi Pad to be recorded you should record using the notes of the C major seventh scale C D E G A an...

Page 133: ...when turning the ACMP off 12 Press the D button then enter a name for each Multi Pad by page 134 13 Press the I button then save the Multi Pad data as a Bank contain ing a set of four Pads to the USER drive or USB storage device page 70 Multi Pad Step Recording EDIT Step Recording can be executed in the EDIT page After selecting a Multi Pad in step 5 of the Multi Pad Realtime Recording on page 132...

Page 134: ...AD EDIT display then select a Pad to be edited by pressing any of the A B F and G buttons 3 Edit each of the Multi Pads as desired Naming Press the 1 button then change the name of each Multi Pad page 76 Copying Press the 3 button select the Multi Pad to be copied select the desti nation location then execute the Copy operation by pressing the 4 button page 74 Deleting Press the 5 button then dele...

Page 135: ...π π π 7π π π π buttons to select items To cancel the operation press the I CANCEL button 4 Enter or remove the checkmark in the box of the item to determine whether the item should be registered or not by pressing the 8π π π π button 5 Press one of the REGISTRATION MEMORY 1 8 buttons to register your settings It is recommended that you select a button whose lamp is not lit in red or green Buttons ...

Page 136: ... REGISTRATION BANK Selection Display 2 Press one of the A J buttons to select a bank 3 Press one of the green lit numbered buttons 1 8 in the Registra tion Memory section Bank 1 Bank 2 Bank 3 Bank 4 Registration Memory data compatibility In general Registration Memory data Bank files is compatible among the models PSR S900 S700 However the data may not be perfectly compatible depending on the spec...

Page 137: ...he 5 button to delete a panel setup page 75 Renaming a panel setup Press the 1 button to rename a panel setup page 76 5 Press the 8π π π π UP button to return to the REGISTRATION BANK Selection display Parameter Lock You can lock specific parameters e g effect split point etc to make them selectable only via the panel control in other words instead of via Registration Memory One Touch Setting Musi...

Page 138: ...REEZE button on the panel to turn the Freeze function on Calling Up Registration Memory Numbers in Order Registration Sequence As convenient as the Registration Memory buttons are there may be times during a performance when you want to quickly switch between settings without having to take your hands from the keyboard The convenient Registration Sequence func tion lets you call up the eight setup...

Page 139: ...se the TAB button to call them up in reverse order The TAB buttons can only be used for Registration Sequence when the Main display is called up When pedal operation has been set in step 3 you can use a pedal to select the Registration Memory numbers in order The pedal can be used for Reg istration Sequence no matter which display is called up except for the dis play in step 3 Saving the Registrat...

Page 140: ...ing Back and Listening to Songs Before Practicing page 36 Displaying Music Notation Score page 39 Muting the Right or Left hand Part Viewing the Score page 40 Practicing by Using the Repeat Playback Function page 42 Recording Your Performance page 43 Singing Along with Song playback Karaoke or Your Own Performance page 57 Connecting a Microphone PSR S900 page 57 Singing with the Lyrics Display pag...

Page 141: ...function This useful function lets you press the TAP TEMPO button to tap out the tempo and automatically start the Song at that tapped speed Simply tap press release the button four times for a 4 4 time signature while the instrument is in Synchro Start standby mode and the Song playback starts automatically at the tempo you tapped Fade In The FADE IN OUT button can be used to produce smooth fade ...

Page 142: ...pop up window showing the cur rent measure number or Phrase Mark number Repeat Playback Chain Playback 1 Call up the operation display FUNCTION B SONG SETTING 2 Set the parameters related to the Repeat Playback by using the H I buttons The available parameters are shown below Phrase Mark Phrase Mark is a pre pro grammed marker in certain Song data which specifies a certain location set of measures...

Page 143: ...y press the DIRECT ACCESS button then press the EXIT button When the Song playback is stopped the Style playback is also stopped at the same time Tempo for playing back a Song and a Style at the same time When playing back a Song and a Style at the same time the tempo value set in the Song is automatically used Parameter Lock You can lock specific parame ters e g effect split point etc to make the...

Page 144: ... 1π π π π 8π π π π buttons 7 You can save the volume settings to the Song in the Setup operation of the SETUP page 166 Make sure to checkmark the VOICE item in step 2 of the Setup procedure Reading Song data automatically when inserting a USB storage device You can have the instrument automatically call up the first Song not con tained in a folder on a USB storage device as soon as the device is c...

Page 145: ...By pressing the SCORE button you can have the notation of the song displayed showing the notes you should play and when you should play them for ease in learning The PSR S900 also features convenient vocal prac tice tools that automatically adjust the timing of Song playback to match your vocal performance when singing into a connected microphone Selecting the Guide Function Type 1 Call up the set...

Page 146: ...control the Song playback timing with just one finger while you sing along This is useful for singing to your own performance Song playback pauses waiting for you to sing Simply play a key on the keyboard and the Song playback continues Vocal CueTIME PSR S900 This function lets you practice singing with the proper pitch Song playback pauses waiting for you to sing When you sing with proper pitch S...

Page 147: ...put signal cannot be recorded here but can be recorded using the Audio Recording function page 63 Internal memory User tab displays capacity The internal memory capacity of the instrument is about 1 4MB PSR S900 560KB PSR S700 This capacity applies to all file types including Voice Style Song and Registration data files Quick Recording See below This convenient and simple recording method lets you...

Page 148: ... your performance and the Style Multi Pad playback simultaneously Press the SONG TR 1 TR 2 buttons and the SONG EXTRA TR STYLE button 4 Start recording There are several different ways you can start recording Starting by playing the keyboard If you ve selected the SONG TR 1 TR 2 buttons in step 3 play in the right hand section of the keyboard page 84 If you ve selected the SONG EXTRA TR STYLES but...

Page 149: ... SONG J STOP buttons simultaneously A blank Song New Song is called up for recording Select Voices for recording the keyboard parts RIGHT 1 RIGHT 2 and or LEFT page 30 page 85 page 86 Select a Style and a Multi Pad Bank for recording also as necessary page 46 page 52 Pausing and restarting your recording To pause recording press the SONG F K PLAY PAUSE button during recording To restart recording ...

Page 150: ... performance appears To close the message press the EXIT but ton For instructions on saving Song data see step 8 6 Listen to your newly recorded performance Press the SONG F K PLAY PAUSE button to playback the performance you just recorded Setting all of the 5 16 chan nels to REC simultaneously While holding the SONG REC button press the SONG EXTRA TR button When selecting the MIDI part Setting a ...

Page 151: ... parts is assigned to the channels 9 16 respectively as shown above Normally the Style parts should be recorded to the channels 9 16 RHYTHM This is the basic part of the Style containing the drum and percussion rhythm patterns Usually one of the drum kits is used BASS The bass part uses various appropriate instrument sounds to match the style CHORD This is the rhythmic chord backing commonly used ...

Page 152: ...g 2 Call up the operation display FUNCTION F DIGITAL REC MENU 3 Press the A button to call up the Song Creator display for recording editing a Song 4 Select the appropriate tab by using the TAB buttons For recording melodies Select the 1 16 tab For recording chords Select the CHORD tab 5 If you select the 1 16 tab in step 4 press the F button to select the channel for recording 6 Press the G butto...

Page 153: ... the G button to select 2 Press the H button to select Tenuto 3 Press the I button to select normal note type 4 Press the 6π π π π button to select the quarter note length 5 Play the keys C3 D3 E3 F3 G3 and A3 in order according to the notation example Since the music score displayed on the instrument is generated from the recorded MIDI data it may not appear exactly the same as shown here About t...

Page 154: ...XIT button to exit from the Step Record display If you want you can also edit already recorded Songs in the same manner page 162 11 Press the I SAVE button to call up the Song Selection display for saving your data then save the data in the Song Selection display page 73 8 9 CAUTION The recorded Song data will be lost if you select another Song or turn the power to the instrument off without exe c...

Page 155: ...Step Record display G button Determines the velocity loudness of the note to be entered H button Determines the gate time note length of the note to be entered I button Determines the note type to be entered Pressing the button alternately switches the note selectors at the bottom of the display among three basic note values normal dotted and triplet Kbd Vel fff ff f mf mp p pp ppp 127 111 95 79 6...

Page 156: ... select 2 Press the H button to select Tenuto 3 Press the I button to select normal note type 4 Press the 5π π π π button to select the half note length 5 While holding F3 on the keyboard press the 7π π π π button Before you go on to step 6 release the F3 key and the 7π button Example 2 Since the music score displayed on the instrument is generated from the recorded MIDI data it may not appear exa...

Page 157: ...the I button to select normal note type 15 Press the 6π π π π button to select the quarter note length 16 Play the F3 key on the keyboard as specified in the example 17 Press the SONG J STOP button to move the cursor to the begin ning of the Song 18 Press the SONG F K PLAY PAUSE button to hear the newly entered notes 19 Press the EXIT button to exit from the Step Record display You can also edit t...

Page 158: ...ess the H button to select Normal 2 Press the I button to select normal note type 3 Press the 7π π π π button to select the eighth note 4 While holding C3 key on the keyboard press the 7π π π π button Do not release the C3 key yet Keep holding it while executing the following steps Example 3 Since the music score displayed on the instrument is generated from the recorded MIDI data it may not appea...

Page 159: ... the 7π π π π button and successively press the 5π π π π button After you press the 5π π π π button release the keys 8 Press the SONG J STOP button to move the cursor to the begin ning of the Song 9 Press the SONG F K PLAY PAUSE button to hear the newly entered notes 10 Press the EXIT button to exit from the Step Record display If you want you can also edit already recorded Songs in the same manne...

Page 160: ... here apply to step 7 of the Basic Operations for Step Recording on page 152 1 Make sure the STYLE CONTROL AUTO FILL IN button is set to OFF then press the STYLE CONTROL MAIN VARIATION A button 2 Press the 5π π π π button to select the half note length 3 Play the chords C F and G in the chord section of the keyboard 4 Press the STYLE CONTROL BREAK button C F G F G7 C 2 3 5 6 8 9 1 4 7 The numbers ...

Page 161: ...lay If you want you can also edit already recorded Songs in the same manner page 162 13 Press the F EXPAND button to convert the input chord change data into the Song data 14 Press the I SAVE button to call up the Song Selection display for saving your data then save the data in the Song Selection display page 73 C 9 8 7 CAUTION The recorded Song data will be lost if you select another Song or tur...

Page 162: ...d or edit Songs 4 Select the appropriate tab by using the TAB buttons and edit the Song Re Recording a Specific Section Punch In Out REC MODE page 163 This lets you re record a specific section of a Song Editing Channel Events CHANNEL page 164 This lets you edit the channel events For example you can delete data or transpose notes by channel Editing Note or Chord Events CHORD 1 16 page 167 This le...

Page 163: ... the I SAVE button to call up the Song Selection display for saving your data then save the data in the Song Selection display page 73 PUNCH IN settings PUNCH OUT settings CAUTION The recorded Song data will be lost if you select another Song or turn the power to the instrument off without exe cuting the Save operation page 73 NORMAL Overwrite recording starts when pressing the SONG F K PLAY PAUSE...

Page 164: ... restore the original data if you are not satisfied with the Operation results The Undo function only has one level only the immediate operation can be undone 1 2 3 4 5 6 7 8 1 2 3 4 5 1 2 3 4 5 6 7 8 1 2 3 4 5 6 7 8 1 2 3 4 5 1 2 3 4 5 6 7 8 1 2 3 4 5 6 7 8 1 2 3 4 5 1 2 3 4 5 6 7 8 8 1 2 3 4 5 6 7 PUNCH IN setting PUNCH OUT setting NORMAL REPLACE ALL NORMAL PUNCH OUT NORMAL PUNCH OUT AT 006 FIRS...

Page 165: ...nnel For example if eighth notes are the shortest in the channel you should use eighth note as the Quantize size Settings The three Quantize settings marked with asterisks are exceptionally conve nient since they allow you to quantize two different note values at the same time For example when the straight eighth notes and eighth notes triplet are contained in the same channel if you quantize by t...

Page 166: ...lected item by pressing the 8π π π π button 4 Press the D EXECUTE button to execute the SETUP recording oper ation SOURCE 1 Selects the channel 1 16 to be mixed All MIDI events in the selected channel are copied to the destination channel SOURCE 2 Selects the channel 1 16 to be mixed Only note events in the selected channel are copied to the destination channel In addi tion to the values 1 16 ther...

Page 167: ... DATA ENTRY dial can also be used To actually enter an edited value simply move the cursor away from the parameter To restore the original value press the 8 CANCEL button before move the cursor 4 When the CHORD tab display is selected press the F EXPAND but ton to convert the data into Song data 5 Press the I SAVE button to call up the Song Selection display for saving your data then save the data...

Page 168: ...ncludes the note number which corresponds to the key which was played plus a velocity value based on how hard the key is played and the gate time value the length of a note Ctrl Control Change Settings to control the Voice such as volume pan filter and effect depth edited via the Mixing Console described on page 91 etc Prog Program Change MIDI program change number for selecting a Voice P Bnd Pitc...

Page 169: ...on page 162 From this display you can edit recorded System Exclusive events which do not belong to a specific channel such as tempo and beat time signature The opera tions here are basically the same as those in the section Editing Note or Chord Events on page 167 System Events Press the I SAVE button to call up the Song Selection display for saving your data then save the data in the Song Selecti...

Page 170: ...ttons to call up the lyrics editing display Operations are the same as in the section Entering Characters page 77 2 Press the I SAVE button to call up the Song Selection display for saving your data then save the data in the Song Selection display page 73 Name Allows you to enter the Song name Lyrics Allows you to enter lyrics Codes CR Enters a line break in the lyrics text LF Unavailable on the i...

Page 171: ... router Connection example 3 Wireless connection The special website can be opened when directly connect ing to the Internet Depending on the Internet con nection you may not be able to connect to two or more devices for example a computer and the instrument depending on the contract with the provider This means you cannot connect with the PSR S900 S700 If in doubt check your contract or contact y...

Page 172: ...the instrument is con nected to the Internet To close the website display and return to the operation display of the instrument press the EXIT button Operations in the Special Website Scrolling the Display When the size of the web page is too large to be shown at one time in the browser display of the instrument a scroll bar appears at the right side of the display Use the DATA ENTRY dial to scrol...

Page 173: ...to actually call up the link destination You can also select and call up links by using the DATA ENTRY dial and pressing the ENTER button Entering Characters See page 77 Entering Characters for instructions on entering characters within the website for inputting a password or searching for data Return to the Previous Web Page To return to a previously selected web page press the 1π BACK button To ...

Page 174: ... button to call up the next highest level folder SSL SSL Secure Sockets Layer is an industry standard method for protecting web communications by using data encryption and other tools CAUTION The Purchased data will be lost if you turn the power to the instrument off during download Monitoring the Internet Connection Status The messages and icons at the bottom right of the Internet display indicat...

Page 175: ... the instrument during pur chase The downloaded data is saved in the MyDownloads folder in the User tab display of the File Selection display To close the folder and call up the next highest level folder press the 8π UP button in the File Selection display Registering Bookmarks of Your Favorite Pages You can bookmark the page you re viewing and set up a custom link so the page can be instantly cal...

Page 176: ... To save the bookmark press the 7π π π π EXECUTE button or press the 8π π π π CANCEL button to cancel 5 To return to the browser press the 8π π π π CLOSE button Opening a Bookmarked Page 1 Press the 4π π π π BOOKMARK button to call up the Bookmark dis play 2 Press the 1π π π π π π π π button to select the desired bookmark 3 Press the 2π π π π VIEW button to open the page of the selected bookmark 3...

Page 177: ...es the order of the bookmarks 1 Select the bookmark you wish to move then press the 4π π π π MOVE button The lower part of the display changes letting you select the new posi tion for the bookmark 2 Select the intended position by pressing the 1π π π π π π π π button 3 Move the bookmark to the selected position by pressing the 7π π π π EXECUTE button 5 Changing names Changes the name of the select...

Page 178: ...s the 5 SETTING button to call up the Internet Setting display 2 Press the TAB buttons to select the desired display 3 Select the desired item by pressing the 1π π π π π π π π button 4 To call up the relevant Edit display press the 2π π π π 3π π π π EDIT button For some items the Edit display may not be shown but the setting or change may be executed 5 Press the 2π π π π π π π π button to select t...

Page 179: ...estores the home page setting 5 Show images Image data and pictures in the web page are shown in the browser when this is set to on Image data is not shown when this is set to off 6 Time zone This determines the time setting for the browser 1 2 3 Make a written note of the settings here in case you have to enter them again Use DHCP DNS server1 DNS server2 IP address Subnet mask Gateway 1 Use DHCP ...

Page 180: ...re displayed 2 SSID Determines the SSID setting 3 Channel Determines the channel 4 Encryption Determines whether or not the data is encrypted 5 WEP key type WEP key length WEP key These settings are available only when Encryption above is enabled These set the type and length of the encryption key 2 3 4 5 1 1 Proxy server Proxy port Non proxy server Determines the proxy server name port number and...

Page 181: ... desired page on the site to be the Home page 1 Open the page you wish to set as your new Home page 2 Press the 5 SETTING button to call up the Internet Setting dis play 3 Press the TAB buttons to select the BROWSER tab 4 Press the 1 button to select the setting Set current page as Home 5 Use the 2π π π π 3π π π π EDIT buttons to actually set the selected page as your new Home page 6 To return to ...

Page 182: ...e made in the Internet Settings displays except for the cookies and bookmarks including those related to Internet connec tion 1 Press the 5 SETTING button to call up the Internet Settings dis play 2 Press the TAB buttons to select the OTHERS tab 3 Press the 1π π π π π π π π button to select Initialize 4 Use the 2π π π π 3π π π π EDIT buttons to initialize the Internet set tings 3 4 Sometimes cooki...

Page 183: ...ects and allows data transfer between a conventional telephone line and a computer It con verts the digital signals from the computer to analog audio for sending over the phone line and vice versa NTP Short for Network Time Protocol a standard for setting the internal system clock of the computer over a network For this instrument the internal clock of the computer is used to specify the valid tim...

Page 184: ...de pages Singing Along with Song Playback Karaoke or Your Own Performance page 57 Connecting a Microphone page 57 Singing with the Lyrics Display page 58 Convenient Functions for Karaoke page 59 Adjusting the tempo page 34 Transpose page 59 Applying effects to Your Voice page 59 Adding Harmony Vocals to Your Voice page 60 Practicing Singing with Proper Pitch Vocal CueTIME page 145 Convenient Funct...

Page 185: ... π π π buttons Or you can re select the Vocal Harmony type by pressing the 8π RETURN button to return to the Vocal Harmony selection display 6 Use the 3π π π π 5π π π π buttons to select the parameter page 186 you want to edit 7 Set the value of the parameter selected above 8 Press the I SAVE button to save your edited Vocal Harmony type page 73 3 3 4 5 6 7 8 CAUTION The settings here will be lost...

Page 186: ... the more feminine the harmony voice becomes The lower the value the more masculine the voice LEAD PITCH CORRECT This parameter is only effective when the LEAD GENDER TYPE above is set to other than Off When Smooth or Hard is selected the pitch of the lead vocal is shifted in precise semitone steps UPPER GENDER THRESH OLD Gender change will occur when the harmony pitch reaches or exceeds the speci...

Page 187: ...oard is played This is effective when the Har mony mode page 190 is set to VOCODER or CHORDAL L63 R C L R63 A setting of L63 R pans the sound hard left while C is at cen ter and L R63 is at hard right HARMONY1 2 3 DETUNE Detunes the first lowest second and third highest harmony notes by the specified number of cents PITCH TO NOTE When this is set to ON you can play the voices of the instru ment wi...

Page 188: ...onse The instrument features a high grade three band LOW MID and HIGH digital equalizer function for the microphone sound Hz Adjusts the center frequency of the corresponding band dB Boosts or cuts the level of the corresponding band by up to 12 dB NOISE GATE This effect mutes the input signal when the input from the microphone falls below a specified level This effectively cuts off extraneous noi...

Page 189: ...lets you determine which notes are used to control the harmony BAL This lets you set the balance between the lead vocal your own voice and Vocal Harmony Raising this value increases the volume of the Vocal Harmony and decreases that of the lead vocal When this is set to L H63 L Lead Vocal H Vocal Harmony only the Vocal Harmony is output when it is set to L63 H only the lead vocal is output SONG CH...

Page 190: ...s automatically set to CHORDAL In all other cases the mode is set to VOCODER VOCODER The harmony notes are determined by the notes you play on the keyboard and or song data You can specify whether the Vocoder effect is controlled by your keyboard performance or by the Song data page 189 CHORDAL The harmony notes are determined by the following three types of chord chords played in the chord sectio...

Page 191: ...SETTING button to call up the MICROPHONE SET TING display 3 Press the TAB buttons to select the TALK SETTING tab display 4 Use the A B buttons to select the item parameter page 192 to be set 5 Use the 1π π π π 7π π π π buttons to set the value 6 Press the EXIT button to exit from the MICROPHONE SETTING dis play 2 1 5 4 6 3 CAUTION Settings in the TALK SETTING tab display are automatically saved to...

Page 192: ...H This sets the depth of the chorus effects applied to the micro phone sound TOTAL VOLUME ATTENUATOR This determines the amount of attenuation to be applied to the overall sound excepting the microphone input allowing you to effectively adjust the balance between your voice and the overall instrument sound DSP MIC ON OFF This turns the DSP effect applied to the microphone sound ON or OFF DSP MIC T...

Page 193: ...instrument s AUX IN L L R R jacks using appro priate audio cables n Use only the L L R jack for connection with a monaural device The instrument s MASTER VOLUME setting affects the input signal from the AUX IN jacks LAN USB TO DEVICE TO HOST MIDI FOOT PEDAL IN OUT 1 2 VIDEO OUT 1 2 4 3 5 6 7 8 9 P 199 P 193 P 198 P 194 P 194 P 193 P 194 P 200 P 198 CAUTION Before connecting the instrument to other...

Page 194: ...r pedal on a piano press for sustain release for normal sound FOOT PEDAL 2 jack PSR S900 Plug an optional Yamaha Footswitch FC4 or FC5 into this jack and use it to control the Super Articu lation Voices page 83 PSR S700 Plug an optionalYamaha FC7 foot controller into this jack and use it to change the volume as you play the instrument expression function n Set the NTSC or PAL to correspond to the ...

Page 195: ...low 4 Use the 2π π π π 8π π π π buttons to set the details of the selected functions The available parameters differ depending on the function selected in step 3 Details on the parameters are given on page 196 5 Check that the desired function is controllable with the pedal by actually pressing the pedal n When you use the pedals to switch Registration Memory settings page 138 these settings are i...

Page 196: ...l MODULATION Applies a vibrato effect to notes played on the keyboard Moreover various effects can be added to the S Articulation Voice PSR S900 page 83 The effect becomes deeper when pressing down the foot controller You can turn this function on off for each key board part on this display S ARTICULATION PSR S900 When you use a S Articulation voice that has an effect assigned to the pedal footswi...

Page 197: ...yboard to select the desired percussion instrument RIGHT1 ON OFF Same as the PART ON OFF RIGHT 1 button RIGHT2 ON OFF Same as the PART ON OFF RIGHT 2 button LEFT ON OFF Same as the PART ON OFF LEFT button OTS Calls up the next One Touch Setting OTS Calls up the previous One Touch Setting SONG STYLE MIC M PAD LEFT RIGHT1 RIGHT2 These specify the part s that will be affected by the pedal Available o...

Page 198: ...the instrument USB TO HOST and USB TO DEVICE Take care not to confuse the two terminals and the corresponding cable connectors Be careful to connect the proper plug in the proper direction Explanations on the USB TO DEVICE terminal follow in the next section n The instrument will begin transmission a short time after the USB connection is made When using a USB cable to connect the instrument to yo...

Page 199: ...e proper plug in the proper direction Explanations on the USB TO HOST terminal can be found in the previous section Using USB Storage Devices This type is used to connect the instrument to a USB storage device and allows you to save data you ve cre ated to the connected device as well as read data from the connected device The following description gener ally explains about how to connect and use ...

Page 200: ...omputer and organizing files folders Copying files from a computer hard disk to a USB storage device Files contained on the hard disk of a computer can be transferred to the instrument by first copying them to the storage media then connecting the storage device to the instrument Not only files created on the instrument itself but also Standard MIDI files and Style File formatted Style files cre a...

Page 201: ...keyboard is captured as MIDI song data see illustration below In order to record the audio performance on an acoustic piano special recording equipment is needed How ever since the PSR S900 S700 features a built in sequencer that lets you record performance data this recording equipment is unnecessary Instead your digi tal instrument allows you to both record and play back the data However we also...

Page 202: ...ls for MIDI data reception when using the USB termi nal This is usually expressed as it can play 16 instru ments at the same time Channel messages transmit information such as Note ON OFF Program Change for each of the 16 channels n The performance data of all Songs and Styles is handled as MIDI data MIDI Channels MIDI performance data is assigned to one of sixteen MIDI channels Using these channe...

Page 203: ...elow Sequence Formats Song data is recorded and stored in a variety of different systems referred to as sequence formats Playback is only possible when the sequence format of the Song data matches that of the MIDI device The PSR S900 S700 is compatible with the following for mats SMF Standard MIDI file This is the most common sequence format Standard MIDI Files are generally available as one of tw...

Page 204: ... using Voices in the XG category is XG compatible DOC Disk Orchestra Collection This voice allocation format is compatible with many of Yamaha s MIDI devices including the PSR S900 S700 series instruments GS GS was developed by the Roland Corporation In the same way as Yamaha XG GS is a major enhance ment of the GM specifically to provide moreVoices and Drum kits and their variations as well as gr...

Page 205: ...play PRESET or USER 6 Select the USER tab display to save the data by using the TAB buttons page 73 SYSTEM display MIDI System Settings page 207 TRANSMIT display MIDI Transmission Settings page 207 RECEIVE display MIDI Reception Settings page 208 BASS display Settings for the bass note of chord for Style playback via MIDI recep tion data page 209 CHORD DETECT display Settings for the chord type fo...

Page 206: ...Style synchronizes with an external MIDI clock instead of the instru ment s internal clock This template should be used when you wish to set the tempo on the MIDI device connected to the instrument MIDI Accord 1 MIDI accordions allow you to transmit MIDI data and play connected tone generators from the keyboard and bass chord buttons of the accordion This template lets you play melodies from the k...

Page 207: ...I USB 1 or USB 2 the Tempo is indicated as Ext in the Main display TRANSMIT CLOCK Turns MIDI clock F8 transmission on or off When set to OFF no MIDI clock or Start Stop data is transmitted even if a Song or Style is played back RECEIVE TRANSPOSE Determines whether or not the instrument s transpose setting page 61 is applied to the note events received by the instrument via MIDI START STOP Determin...

Page 208: ...hannel will be received You can also determine the types of data to be received The PSR S900 S700 can receive MIDI messages over 32 channels 16 channels x 2 ports by USB connection With the exception of the next two parts the configuration of the parts is the same as those already explained elsewhere in this manual KEYBOARD The received note messages control the instrument s keyboard performance E...

Page 209: ... playback based on the note messages received via MIDI The note on off messages received at the chan nel s set to ON are recognized as the notes for detecting chords in Style playback The chords to be detected depend on the fingering type The chord type will be detected regardless of the ACMP or split point settings When several channels are simultaneously set to ON the chord type is detected from...

Page 210: ...me The volume of the keyboard parts may be set too low Raise the volume in the BALANCE display page 41 Keys do not sound at the proper pitch Make sure the Performance Assistant function is off on the operation display page 44 Certain notes sound at the wrong pitch The Scale parameter has probably been set to some thing other than Equal changing the tuning system of the keyboard Make sure Equal is ...

Page 211: ...ound Adjust these settings if necessary Noise may occur depending on the settings made in the Filter display of the Mixing Console Adjust the Har monic Content or Brightness controls in the Filter display page 93 The sound does not change when replacing Voices with the Song Auto Revoice feature Depending on the particular Song data there are some instances where Song Auto Revoice has no effect eve...

Page 212: ...e is selected the File Selection dis play shows a Preset Voice This is normal even with the Preset Voice shown the actual sounding Voice is the selected User USB Voice When a User USB Voice is saved to the User USB drive the actual data is divided into two separate types 1 the source Preset Voice itself and 2 the parameter settings as set in the Voice Set When you recall a Registration Memory sett...

Page 213: ...n entered such as whole notes and ties are not displayed correctly Long notes such as whole notes and ties may not be shown in the music score display exactly as they were entered Selecting Tenuto by pressing the H button before inputting each note in the Step Record display page 153 may solve the problem The tempo beat measure and music notation is not displayed correctly Some Song data for the i...

Page 214: ...ge 63 Harmony can be heard in addition to the microphone sound Vocal Harmony is set to ON Turn Vocal Harmony off page 60 The Vocal Harmony effect sounds distorted or out of tune Your vocal microphone may be picking up extraneous sounds such as the Style sound from the instrument In particular bass sounds can cause mistracking of the Vocal Harmony To remedy this Sing as closely to the microphone as...

Page 215: ...Chorus 29 Preset 3 User DSP 1 191 Preset 3 User DSP 2 4 106 Preset 10 User Master EQ 5 Preset 2 User Part EQ 28 Parts Vocal Harmony 60 Preset 10 User Accompani ment Style Accompaniment Styles 305 205 Pro Styles 281 193 Session Styles 24 12 Mega Voice Style YES Fingering Single Finger Fingered Fingered On Bass Multi Finger AI Fingered Full Keyboard AI Full Keyboard Style Creator YES OTS One Touch S...

Page 216: ... Spanish Italian Direct Access YES Transpose Keyboard Song Master Scale Type 9 Computer Connection USB to HOST YES USB to DEVICE YES Other Connectors PHONES MIDI IN OUT FOOT PEDAL 1 2 AUX IN R L L R OUTPUT R L L R LAN MIC INPUT VOLUME MIC LINE IN VIDEO OUT Pedal Functions VOLUME SUSTAIN SOSTENUTO SOFT GLIDE PORTAMENTO PITCHBEND MODULATION S ARTICULATION PSR S900 DSP VARIATION SONG PLAY PAUSE STYLE...

Page 217: ...er 114 Edit OTS 51 Edit Song 162 Edit Style 124 Edit Vocal Harmony 184 Edit Voice 99 EFFECT 93 Effect microphone 59 Effect Return Level 96 Effect Type 95 EFFECT EQ 102 Entering characters 77 EQ Equalizer 93 EQUAL TEMPERAMENT 88 ESEQ 203 EXIT 71 F Factory Reset 79 Factory programmed Settings 79 FADE IN OUT Song 141 FADE IN OUT Style 48 Fade In Out time 141 FADE IN OUT HOLD TIME 108 Fast forward 142...

Page 218: ...Name 21 P PANEL PART 92 PARAMETER 128 Part 84 PASTE 74 75 Pause 142 Pedal polarity 195 percussion sounds 32 performance assistant technology 44 Phrase Mark 142 Pitch 87 Pitch Bend Wheel 33 Portamento Time 100 Practice Function 145 PRESET 27 Pro 106 PROPERTY 199 Prot 1 74 Prot 2 Edit 74 Prot 2 Orig 74 PURE MAJOR 88 PURE MINOR 88 PYTHAGOREAN 88 Q QUANTIZE 127 Quick Recording 147 QUICK START 143 R RA...

Page 219: ...62 TALK SETTING 191 Tap function 141 TAP TEMPO 48 Tempo 34 Text 58 Time Signature 35 Top 142 TOUCH 33 53 TRANSMIT 207 Transpose 59 61 87 TUNE 93 U UP 71 USB Audio Recorder 63 USB Storage Device 23 USB TO DEVICE terminal 13 USB TO HOST terminal 13 USER 27 V Vibrato 102 VIDEO OUT 59 Vocal CueTIME 146 Vocal Harmony 60 184 VOCAL HARMONY EDIT 185 186 VOCAL HARMONY TYPE 184 Voice 30 83 VOICE buttons 13 ...

Page 220: ...900 0 LYRICS PSR S700 0 M MAIN VARIATION A B C D T MASTER VOLUME 2 MEMORY o METRONOME L MIC SETTING VOCAL HARMONY 7 MIXING CONSOLE MODULATION wheel 4 MONO x MULTI PAD CONTROL 1 4 r MULTI PAD CONTROL SELECT q MULTI PAD CONTROL STOP s MUSIC FINDER j O ONE TOUCH SETTING 1 4 t OTS LINK P P PART SELCT PART ON OFF k PITCH BEND wheel 3 R REGIST BANK m REGISTRATION MEMORY 1 8 p REPEAT A S SCORE 9 SONG F K...

Page 221: ...r assistance You may also contact Yamaha directly at the address provided below 2 Deliver the unit to be serviced under warranty to the retailer selling the product an authorized service center or toYamaha with an explanation of the problem Please be prepared to provide proof purchase date sales receipt credit card copy etc when requesting service and or parts under warranty 3 Shipping and or insu...

Page 222: ...6600 Orangethorpe Ave Buena Park CA90620 The above statements apply ONLY to those products distributed by Yamaha Corporation of America or its subsidiaries OBSERVERA Apparaten kopplas inte ur växelströmskällan nätet så länge som den ar ansluten till vägguttaget även om själva apparaten har stängts av ADVARSEL Netspæendingen til dette apparat er IKKE afbrudt sålæenge netledningen siddr i en stikkon...

Page 223: ...TUGAL Yamaha Hazen Música S A Ctra de la Coruna km 17 200 28230 Las Rozas Madrid Spain Tel 91 639 8888 GREECE Philippos Nakas S A The Music House 147 Skiathou Street 112 55 Athens Greece Tel 01 228 2160 SWEDEN Yamaha Scandinavia AB J A Wettergrens Gata 1 Box 30053 S 400 43 Göteborg Sweden Tel 031 89 34 00 DENMARK YS Copenhagen Liaison Office Generatorvej 6A DK 2730 Herlev Denmark Tel 44 92 49 00 F...

Page 224: ...Instrument Division Yamaha Corporation Printed in China 703APAP4 3 02B1 2007 Yamaha Corporation WH65940 Yamaha Home Keyboards Home Page English only http music yamaha com homekeyboard Yamaha Manual Library http www yamaha co jp manual ...

Reviews: