background image

CHAPTER 6: Other Settings

66

Englis

h

If you want to return your Disklavier to its initial factory 
settings, follow the procedure below.

You can assign the ONE TOUCH button on the cradle a 
series of procedures for an often used function. The 
followings are the available functions.

[REC]:

Sets the Disklavier in recording mode. (


pg. 41)

[Performance]:

Turns on the Performance function. (


pg. 37)

[Standby]:

Turns off the Disklavier. (

 pg. 6 in 

“Quick Guide”)

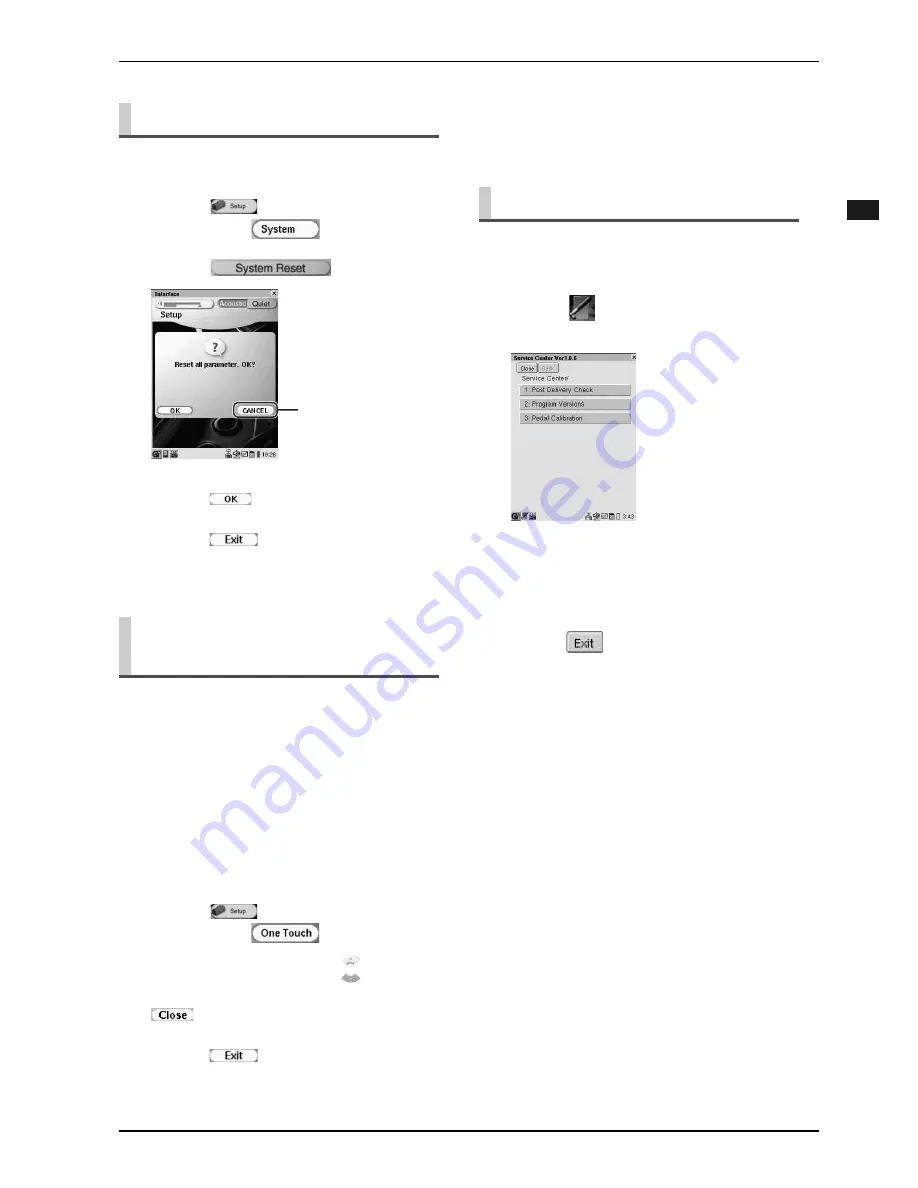
The piano diagnostics may be required as the occasion 
demands. In such a case, follow the instructions of your 
Yamaha dealer and perform the following procedure.

Resetting the Disklavier

1

Tap on 

 in the [Main] screen, 

and then on 

.

2

Tap on 

.

3

Tap on 

 to start resetting.

4

Tap on 

 to complete the 

operation.

Assigning a Specific Function 
to the ONE TOUCH Button

1

Tap on 

 in the [Main] screen, 

and then on 

.

2

Tap on [Function], press  

to 

select 

the desired option, and then on 

.

3

Tap on 

 to complete the 

operation.

Tap to cancel resetting.

To inactivate the ONE TOUCH button,

 select 

[No Function] in step 

2

.

Diagnosing the Disklavier

1

Tap on 

 [Service Center] in the 

[PRC-100 Menu] screen.

2

Tap on the desired option, and then 
follow the instructions that appears 
on the screen.

3

Tap on 

 to return to the [PRC-100 

Menu] screen.

Summary of Contents for piano

Page 1: ......

Page 2: ...letter L or coloured RED Alleen voor klanten in Nederland Bij dit produkt zijn batterijen geleverd Wanneer deze leeg zijn moet u ze niet weggooien maar inleveren als KCA The Control Unit is classified...

Page 3: ...es necessary contact a qualified service representative to perform the replacement Warning Do not attempt to recharge disassemble or incinerate this type of battery Keep all batteries away from childr...

Page 4: ...of an extension cord is not recommended If you must use an extension cord the minimum wire size for a 25 cord or less is 18 AWG NOTE The smaller the AWG number the larger the current handling capacit...

Page 5: ...ation consult Safety Code 6 obtainable from Health Canada s website www hc sc gc ca rpb L installateur du pr sent mat riel radio doit s assurer quel antenne est situ e ou point e demani re ce que cett...

Page 6: ...surance that your use of this product in a residential environment will not result in harmful interference with other electronic devices This requirement generates uses radio frequencies and if not in...

Page 7: ...English...

Page 8: ...provided at no charge however we may require you to reimburse Yamaha for the cost of delivering the source code to you The source code download is also available on the following website http www glo...

Page 9: ...l by the plug Never pull the cable Damaging the cable in this way is a potential fire and electric shock hazard The cover of the unit should be removed only by qualified service technicians Do not pla...

Page 10: ...high frequency digital circuits that may cause interference to radios and TVs placed close to it If interference does occur relocate the affected equipment Handling Rechargeable Battery Only use the E...

Page 11: ...26 Editing Tracks 28 Checking and Modifying the Song Information 31 Presetting Playback Control Options for Each Song 34 SmartKey Playback 35 Adding Disklavier Accompaniment to Commercial CD Songs Pi...

Page 12: ...ng MIDI Data to a Standard Form Strip XP 63 Making Backups and Restoring the Song Library 64 Restoring the Contents in the Demo Album 65 Making an Install Floppy Disk 65 Formatting a Floppy Disk 65 Re...

Page 13: ...n Pressing the button turns the Disklavier on or puts it in Standby mode Holding down the button shuts down the Disklavier B QUIET button Activates the Quiet Mode C Source Select buttons Starts or sto...

Page 14: ...1 2 jacks Accepts foot controls switches pg 59 P MIC LINE switch Switches the input sensitivity of the MIC LINE IN jack MIC Select this when you connect a microphone to the MIC LINE IN jack LINE Selec...

Page 15: ...of a camcorder E USB type B port Accept the USB cable from a computer F MIDI IN OUT terminals Accept the MIDI cable from the input output of a MIDI device G SYNC OUT L R jacks Accept the RCA cords fro...

Page 16: ...tc P TO PIANO jacks Accept the cords from the Central Signal Processor Q USB Type A port For future use R LAN RJ 45 port Accepts the LAN cable from a personal computer S VIDEO OUT jack Accepts the vid...

Page 17: ...the Power Supply unit on off B AC OUTLET Accepts the power cable from the I O Center C AC IN Accepts the power cable from an AC outlet D AC OUTLET SWITCHED Accepts the Monitor speakers AC power cable...

Page 18: ...CHAPTER 1 Getting Started 6 English F TO DRIVE terminal Accepts the power cord from the Key Drive KD unit G TO CSP terminal Accepts the power cable from the Central Signal Processor CSP Right side...

Page 19: ...uch screen or move the slider on a control bar H AC adapter jack Accepts the AC adaptor I PLAY button Starts playback J Song Select Fast Reverse Fast Forward buttons Pressing the button selects a song...

Page 20: ...the battery compartment lid Resets the Pocket Controller R Battery replacement switch pg 15 Preparing the Pocket Controller S Stylus pen For operating the touch screen T CF card slot Holds the CF wir...

Page 21: ...etting Started 9 A AC adaptor jack Accepts the AC adaptor B I O port Accepts the I O port on the Pocket Controller C ONE TOUCH button pg 66 Assigning a Specific Function to the ONE TOUCH Button ONE TO...

Page 22: ...up the LINE2 volume at the three o clock position E Tweeter unit F POWER switch Turns the monitor speaker on off G AC power cable H INPUT LINE2 XLR connector phone jack Accepts the line output from t...

Page 23: ...rew the supplied screws into the nuts 2 Hang the Media Center 3 Tighten the screws to secure the Media Center Screws M5 x 16 supplied Leave 5 mm of the shank Nuts Note When you hang the Media Center b...

Page 24: ...Disklavier 3 Hang the Monitor Speaker to the bracket 4 Screw the thumbscrews to secure the Monitor Speaker Horizontal installation Slant installation Hanger supplied Screws M5 x 16 supplied You can a...

Page 25: ...equivalent to the supplied one that has L shaped phone jacks at both ends I O Center Media Center Cable Note The location of each unit differs depending on the model AC OUTLET 2A 480VA TOTAL SWITCHED...

Page 26: ...e hooked up at the factory TO PD TO MD TO SENSOR PD MD SENSOR Central Signal Processor TO PS GREEN TO I O BLUE CENTER AC OUTLET 2A 480VA AC OUTLET 2A 480VA TOTAL AC IN DIGITAL OUT TO PIANO PS PS AC po...

Page 27: ...o the battery compartment NORMAL OPERATION REPLACE BATTERY Make sure that the and marks on the battery are aligned correctly with those printed inside the battery compartment 4 Set the battery replace...

Page 28: ...em Info Shows system information memory storage version For normal use modification of these setups are not required Initial Settings of the Pocket Controller PRC 100 Menu screen PRC 100 Menu icon Tas...

Page 29: ...eboot on the menu that appears 3 Tap on The Main screen appears after approximately three minutes 4 Reset the Pocket Controller pg 18 Resetting the Pocket Controller 3 Tap on Hour Minutes to set the t...

Page 30: ...h the stylus pen 4 Replace the battery compartment lid and then set the battery replacement switch back to the NORMAL OPERATION position 5 Press to turn the Pocket Controller on The Main screen appear...

Page 31: ...k or erasing files Description of the Task Bar The task bar is always displayed at the bottom of the screen to show various information and status of the Pocket Controller Tapping on the icon shows th...

Page 32: ...is between 4 C and 52 C 40 F and 125 F Wipe CDs with a clean cloth before playback Remove the CD from the CD drive before turning the Disklavier off Floppy disk drive on the Media Center Eject button...

Page 33: ...nnaturally when the song file is modified on the external MIDI device such as sequencer etc The above mentioned problem does not occur in the following cases When the song file stored loaded in the Di...

Page 34: ...aracter Tempo on To resume the original tempo tap on in step 3 Tip The value can be adjusted from 50 to 20 in 1 increments Playing Back Songs in a Different Key Transposition 1 Select the desired song...

Page 35: ...nd then on Repeats all songs in the current album Repeats the current song only Repeats all songs in the current album in random order The selected mode appears instead of the character Repeat on To c...

Page 36: ...registered points point A and B during playback or while stopped tap on or Tip You can also locate a point by fast reversing forwarding between points A and B To clear the registered point tap on This...

Page 37: ...liminate the trouble of changing CDs floppy disks or USB flash memories each time you want to listen to songs on a different medium First create your own play list and then play back that list by foll...

Page 38: ...pg 54 Rearranging the Order of Songs Albums Select the Play Lists that you created in the above procedure pg 12 Selecting a Song in Quick Guide and then press Tap to cancel the selection You can chang...

Page 39: ...Tap on the desired voice name Tip You can also select the desired voice by specifying the voice number Tap and the voice number selection screen appears Confirm the desired voice number referring to E...

Page 40: ...l for arranging existing ensemble parts For example when you have transposed a specific track to suit its instrument voice in advance you can transpose other tracks in the same key Mix Move Copy Track...

Page 41: ...n track number Mix Track The track selected in step 4 will be mixed with the destination track Move Track The destination track will be overwritten by the track selected in step 4 the selected track w...

Page 42: ...Mix Move Copy Track 2 Tap on 3 Tap on 4 Tap on after the completion message appears Tap to cancel editing Transpose Track 1 Perform steps 1 thru 5 in Editing Tracks Mix Move Copy Track pg 28 2 Tap on...

Page 43: ...ntirety Copyright Shows the copyright 4 Tap on to adjust the transposition value and then tap on Tip The track can be transposed in half step keys up or down 60 to 60 5 Tap on Tip To transpose all the...

Page 44: ...Selecting a Song in Quick Guide 2 Tap on repeatedly in the Song screen so that the following screen appears Song Tag screen 3 Tap on the title of the desired information For Song Title and Comment The...

Page 45: ...Caps lock To cancel the function press again Will insert a space Will act as a tab key On the Edit screen the cursor will move to the next field Back space Will delete the character to the left of the...

Page 46: ...Adjusts the overall volume Audio Volume Adjust Adjusts the volume of the accompaniment or standard audio sound pre recorded on the software CDs Audio Pitch Adjust Adjusts the pitch of the accompanimen...

Page 47: ...d be turned on in advance pg 34 SmartKey Playback 1 Select the desired song with icon pg 12 Selecting a Song in Quick Guide 2 Press Key prompt Key prompt The key slightly moves downward Key notation A...

Page 48: ...ano song and the CD with the Registering appearing on the screen Guide orange Normal play green Mute white 3 Wait until the Registering disappear and then press to start PianoSmart playback Note If Di...

Page 49: ...e does with the left hand part You can also mute the piano sound to your preference Playing the Disklavier along with the Internal Metronome 1 Tap on in the Main screen 2 Tap on to start the metronome...

Page 50: ...p is selected depressing the pedal adds articulations specific to the wood brass wind Three types of articulation are assigned to the respective pedals Soft pedal Assigned for adding Head blow up arti...

Page 51: ...effective when the interval of the two notes is an octave Note When the interval of the jointed notes is narrower or wider than an octave Joint articulation may not effect those notes For Tail fall d...

Page 52: ...the Information Area 3 Tap on to activate Harmony Mode Each time you tap on Harmony Mode is activated or inactivated alternately 4 Tap on to clear the Voice screen 5 Play the desired chord on the key...

Page 53: ...you record both left and right hand part go to step 4 When you record either left or right hand part go to step 5 4 Tap on Split Point and then press to select the desired note as the split point The...

Page 54: ...and turn off Titling a Song at the Start of Recording 1 Perform the procedures from step 1 thru step 2 of Recording a New Song pg 41 REC REC User REC User User REC User REC User You can overwrite the...

Page 55: ...verwrite green Record overwrite red Tip You can also overwrite the previously recorded part along with the blank part 5 Press to start and then immediately pause recording 6 Confirm that Recording app...

Page 56: ...e following conditions While songs on SmartPianoSoft PianoSoftPlusAudio SmartKey and audio CD are played back While Vocal Harmony mode is activated In such cases the icon is shown in gray Each time yo...

Page 57: ...sklavier are recorded as MIDI data MIDI data consist of 16 tracks with a single voice assigned to each track There is a resemblance to a score with 16 staves Generally the left hand part of the piano...

Page 58: ...advance the desired voice number in Ensemble Part Playback Voice List pg 68 helps you quickly select the voice Tap on and the following screen appears Enter the voice number with the keyboard on the p...

Page 59: ...from green to red pg 42 Recording the Left and Right Hand Parts Separately Overwrite Recording Overdubbing an Ensemble Part Tap on and then the desired track black number pg 45 Recording Ensemble Par...

Page 60: ...onome steps 1 and 3 of Playing the Disklavier along with the Internal Metronome on pg 37 2 Tap on 3 Press 4 Play the Disklavier along with the metronome Recording starts automatically 5 After playing...

Page 61: ...ng Songs Based on Measures and Beats Metronome Mode Recording pg 48 2 Tap on the desired song in the list that appears 3 Tap on repeatedly until the following screen appears 4 Tap on Quantize and then...

Page 62: ...part track and its voice pg 42 Recording the Left and Right Hand Parts Separately Overwrite Recording pg 45 Recording Ensemble Parts 4 Tap on 5 Tap on of Tempo to adjust the tempo To resume the origin...

Page 63: ...s Ex Function Menu for the Album List of User Library Note The menu items differ depending on the screen To clear the Function Menu screen tap on or or press This function is available for PianoSoft L...

Page 64: ...pears Making Copies of Songs or Albums 1 Select the desired song or album pg 12 Selecting a Song in Quick Guide and then tap on or Tap to cancel renaming in step 3 2 Tap on or Ex Copy Song 3 Copy the...

Page 65: ...t the format of the album stored in a floppy disk tap on the check box for Convert to E SEQ Piano1 Copying an Album when a source other than FD is selected Tap on Tap on the desired album and then go...

Page 66: ...g in Quick Guide and then tap on or 2 Tap on or To cancel deletion tap on 3 Tap on 4 Tap on after the completion message appears Rearranging the Order of Songs Albums 1 Select the desired song or albu...

Page 67: ...ion select OFF in step 2 Tip The shortcut button on the Song screen is also available Tap on to activate the function above and on to inactivate it You can start or stop playback of a song automatical...

Page 68: ...d then the desired library Tip If you want to select the current album tap on appears in the Album column in the timer list screen Tap to delete the current timer program Tap to close the list 8 Tap o...

Page 69: ...ou may feel as if you were singing in a bar lounge It s great fun to use this function Tuning the Tone Generator MasterTune 1 Tap on in the Main screen and then on 2 Tap on to tune the Disklavier To c...

Page 70: ...ach time you tap on the mode is activated the color turns to blue or inactivated Vocal Harmony screen Vocal harmony type 11Tap on to clear the Vocal Harmony screen Tip The shortcut button on the Song...

Page 71: ...voice Setting Up the Disklavier for Foot Controls Switches Preparing for Use of Foot Controls Switches 1 Connect a foot control switch to the FOOT CNTRL1 2 jack Foot control switch not supplied Botto...

Page 72: ...ressed playback will start When the switch is released playback will pause When Main Volume or Voice Volume is selected for Function with Direction set to Down 3 When the switch is pressed the sound w...

Page 73: ...djust the ONMI IN Vol value and Video Synchronized Playback and Vocal Harmony Mode is not available OFF Select this when you cancel the data reception from the OMNI IN jacks OMNI OUT Selects the desir...

Page 74: ...2 Tap on OMNI IN OMNI OUT Digital Out and then press to select the desired option 3 Tap on to complete the operation By hooking up a TV or a monitor display to the I O Center lyrics are automatically...

Page 75: ...song to standard MIDI format before using it for playback Strip XP also makes it possible to reduce the size of MIDI files when desired Note Once the XP event is stripped the original data cannot be r...

Page 76: ...pported for this function Making Backups Restoring the Song Library Making Backups and Restoring the Song Library 1 Connect an external USB HDD to the USB port on the Media Center 2 Tap on in the Main...

Page 77: ...n and then on 2 Tap on 3 Tap on to start restoring 4 Tap on to complete the operation Making an Install Floppy Disk 1 Tap on in the Main screen and then on 2 Load a formatted floppy disk 2HD to the dr...

Page 78: ...low the instructions of your Yamaha dealer and perform the following procedure Resetting the Disklavier 1 Tap on in the Main screen and then on 2 Tap on 3 Tap on to start resetting 4 Tap on to complet...

Page 79: ...Piano Vintage Electric Piano Harpsichord Harpsichord 4 Harpsichord 4 8 Clavinet Vibraphone Vibraphone Marimba Celesta Church Organ Church Organ Principal Church Organ Flute Church Organ Full Jazz Org...

Page 80: ...rPnoK 13 XG Det CP80 14 XG ElGrPno1 15 XG ElGrPno2 16 XG HnkyTonk 17 XG HnkyTnkK 18 Electric Piano 19 Modern Elec Piano 20 Vintage Elec Piano 21 XG E Piano1 22 XG El Pno1K 23 XG MelloEP1 24 XG Chor EP...

Page 81: ...91 XG DetPrcOr 92 XG LiteOrg 93 XG PercOrg2 94 Rotor Organ Group Name Voice Number Voice Name Organ 95 XG RockOrgn 96 XG RotaryOr 97 XG SloRotar 98 XG FstRotar 99 Ch Organ Principal 100 Ch Organ Flute...

Page 82: ...XG Ba DstEG 157 XG FngrSlap 158 XG FngBass2 159 XG ModAlem 160 XG PickBass 161 XG MutePkBa 162 Fretless Bass Group Name Voice Number Voice Name Guitar 163 XG Fretless 164 XG Fretles2 165 XG Fretles3...

Page 83: ...n Str1 225 XG ResoStr 226 XG Syn Str4 227 XG SS Str 228 XG Syn Str2 229 Choir Group Name Voice Number Voice Name Ensemble 230 Slow Choir 231 Scat 232 XG ChoirAah 233 XG S Choir 234 XG Ch Aahs2 235 XG...

Page 84: ...291 AEM Baritone Sax 292 XG Bari Sax 293 XG Oboe 294 XG Eng Horn 295 XG Bassoon 296 XG Clarinet Pipe 297 XG Piccolo Group Name Voice Number Voice Name Pipe 298 XG Flute 299 XG Recorder 300 XG PanFlute...

Page 85: ...edPad 361 XG Glacier 362 XG GlassPad 363 XG MetalPad 364 XG Tine Pad Group Name Voice Number Voice Name Synth Lead 365 XG Pan Pad 366 XG Halo Pad 367 XG SweepPad 368 XG Shwimmer 369 XG Converge 370 XG...

Page 86: ...26 XG Sci Fi 427 XG Starz 428 XG Sitar 429 XG DetSitar 430 XG Sitar 2 431 XG Tambra 432 XG Tamboura Group Name Voice Number Voice Name Synth Effects 433 XG Banjo 434 XG MuteBnjo 435 XG Rabab 436 XG Go...

Page 87: ...m 499 XG Bubble 500 XG Feed 501 XG Dog 502 XG Horse 503 XG Bird 504 XG Ghost 505 XG Maou 506 XG Tel Dial 507 XG DoorSqek 508 XG Door Slam 509 XG Scratch 510 XG Scratch 2 Group Name Voice Number Voice...

Page 88: ...ils on the type selection see Applying an Effect to Your Voice Vocal Harmony on page 57 Vocal Harmony Type List Vocal Harmony Type Vocal Harmony Mode Instrument Scat Vocoder Octave Up Scat Vocoder Aut...

Page 89: ...Vocoder Diatonic Girl Vocoder A Capella Dia Vocoder Chordal XG Vocoder Karaoke Auto Vocoder Karaoke Mode Vocoder Karaoke Girl Vocoder Karaoke Pitch Vocoder 2 Unison High Vocoder 3 Unison High Vocoder...

Page 90: ...er to the Disklavier s I O Center Be sure to use the commercially available MIDI cable with the L shaped connector on the I O Center end Note When you use the USB connection it is required to install...

Page 91: ...no parts and the 03 channel to the pedal part 1 2 Select this when the 01 and 02 channels are assigned to the piano parts Prg Selects the smallest number channel assigned to the piano group voice pg 6...

Page 92: ...it Selects one of the following parts to be transmitted to the connected MIDI device ESBL Out Select this when you transmit the ensemble part played back on the Disklavier KBD Out Select this when you...

Page 93: ...played on the Disklavier on the external MIDI device This option inactivates the internal tone generator to prevent both the internal and external tone generator sound at the same time Split Sets the...

Page 94: ...pg 12 Adjusting the Overall Volume in Quick Guide Make sure that the volume adjusted in Balance screen is adequately turned up on the Pocket Controller pg 25 Adjusting the Volume Balance among the Ke...

Page 95: ...he song files should be formatted in ISO 9660 LEVEL1 The Disklavier may not read song files other than this format Some notes drop out during playback In Acoustic mode when a piano song is played back...

Page 96: ...into a library that already contains 10 000 songs CANNOT EXECUTE Exceeds limit of 10 000 songs The maximum number of songs in a library or playlist is limited to 10 000 You tried to copy song files i...

Page 97: ...85 CHAPTER 10 Screen Transition Diagrams Main screens pg 9 in Quick Guide and 37 41 pg 6 7 9 in Quick Guide and 37 55 57 59 62 66 79 81...

Page 98: ...CHAPTER 10 Screen Transition Diagrams 86 English Rec screens pg 41 L R Piano mode Time mode Time mode Ensemble mode Metronome mode Metronome mode pg 50 pg 47 pg 45 pg 50 pg 47 49...

Page 99: ...en Transition Diagrams 87 Song screens pg 15 in Quick Guide pg 24 pg 31 PianoSmart manual adjustment screen only for PianoSmart playback For normal use modification of these setups are not required pg...

Page 100: ...CHAPTER 10 Screen Transition Diagrams 88 English Song playback option buttons Setup menu screens pg 22 pg 23 55 Playback option buttons pg 44 57 pg 39 40 43 57 59 62 66 79 81 pg 55 63 65 66...

Page 101: ...CHAPTER 10 Screen Transition Diagrams 89 Setup option screens pg 79 pg 43 pg 61 pg 63 pg 55 pg 65 66 pg 64...

Page 102: ...CHAPTER 10 Screen Transition Diagrams 90 English pg 80 pg 81 pg 40 pg 57 pg 39 pg 59 pg 66...

Page 103: ...upport 24 note polyphony 16 parts and 128 standard voices Half Pedal See Incremental Pedal Incremental Pedal Piano pedals are not always completely up or down and may be held somewhere in between Usin...

Page 104: ...ffectively silencing the acoustic piano Sound is sent to the digital piano tone generator and output through the speakers Quiet mode or headphones Headphone mode Standard MIDI File SMF A file of MIDI...

Page 105: ...oppy disk USB Flash Memory Yamaha does not assure the operation of all the commercially available USB flash memories For a list of compatible products please visit www yamaha com disklavier USB Hard D...

Page 106: ...ia Select Floppy disk CD USB media internal HDD Arrangement of Songs Song Libraries PianoSoft Library User Library CD Library pg 9 in Quick Guide Polyphony 32 keys PRO Series 16 keys Mark IV Series Vo...

Page 107: ...res Overwrite Recording pg 42 Video Synchronization pg 43 Ensemble Part Recording pg 45 Overdubbing pg 47 Metronome Mode Recording pg 48 Quantize pg 49 Tempo Changing pg 50 Other Features Timer Play p...

Page 108: ...Appendix...

Page 109: ...so they know their rights We protect your rights with two steps 1 copyright the software and 2 offer you this license which gives you legal permission to copy distribute and or modify the software Al...

Page 110: ...e Program the distribution of the whole must be on the terms of this License whose permissions for other licensees extend to the entire whole and thus to each and every part regardless of who wrote it...

Page 111: ...tion of this section is held invalid or unenforceable under any particular circumstance the balance of the section is intended to apply and the section as a whole is intended to apply in other circums...

Page 112: ...ur freedom to share and change free software to make sure the software is free for all its users This license the Lesser General Public License applies to some specially designated software packages t...

Page 113: ...free software only so we use the Lesser General Public License In other cases permission to use a particular library in non free programs enables a greater number of people to use a large body of free...

Page 114: ...ctions of that work are not derived from the Library and can be reasonably considered independent and separate works in themselves then this License and its terms do not apply to those sections when y...

Page 115: ...e the copyright notice for the Library among them as well as a reference directing the user to the copy of this License Also you must do one of these things a Accompany the work with the complete corr...

Page 116: ...from the conditions of this License If you cannot distribute so as to satisfy simultaneously your obligations under this License and any other pertinent obligations then as a consequence you may not...

Page 117: ...LIBRARY AS IS WITHOUT WARRANTY OF ANY KIND EITHER EXPRESSED OR IMPLIED INCLUDING BUT NOT LIMITED TO THE IMPLIED WARRANTIES OF MERCHANTABILITY AND FITNESS FOR A PARTICULAR PURPOSE THE ENTIRE RISK AS T...

Page 118: ...ke additional copies You may transfer to another party all your license rights in the Software and related documentation by transferring to that party both the original media on which the Software and...

Page 119: ...unit or agency of the United States Government the following provisions apply The Licensed Software constitutes a commercial item as that term is defined at Federal Acquisition Regulation FAR 2 101 M...

Page 120: ...UENTIAL DAMAGES THAT RESULT FROM THE USE OR INABILITY TO USE THE SOFTWARE OR RELATED DOCUMANTATION UNDER ANY THEORY INCLUDING CONTRACT TORT OR NEGLIGENCE EVEN IF METROWERKS HAS BEEN ADVISED OF THE POS...

Page 121: ...7501 E mail info_europe metrowerks com Metrowerks Japan Shibuya Mitsuba Bldg 5F Udagawa cho 20 11 Shibuya ku Tokyo 150 0042 Japan Phone 81 3 3780 6091 Fax 81 3 3780 6092 E mail asia sales metrowerks c...

Page 122: ......

Reviews: