background image

Owner’s Manual

30

Re
fe

re

n

c

e

Select a Song For a Lesson

Yamaha Education Suite

You can select song you like and use it for a left-hand, right-hand, or both-hands les-
son. During the lesson you can play as slowly as you like, and you can even play wrong 
notes. Song playback will slow down to a speed you can handle. It’s never too late to 
start learning!

The practice methods:

Lesson 1—Waiting

In this lesson, try playing the correct notes. Play the note shown in the display. The song will wait until you play 
the right note.

1

Select a song for your lesson.

Select a song from the Piano Solo, Piano Ensemble category! For this example 
try selecting the “012 ForElise”.

2

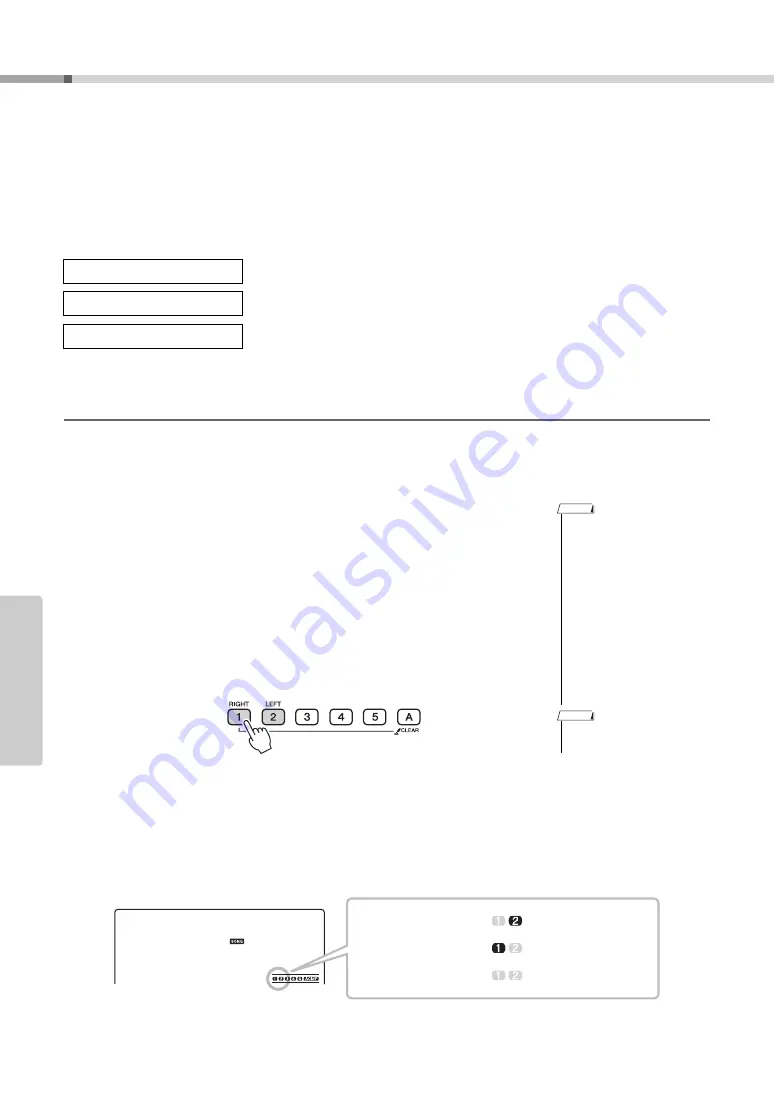
Turn off playback of the part you wish to practice.

The preset songs have separate left- and right-hand parts. The right-hand part is 
selected by the [RIGHT](1) button and the left-hand part is selected by the 
[LEFT](2) button. You can turn the left- and right-hand parts on or off as 
required in order to practice the corresponding part (the part that is turned off) 
on the keyboard. You can practice both parts when both the left- and right-parts 
are turned off.

Pressing the part buttons toggles part playback on and off. Turn off playback of 
the part you wish to practice. When you press one of the buttons to turn play-
back off, the corresponding part indicator in the display turns off and playback 
of that part is muted. 
(When you first select a song, both the “1” and “2” parts indicators will light, 
indicating that both parts are on.)

Lesson 1—Waiting

Learn to play the correct notes.

Lesson 2—Your Tempo


Learn to play the correct notes with the correct timing.

Lesson 3—Minus One


Learn to play the correct notes at the correct timing along with the song.

• Song numbers 10 and 11 are 

function demos for perfor-
mance assistant. The les-
son function cannot be used 
with them.

• You can also use songs 

(only SMF format 0) trans-
ferred from the computer 
and saved to flash memory. 
(pages 86–88)

• (NP-V80 only) You can also 

use songs (only SMF format 
0) on a USB flash memory. 
(page 28)

• You can turn parts on or off, 

even during playback.

NOTE

NOTE

012

ForElise

Track 1 is unlit

Track 2 is unlit

Track 1 and 2 are unlit

Right-hand

 lesson

Left-hand

 lesson

Both-hands

 lesson

Reference

Summary of Contents for NP-V80

Page 1: ...Setting Up Reference Appendix Quick Guide EN Owner s Manual ...

Page 2: ...s of batteries Batteries MUST be installed cor rectly Mismatches or incorrect installation may result in overheating and battery case rupture Warning Do not attempt to disassemble or incinerate any battery Keep all bat teries away from children Dispose of used batteries promptly and as regulated by the laws in your area Note Check with any retailer of household type batteries in your area for batt...

Page 3: ...spændingen til dette apparat er IKKE afbrudt sålæenge netledningen siddr i en stikkontakt som er t endt også selvom der or slukket på apparatets afbryder VAROITUS Laitteen toisiopiiriin kytketty käyttökytkin ei irroita koko laitetta verkosta standby The serial number of this product may be found on the bottom of the unit You should note this serial number in the space provided below and retain thi...

Page 4: ...o prevent possible leakage of the battery fluid When one of the following problems occur immediately turn off the power switch and disconnect the electric plug from the outlet If you are using batteries remove all batteries from the instrument Then have the device inspected by Yamaha service personnel The power cord or plug becomes frayed or damaged It emits unusual smells or smoke Some object has...

Page 5: ... other external device such as a computer page 88 NP V80 only To protect against data loss through media damage we recommend that you save your important data onto two USB storage devices or other external device such as a computer About copyrights Copying of the commercially available musical data including but not limited to MIDI data and or audio data is strictly prohibited except for your pers...

Page 6: ...urally you can play back any XG song data using an XGlite tone generator However keep in mind that some songs may play back differently compared to the original data due to the reduced set of control parameters and effects USB USB is an abbreviation for Universal Serial Bus It is a serial interface for connecting a computer with peripheral Devices It allows hot swapping connecting peripheral devic...

Page 7: ...ou have them all AC Power Adaptor May not be included depending on your particular area Please check with your Yamaha dealer Owner s Manual Music rest Accessory CD ROM Footswitch NP V80 only Data List My Yamaha Product User Registration The PRODUCT ID on the sheet will be needed when you fill out the User Registration form Setting Up Please read this section first This section explains how to use ...

Page 8: ...mpaniment Styles The accompaniment styles provide the equivalent of a full backing band cover ing a wide variety of styles from waltzes to 8 beat to euro trance and much more Select a style that matches the music you want to play or experiment with new styles to expand your musical horizons Using Songs Page 26 You can simply enjoy listening to the 30 internal songs or use them with just about any ...

Page 9: ...usting the Metronome Volume 54 Pitch Bend 54 One Touch Setting 54 Select an EQ Setting for the Best Sound 55 Auto Power Off Setup 55 Voice Settings 56 Voice Editing 56 Selecting a Dual Voice 57 Selecting a Split Voice 57 Touch Response Sensitivity NP V80 58 Touch Response Sensitivity NP V60 58 Harmony 59 Arpeggio Settings NP V80 only 60 Controlling Arpeggio Volume with Keyboard Dynamics 60 Synchro...

Page 10: ...pages 50 88 Use the specified adaptor page 97 The use of other adaptors may result in irreparable damage to both the adaptor and the instrument Unplug the AC Power Adaptor when not using the instrument or during electrical storms Connecting the AC power adaptor automatically supplies power from the adaptor and overrides battery power even when batteries are installed WARNING CAUTION AC outlet AC p...

Page 11: ...r On The Standby On switch turns the power to the instrument on or standby Turn down the volume by turning the MASTER VOLUME control to the left and press the Standby On switch to turn on the power Press the Standby On switch again to turn the power standby While playing the keyboard adjust the volume level by using the MASTER VOLUME control Avoid listening with the headphones at high volume for l...

Page 12: ... P A T ON OFF button page 35 0 EASY SONG ARRANGER button page 41 1 SONG REPEAT LEARN button page 33 A B REPEAT button page 71 REW button page 29 FF button page 29 PAUSE button page 29 START STOP button page 27 2 STYLE ACMP ON OFF button page 23 INTRO ENDING rit button page 63 MAIN AUTO FILL button page 63 SYNC STOP button page 63 SYNC START button page 62 START STOP button page 22 3 SONG button pa...

Page 13: ...EGGIO ON OFF button NP V80 only page 20 TOUCH ON OFF button NP V60 only page 58 3 DUAL ON OFF button pages 18 57 4 SPLIT ON OFF button pages 18 57 5 HARMONY ON OFF button page 59 6 PITCH BEND wheel page 54 7 USB TO DEVICE terminal NP V80 only page 76 Rear Panel 8 USB TO HOST terminal page 84 9 SUSTAIN jack page 11 0 PHONES OUTPUT jack page 11 1 DC IN jack page 10 f r iveGPno 8 9 0 1 3 8 99 4 5 6 7...

Page 14: ...ems sequentially after pressing the FUNCTION button CATEGORY and buttons f r f r The number buttons can be used to directly enter a Song Style or Voice number or parameter value For numbers that start with one or two zeroes the first zeroes can be omitted Example Selecting Voice 003 Grand Piano Number buttons 0 9 Press the button briefly to increase the value by 1 or press the button briefly to de...

Page 15: ...dy and chord notes of a song when the Song Lesson function is in use or the notes of chords you specify when the Dic tionary function is in use At other times the notes you play on the keyboard are dis played Notation Any notes occurring below or above the staff are indicated by 8va in the notation For a few specific chords not all notes may be shown in the notation section of the display This is ...

Page 16: ...voice For this example select the 102 Flute voice Preset Voice Types NP V80 Preset Voice Types NP V60 Select and Play a Voice MAIN 001 LiveGPno Appears when the Voice mode is engaged Voice name Voice number You can also select the voice using the CATEGORY and buttons after press ing the VOICE button page 14 NOTE f r 102 Flute Select 102 Flute 001 127 Instrument Voices 128 139 Drum Kit Various drum...

Page 17: ... have to do is press one convenient button Press the GRAND PIANO button The Grand Piano voice will be selected Voice Settings page 56 NOTE Play the Grand Piano Voice When you press the GRAND PIANO button all settings other than touch sensitivity are turned off The dual and split voices will also be turned off so only the Grand Piano voice will play over the entire key board NOTE ...

Page 18: ... can play different voices to the left and right of the keyboard split point The main and dual voices can be played to the right of the split point while the voice played to the left of the split point is known as the split voice The split point setting can be changed as required page 65 Press the button a second time to turn the split voice function off A suitable split voice is automatically sel...

Page 19: ...he METRONOME ON OFF button again If you want to adjust the metronome tempo press the TEMPO TAP button to call up the Tempo setting in the display then you can use the dial to set the tempo You can also set the tempo using the number buttons on the front panel You can set the time signature page 53 Using the Metronome 001 LiveGPno 4 Indicates the beat number in a measure during the Metronome functi...

Page 20: ...gio function on The button lights when the Arpeggio function is on 2 Play a note or notes on the keyboard to trigger Arpeggio playback The sound of the arpeggio produced will change according to the number of notes you play and the area of the keyboard you play in When the split function is on the arpeggio applies to the split voice The arpeggio applies to the main and dual voices when the split f...

Page 21: ...he dial to select the desired arpeggio type A list of the available arpeggio types is provided in the Arpeggio List of the separate Data List You can save the instrument s settings at this point and then recall them at any time you want to repeat your performance page 48 You can also record your performance page 43 Please note that the arpeggio sound for the split voice cannot be recorded Changing...

Page 22: ...tyle you want to use A list of all the available styles is provided in the Style List of the sep arate Data List 3 Press the START STOP button The style rhythm will start playing Press the START STOP button a second time when you want to stop playback Select a Style Rhythm 001 Std 8Bt This icon appears when a style number and name is displayed Style Name Style Number You can also use the style fil...

Page 23: ...off 3 Turn sync start on Press the SYNC START button to turn the sync start function on When sync start is on the bass and chord accompaniment included in a style will start playing as soon as you play a note to left of the key board split point Press the button a second time to turn the sync start function off Play Along with a Style 153 PnoBoogi This icon appears when automatic accompaniment is ...

Page 24: ...layback when you re done You can also stop playing by pressing the INTRO ENDING rit but ton so that an appropriate ending pattern will play and then style play back will stop You can switch style sections to add variety to the accompaniment Refer to Pattern Variation Sections on page 62 Chords page 25 Looking Up Chords Using the Chord Dictionary page 68 NOTE F G F C C C Auto accompa niment range S...

Page 25: ... root name only Major Minor Seventh Minor Seventh Major Seventh C Cm 7 C Cm7 CM7 D Dm 7 D Dm7 DM7 E Em 7 E Em7 EM7 C F Fm 7 F Fm7 FM7 G Gm 7 G Gm7 GM7 A Am 7 A Am7 AM7 B Bm 7 B Bm7 BM7 Easy Chords This method lets you easily play chords in the accompaniment range of the keyboard using only one two or three fingers For root C To play a major chord Press the root note of the chord To play a minor ch...

Page 26: ...ngs that have been transferred to the instrument from a computer in the same way that you play the internal songs NOTE 012 ForElise The song displayed here can be played Song No Category Description 001 003 Main Demo The songs in this category have been created to give you an idea of the advanced capabilities of this instrument 004 008 Voice Demo These songs features some of the instrument s many ...

Page 27: ...ayback at any time by pressing the START STOP button again Score data for the 30 internal songs are provided in the Songbook on the CD ROM The exceptions are songs 1 11 and 30 The scores for songs 9 to 11 are provided in the separate Data List NOTE The arrow marks in the beat display flash in time with the rhythm of the song or style 012 ForElise ...

Page 28: ...ata must be stored either in the USB flash mem ory s root directory or a first level second level folder in the root directory Data stored in third level folders created inside a second level folder cannot be selected and played by this instrument NOTE IMPORTANT Song Title Display Language File names containing Japanese katakana characters will be properly displayed if the instrument s display lan...

Page 29: ...e generator These are just like the transport controls on a cassette deck or CD player letting you fast forward FF rewind REW and pause PAUSE playback of the song Play Songs in Sequence You can select a song by using the button after pressing the DEMO BGM button The button can be used to go back to the beginning of the selected song NOTE Song Fast Forward Fast Reverse and Pause When an A B repeat ...

Page 30: ... is turned off on the keyboard You can practice both parts when both the left and right parts are turned off Pressing the part buttons toggles part playback on and off Turn off playback of the part you wish to practice When you press one of the buttons to turn play back off the corresponding part indicator in the display turns off and playback of that part is muted When you first select a song bot...

Page 31: ...e Lesson mode by pressing the WAITING button Once you ve mastered Lesson 1 move on to Lesson 2 r1 007 Waiting Keyboard Display Notation In this case r1 indicate that right hand lesson 1 has been selected The evaluation feature can be turned off via the FUNC TION Grade item page 75 NOTE See How You ve Done After the evaluation display has appeared the lesson will start again from the beginning Exce...

Page 32: ...our Tempo button to start Lesson 2 Play the note shown in the display Try to play the notes at the correct timing As you learn to play the right notes at the right timing the tempo will increase until eventually you ll be playing at the song s original tempo 3 Stop the Lesson mode You can stop the Lesson mode at any time by pressing the START STOP but ton You can also stop the Lesson mode by press...

Page 33: ...made a mistake or to repeat edly practice a section you find difficult Press the REPEAT LEARN button during a lesson The song location will move back four measures from the point at which you pressed the button and playback will begin after a one measure count in Playback will con tinue up to the point at which you pressed the REPEAT LEARN button and then jump back four measures and repeat again a...

Page 34: ...nce assistant technology offers two selectable types Select the type that pro duces the best results for you Chord No matter where or what you play the result will be musical well balanced sound This type offers the greatest freedom allowing you to play anything with both your left and right hands Chord Free If you can play simple right hand melodies but have trouble with left hand chords this is ...

Page 35: ... Ave Maria 2 Press the P A T ON OFF button The indicator lights when the performance assistant technology feature is on 3 Select the CHORD type Press the FUNCTION button then press the CATEGORY and but tons as many times as necessary to select the performance assistant technology item PAT Type PAT Type will appear in the display for a few seconds then the currently selected performance assistant t...

Page 36: ...hands You can even play the same keys over and over C E G C E G C E Performance assistant technology will make sure that the notes will come out as if they were played according to the score on the right Keep playing and performance assis tant technology will continue to correct the notes that you play You can stop song playback at any time by pressing the START STOP button 6 Press the P A T ON OF...

Page 37: ...logy feature is on 3 Select the CHD FREE type Press the FUNCTION button then press the CATEGORY and but tons as many times as necessary to select the performance assistant technology item PAT Type PAT Type appears in the display for a few seconds then the currently selected performance assistant technology type will be displayed Select the CHD FREE type by using the dial Select and Listen to a Son...

Page 38: ...y the keys shown in the illustration Keep playing F A and C with your left hand and the correct notes will sound as the song proceeds When you get used to playing the left hand part refer to step 2 on the next page and try adding the right hand part 6 Press the P A T ON OFF button to turn the performance assis tant technology feature off The score for Nocturne is provided in the separate Data List...

Page 39: ...thm of the song Then with your hands spread as shown in the illustration simply play the keyboard alternately with your left and right hands any notes will do How does it sound You ll get acceptable results no matter where you play thanks to performance assis tant technology Next try the three playing methods illustrated below Different ways of playing produce different results Once you get a feel...

Page 40: ... button A Music Database name will appear in the display 2 Select a Music Database Referring to the Music Database List in the separate Data List use the dial to select a music database Select one that matches the image of the song you intend to play For this example select the 162 Patrol 3 Play the chords with your left hand and melody with your right The jazz style will start playing when you pl...

Page 41: ... Song Arranger Playing it Press the SONG button then select a 009 Hallelujah Chorus by using the dial Press the START STOP button to play it As the song progresses you will see only the style changes while the song remains the same Keep in mind that you can enjoy using Easy Song Arranger with other songs as well any songs that include chord data Using the Easy Song Arranger Try switching styles wh...

Page 42: ...21 to 030 while using the Easy Song Arranger melody tracks will be automatically muted and no melody will sound In order to hear the melody tracks you will need to press the track buttons 3 to 5 NOTE Because the Easy Song Arranger uses song data you can t specify chords by play ing in the accompaniment range of the keyboard The ACMP ON OFF button will not function If the time signature of the song...

Page 43: ...cally be selected In this case you will record over and erase any previous data in Song 031 so be careful that you won t be erasing any mate rial you want to keep Accompaniment cannot be turned on or off once the REC button is pressed NOTICE NOTE 031 User 1 001 The lowest numbered unrecorded User Song Song numbers 031 035 avail able for recording is displayed If you want to select the Song you wil...

Page 44: ...ecord only to the style track NOTE Recordable Data You can record up to a total of 6 tracks 5 melody tracks and 1 style chord track Each track can be recorded individually Melody Track 1 5 Record the melody parts Style Track A Records the chord part Track Mute This instrument allows you to choose whether recorded tracks will play back while you are recording or playing back other tracks page 71 Me...

Page 45: ...in the display will light If style accompaniment is on and track A has not yet been recorded the style track A will automatically be selected for recording when a melody track is selected If you only want to record a melody track be sure to turn the style track A off NOTE rEC User 1 001 Track 1 will flash If the memory becomes full during recording a warning message will appear and recording will ...

Page 46: ...maining tracks By selecting an unrecorded track track buttons 1 5 A you can record the new track while listening to previously recorded tracks the play back tracks will appear in the display You can also mute previously recorded tracks the muted tracks will not appear in the display while recording new tracks To Re record a Track Simple select the track you want to re record for recording in the n...

Page 47: ...ared Track Clear Deleting a Specified Track from a User Song This function lets you delete a specified track from a user song 1 Press the SONG button then select the user song 031 035 you want to clear 2 Press and hold the track button 1 5 A corresponding to the track you want to clear for longer than a second A confirmation message will appear on the display 3 Press the YES button A confirmation ...

Page 48: ... or the 1 8 number buttons to select a bank num ber from 1 to 8 4 Press one of the REGIST MEMORY buttons 1 to 4 while hold ing the MEMORY BANK button to store the current panel set tings to the specified registration memory Up to 32 presets eight banks of four each can be memorized Memory 1 Memory 2 8 Banks Memory 3 Memory 4 1 Bank Bank number Data cannot be saved to the registration memory during...

Page 49: ...n Memory Style settings Style number Auto Accompaniment ON OFF Split Point Style settings Main A B Style Volume Tempo Voice settings Main Voice setting Voice number Volume Octave Pan Reverb Send Level Chorus Send Level Dual Voice settings Dual ON OFF Voice number Volume Octave Pan Reverb Send Level Chorus Send Level Split Voice settings Split ON OFF Voice number Volume Octave Pan Reverb Send Level...

Page 50: ... you want to delete the files see Deleting Files below Deleting Files To clear song and style files that have been transferred to the internal flash memory from a computer turn the power on by pressing the Standby On switch while simultaneously holding the highest white key on the keyboard and the three highest black keys You can save the settings as backup data to your com puter by using the Musi...

Page 51: ...ces being played in unison When you select a style or song the optimum chorus type for the voice used is automatically selected If you want to select a different chorus type use the pro cedure described below 1 Press the FUNCTION button 2 Use the CATEGORY and but tons to select Chorus Chorus will appear in the display for a few sec onds and the currently selected chorus type will be displayed 3 Us...

Page 52: ...n or off Panel Sustain will be added to the notes you play on the keyboard when the Panel Sustain is on To turn it off select oFF Pitch Controls Transpose The overall pitch of the instrument can by shifted up or down by a maximum of 1 octave in semitone incre ments 1 Press the FUNCTION button 2 Use the CATEGORY and but tons to select the Transpose item 3 Use the dial to set the transpose value bet...

Page 53: ... each mea sure while the other beats will click All beats will simply click with no chime at the beginning of each measure if you set this parameter to 00 The available range is from 0 through 60 Select 5 for this example 3 Press the CATEGORY and but tons as many times as necessary to select the beat length function TimesigD The currently selected beat length will be dis played 4 Use the dial to s...

Page 54: ...ariations to notes you play on the keyboard Roll the wheel upward to raise the pitch or downward to lower the pitch You can change the amount of pitch bend produced by the wheel as described on page 74 One Touch Setting Sometimes selecting the ideal voice to play with a song or style can be confusing The One Touch Set ting feature automatically selects a well balanced voice for you when you select...

Page 55: ...l to select the desired Master EQ setting Five settings are available 1 5 Settings 1 and 2 are best for listening via the instrument s built in speakers setting 3 is for headphones and settings 4 and 5 are ideal for listening via external speak ers Auto Power Off Setup The Auto Power Off function automatically turns the instrument s power off if it is not operated for a speci fied period of time T...

Page 56: ...he value Edited parameters can be saved to registration memory page 48 If you select a different key board voice the parameters will be reset and the ideal settings for the selected voice will be auto matically recalled f r 064 M Volume Category Setting Display Range Settings Main Voice Volume M Volume 000 127 Octave M Octave 2 2 Pan M Pan 000 left 64 center 127 right Reverb Level M Reverb 000 127...

Page 57: ...l be displayed 2 Select the desired Dual Voice by using the dial Selecting a Split Voice 1 Press and hold the SPLIT ON OFF but ton for longer than a second S Voice will appear in the display for a few sec onds then the currently selected split voice will be displayed 2 Select the desired Split Voice by using the dial D Voice 121 Marimba The currently selected dual voice S Voice 047 FngrBass The cu...

Page 58: ... adjust the key board s sensitivity to dynamics in three steps 1 Press the TOUCH ON OFF button to turn touch response on The TOUCH ON OFF button alternately turns touch response on and off The touch response icon will appear in the dis play when touch response is on When touch response is set to off all notes will be played at the same volume no matter how hard or softly you play the keys 2 Press ...

Page 59: ...ypes Try playing the keyboard with the harmony function The effect and operation of each Har mony Type is different refer to the below section How to sound each Harmony Type as well as the Effect Type List for details You can adjust the Harmony Volume in the Function Settings page 75 When harmony is on the harmony icon will appear in the display HarmType 02 Trio The currently selected harmony type...

Page 60: ... the arpeggio quantization to synchronize the arpeggio to a Style or Song 1 Press the FUNCTION button 2 Press the CATEGORY and but tons as many times as necessary to select the Quantize Quantize will appear in the display for a few seconds then the currently selected Quantize value will be displayed 3 Use the dial to select the appropriate quantize value 1 8 1 16 or OFF as required A setting of 1 ...

Page 61: ...ss the FUNCTION button 2 Press the CATEGORY and but tons as many times as necessary to select Pdl Func Pdl Func will appear in the display for a few seconds then the currently selected function assigned to the footswitch will be displayed 3 Use the dial to select Arp Hold If you want to restore the footswitch function to sustain select Sustain If you want to use both hold and sustain functions sel...

Page 62: ...ted Style MAIN section This is used for playing the main part of the Song It plays a main accompaniment pattern and repeats indefinitely until another section s button is pressed There are two variations on the basic pattern A and B and the Style playback sound changes harmonically based on the chords you play with your left hand Fill in section This is automatically added before changing to secti...

Page 63: ...ction When the ending is finished the auto accompani ment stops automatically You can have the ending gradually slow down ritardando by pressing the INTRO ENDING rit button again while the end ing is playing back MAIN A The name of the selected section MAIN A or MAIN B will be displayed INTRO A Split point Accompani ment range FILL A B Synchro Stop When this function is selected the accompani ment...

Page 64: ...0 quarter note beats per minute Press the and buttons simultaneously to instantly reset the value to the default tempo of a Style You can change the tempo during style playback by pressing the TEMPO TAP button just twice Adjusting the Style Volume Press the STYLE button to engage the style func tion 1 Press the FUNCTION button 2 Use the CATEGORY and but tons to select the Style Volume item 3 Use t...

Page 65: ...rt You can start the style by simply tapping the TEMPO TAP button at the required tempo 4 times for time signatures in 4 and three times for time sig natures in 3 You can change the tempo during style playback by pressing the button just twice When you change the split point the auto accompani ment split point also changes The split point cannot be changed during a song lesson You can also access ...

Page 66: ...les Using the Entire Keyboard In Play Along with a Style on page 23 we described a method of playing styles in which chords were detected only to the left of the keyboard split point By making the settings described below however chord detection for style accompaniment occurs over the entire range of the keyboard allowing for even more dynamic style performance In this mode only chords played in t...

Page 67: ... The procedure described below loads a style file that has already been transferred from a computer to the instru ment into style number 161 1 Press the FUNCTION button The currently selected function will appear in the display 2 Press the CATEGORY and but tons as many times as necessary to select the style file load function Sff Load After about 2 seconds the name of a loadable style file will ap...

Page 68: ...y in the CHORD TYPE area no sound will be produced The notes you should play for the speci fied chord root note and chord type are shown in the display both as notation and in the keyboard diagram To call up possible inversions of the chord press the buttons 4 Try playing a chord in the auto accom paniment section of the keyboard checking the indications in the display When you ve played the chord...

Page 69: ... group from the table below Random Song Playback The random play mode causes the songs in the group selected for BGM playback to be played back in ran dom order 1 Press the FUNCTION button 2 Press the CATEGORY and but tons as many times as necessary to select PlayMode PlayMode will appear in the display for a few seconds then the currently selected repeat play back mode will be displayed You canno...

Page 70: ...note beats per minute Press the and buttons simultaneously to instantly reset the value to the default tempo of a Song You can change the tempo during song playback by pressing the TEMPO TAP button just twice Song Volume 1 Press the FUNCTION button 2 Use the CATEGORY and but tons to select the Song Volume item 3 Use the dial to set the song volume between 000 and 127 090 Tempo Current Tempo value ...

Page 71: ...s Each track of a song plays a different part of the song melody percussion accompaniment etc You can mute individual tracks and play the muted part on the keyboard yourself or simply mute tracks other than the ones you want to listen to To mute a track press the appropriate track button TRACK 1 5 A button Press the same button a second time to disengage track muting The repeat start and end point...

Page 72: ...lody Voice You can change a song s melody voice to any other voice you prefer 1 Select the song and play it 2 Rotate the dial to select the voice you want to listen to after pressing the VOICE button 3 Press the VOICE button for longer than a second SONG MELODY VOICE appears in the display for a few seconds indicating that the voice selected in step 2 has replaced the song s original melody voice ...

Page 73: ...d buttons as many times as necessary until the function s dis play name appears in the display 4 Use the dial the and buttons or the 0 9 number buttons to set the selected function as required In some cases the button will initiate execu tion of the selected function and the will can cel the selection Some Function settings are stored in memory as soon as they are changed See The Backup Parameters...

Page 74: ...e Reverb effect Chorus Level M Chorus 000 127 Determines how much of the Main voice s signal is sent to the Chorus effect Dual Voice Voice D Voice 000 500 NP V80 000 489 NP V60 Selects the Dual voice Volume D Volume 000 127 Determines the volume of the Dual voice Octave D Octave 2 2 Determines the octave range for the Dual voice Pan D Pan 000 left 64 center 127 right Determines the pan position of...

Page 75: ...Song playback Initial Send InitSend YES NO Lets you send the data of the panel settings to a computer Press YES to send or press NO to cancel Metronome Time Signature Numerator TimesigN 00 60 Determines the time signature of the Metronome Time Signature Denominator TimesigD Half note Quarter note Eighth note Sixteenth note Sets the length of each metronome beat Metronome Vol ume MtrVol 000 127 Det...

Page 76: ...on mode Press and hold the FUNCTION button until the display changes When the display changes you will be able to access the file control functions If the file control functions are accessed while an unformatted USB flash memory is connected to the instrument the Format function will auto matically be selected Use the category and buttons to select one of the file control functions listed below To...

Page 77: ...When a USB storage device is connected or media is inserted a message may appear prompting you to for mat the device media If so execute the Format opera tion page 78 To protect your data write protect To prevent important data from being inadvertently erased apply the write protect provided with each storage device or media If you are saving data to the USB storage device make sure to disable wri...

Page 78: ...he VOICE STYLE SONG FUNC TION or GRAND PIANO button Messages may appear on the display during file control procedures to aid in smooth operation Refer to the Message List on page 83 for details No sound will be produced if the keyboard is played while the file control display is showing and only buttons related to file control operations will be active The file control display will not appear duri...

Page 79: ...press the 0 button The dial can be used to select a different target file USER001 USER100 if desired before pressing the 0 button 3 Save the user file A confirmation message will appear Press the 0 button to execute the save operation or press the button to cancel the operation User files will be saved in a folder labeled USER FILES which will automatically be created on the USB flash memory Wait ...

Page 80: ... specified target user song is satisfactory press the 0 button The dial can be used to select a different target user song SONG001 100 if desired before pressing the 0 button 4 Save the user song A confirmation message will appear Press the 0 button to execute the save operation or press the button to cancel the operation User songs will be saved in a folder labeled USER FILES which will automatic...

Page 81: ...must first be transferred to the internal memory from a computer page 87 1 Select the Load Style function Press the category or button as many times as necessary until the Load STY function appears 2 Select the style file to be loaded When the 0 button is pressed style files located on the USB flash memory or in the instrument s internal memory will be displayed If the initially selected file is t...

Page 82: ...s instrument from a USB flash memory USB flash memory save delete and format opera tions can only be performed when the instrument is being powered from an AC adapter These operations cannot be performed using battery power 1 Select the Delete SMF File function Press the category or button as many times as necessary until the Del SMF function appears 2 Specify the SMF file to be deleted When the 0...

Page 83: ...al data Disk Ful Displayed when saving data cannot be exe cuted since the media memory becomes full Error Displayed when a file error or operational error occurs File Ful Indicates that SMF songs cannot be displayed since the total number of files exceeds the capacity no data There is no data to save in the flash memory no file There is no file to load or delete from the media Communication with t...

Page 84: ... the USB TO HOST terminal exit from any power saving mode of the computer such as suspended sleep standby Before turning on the power to the instrument con nect the computer to the USB TO HOST terminal Execute the following before turning the power to the instrument on off or plugging unplugging the USB cable to from the USB TO HOST terminal Quit any open application software on the com puter Make...

Page 85: ...o PC2 when using Digital Music Notebook 1 Press the FUNCTION button 2 Press the CATEGORY and but tons as many times as necessary to select the PC mode item PC Mode 3 Use the dial to select PC1 PC2 or OFF Item Display Range Settings Description Local Local ON OFF Local control determines whether or not notes played on the instrument are sounded by its internal tone generator system the internal ton...

Page 86: ...y CD ROM Installation Guide on page 89 for installation details With the Musicsoft Downloader You Can Transfer files from the computer to the instrument s flash memory refer to the procedure described on page 87 The procedure for transferring songs included on the Accessory CD ROM from your computer to the instrument is given as an example Backup files can be transferred from the instrument to a c...

Page 87: ...or CD ROM and transfer it to the instrument in the same way as a song file 6 A copy of the selected MIDI song file will appear in the List of files stored temporarily at the top of the window The memory medium will also be displayed at the bottom of the window to specify the destination for the transfer Click the Electronic Musical Instruments and then Flash memory 7 After selecting the file in th...

Page 88: ...ed and saved but opera tion of the memory media may become unstable and its contents may disappear completely when the power is turned on or off Store data can be lost due to equipment malfunction or improper operation For safety we recommend that you keep a copy of all important data stored on your computer We recommend that you use a power adaptor rather than batteries when transferring data The...

Page 89: ...em CD player DVD player etc Do not attempt to use the disk on equipment other than a computer The screen displays as illustrated in this manual are for instructional purposes and may appear somewhat dif ferent from the screens which appear on your computer Software such as the USB MIDI driver may be revised and updated without prior notice Make sure to check and download the latest version of the ...

Page 90: ...fer it from the computer to the instrument s mem ory Refer to page 93 for installation instructions w USBdrv32_ USB MIDI Driver for 32 bit version Windows 2000 XP Vista 7 This driver software is necessary to connect MIDI devices to your computer via USB Refer to page 91 for installation instructions USBdrv64_ USB MIDI Driver for 64 bit version Windows XP Vista 7 e SongBook Song Book Includes score...

Page 91: ...Display Musicsoft Downloader Windows 2000 XP Home Edition XP Professional Vista Only 32 bit is supported Windows 7 233 MHz or higher Intel Pentium Celeron Proces sor family 500 MHz or higher is rec ommended 64 MB or more 256 MB or more is recommended 128 MB or more at least 512 MB of free space is recommended 800 x 600 HighColor 16 bit USB Driver for Windows Windows XP Professional SP2 SP3 XP Home...

Page 92: ...mpting you to restart the computer do so Restart the computer by following the on screen directions This screen will not appear on Windows 7 When the message Device driver software was not successfully installed appears continue the installation procedure This screen will not appear if you are updating the USB MIDI driver from the previous version Continue the installation procedure The messages t...

Page 93: ...only in Windows XP 2 Make sure that no or x marks appear at Universal serial bus controller or USB Root Hub If you see an or x mark the USB controller is disabled Is any unknown device registered If driver installation fails the instrument will be marked as an Unknown device and you will not be able to install the driver Delete the Unknown device by following the steps below 1 Select Control Panel...

Page 94: ...om any open applications and close all open windows 3 From the Start menu select Settings Control Panel Add or Remove Pro grams to display the Add or Remove Pro grams panel 4 Click Change or Remove Programs located in the upper left then select Yamaha USB MIDI Driver or Yamaha Musicsoft Downloader from the list in the right panel 5 Click Remove A dialog box appears Follow the instructions to remov...

Page 95: ...f the defective media if it is returned to Yamaha or an authorized Yamaha dealer within fourteen days with a copy of the receipt Yamaha is not responsible for replacing media dam aged by accident abuse or misapplication TO THE FULLEST EXTENT PER MITTED BY LAW YAMAHA EXPRESSLY DISCLAIMS ANY IMPLIED WARRANTIES ON THE TANGIBLE MEDIA INCLUDING THE IMPLIED WARRANTIES OF MERCHANTABILITY AND FITNESS FOR ...

Page 96: ...ianist category styles have no rhythm parts so no rhythm will play The other parts will begin playing when you play a chord in the accompaniment range of the keyboard if style playback is turned on Not all of the voices seem to sound or the sound seems to be cut off The instrument is polyphonic up to a maximum of 32 notes If the Dual voice or Split voice is being used and a style or song is playin...

Page 97: ...ypes Harmony 26 types Arpeggio 50 types Song 30 Preset Songs 5 User Songs Accessory CD ROM Songs 70 Song Clear Track Clear Song Volume Song Control REPEAT LEARN A B REPEAT PAUSE REW FF START STOP Performance assistant technology Chord Chord Free Recording Song User Song 5 Songs Recording Tracks 1 2 3 4 5 STYLE MIDI Local On Off Initial Send External Clock Keyboard Out Style Out Song Out Auxiliary ...

Page 98: ...ser Song 47 Demo 29 Demo Cancel 75 Demo Group 69 Demo Play Mode 69 Display 15 Drum Kit 16 Dual Voice 18 57 E Easy Song Arranger 41 Effect 51 Ending 62 External Clock 85 F Fast Forward FF 29 File Control 76 Fill 62 Flash Memory 26 87 Footswitch 11 61 Format USB Flash Memory 78 Function 73 75 G Grade 31 H Harmony 59 Harmony Volume 75 Headphones 11 I Initial Send 86 Initialization 50 Intro 62 K Keybo...

Page 99: ...ng Clear 47 Song Out 85 Split Point 18 65 Split Voice 18 57 Style 22 62 Style File 67 Style Out 85 Style Tempo 64 Sustain Footswitch 11 61 Synchro Start 23 62 Synchro Stop 63 T Tap Start 65 72 Tempo Metronome 19 Tempo Song 70 Tempo Style 64 Time Signature Denominator 53 Time Signature Numerator 53 Touch Response 58 Touch Sensitivity 58 Track 44 Track Clear 47 Transfer 86 88 Transpose 52 Troublesho...

Page 100: ...hase documents will cause this warranty to be void This warranty covers only the Original Owner and is not transferable In Order to Obtain Warranty Service Warranty service will only be provided for defective products within the Warranted Area Contact your local authorized Yamaha dealer who will advise you of the procedures to be followed If this is not successful contact Yamaha at the address tel...

Page 101: ...Owner s Manual 101 ...

Page 102: ...Owner s Manual 102 ...

Page 103: ...Denmark Tel 44 92 49 00 FINLAND F Musiikki Oy Kluuvikatu 6 P O Box 260 SF 00101 Helsinki Finland Tel 09 618511 NORWAY Norsk filial av Yamaha Scandinavia AB Grini Næringspark 1 N 1345 Østerås Norway Tel 67 16 77 70 ICELAND Skifan HF Skeifan 17 P O Box 8120 IS 128 Reykjavik Iceland Tel 525 5000 RUSSIA Yamaha Music Russia Office 4015 entrance 2 21 5 Kuznetskii Most street Moscow 107996 Russia Tel 495...

Page 104: ...sical Instrument Division Yamaha Corporation 2010 Yamaha Corporation WT59290 XXXPOXXX X XXB0 Printed in China Yamaha Home Keyboards Home Page http music yamaha com homekeyboard Yamaha Manual Library http www yamaha co jp manual ...
Reviews: