background image

MX49 MX61 MX88 Reference Manual

2

Using the Manuals

Your MX49, MX61, or MX88 synthesizer comes with four different reference guides—the Owner’s Manual, the Reference Manual (this 
document), the Synthesizer Parameter Manual, and the Data List. While the Owner’s Manual is packaged together with the synthesizer as a 
hardcopy booklet, this Reference Manual, Synthesizer Parameter Manual, and the Data List are provided as PDF documents from the Yamaha 
Downloads web page.

Owner’s Manual (hardcopy booklet)

Describes how to set up your instrument and how to perform basic operations. It also has some useful, informative appendices for 
the instrument. This manual explains the following operations.

Reference Manual (this PDF document)

Describes the internal design of your instrument, how to use a connected computer, and all parameters that can be adjusted and set.

Synthesizer Parameter Manual (PDF document)

Explains the voice parameters, effect types, effect parameters, and MIDI messages that are used for synthesizers incorporating the 
Yamaha AWM2 sound generators. Read the Owner’s Manual and Reference Manual first and then use this parameter manual, if 
necessary, to learn more about parameters and terms that relate to Yamaha synthesizers.

Data List (PDF document)

Provides lists such as the Voice List, Performance List, Arpeggio Type List, Effect Type List, as well as reference materials such as 
the MIDI Implementation Chart and Remote Control Function List.

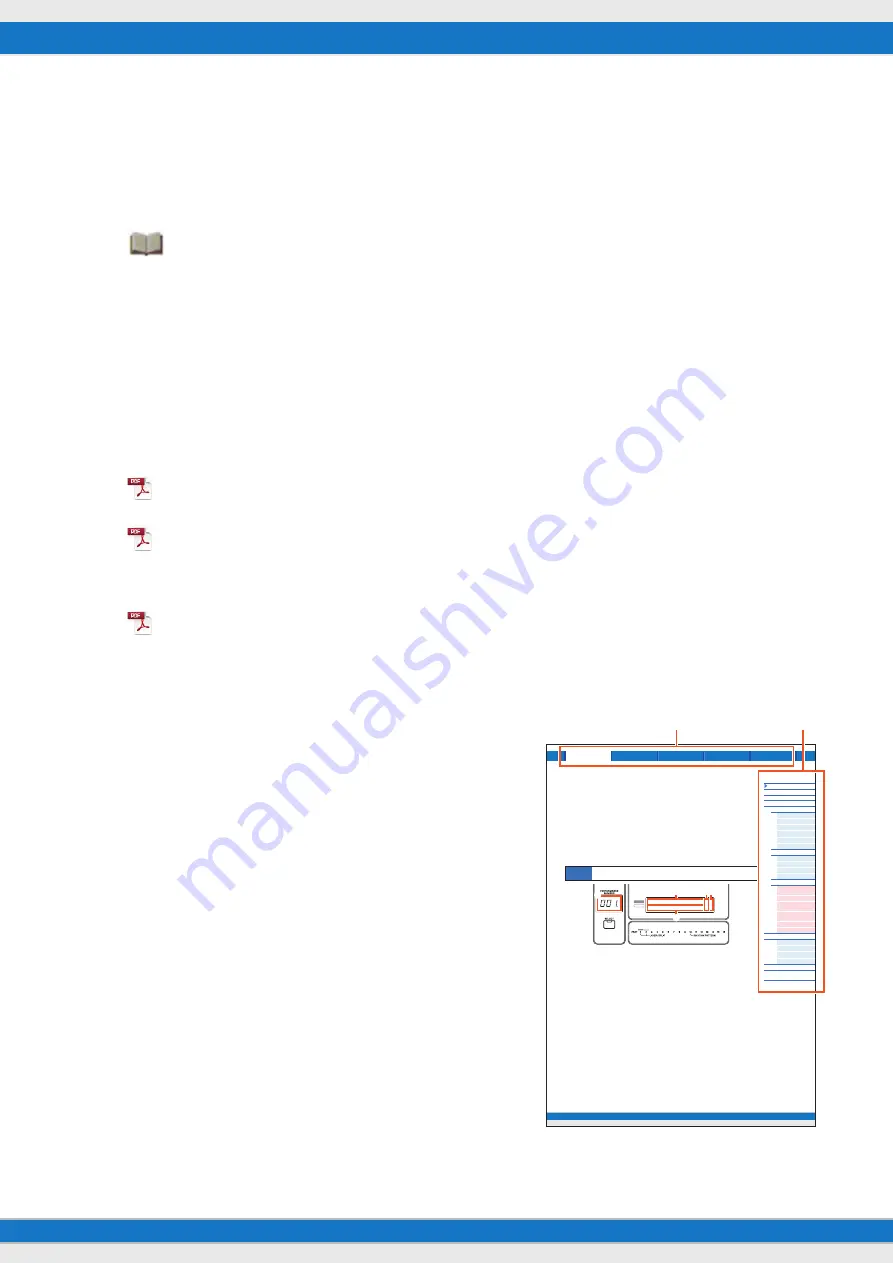
Using the Reference Manual

• Using the major function tabs along the upper part of each page from the 
Reference section, you can jump to the page for parameter explanations of 
the corresponding function. The list indicated at the right of each page in the 
selected function is equivalent to the function tree. By clicking the desired 
item from this list, you can jump to the page for the corresponding function’s 
explanations.

• You can click on any page number from the Table of Contents or within 
descriptive text to jump to the corresponding page.

• You can also click on desired items and topics you want to refer to in the 
“Bookmarks” index to the left of the main window, and jump to the 
corresponding page. (Click the “Bookmarks” tab to open the index if it is not 
displayed.)

• If you want to find information on a specific topic, function or feature, select 
“Find” or “Search” from the Adobe Reader “Edit” menu and enter a key word 
to locate the related information anywhere in the document.

NOTE

The most-recent version of Adobe Reader can be downloaded from the 
following web page.

http://www.adobe.com/products/reader/

NOTE

The names and positions of menu items may vary according to the version of 
Adobe Reader being used.

Information

• The illustrations and LCD screens as shown in this Reference Manual are 

for instructional purposes only, and may appear somewhat different from 
those on your instrument.

• Windows is a registered trademark of Microsoft

®

 Corporation in the United States and other countries.

• Apple, Mac, iPhone, iPad, and iPod Touch are trademarks of Apple Inc., registered in the U.S. and other countries.

• All other trademarks are the property of their respective holders.

• Setting up

• Basic operation and displays

• Playing the Voices

• Changing the tonal qualities of the Voice with the 

Controllers

• Using the Arpeggio function

• Keyboard Octave/Transpose settings

• Playing the Performances

• Playing the Rhythm Patterns

• Playing the Songs

• Creating an original Performance

• Switching Voices during live performance without the sound cutting off 

• Making global System settings

• Exchanging files with USB flash memories

• Connecting external MIDI instruments

• Shift Function list

• Display messages

• Troubleshooting

• Specifications

Son

g

/Pattern

File

Utility

Remote

Performance

MX49 MX61 MX

88

 Reference Manual

Performance

Performance Play

Performance Select

Performance Part Select

Performance Edit

Common Edit

Chor

u

s Eff

Re

v

er

b

 Eff

Master EQ

Arp S

w

itch

General

Name

Part Edit

Play Mode

Filter/EG

Arp Select

Rc

v

S

w

itch

Voice Edit

Voice Insert Eff / 
Dr

u

mKit Insert Eff

Voice LFO

Voice Ctrl Set /
Dr

u

mKit Ctrl Set

Voice Name /
Dr

u

mKit Name

Voice Jo

b

Voice Store

Performance Jo

b

Initialize

Recall

Copy

B

u

lk

Performance Store

S

u

pplementary 

Information

40

Reference

Performance

A Performance is typically made up of multiple Voices, allowing you to sound them together in various ways. For 
example, you can play a richly textured sound on the keyboard by combining two Voices (of Parts 1 and 2), or play 
multiple Parts simultaneously by using an external sequencer or MIDI data. This section explains all the Performance 
parameters, divided into six categories (Performance Play, Performance Select, Performance Part Select, Performance 
Edit, Performance Job, and Performance Store).

Performance Play

This corresponds to the top or main display of the instrument. In this display, you can select/play Part 1 or Part 2, play 
different Voices of Parts 1 and 2 together in a layer (Layer function), or play one Voice of Part 2 with your left hand while 
you play a different Voice of Part 1 with your right (Split function).

1

Performance number

The selected Performance number is always displayed in this three-digit display. When editing Performance 
parameters, a dot (.) is shown in the lower right of the screen. This provides a quick confirmation that the current 
Performance has been modified but not yet stored. When you want to store the current status, execute the Performance 
Store function (

page 56

).

2

Voice of Part 1

3

Voice of Part 2

Indicates/determines the Voice assigned to Parts 1 and 2 of the selected Performance. The Voice category, Voice 
number, Voice name are displayed in order from left to right. User Voices are indicated by a “u” mark at the beginning of 
the Voice name. When a category contains User Voices, the User Voices are listed after the Preset Voices of the 
category. A cursor (

>

) is displayed between the Voice category and number of the selected Part.

4

(Edit) indicator

When the Voice assigned to Part 1 or Part 2 has been modified, this indicator appears to the right of the Voice name. 
This gives a quick confirmation that the Voice has been modified but not yet stored. When you want to store the current 
status, execute the Voice Store function (

page 53

).

5

Keyboard icon

When playing the keyboard, this icon appears to the right of the Part that is currently sounding. When the Layer function 
is active, this icon appears to the right of both Parts, since both Parts will sound. When the Split function is active, the 
icon appears at Part 1 when you play the right side of the keyboard (right of the Split Point; 

page 45

), and appears at 

Part 2 when you play the left side. 

Operation

Call 

u

p Performance Play display 

b

y pressing [EXIT] repeatedly 

 Select Part 1/2 

w

ith C

u

rsor [

u

]/[

d

bu

ttons 

 Select Voice 

w

ith [DATA] dial.

AP 
STR:081:Amb

m

Pizza

001:CncrtGrand

c

n

2
2 n

2

3

1

5

4

Select a major function

Select a function

Summary of Contents for MX88

Page 1: ...nce on the instrument to DAW software as MIDI data 22 Recording your performance on the instrument to DAW software as audio data 27 Recording Arpeggio phrases of the instrument to DAW software as MIDI...

Page 2: ...the Performances Playing the Rhythm Patterns Playing the Songs Creating an original Performance Switching Voices during live performance without the sound cutting off Making global System settings Ex...

Page 3: ...he keyboard transmits note on off messages to the Tone Generator Block for sounding the Voices The keyboard is also used for triggering Arpeggio playback The default note numbers assigned to the keybo...

Page 4: ...e you start playing Various functions can be assigned to the Modulation wheel in the Ctrl Set display page 52 of Voice Edit Knobs The four Knobs let you change various aspects of the Voice s sound in...

Page 5: ...s multiple samples of a real instrument s waveform Furthermore a wide variety of parameters envelope generator filter modulation and others can be applied Voices A program that contains the sonic elem...

Page 6: ...settings for each Voice FILTER This component modifies the tone of the sound output from OSC by subtracting a specific frequency range of the sound Filter related parameters can be set in the Filter...

Page 7: ...rent categories are listed below Each category has multiple Voices Category name Abbreviation Category button name Voice type Acoustic Piano AP PIANO Normal Voice Keyboard KB KEYBOARD Normal Voice Org...

Page 8: ...This instrument features multiple Voices in Preset Memory which cannot be overwritten page 17 These Voices are referred to as Preset Voices On the other hand Voices which are created by editing the P...

Page 9: ...nt also allows you to play different Voices of Part 1 and Part 2 together in a layer Layer function or play one Voice of Part 2 with your left hand while you play a different Voice of Part 1 with your...

Page 10: ...e parameters that are related to the entire Voice Voice Edit is available only for Voices assigned to the Performance Parts When editing the Voice make sure to store it as a User Voice separate from t...

Page 11: ...or sounds for which you want to drastically change the character Each Voice features one Insertion Effect You can set different Effect types to the Insertion Effect This setting can be set in the Voic...

Page 12: ...g the Effect categories of this instrument and the Effect types contained in their categories see the Effect Type List in the Data List PDF document For information on the Effect parameters which can...

Page 13: ...ence also changes in response to the actual notes or chords you play giving you a wide variety of inspiring musical phrases and ideas both in composing and performing Two Arpeggio types can be played...

Page 14: ...ntervals between them C Chord indicates that chords are detected from note data played on the keyboard and Arpeggio playback then changes with the chords Blank cells indicate Arpeggios for Drum Voices...

Page 15: ...for use with Drum Voices giving you instant access to various rhythm patterns Three different playback types are available Playback of a drum pattern Pressing any note s will trigger the same rhythm p...

Page 16: ...s instrument features multiple Rhythm Patterns The appropriate Rhythm Pattern is determined for each Performance This Pattern is played back using the Drum Voice assigned to Part 10 of the Performance...

Page 17: ...a reading operations The contents of this memory are lost when the power is turned off You should always store edited data to User memory before switching the Performance or turning off the power Reca...

Page 18: ...he OUTPUT L MONO R jacks and PHONE jack These signals are not output to the USB TO HOST terminal 2 The audio data of the USB flash memory are output only to the OUTPUT L MONO R jacks and PHONE jack Th...

Page 19: ...he instrument to the computer Note that both audio data and MIDI data can be transmitted via USB Also the MX49 MX61 Remote Tools and the MX Voice List are useful for using DAW software with this instr...

Page 20: ...for six seconds or more between these operations 1 when turning the power of the instrument off then on again or 2 when alternately connecting disconnecting the USB cable MIDI channels and MIDI ports...

Page 21: ...rminal and the OUTPUT L MONO R jacks When connecting to a computer use the USB TO HOST terminal In this case up to two audio channels USB 1 and USB2 are available The audio signals of the instrument c...

Page 22: ...see the following website http download yamaha com Important For the sake of example in the explanations below Cubase 6 is used on a computer running Windows 7 The Cubase windows and names as shown i...

Page 23: ...e sure to start Cubase after turning on the power of the instrument 2 On Cubase open a new project Select the Empty project in the More area of the Project Assistant window and then click Create 3 Con...

Page 24: ...OK to close the Device Setup window 5 Set up the MX Voice List installed in your computer for use on Cubase Setting up the MX Voice List makes operation smoother easier and more convenient when creat...

Page 25: ...MX61 1 All incoming MIDI data will be input to Cubase and MIDI track data will be output to the channel determined at the track on MIDI Port 1 of the instrument Also the MX Voice List can be shown on...

Page 26: ...instrument performance to the selected MIDI track After setting the time position to zero click Record When you begin playing the instrument recording of your performance starts When you ve finished...

Page 27: ...ction Recording your performance on the instrument to the DAW software as MIDI data Click Project menu Add Track Audio Add Track 3 In this new Audio track set the Input Output destinations for the ins...

Page 28: ...set the signal flow as shown in the following illustration and use the convenient Quick Setup function to simplify the connection settings on the instrument Setting up the instrument 1 For Part 1 det...

Page 29: ...ns are off If the lamps of the LAYER button and SPLIT button are lit press the buttons to turn them off Setting up Cubase 1 Start Cubase on your computer Important Cubase cannot recognize the instrume...

Page 30: ...pped on Cubase Stop mode If you wish to playback the Arpeggio in the Stop mode also check the Send MIDI Clock in Stop Mode 6 Record Arpeggio phrases of the instrument to the selected MIDI track After...

Page 31: ...background For example the PLAY R K button STOP J button and AI KNOB DATA dial can be used as transport controls for Cubase DAW programs that can be controlled from the instrument are Cubase Logic Pr...

Page 32: ...e Install MX49 MX61 Remote Tools to complete the setup SONAR 1 Pull down the Edit Preferences menu and select Devices of MIDI 2 Add Yamaha MX Series 2 to the Input Device then add Yamaha MX Series 2 t...

Page 33: ...N COMP on the instrument to display the Add Instrument Track dialog in the Cubase project window 5 Select a VSTi by using the Cursor buttons of the instrument Press the Cursor V button to display the...

Page 34: ...STi WINDOW CHROMATIC PERCUSSION to open the VSTi window of the selected Instrument track 8 Select a program of the VSTi by pressing INC YES DEC NO of the instrument 9 Play the VSTi by using the instru...

Page 35: ...Mode page 68 setting When using other DAW software than Cubase the PrgChgMode is always set to PC NOTE When multiple tracks are selected on the DAW software the program change function works for only...

Page 36: ...p in mind the following points VSTi WINDOW function applies to the top track EDIT CH SET function applies only to the top track AUTOMATION READ AUTOMATION WRITE DELETE functions apply to all selected...

Page 37: ...can be used for Jog Shuttle operation as in freely moving the time position The assignable parameters to the AI KNOB change according to the on off status of the JOG SYN LEAD button and the LOCK PAD...

Page 38: ...B by turning this button on When you locate the mouse pointer to the desired parameter then turn the LOCK button on the AI KNOB will control the locked parameter regardless of the mouse pointer s posi...

Page 39: ...the optional i MX1 MIDI interface giving you even greater enjoyment and musical versatility For details how to connect this instrument to the iPad iPhone iPod Touch refer to the i MX1 Owner s Manual...

Page 40: ...isplay When editing Performance parameters a dot is shown in the lower right of the screen This provides a quick confirmation that the current Performance has been modified but not yet stored When you...

Page 41: ...mance Part Select In this display you can select one Part from Parts 1 16 and play it Also you can change the Voice assigned to each Part and certain Part parameters including Volume and Pan There are...

Page 42: ...selected Part by using the DATA dial or the INC YES DEC NO buttons To change the Part use the Cursor buttons Parameter Description Pan Determines the stereo pan position for each Part Settings L63 far...

Page 43: ...selected display Chorus Eff Chorus Effect Parameter Description Chorus category Chorus type Determines the Chorus Effect category and type Settings For details on the editable Effect categories and t...

Page 44: ...hether the equalizer type used is Shelving or Peaking The Peaking type attenuates boosts the signal at the specified Frequency setting whereas the Shelving type attenuates boosts the signal at frequen...

Page 45: ...ts as soon as you trigger it The number shown at right of each value indicates quarter note resolution in clocks Settings off 60 32nd note 80 16th note triplet 120 16th note 160 8th note triplet 240 8...

Page 46: ...e cursor to the desired location by using the Cursor buttons and select the character by using the DATA dial A name can contain up to 10 alphabetic and numeric characters Release Release time Determin...

Page 47: ...g the DATA dial or the INC YES DEC NO buttons Operation Press EDIT Select 02 Part with Cursor d button Press ENTER Select Part with Category buttons 1 16 Select display to be edited with Cursor u d bu...

Page 48: ...tions assigned to the ASSIGN 1 2 Knobs can be set in the Ctrl Set display page 52 of Voice Edit Filter EG Parameter Description Cutoff Determines the cutoff frequency of the filter for each Part Setti...

Page 49: ...er Description BankSel Bank Select Determines whether Bank Select MSB LSB messages for the Voice assigned to each Part are received or not PrgChange Program Change Determines whether Program Change me...

Page 50: ...Category buttons 1 16 Select desired display for editing from 05 08 with Cursor u d buttons Press ENTER Edit parameters in selected display Voice Insert Eff Voice Insertion Effect DrumKit Insert Eff...

Page 51: ...half notes 4th x 4 quarter note quadruplets four quarter notes to the beat 4th x 5 quarter note quintuplets five quarter notes to the beat 4th x 6 quarter note sextuplets six quarter notes to the bea...

Page 52: ...tion that is controlled by the controller set in Source Settings See the Control List in the Data List PDF document Depth Determines the degree to which the Source controller affects the Destination S...

Page 53: ...in mind that the edited Voice will be erased by executing Performance Store 1 User Voice number Selects the User Voice number as the storing destination Settings For Normal Voices 001 128 For Drum Voi...

Page 54: ...execute Initialize Data type to be initialized All All data in the Performance Common Data in Common Edit Part 1 16 Data of the Part Edit parameters of the corresponding internal Part PartAll Data of...

Page 55: ...y the parameter settings from a Part to a different Part of the same Performance Settings Current 001 128 2 Data type of the source Determines the source data type including the Part number Select the...

Page 56: ...ormance 1 Performance number Selects the Performance number as the storing destination Settings 001 128 2 Performance name Indicates the current Performance name of the selected Performance number Aft...

Page 57: ...ned on When the 3rd lamp is turned on Knob Parameter Settings Reference page A VOLUME Volume in Common Edit 0 127 page 46 B PAN Pan in Common Edit L63 C R63 page 46 C ASSIGN1 Assign 1 in Common Edit 6...

Page 58: ...yback location of the selected Song When the selected Song is MIDI data Measure and Beat are indicated When the selected Song is audio data Minutes and Seconds are indicated 2 File Selects a desired S...

Page 59: ...e for the Rhythm Pattern This Voice is set by default as the Voice of Part 10 of the selected Performance Settings Refer to the Voice List of the Data List PDF document Volume For adjusting the Patter...

Page 60: ...ates the type of file and cannot be changed by panel operations on the instrument File Size This refers to the memory amount of the file The file size is determined by the amount of data saved to the...

Page 61: ...ines which specific type of data will be loaded from a single file Press ENTER after selecting the type The display which is called up differs depending on the selected type Settings File types which...

Page 62: ...ed unreadable If this happens you should rename the file with valid characters Performance A specified Performance in an All file that is saved to USB flash memory can be individually selected and loa...

Page 63: ...ou can use a new USB flash memory with the instrument you will need to format it Select 05 Format in the top File display then press ENTER to appear the confirmation display Then press INC YES to exec...

Page 64: ...he same parameter of the Song display page 58 Settings 0 127 Octave Octave shift Determines the amount in octaves by which the range of the keyboard is shifted up or down This parameter is linked with...

Page 65: ...the lowest key on the keyboard and turning the power on This operation retains the off setting even if the power is turned off MIDI Parameter Description MIDI IN OUT Determines which physical output i...

Page 66: ...ly disabled and the instrument is synchronized with the external clock When MIDI clock is not transmitted from the external MIDI device or computer the internal clock of the instrument continues to ru...

Page 67: ...nerator also responds to those messages as if the Footswitch of the instrument itself was used Settings off 1 95 arp sw play stop PC inc PC dec octave reset NOTE An FC4A or FC5 connected to the SUSTAI...

Page 68: ...gram Change Mode Determines what messages will be transmitted to the computer when you operate the INC YES DEC NO buttons or DATA dial When PC is selected Program Change messages will be transmitted v...

Page 69: ...o a USB flash memory computer or other device NOTE For instructions on executing Factory Set see the Owner s Manual 1 PowerOn Auto Power On Auto Factory Set When this parameter is set to on turning th...

Page 70: ...b does not affect the value Once you move the Knob past the current value moving the Knob affects the value and the Knob indication will correspond with the current value 2 Parameter name Indicates th...

Page 71: ...display When the Control Template is switched on the instrument the Template will also be switched on the Remote Editor NOTE If Remote Tools has been installed in your computer switching the VSTi on...

Reviews: