background image

MCX-2000 Owner’s Manual Addendum for Version 2

4

7

Updating the MusicCAST Server Firmware

Do not disconnect the power cable while this unit is in the firmware update procedure.

Follow the procedure below to update the firmware on this unit. You need to perform the firmware update in advance to 
use the new features in the firmware update.

1

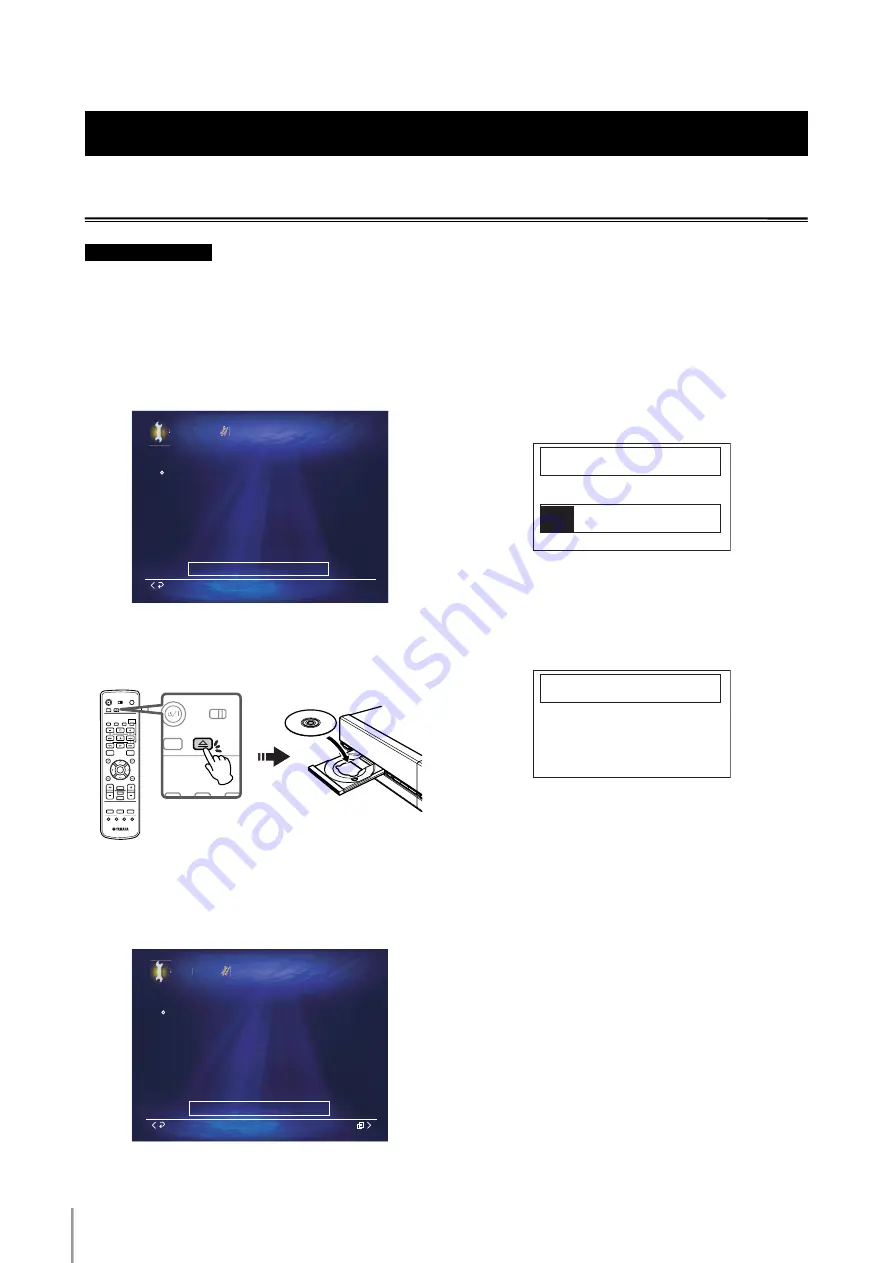
Select “Top Menu” > “Setup” > “System Utilities” > 

“System Update”.
The following display appears in the OSD.

2

Press OPEN/CLOSE on the front panel (or the remote 

control), and then load the firmware update CD with 
its label side facing up.

3

Press OPEN/CLOSE on the front panel (or the remote 

control) to close the CD tray.
This unit starts reading the data of the update CD, 
and then the following display appears in the OSD.

4

Push the center stick rightward on the front panel (or 

press > on the remote control) to open the Submenu, 
and then select “Start”.
The OSD disappears, and the following screen 
appears in the front panel display.

n

It takes about 20 minutes to update the firmware of the server.

5

When the following message appears in the front 

panel display, press OPEN/CLOSE on the front panel 
(or the remote control) to open the CD tray, and then 
unload the firmware update CD.

6

Press STANDBY/ON on the front panel (or the remote 

control) twice to reboot this unit.

n

Once this unit reboots, select “Top Menu” > “Setup” > “System 
Utilities” > “System Information” > “Version” to make sure the 
version of the firmware of this unit is 2.0 (or later).

n

If the firmware update fails, an error message appears in the 
front panel display. In such cases, try the firmware update 
procedure again. If the same error message appears in the front 
panel display again, consult with an authorized YAMAHA 
service center.

General Information

CAUTION

Use this utility to update the MCX-2000 firmware.

System Utilities

System Update

Setup

Step 1 : Insert the system update CD

Step 2 : Push the > key to open the Submenu

Step 3 : Select "Start"

No update CD present

Cancel

1

2

3

4

5

6

7

8

9

0

2

3

4

1

STAMDBY/ON

POWER

AMP/TV

TV

AMP

TIMER

TOP

MENU

PLAU
INFO.

PAGE

A

PAGE

Z

VOL.

BOOLMARK

AMP/TV

MUTE

LIBRALY

ARTSTS

FAVORITES

PLAULISTS

INPUT

SELECT

OPEN/CLOSE

1

2

3

MENU

MENU

MENU

Remote control

RANDOM

REPEAT

BROADCAST

RADIO

STANDBY/ON

TV

AMP

TIMER

OPEN/CLOSE

RANDOM

REPEAT

BROADCA

Use this utility to update the MCX-2000 firmware.

System Utilities

System Update

Setup

Step 1 : Insert the system update CD

Step 2 : Push the > key to open the Submenu

Step 3 : Select "Start"

Update CD is ready

Cancel

Submenu

SYSTEM UPDATE

EJECT CD AND RESTART

UPDATE OK

SYSTEM UPDATE

SYSTEM UPDATE

Summary of Contents for MCX-2000 - MusicCAST Digital Audio Server

Page 1: ...Digital Audio Server for Version 2 Owner s Manual Addendum MCX 2000...

Page 2: ...ures in Version 2 7 Using This Unit with Microsoft Windows Media Connect 2 0 7 Connecting This Unit and Your PC by Using Windows Media Connect 2 0 7 Playing Back the Audio Contents on the PC with Wind...

Page 3: ...0 FAVORITES 1 4 Keys Allow you to assign the desired items artists radio stations etc to the FAVORITES 1 4 keys on the remote control MCX 2000 MENU 1 3 Keys Allow you to change the preset menu items o...

Page 4: ...n unload the firmware update CD 6 Press STANDBY ON on the front panel or the remote control twice to reboot this unit n Once this unit reboots select Top Menu Setup System Utilities System Information...

Page 5: ...panel display of MCX A10 3 Press p on the front panel of the client or p on the remote control of the client to start the firmware update for the client The client receives the latest firmware from th...

Page 6: ...a CD Create an Original CD Client Control Client 1 Client 15 Setup Timer Network Client Configuration Auto Configuration Manual Configuration Status View Server IP Address Wireless LAN Advanced Setti...

Page 7: ...onnect this unit to your PC and configure them appropriately The following procedure is a standard example Some details of the function may vary according to your PC configuration and connection envir...

Page 8: ...ts on the PC with Windows Media Connect 2 0 Use this feature to play the music contents stored on your PC by using Windows Media Connect 2 0 n When you use this feature the PC where the desired conten...

Page 9: ...t establish the link to the selected server Cannot find PC Server appears in the OSD 5 Proceed with the operation to play the music contents in the PC as identical as in this unit See pages 46 to 51 o...

Page 10: ...ou play back a podcast to the end of an episode this unit stops playback Recently Played Stations Selects a station from the list of the stations most recently selected on this unit You can clear the...

Page 11: ...59 of MCX 2000 OWNER S MANUAL for details Highlighted Stations By Location 3 2 1 All Stations Blues Internet Radio Radio Library Select Back Example Washington DC Switzerland Salima KS Normal IL 10 9...

Page 12: ...elect Background or Icon The following display is an example when you select Background 3 Select the desired item 4 Select OK to confirm your selection Please wait a moment appears in the OSD and then...

Page 13: ...e details of the design displayed in the web browser window or the function of this feature may vary n Make sure that this unit is not in the standby mode when you use this feature When this unit is i...

Page 14: ...rtional n When you select a graphic file incompatible with this unit the graphic size is oversized the format is incorrect etc Please choose 24 bit bitmap file below 120x120 pixel appears in your web...

Page 15: ...es Bookmarks All Songs Statistics Playlists Library Submenu Back Select Albums Music Archive Albums Songs Time Approximate Adult Snakes Broadway is the Easy Way Burnt Winny Chunga s Revenant Cold Cats...

Page 16: ...is the Easy Way Burnt Winny Chunga s Revenant Cold Cats Citar Have I Been Sadistic Hot Dogs Joe s Garakuta 23 1 2 3 4 5 6 7 8 9 10 9 8 17 9 10 6 32 15 10 19 31 55 36 15 1 11 05 41 10 40 23 47 13 2 12...

Page 17: ...select Clear All you can clear all the items assigned to the FAVORITES 1 4 keys 4 Select OK when the following message appears in the OSD Saving appears in the OSD and then this unit returns to Remot...

Page 18: ...wing message appears in the OSD Saving appears in the OSD and then this unit returns to Remote Control menu LIBRARY ARTISTS FAVORITES PLAYLISTS 1 2 3 MENU MENU MENU 2 3 4 1 Music Archive Albums Artist...

Page 19: ...album artist Artists playlist genre album artist Group A J Recently Played Songs Times Played playlist genre album Albums Genres All Songs Playlists Bookmarks Statistics Radio Preset Network Content...

Page 20: ...stored on this unit Setting Up the File Sharing of Your PC When you back up the song data stored on this unit to your PC you must make a shared folder directory whose shared name is mc_backup on your...

Page 21: ...tab in the Properties window and then place the check marks in the Share this folder on the network and Allow network users to change my files check boxes as shown below 8 Make sure Share name is mc_b...

Page 22: ...ch you want to store the backup data When more than one PC is connected to the LAN you can switch the PC in the LAN by selecting Cancel in the front panel display When the network ID of the desired PC...

Page 23: ...d on your PC change the folder directory of all the previous song data files from the shared folder to another n This unit searches for the shared folder directory whose Share name is mc_backup When t...

Page 24: ...ng Cancel in the front panel display When the network ID of the desired PC appears in the front panel display select OK in the front panel display n When you select the PC on which has the song data f...

Page 25: ...s unit 11 Once the restore is complete open the Properties window of the shared folder on the PC and then remove the check mark in the Share this folder on this network check box as below Song Data Re...

Reviews: