background image

17

Launching and Setting Up the Studio Manager/LS9 Editor

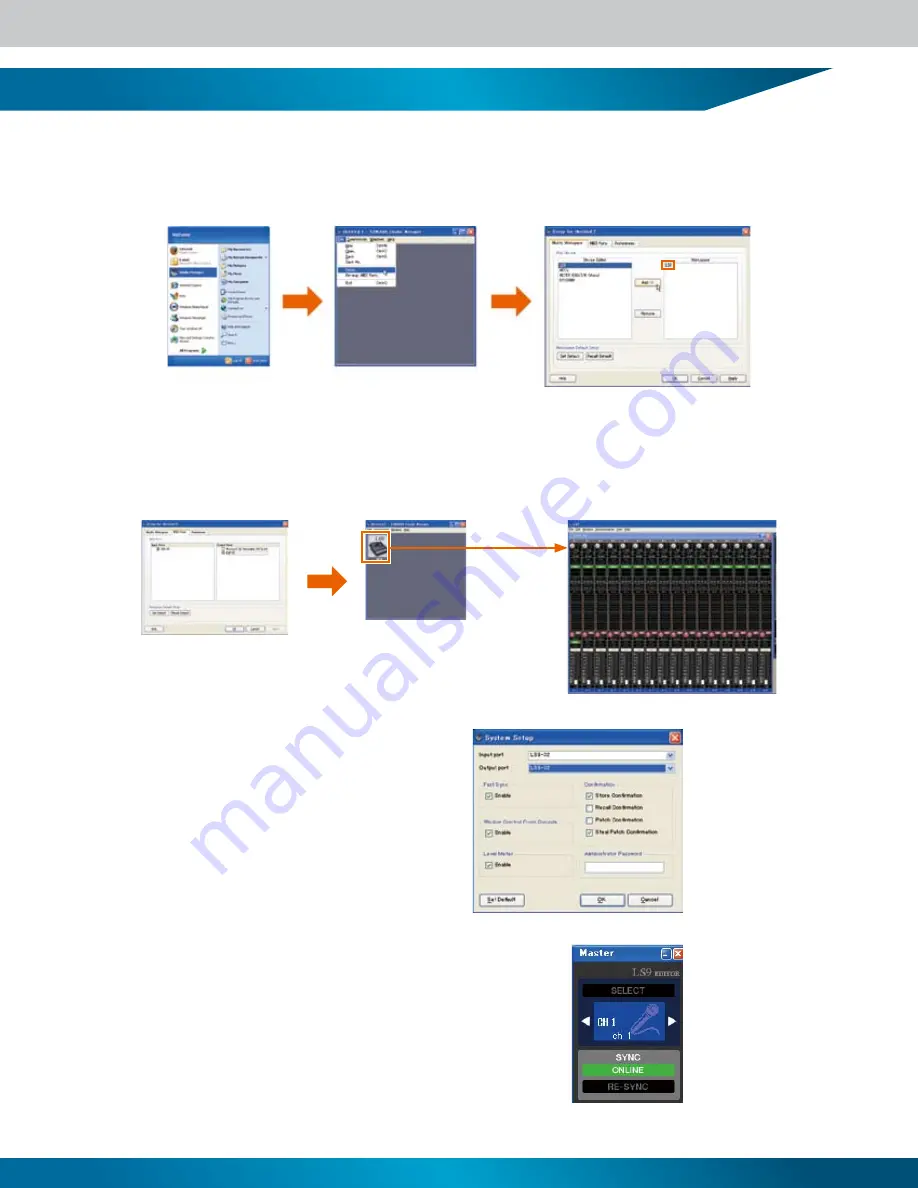
(1) Launch the YAMAHA Studio Manager either from the Programs menu or from the desktop shortcut�
Select [Setup] from the Studio Manager [File] menu� Select “LS9” in the list on the left side of the window, then click the [Add] button� Confirm 
that “LS9” has been added to the list on the right side of the window�

(2) Next, click the MIDI Ports tab to open the MIDI Ports window. The Device Name specified in the DME-N Driver will appear 

in both the Input Ports and Output Ports windows, and both should be checked� Click the [OK] button and the LS9 icon should 
appear in the Studio Manager window� Double-click the LS9 icon to launch the LS9 Editor�

(3) When the LS9 Editor has launched, select [System Setup] 
from the [File] menu� Select the port you intend to use for 
communication in the window that opens� Both the Input Port 
and Output Port settings should be matched to the settings 
you made in the Studio Manager (LS9-32 in this example)� 
If an administrator password has been set for the LS9, enter 

the password in the [Administrator Password] field. When all 

settings have been made as required, click the [OK] button to 
close the window�

Click the [RE SYNC] button to open the “Re Synchronize” window via which 
you can synchronize the LS9 and computer settings�
If the LS9 scene and library have already been stored, use [Direction] in the 
window to select [Console -> PC] and then click the [OK] button to backup 
the LS9 settings to the computer� Always make sure that you have selected 
the appropriate direction when synchronizing the console and computer�

Double-click.

If the LS9 and computer 
are properly connected, the 
[ONLINE] indicator will be 
highlighted in green. In this 
state the LS9 and LS9 Editor 
parameters are synchronized 
so that when a parameter 
is edited the change is 
reflected on both the LS9 
and the computer.

If you click [Set Default], the 
settings you have been made 
will be loaded as the initial 
defaults the next time the LS9 
Editor is launched.

Summary of Contents for LS9 Editor

Page 1: ...use and operation of scenes the virtual rack and other useful functions The Quick Start Guide is provided for first time users of the Yamaha LS9 Digital Mixing Console and provides a streamlined intr...

Page 2: ...EQ Channel Assignment 8 GEQ Selection and Editing 9 Recalling and Saving Scenes 10 Scene Data 11 Recall Safe 12 BGM Playback from USB Memory 13 USER DEFINED KEY Assignment 14 Connecting the LS9 to a C...

Page 3: ...annel section and all default settings are stored in scene number 000 So all you have to do to normalize or reset the entire console is to recall scene 000 Check Your Connections This document presume...

Page 4: ...AUX and EFF controls as the LS9 it should be referred to only as an example The Selected Channel section is located to the right of the LCD panel Module Comparison The channel module controls the par...

Page 5: ...s you want to edit press the button once The selected MIX bus button will light 3 Press the same button a second time and all buttons in the MIX MATRIX section while light while the selected button fl...

Page 6: ...k spaces and you cal select either the single channel 31 band GEQ type or the dual channel 15 band Flex15 GEQ type Effect units can only be mounted in rack spaces 5 through 8 You can change the type o...

Page 7: ...window to open the EFFECT LIBRARY pop up window Use the dial to select an effect from the list that appears in the pop up window You can click the RECALL button to load the selected effect Edited eff...

Page 8: ...fect returns to channels In scene 000 the effect return are assigned to STEREO input channels 1 4 but these assignments can be changed Either click the button to the right of the effect unit in the ra...

Page 9: ...ex15 GEQ unit is being edited the number of remaining available bands will be displayed Although you can boost and cut the EQ bands via the display you can also use the channel faders to directly cont...

Page 10: ...been reset you can begin to edit the various parameters for your mix But of course you can edit parameters from any scene number When any changes have been made to the currently selected scene an Edit...

Page 11: ...off position Direct out settings on off position level EQ settings all parameters including HPF ATT digital attenuator Dynamics 1 and 2 settings all parameters Rack settings all parameters MIX send s...

Page 12: ...ene is recalled This is known as Partial Safe Select specific parameters for Recall Safe by using the SAFE PARAMETER field buttons any button other than ALL Partial Safe and engage the SAFE button in...

Page 13: ...nsupported formats will not be recognized Playback will begin at the selected song and all checked songs up to the end of the title list will be played in sequence Playback will stop automatically whe...

Page 14: ...pened is actually specified by pressing and holding the USER DEFINED KEY for more than 2 seconds while the target display page is showing Once assigned you can instantly open the assigned display page...

Page 15: ...ub using a high quality CAT5 Ethernet cable Either a straight or cross Ethernet cable can be used when connecting the LS9 directly to the computer Press the SETUP key in the DISPLAY ACCESS section as...

Page 16: ...oped for use with Yamaha DME series Digital Mixing Engines thus the DME in the name But through successive versions it has grown to provide TCP IP functionality for a wide range of Yamaha products Fro...

Page 17: ...be matched to the settings you made in the Studio Manager LS9 32 in this example If an administrator password has been set for the LS9 enter the password in the Administrator Password field When all...

Page 18: ...at has been specifically designed to provide open ended expansion capability Input and output expansion in a variety of analog and digital audio formats is provided via Mini YGDAI cards that install e...

Page 19: ...visual feedback and confirmation This type of centralized operation and display allows the engineer to concentrate more fully on the job at hand while providing operating ease that allows extra leewa...

Page 20: ...l to be varied for AUX type operation while the send level of the FIXED type is fixed at nominal for BUS type operation The MATRIX buses are used to further group the MIX bus signals MATRIX buses have...

Page 21: ...etween the MIX bus PRE and POST settings After pressing the HOME key position the cursor at the target MIX bus and press the ENTER key A pop up window will appear in which you can select PRE or POST A...

Page 22: ...Block Diagram 22...

Page 23: ...23...

Reviews: