En
21
PLAYBACK
1
Turn on external components (TV, BD
player, etc.) connected to this unit.
2
Turn on this unit and select the input source
using
c
Input selector
.
The name of the selected input source is displayed for
a few seconds.
J
1
3
Play the external component that you have
selected as the source input, or select a
radio station on the tuner.
Refer to the instruction manuals provided with the
external component for details on playback.
For details on how to tune in to FM stations, refer to
“FM tuning” (
4
Press
m
/-
to adjust the volume.
To mute the output.
Press
n
MUTE
to mute the audio output.
Press
n
MUTE
again to unmute.
Adjusting high/low-frequency sound
(Tone control)
You can adjust the balance of the high-frequency range
(Treble) and low-frequency range (Bass) of sounds
output from the front left and right speakers to obtain
desired tone.
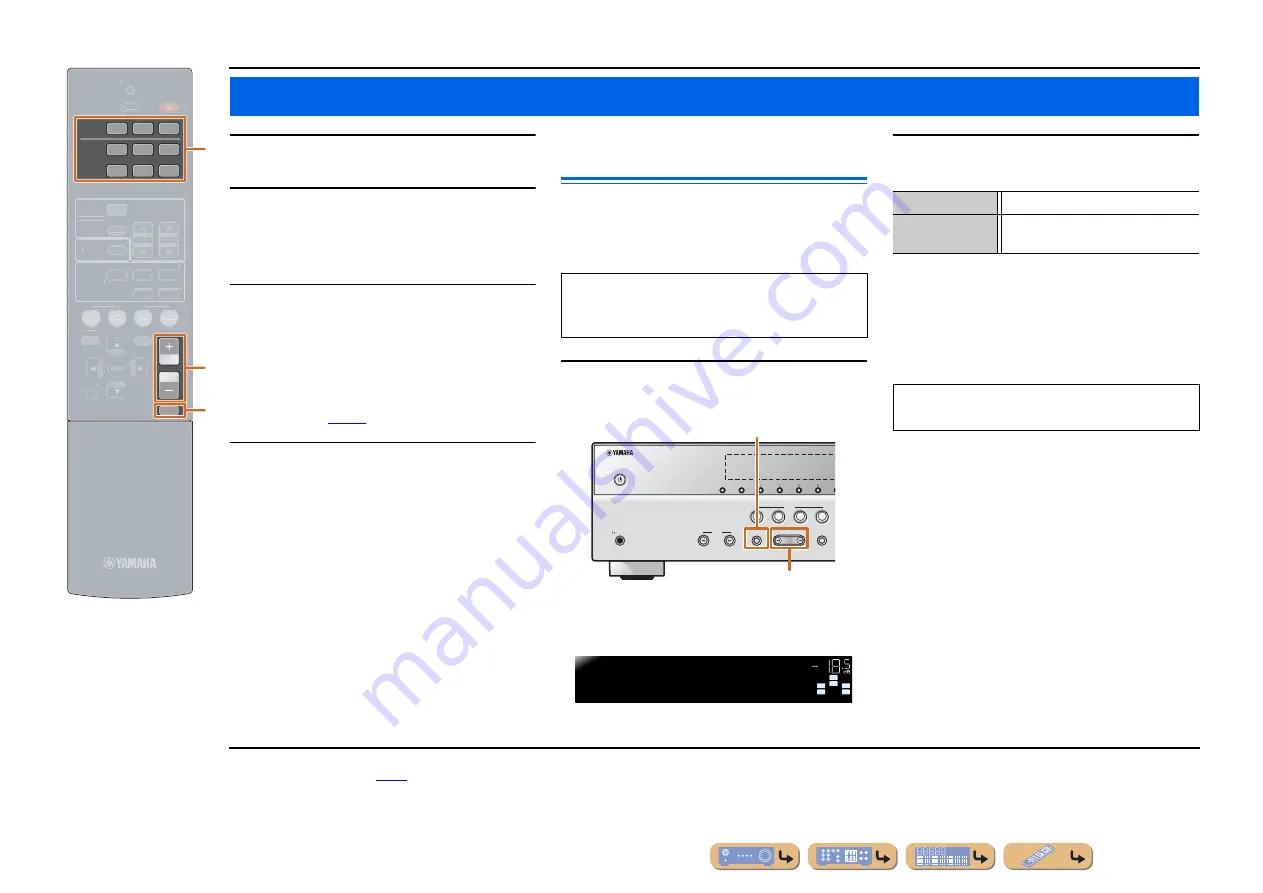
1
Press TONE CONTROL on the front panel
repeatedly to select “Treble” or “Bass.”
The current setting is displayed on the front panel
display.
2
Press PROGRAM
l
/
h
to adjust the output
level in those frequency ranges.
When “Treble” and “Bass” are both 0.0 dB, the audio
signal will bypass the tone control circuit, the “Bypass”
is displayed on the front panel display.
The display returns to the previous display soon after
you release the key.
Basic playback procedure
VOLUME
MUTE
1
2
3
1
2
3
4
5
6
HDMI
AUDIO
RECEIVER
SCENE
OPTION
SETUP
RETURN
TRANSMIT
SLEEP
BD
DVD
TV
CD
RADIO
TUNER
SOUND
INFO
TUNER
MEMORY
PRESET
TUNING
SUR. DECODE
STRAIGHT
ENHANCER
STEREO
MUSIC
MOVIE
c
m
n
c
Input selector
m
/-
n
MUTE
The tone control of the speakers or headphones can be
set separately. Set the headphone tone control with the
headphones connected.
PHONES
SILENT CINEMA
TONE CONTROL
STRAIGHT
TV
BD
DVD
CD
RADIO
INPUT
PROGRAM
SCENE
INFO
MEMORY
PRESET
FM
TUNING
TONE CONTROL
PROGRAM
l
/
h
SW
C
L
SL
SR
R
SW
C
L
SL
SR
R
Treble
0.0dB
TONE
VOL.
Adjustable range
-6.0 dB to +6.0 dB
Adjustment
increments
0.5 dB
If you set the balance extremely off, sounds may not
match those from other channels well.
J
1 :
You can change the input source name displayed on the front
panel display as necessary (


