background image

Producing Reference Tones for Playing Harmony (Voice, Temperament, Hold, Octave, Transpose)

HD-300 Owner’s Manual

21

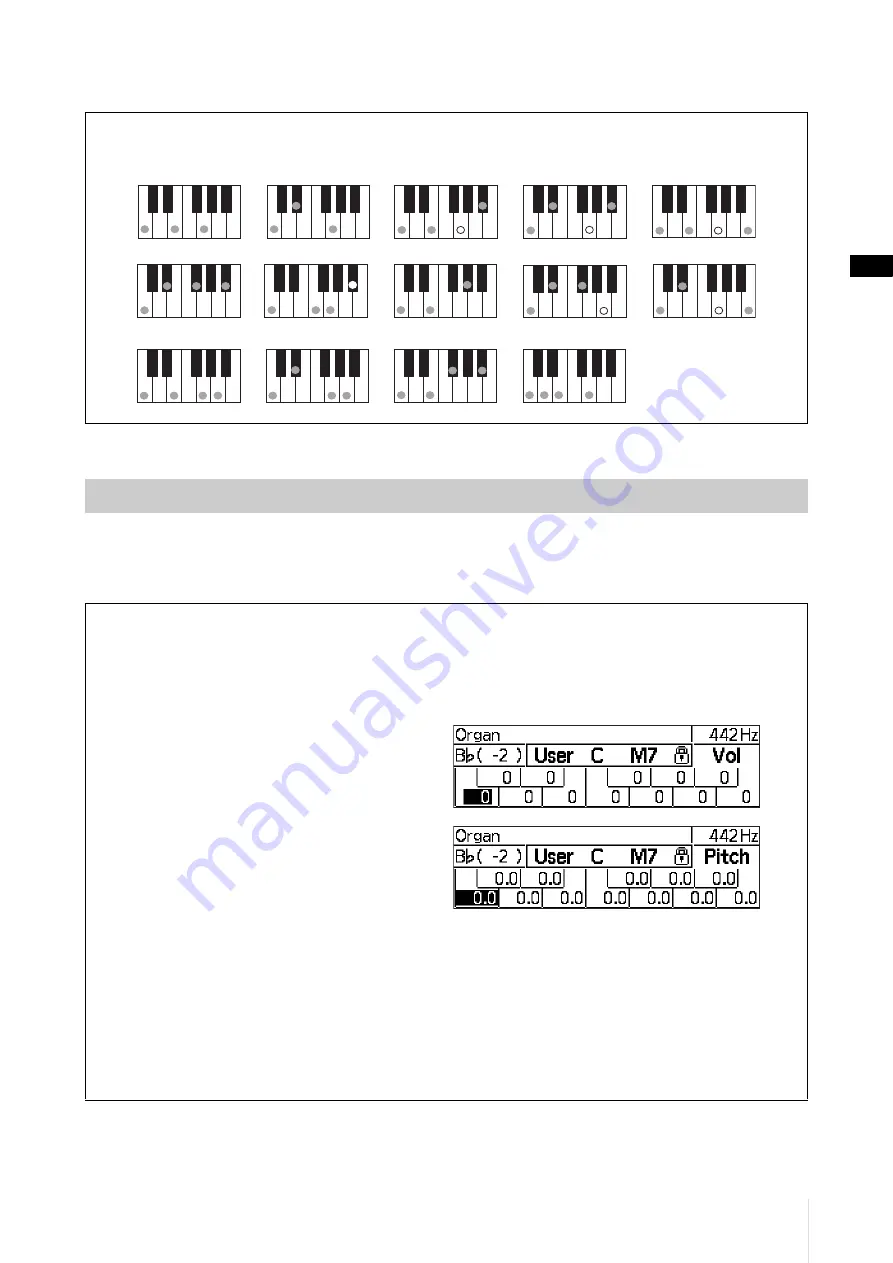
For details on what chords can be recognized, refer to the chart below.

Use the TEMPERAMENT [EQUAL]/[PURE]/[INDIVIDUAL VOL/PITCH] buttons to select a temperament mode out 
of the three available (pages 18-19). 
This section covers about the detailed setting in the Individual temperament mode.

Chord types recognized

These shows examples in case of the root key “C.” The inversion of each fingering is also recognized. 

Selecting and Setting a Temperament

Setting the Individual Volume and Pitch (for each of 12 notes in an octave)

In the Individual temperament mode, you can set the volume and pitch for all 12 notes (“C”–“B”) in an octave.
While in Individual temperament mode, each press of the [INDIVIDUAL VOL/PITCH] button alternates among 
the three screens in order (as below).
Home screen → Individual Volume screen → Individual Pitch screen → Home screen → ...

Individual Volume screen:


This screen is used to set the volume of each of the 
12 notes individually. 
The volume setting range is -15 – +5. 

Individual Pitch screen:


This screen is used to set the pitch of each of the 
12 notes individually. 
The pitch setting range is -55 – +55 cents (0.1 cent 
increments).

Select the note with the CURSOR [

L

][

R

] buttons. Use the dial or [-]/[+] buttons to change the setting for the 

selected note. Press both [-]/[+] buttons simultaneously to return the set value to 0.

NOTE

• While on the Individual Volume screen and Individual Pitch screen, certain functions not relating to the temperament will be 

unavailable. Return to the Home screen when you are no longer adjusting individual temperament settings.

• The settings of the Individual temperament mode will be saved to the instrument and kept in memory even after the power is 

turned off.

• By using the “HD-300 Assistant” iPhone/iPad app, you can create and switch between multiple individual temperament setting 

configurations. For details, refer to page 35.

Maj

M7

dim

mM7

C add9

m7 

b

5

b

5

m

7

(7)s

u

s4

m7

a

u

g

6

m6

Summary of Contents for Harmony Director HD-300

Page 1: ...DE ES FR EN Owner s Manual Mode d emploi Manual de instrucciones Benutzerhandbuch English Français Español Deutsch HARMONY DIRECTOR ...

Page 2: ...rantee that interference will not occur in all installations If this product is found to be the source of inter ference which can be determined by turning the unit OFF and ON please try to eliminate the problem by using one of the following measures Relocate either this product or the device that is being affected by the interference Utilize power outlets that are on different branch circuit break...

Page 3: ...he presence of important operating and maintenance servicing instructions in the literature accompanying the product IMPORTANT SAFETY INSTRUCTIONS 1 Read these instructions 2 Keep these instructions 3 Heed all warnings 4 Follow all instructions 5 Do not use this apparatus near water 6 Clean only with dry cloth 7 Do not block any ventilation openings Install in accordance with the manufacturer s in...

Page 4: ...nted on the name plate of the instrument Use the specified adaptor page 40 only Using the wrong adaptor can result in damage to the instrument or overheating Check the electric plug periodically and remove any dirt or dust which may have accumulated on it This instrument contains no user serviceable parts Do not open the instrument or attempt to disassemble or modify the internal components in any...

Page 5: ...ord can damage it Remove the electric plug from the outlet when the instrument is not to be used for extended periods of time or during electrical storms Do not place the instrument in an unstable position where it might accidentally fall over Before moving the instrument remove all connected cables to prevent damage to the cables or injury to anyone who might trip over them When setting up the pr...

Page 6: ...e This product incorporates and bundles contents in which Yamaha owns copyrights or with respect to which Yamaha has license to use others copyrights Due to copyright laws and other relevant laws you are NOT allowed to distribute media in which these contents are saved or recorded and remain virtually the same or very similar to those in the product The contents described above include a computer ...

Page 7: ...connecting the instrument to a USB flash drive you can save data you ve created to the connected device as well as read data from the connected device Number of USB flash drives that can be used Only one USB flash drive can be connected to the USB TO DEVICE terminal Formatting a USB flash drive A USB flash drive cannot be formatted with this instrument If necessary please format it on your compute...

Page 8: ...oroughly to fully understand and make use of the features included on this instrument After reading carefully store this manual in a location where you can easily and quickly refer to it Included Accessories Owner s Manual this manual 1 Utilization Guide Feature Introduction 1 AC adaptor 1 Warranty information 1 Online Member Product Registration 1 About this Manual This instrument comes with the ...

Page 9: ...rding Playback 26 Playing Back Previously Recorded Files and Files Created on a Computer USB 28 Enhancing Basic Practice Sound Back Training 29 Training Your Ability to Imagine the Correct Pitch Sound Back 29 Playing Training Examples and Accompaniments Training 30 Restoring Factory Settings 30 Advanced Settings Settings 31 Connecting External Devices 32 Connecting Amplifiers or Other Equipment OU...

Page 10: ...tooth status LED page 35 Indicates the Bluetooth connection status This is used when connecting to an iPhone or iPad 6 VOICE buttons page 18 Selects the Voice for use when playing the keyboard or when playing back the contents for training 7 TEMPERAMENT buttons pages 18 21 These set the temperament equal pure individual and lock unlock the root key auto detection 8 TRANSPOSE buttons page 19 These ...

Page 11: ...playback tempo BEAT TEMPO MEMORY buttons pages 22 24 Used to enter store and load special metronome beats NOTE The CURSOR L R buttons are also used to move the cursor for other functions METRONOME VOL slider pages 16 23 Adjusts the volume for each metronome note type TRAINING button page 30 This sets the instrument to the training content JBS content playback mode USB button page 28 Sets the instr...

Page 12: ...k and plug in power compatibility When an external microphone is connected the internal microphone will be disabled Turn the GAIN knob to adjust the sensitivity of the internal microphone and the external microphone 4 USB TO HOST terminal pages 7 33 For connecting to a computer using a commercially available USB cable When connected you can send and receive MIDI and audio data 5 USB TO DEVICE term...

Page 13: ... with a removable plug make sure to keep the plug attached to the AC adaptor during use or storage Inserting the plug alone into the AC outlet can cause electric shock or fire If the plug is accidentally removed from the AC adaptor insert the plug all the way in until you hear a click taking care to avoid touching any internal metal parts To avoid electric shock short circuit or damage to the inst...

Page 14: ...ecified charger device for charging rechargeable batteries This instrument cannot be used to recharge batteries Power will be automatically drawn from the AC adaptor when an AC adaptor is connected even if batteries are installed in the instrument Turning the Power On Off 1 Move the MAIN VOL slider to the left to reduce the volume to the minimum setting 2 If necessary connect any external devices ...

Page 15: ... off depends on the type of power being used This is set to 30 minutes for battery power and two hours when using an AC adaptor The Auto Power Off function can be enabled disabled on the Settings screen page 31 Disabling Auto Power Off When the power is off Turn the power on while holding down the lowest key on the keyboard When the power is on Press the SETTING button to call up the Settings scre...

Page 16: ...the microphone Configure this so the microphone volume CLIP LED at the top left of the panel does not light up even when the sound you want to record is at maximum volume NOTE You can also check the volume of input sounds on the input level meter on the bottom left of the LCD display When using this to adjust settings adjust the sensitivity until Clip no longer appears on the screen If the microph...

Page 17: ... the tempo reference note Page 22 7 Beat memory number Shows the beat or the beat tempo memory irregular meter Pages 22 25 The location of the cursor is highlighted and the cursor can be controlled with the buttons and the dial In the image above the cursor is on M1 Press the panel buttons CURSOR L R buttons etc to move the cursor and change items settings in the screen display Press the INDIVIDUA...

Page 18: ... useful since there are a variety of available sounds For details on the Voices of each category refer to page 41 You can configure advanced settings such as the root key and temperament Equal Pure Individual temperament of the song Setting the root key See the page 20 Setting the temperament Use the TEMPERAMENT EQUAL PURE INDIVIDUAL VOL PITCH buttons to select a temperament mode out of the three ...

Page 19: ... sound being produced press the HOLD button again and turn the hold function off Use the OCTAVE slider to select the octave of notes played with the keyboard The relationship between the slider position and octave is as follows This function is used to match the keyboard sound to a transposing instrument With this function you can play the sounds at the same pitch as the transposing instrument by ...

Page 20: ...rds this will be set to minor displayed in lower case letter The recognized chord and the root key will appear on the screen NOTE If the chord cannot be determined the root key will not change Chord detection and root key changes continue with each key pressed on the keyboard To lock fix the current root key press and hold the PURE button When a root key is locked a icon will appear to the right o...

Page 21: ...creen Individual Pitch screen Home screen Individual Volume screen This screen is used to set the volume of each of the 12 notes individually The volume setting range is 15 5 Individual Pitch screen This screen is used to set the pitch of each of the 12 notes individually The pitch setting range is 55 55 cents 0 1 cent increments Select the note with the CURSOR L R buttons Use the dial or buttons ...

Page 22: ...h for displaying tempo To do this press the CURSOR L button while the cursor is over the tempo value to move the cursor and then press the buttons When the reference note length is changed the tempo value will be converted automatically to represent the same actual speed as before changing the note length NOTE Pressing keys Bb 5 C6 on the keyboard while the cursor is over the tempo display area te...

Page 23: ...ange the value with the buttons or the dial The numerator can be set from 1 9 while the denominator can be set to 4 or 8 You can adjust the volume of each note type of the metronome by using the ACCENT and sliders Sounding Timing Chart 4 4 Notes marked are not played when the Metronome Pattern page 31 is set to Alternate Sounding Timing Chart 6 8 The quarter notes do not sound and the triplets sou...

Page 24: ...h up to eight measures The variable range for the numerator is 1 9 for the first measure and 0 9 for the second and subsequent measures If the numerator is 0 the metronome will not proceed to the next measure The variable value for the denominator is 4 or 8 There are no special operations required to save or load memories A memory being edited will be saved automatically Selecting a memory number ...

Page 25: ...YTHM STYLE button to switch rhythm playback to Rhythm Style mode Press the RHYTHM STYLE button to move the cursor to the Rhythm Style name Use the buttons or the dial to change the Rhythm Style NOTE The operation for starting stopping playback and changing the tempo is the same as for the metronome For details see page 23 Using Rhythm Style Selecting the Type of Rhythm Style Rhythm Style name ...

Page 26: ...ge 16 before recording Recording Playback Press the REC button to start recording Recording will start automatically under a new file name Press the REC or R J button to stop recording You can easily play back a recording immediately after the recording stops Use the buttons to select a file and then press the R J button to play stop the recording NOTE If the cursor has moved away from the recordi...

Page 27: ...screen 2 Start performing 3 When you feel like you want to record the section during a performance press the REC button This will start recording at the specified number of seconds 3 10 seconds before the REC button is pressed 4 To extend the recording time press the REC button again 5 Without further operation for the specified number of seconds 5 20 sec after the REC button is pressed the record...

Page 28: ...a number from 0001 9999 REC is used for regular recordings and TSR for time shift recordings Supported formats include WAV 44 1 kHz Stereo Mono and MIDI GM XG Lite Past data cannot be deleted on the HD 300 All file operations besides playback must be performed on a computer To exit the USB File Selection mode press the EXIT button when at the uppermost level You can also stop playback exit the USB...

Page 29: ...sound even when you play the keyboard 4 Practice to play at a correct pitch using the Sound Back function 4 1 Perform on your instrument with the pitch you imagined and input the sound into the HD 300 The HD 300 will play the note in the correct pitch that is nearest to the sound you have played 4 2 Adjust your performance to match the pitch to the note played back by the HD 300 The HD 300 continu...

Page 30: ...or during playback If you want to select another file after changing the tempo press the TRAINING button so that the cursor moves to the file selection area To exit the Training mode press the EXIT button when at the uppermost level You can also stop playback exit the Training mode and then return to the Home screen by pressing one of these buttons BEAT RHYTHM STYLE REC or TIME SHIFT RECORDING Pre...

Page 31: ...es the number of seconds recorded before the REC button is pressed while in Time Shift Recording mode 3 10 sec Post Time Shift Rec Specifies the number of seconds until a recording automatically stops after starting or extending a recording in Time Shift Recording mode 5 20 sec Bluetooth Sets the Bluetooth communication mode Off Use this to disable Bluetooth communication On Use this to connect to...

Page 32: ...tric shock or damage the device NOTICE When outputting sound from the instrument to an external device first turn on the power to the instrument and then turn the external device on When turning the power off follow the procedure in reverse order Failure to do so may damage the device Connecting a Microphone MIC INPUT jack MIC GAIN knob Connect a commercially available external microphone to the M...

Page 33: ...oad yamaha com NOTE A USB flash drive cannot be formatted on the instrument If the USB flash drive needs formatting format it in FAT32 format on a computer Connecting to a Computer USB TO HOST terminal Use the USB TO HOST terminal to connect to a computer and transmit audio and MIDI signals to and from the computer You can use this to record audio from the HD 300 in high quality and control the HD...

Page 34: ...MIDI data Play a song in MIDI format You can play a MIDI file on the computer and produce the sounds on the instrument Record a performance as MIDI data Once a performance is recorded as MIDI data you can then change the Voice note numbers and make other edits using music production software Use the instrument as a keyboard for entering data into music production software or music notation softwar...

Page 35: ...e iPad Bluetooth You can connect to an iPhone iPad via Bluetooth to output audio played back on the iPhone iPad from the HD 300 When connecting the instrument to an iPhone iPad via Bluetooth for the first time you will need to pair the two devices To do this follow the operation steps below 1 Press the SETTING button on the HD 300 to open the Settings screen 2 Set Bluetooth to Pairing The Bluetoot...

Page 36: ...USB device connection status device data contents and write protect status Connect USB Memory No USB device is connected Connect a USB device page 33 Cannot Record The USB device is write protected Check the write protect status of the USB device Cannot Play Failed to play back the file Check the USB device connection status device data contents and write protect status Operation Failed File delet...

Page 37: ...ause the volume was raised too high Reduce the volume The LCD display is hard to read The contrast settings are not appropriate Adjust the LCD Contrast setting value page 16 The recorded data cannot be erased This instrument only can delete data immediately after it was recorded Connect the USB flash memory to the computer and delete the files Communication with the USB device has stopped An incom...

Page 38: ...nd Cent Values for the Main Intervals Interval Interval Frequency Ratio Cent Value Comments Octave 2 1200 000 Pure Perfect 5th 3 2 701 955 Pure Perfect 4th 4 3 498 045 Pure Major 3rd 5 4 386 314 Pure Minor 3rd 6 5 315 641 Pure Large Interval Whole Tone 9 8 203 910 Pure Small Interval Whole Tone 10 9 182 404 Pure Diatonic Scale Semi tone 16 15 111 731 Difference between the perfect 4th and major 3r...

Page 39: ...nts Pure minor Like the pure major this tuning preserves the pure mathematical intervals of the minor scale in case of a minor ACE DFA EGB Changing keys also requires changing the pitch of every note in the scale making it impractical for keyboard or fretted instruments Display Temper ament Type Difference from the equal temperament cent C Db D Eb E F Fb G Ab A Bb B Equal Equal 0 0 0 0 0 0 0 0 0 0...

Page 40: ...e Internal stereo microphone or commercially available external microphone Recording Time max 80 minutes approx 0 9 GB for each file Format WAV 44 1 kHz 16 bit stereo Time Shift Recording function Yes Sound Back Yes Sound Back Time Setting Short Long Training 167 Songs Other Settings Foot pedal function assignment Volume Hold Start Stop Rec Message display language English Japanese External Input ...

Page 41: ...assoon 54 Finger Bass 20 Clarinet 55 Acoustic Bass 21 Soprano Sax 56 Pick Bass 22 Alto Sax 57 Slap Bass 23 Tenor Sax 58 Synth Bass 24 Baritone Sax 59 Orchestra Hit 25 Pan Flute 60 Choir 26 Recorder 61 Gemini 27 Ocarina 62 Sweet Heaven 28 Trumpet 63 Square Lead 29 Muted Trumpet 64 Sawtooth Lead 30 French Horn 65 Bell Pad 31 Trombone 66 Banjo 32 Euphonium 67 Steel Drums 33 Tuba 68 Bagpipe 34 Brass S...

Page 42: ...jor or minor See table following chord Chord This also specifies major minor at the same time See table following root HEX Key signature for reference Major Minor 00 0 C A 01 b 5 Db Bb 02 2 D B 03 b 3 Eb C 04 4 E C 05 b 1 F D 06 b 6 6 F Eb 07 1 G E 08 b 4 Ab F 09 3 A F 0A b 2 Bb G 0B 5 B G chord HEX Chord Major Minor 00 Maj Major 01 m Minor 02 7 Major 03 m7 Minor 04 M7 Major 05 m7b 5 Minor 06 sus4...

Page 43: ...84 91 93 96 97 100 101 1 16 X O 9nH v 1 127 X X X O X X X O X X X X X O X X O 0 127 X X X O O O O X X X X O X O 120 126 127 O 121 O 122 O 123 125 O X 3 X 0 127 O Mode 1 OMNI ON POLY Mode 2 OMNI ON MONO Mode 3 OMNI OFF POLY Mode 4 OMNI OFF MONO X 1 16 X O 9nH v 1 127 X X X O O O O O O O O O O O O O X X X 3 X X 0 127 0 127 O O O Yes X No Default Messages Altered YAMAHA Harmony Director Date 01 Nov 2...

Page 44: ... erasing or forgery of proof of purchase documents will cause this warranty to be void This warranty covers only the Original Owner and is not transferable In Order to Obtain Warranty Service Warranty service will only be provided for defective products within the Warranted Area Contact your local authorized YAMAHA dealer who will advise you of the procedures to be followed If this is not successf...

Page 45: ...at may cause undesired operation of the device L émetteur récepteur exempt de licence contenu dans le présent appareil est conforme aux CNR d Innovation Sciences et Développement économique Canada applicables aux appareils radio exempts de licence L exploitation est autorisée aux deux conditions suivantes 1 L appareil ne doit pas produire de brouillage 2 L appareil doit accepter tout brouillage ra...

Page 46: ...compliance doc html LV Latvian VIENKĀRŠOTA ES ATBILSTĪBAS DEKLARĀCIJA Ar šo Yamaha Music Europe GmbH deklarē ka radioiekārta HD 300 atbilst Direktīvai 2014 53 ES Pilns ES atbilstības deklarācijas teksts ir pieejams šādā interneta vietnē https europe yamaha com en support compliance doc html LT Lithuanian SUPAPRASTINTA ES ATITIKTIES DEKLARACIJA Aš Yamaha Music Europe GmbH patvirtinu kad radijo įren...

Page 47: ......

Page 48: ...kazawa cho Naka ku Hamamatsu 430 8650 Japan Manual Development Group 2020 Yamaha Corporation Published 10 2020 MWES A0 VDX5630 Yamaha Global Site https www yamaha com Yamaha Downloads http download yamaha com ...

Reviews: