CONNECTIONS
13
Eng
lish
PREP
ARA
TION
2
■
Placing the front/surround
speakers
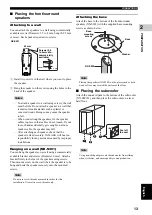
Attaching to a wall
You can attach the speakers to a wall using commercially
available screws (Diameter: 3.5 to 4 mm, Length: 25 mm
or more). Each speaker requires two screws.
1
Install two screws in the wall where you want to place
the speaker.
2
Hang the speaker on the screws using the holes in the
back of the speaker.
– To attach a speaker to a wall using screws, the wall
must be firm. Do not attach a speaker to a wall that
is made of weak materials such as plaster or
veneered woods. Doing so may cause the speaker
to fall.
– When connectiong the speakers, fix the speaker
cables in place so that cables do not loosen. If your
foot or hand accidentally gets caught on a loose
speaker cable, the speaker may fall.
– After attaching each speaker, check that the
speaker is fixed securely. YAMAHA will bear no
reponsibility for any accidents caused by improper
installations.
Hanging on a wall (NX-S301)
You can hang the speakers on a wall using a commercially
available bracket and screws (Diameter: 6 mm). Attach a
bracket firmly to the rear of the speakers using screws.
Then mount a screw on the wall where the speaker is to be
hung and hook the speaker securely onto the mounted
screws.
Do not use screw threads neasured in inches for this
installation. Use metric screw threads only.
Attaching the base
Attach the base to the bottom of the front/surround
speakers (NX-S302) with the supplied base mounting
screws as shown below.
Placing the speakers (NX-S302) on the places such as hard
wooden floor may scratch the surface of the floor.
■
Placing the subwoofer
Attach the non-skid pads to the bottom of the subwoofer
(NX-SW301), and then place the subwoofer on a level
hard floor.
Using non-skid pads prevents the subwoofer from sliding
when it vibrates, and ensure quality sound production.
Notes
Note
+
–
5 mm
Screws (3.5
to 4 mm dia.,
commercially
available)
20 mm or more
40 mm
NX-S301
Note
Note
Base
mounting
screws
NX-S302
Base
Washer
Peel off
the seal

