background image

5

Getting started

º


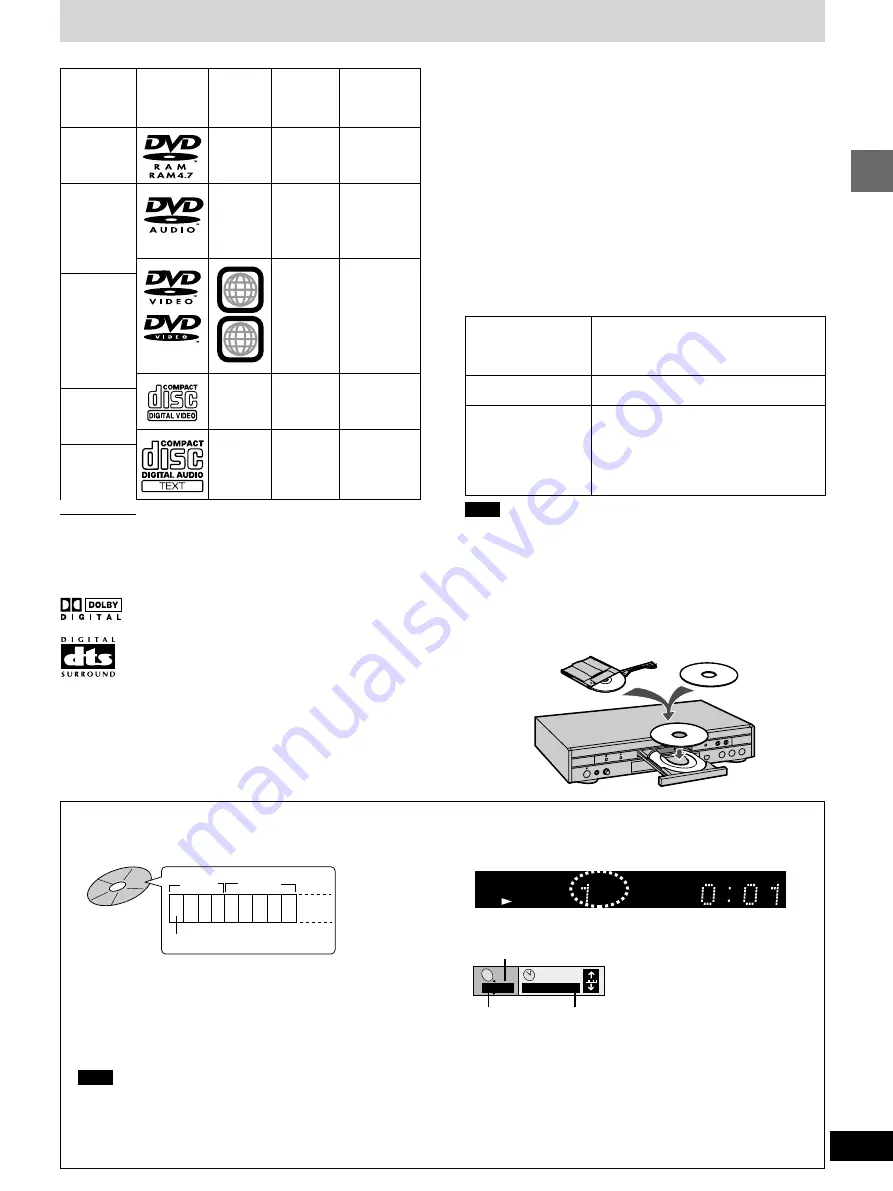
Discs that can be played

Video
system

NTSC

NTSC
(and PAL,
but audio
only)

NTSC

NTSC

Disc information

Logo

Disc type

DVD-RAM
(4.7 GB)

DVD-
Audio

DVD-Video

Video CD

Audio CD

Indication
used in
instructions

[RAM]

[DVD-A]

[DVD-V]

[VCD]

[CD]

Region
number

º

Region Management Information
(DVD-Video only)

This unit responds to the Region Management Information recorded
on DVD-Video. This unit’s region number is “1”. You cannot play the
disc if the region number on the DVD-Video does not correspond to
the region number on the unit.
You can play discs with labels containing the region number “1” and
“ALL”. Read the disc’s instructions carefully.

º


Playing DVDs and Video CDs

The producer of the material can control how these discs are
played. This means that you may not be able to control play of a disc
with some operations described in these operating instructions.
Read the disc’s instructions carefully.

º


DVD-RAM discs

DVD-RAM discs must meet the following conditions for this unit to
be able to play them. It may not be possible to play some discs due
to the condition of the recording.

1

ALL

³

Structure of the disc (example)

³

Starting play from a selected chapter

Press the numeric buttons and press [ENTER].
Example: Chapter 23: [2] 

 [3] 

 [ENTER]

(Pressing [

S

10] is unnecessary.)

³

Repeat play

You can use chapter repeat or title repeat.

³

Program play, random play

You cannot use program play or random play.

MP3 playback

You can use this unit to play MP3 format audio recorded for personal use with a computer etc. onto CD-R or CD-RW. Play may not be
possible in some cases due to the condition of the recording. Discs recorded using MP3 differ to CDs in the following ways.

³

Display during play

³

On-Screen Menu Icons for disc information during play

1  2  3  4  5  6  7  8  9

Title

(Album)

Title

(Album)

PGM

GROUP

TITLE

TRACK

CHAP

PG

D.MIX

P.PCM

MLT.CH

HP

SP

V.S.S.

RMTR

DVD
VIDEO
AUDIO

VR

V

CD

RNDA B

-

Type

Capacity

Recording format

4.7 GB TYPE 2 disc

Note

³

Remove TYPE 2 discs from their cartridges before use. Read the
instructions for the disc carefully.

³

Do not allow the disc to become dirty or scratched.

³

Store discs in their cartridges. Be sure the label of the disc and the
cartridge both face up when replacing the disc.

For your reference

Some parts of the disc, for example where one program ends and
another begins, may not play smoothly.

Current chapter

Chapter (Track)

1/  59

C

0 : 01

Note

³

Not compatible with multi-session recordings

If you record MP3 onto CD-R/CD-RW over a number of sessions, this unit can play only the recordings made in the first session.

³

Recordings will not necessarily be played in the order you recorded them. The recordings will be reordered according to their titles:
numbers in numerical order first, upper case in alphabetical order next, and lower case in alphabetical order last.

³

If you play an MP3 track that includes still picture data, it will take some time before the music itself starts playing and the elapsed time
will not be displayed during this time. Even after the track starts, the correct play time will not be displayed.

º


Discs that cannot be played

PAL discs (the audio on DVD-Audio can be played), DVD-RAM
(2.6 GB, TYPE 1), DVD-ROM, DVD-R (some DVD-R can be
played), CD-ROM, CDV, CD-G, 

i

RW, DVD-RW, CVD, SVCD,

SACD, Divx Video Discs and Photo CD.

º


DVDs that can be played

This unit has a Dolby Digital decoder so you can play
DVDs with this mark.

This unit has a DTS decoder so you can play DVDs
with this mark.

Non-cartridge 4.7 GB

Total number of chapters

Elapsed play time
(display only, cannot be changed)

Non-cartridge discs
Discs that can be removed from their
cartridges (TYPE 2)

12 cm 4.7 GB and 8 cm 2.8 GB

Discs recorded with DVD video
recorders, DVD video cameras,
personal computers, etc., using Version
1.1 of the Video Recording Format (a
unified video recording standard).

Summary of Contents for DVD-S1200

Page 1: ...ENTER VIDEO OFF PLAY MODE SKIP SLOW SEARCH SUBTITLE DVD V739700 AUDIO ANGLE REPEAT A B HP V S S SP V S S TOP MENU MENU ON SCREEN RETURN PLAY LIST DIRECT NAVI SET UP Í I AU DIO VIDEO PLAY PAUSE STOP AUDIO VIDEO DVD AUDIO VIDEO PLAYER Owner s manual Before connecting operating or adjusting this product please read these instructions completely Please keep this manual for future reference RQT5938 W U...

Page 2: ...by Yamaha may void your authority granted by the FCC to use the product 2 IMPORTANT When connecting this product to accessories and or another product use only high quality shielded cables Cable s supplied with this product MUST be used Follow all in stallation instructions Failure to follow instructions could void your FCC authorization to use this product in the USA 3 NOTE This product has been ...

Page 3: ...ER 16 Changing the play sequence 17 All group play Random play 17 Program play 18 Playing the programs on DVD RAM 19 Selecting programs to play DIRECT NAVIGATOR 19 Using the play list menu to play specific scenes 20 Table of contents Repeat play 21 Repeat play A B repeat play 21 Increasing your enjoyment of movies and music 22 Enjoying virtual surround effects with 2 speakers or headphones VIRTUAL...

Page 4: ...uctions or as marked on the unit If you are not sure of the type of power supply to your home consult your appliance dealer or local pow e r company 2 Polarization If the unit is equipped with a polarized AC power plug a plug having one blade wider than the other that plug will fit into the AC outlet only one way This is a safety feature If you are unable to insert the plug fully into the outlet t...

Page 5: ...E TRACK CHAP PG D MIX P PCM MLT CH HP SP V S S RMTR DVD VIDEO AUDIO VR VCD RNDA B Type Capacity Recording format 4 7 GB TYPE 2 disc Note Remove TYPE 2 discs from their cartridges before use Read the instructions for the disc carefully Do not allow the disc to become dirty or scratched Store discs in their cartridges Be sure the label of the disc and the cartridge both face up when replacing the di...

Page 6: ...nto the remote control Remote control signal sensor 7 m 23 feet Disc handling Do not use irregularly shaped discs such as heart shaped These can damage the unit 1 2 R6 AA º How to hold a disc Do not touch the recorded surface º If the surface is dirty DVD Audio DVD Video Video CD CD Wipe it with a damp cloth and then wipe dry Do not wipe with a circular motion wipe straight outward from the center...

Page 7: ... button 1 12 Disc tray open close button 12 Display VIDEO OFF button VIDEO OFF 15 Headphone level control LEVEL 22 PROGRESSIVE ON button PROGRESSIVE ON 15 Headphone jack 22 Standby on switch STANDBY ON 12 Press to switch the unit from on to standby mode or vice versa In standby mode the unit is still consuming a small amount of power Buttons such as function the same as the controls on the unit Co...

Page 8: ...ect Multi channel 32 Digital connection Connect to an amplifier with built in decoder or a separate decoder amplifier combination 9 A Digital Audio Output Select On PCM Down Conversion Dolby Digital DTS Digital Surround Change the settings to suit the equipment you connect Make the speaker settings on the amplifier or decoder 29 33 Analog connection Connect to an amplifier or system component with...

Page 9: ...e played correctly due to copy guards if you connect a video cassette recorder between the unit and your television MONITOR OUT terminal Television Video cable AV amplifier VIDEO INPUT terminal Audio video cable To household AC outlet AC 120V 60 Hz Back of the unit AC power supply cord included Audio video cable included Yellow VIDEO White L Red R Change PCM Down Conversion Dolby Digital and DTS D...

Page 10: ...Speaker setting page 32 Note Turn speaker and headphone V S S page 22 off when you connect through the 6CH DISCRETE terminals The unit does not output the signals for channels other than the front speakers when V S S is on D Analog connection to a 2 channel amplifier or system component To enjoy Dolby Pro Logic If you connect an amplifier that can decode Dolby Pro Logic you will also need to conne...

Page 11: ...n a television compatible with this unit s copy guard system Video will not be displayed correctly if you connect to a television that is incompatible with this unit s copy guard system 2 Press PROGRESSIVE ON on the front panel so the indicator lights page 15 Recording to MDs or cassette tapes To make a digital recording 1 Connect the recording equipment with an optical or coaxial digit al audio c...

Page 12: ...op play Press º page 13 Resume function º To pause play A Press during play Press 1 PLAY to restart play º Displaying the text information on discs DVD A DVD V CD Remote control only You can display the disc title artist name and track titles on the television if this information is recorded on the disc Press TEXT The text display is turned on and off each time you press the button Some text infor...

Page 13: ... PLAY the message disappears and play starts from where you stopped it To cancel Press º until disappears from the unit s display Note The resume function does not work if the disc s play time is not displayed The position is cleared when the disc tray is opened The unit saves the position even when you switch the unit to stand by except when playing a play list page 20 C Starting play from a sele...

Page 14: ...r buttons The frames change in succession if you press and hold the button Pressing also activates forward frame by frame C Fast forward and rewind SEARCH RAM DVD A DVD V VCD CD During play Press 6 or 5 Press and hold or on the main unit For your reference Audio will be heard during search for most discs You can turn this audio off if you want to page 29 Audio Audio during Search D Slow motion pla...

Page 15: ...ontain bonus groups To enjoy these groups you may have to enter a password Refer to the disc s jacket 1 While stopped press GROUP 2 Press the cursor buttons 3 4 to select the bonus group and press ENTER or 1 PLAY 3 Enter the 4 digit password with the remote control s numeric buttons and press ENTER 4 Press the cursor buttons 3 4 to select a track and press ENTER to start play Some discs will show ...

Page 16: ...the current group is full To clear the marker display Press RETURN To play from a marked position Press the cursor button 2 1 to select a marker number and press ENTER To clear a marker Press the cursor button 2 1 to select a marker number and press CANCEL You can clear existing markers but they are restored when you open the disc tray or switch the unit to standby Note All the markers added with ...

Page 17: ...oups on a disc 1 While stopped Press PLAY MODE until the all group play screen appears 2 Press 1 PLAY B Random play DVD A VCD CD The unit plays the tracks on a disc in random order While stopped Press PLAY MODE until the random play screen appears DVD Audio only Press the cursor buttons 2 1 to se lect a group and press ENTER You can select more than one group You can also select groups with the nu...

Page 18: ... cursor buttons 3 4 to se lect a group and press ENTER 4 Press the cursor buttons 3 4 to se lect a track and press ENTER Each time you press the cursor button 1 2 ALL J Repeat steps 2 3 and 4 to program other tracks You can also select a group or track with the numeric but tons Total Time tells you the total time of the programmed tracks All the tracks on a disc are selected when you select ALL al...

Page 19: ...u can use it to find programs you want to watch and start play 1 Press DIRECT NAVI The program list is displayed and the program currently selected plays in the background 2 Press the cursor buttons 3 4 to select the program you want to watch You can also select a program with the numeric buttons Step 3 is unnecessary To enter a 2 digit number Example 17 press S10 1 7 3 Press 1 PLAY or ENTER Play ...

Page 20: ...ric buttons all the scenes in the play list are played from the beginning 3 Press the cursor button 1 to select Contents on the right side of the list and press ENTER 4 Press the cursor buttons 3 4 to select Scene List and press ENTER 5 Press the cursor buttons 3 4 2 1 to select the scene you want to watch and press ENTER The scene starts playing You cannot move the highlighting to places where a ...

Page 21: ...ntrol Cancel menu play first 1 Press º during play until PBC Play is cleared from the unit s display 2 Press the numeric buttons to select a track to start play 3 Press REPEAT above To return to menu play press º and press MENU Note Repeat play may not work as desired with some DVDs Repeat play does not work if the disc s elapsed play time is not shown on the unit s display You cannot use repeat p...

Page 22: ...EG LPCM 2 channel or over only Remote control only Use VIRTUAL SURROUND V S S Virtual Surround Sound to en joy a surround like effect if you are using two front speakers or headphones If you are playing a disc with surround effects recorded on it the effect is broadened and sound seems to come from virtual speakers on either side During play Press SP V S S or HP V S S Each time you press the butto...

Page 23: ...tle lan guage and turn the subtitles on and off With DVD RAM you can turn the subtitles on and off During play Press SUBTITLE The number changes each time you press the button To clear display the subtitles 1 Press SUBTITLE 2 Press the cursor button 1 DVD Audio and DVD Video only 3 Press the cursor button 3 4 to select ON or OFF C Angles DVD A DVD V During play Press ANGLE The number changes each ...

Page 24: ... highlighted Press the cursor buttons 3 4 to select the menu Each time you press the button Play menu A l l Display menu B l l Audio menu C l Video menu D 3 Press the cursor buttons 2 1 to select the item 4 Press the cursor buttons 3 4 to select the setting Items with 3 or 4 above and below can be changed by 3 4 Press ENTER if the setting does not change after pressing the cursor button 3 4 Some i...

Page 25: ...ht 3 Main leftiMain rightiCenter 2 PG 2 G T 2 C 2 1 46 50 1 ENG 3 2 1 ch Digital Î 1 ENG 3 2 1 ch Digital Î 1 Vocal OFF 1 ENG ON 1 ENG 1 ON L R ON PBC Content DVD A DVD V Karaoke vocal on off Karaoke DVD only Solo OFF or ON Duet OFF V1iV2 V1 or V2 DVD A DVD V Subtitle language See A below for language abbreviations RAM DVD A DVD V Subtitles on off ON OFF DVD A DVD V Angle number VCD with playback ...

Page 26: ...OUND V S S mode page 22 SP V S S Dolby Digital DTS MPEG LPCM 2 channel or over only HP V S S Dolby Digital MPEG LPCM 2 channel or over only V S S level page 22 SP 1 HP 1 SP 2 HP 2 SP OFF HP OFF J DVD V Dolby Digital DTS 3 channel or over only Dialogue Enhancer ON OFF The volume of the dialogue from the center channel is raised when you select ON Display menu Icon Content RAM DVD V VCD Bit rate dis...

Page 27: ...ziness and improve the sense of depth TINT j15 to i15 Change the overall tint of the picture Transfer MODE Select the method of conversion for progressive output to suit the type of material being played page 34 Film and video Auto 1 normal for viewing film material Auto 2 for viewing film material the same as Auto 1 but able to convert 30 frame per second progressive video Auto 3 for animated mat...

Page 28: ... and press ENTER The screen now shows the menu again To return to the previous screen Press RETURN When you are finished Press SET UP 2 1 3 4 a b c d e Display Menu Language On Screen Messages English On SET UP SELECT Disc SET UP SELECT ENTERRETURN Audio Subtitle Menus Ratings English English Automatic Level 8 Audio PCM Down Conversion Dolby Digital DTS Digital Surround D Range Compression Audio d...

Page 29: ...language Menus DVD A DVD V Choose the preferred language for disc menus Ratings DVD V Set a ratings level to limit DVD Video play The password screen is shown if you choose levels 0 to 7 or if you choose Ratings when levels 0 to 7 have been selected page 30 Select Level 0 to prevent play of discs that do not have ratings levels recorded on them TV Aspect Choose the setting to suit your television ...

Page 30: ...f if sound is interrupted when playing Dolby Digital 5 1 channel and DTS bitstream signals Audio will be heard when playing some DVD Audio despite the settings you make here Entering a password DVD V Refer also to Common procedures page 28 and the Disc section in Summary of settings page 29 Language code list Abkhazian 6566 Afar 6565 Afrikaans 6570 Albanian 8381 Ameharic 6577 Arabic 6582 Armenian ...

Page 31: ...r reference DVDs are recorded in a variety of aspect ratios and how these appear depend on these settings the on screen menu settings and the television s screen modes When connected to a regular 4 3 aspect television use these settings When connected to a widescreen 16 9 aspect television using progressive output use the on screen menu icons page 27 4 3 ASPECT When connected to a widescreen 16 9 ...

Page 32: ...e factory preset If either distance or B is less than A find the difference in the relevant table and change to the recommended setting Changing the delay time 1 Press the cursor buttons 3 4 2 1 to select the delay time box and press ENTER 2 Press the cursor buttons 3 4 to adjust the delay time and press ENTER Speaker balance 1 Press the cursor buttons 3 4 2 1 to select Test and press ENTER A test...

Page 33: ...utput signals of 88 2 kHz or more if the setting is No and the equipment is unable to handle these sig nals Note Signals are down sampled to either 48 kHz or 44 1 kHz despite the above settings if they have a sampling frequency of 176 4 kHz or more or are copyright protected Dolby Digital Bitstream Factory preset When you have connected a unit with a built in Dolby Digital decod er PCM When you ha...

Page 34: ...pling frequency results in a sound close to the original when played back Title Chapter DVD Video are divided up into large sections titles and smaller sections chapters The numbers allocated to these sections are called title numbers and chapter numbers Track This is the smallest division on DVD Audio CD and Video CD and usually equates to a single song Bitstream This is the digital form of multi...

Page 35: ...rized YAMAHA dealer or service center for instructions Reference pages are shown as black circled numbers 9 Power Some operations may be prohibited by the disc The unit may not be operating properly due to lightning static electricity or some other external factor Reset procedure Press STANDBY ON to switch the unit to the standby mode and then back to ON Alternatively press STANDBY ON to switch th...

Page 36: ...OGRESSIVE ON off This problem is caused by the editing method or material used on the DVD but should be corrected if you use interlace output Check the setting for output with the on screen menu icons K Check the settings in the on screen menu s video menu K Use the on screen menu icons to adjust the picture quality K No Play appears on the unit s display No on screen display On Screen Menu Icons ...

Page 37: ...utput 5 1ch 1 system Audio signal output characteristics 1 Frequency response DVD linear audio 2 Hz 22 kHz 48 kHz sampling 2 Hz 44 kHz 96 kHz sampling DVD Audio 2 Hz 88 kHz 192 kHz sampling CD audio 2 Hz 20 kHz 2 S N ratio CD audio 115 dB 3 Dynamic range DVD linear audio 103 dB CD audio 99 dB 4 Total harmonic distortion CD audio 0 002 Digital audio output Optical digital output Optical terminal Co...

Page 38: ...BEI HAMBURG F R OF GERMANY YAMAHA ELECTRONIQUE FRANCE S A PA PARIS EST RUE AMBROISE CROIZAT CROISSY BEAUBOURG BP70 77312 MARNE LAVALLEE CEDEX 2 FRANCE YAMAHA ELECTRONICS UK LTD YAMAHA HOUSE 200 RICKMANSWORTH ROAD WATFORD HERTS WD1 7JS ENGLAND YAMAHA SCANDINAVIA A B J A WETTERGRENS GATA 1 BOX 30053 400 43 VÄSTRA FRÖLUNDA SWEDEN YAMAHA MUSIC AUSTRALIA PTY LTD 17 33 MARKET ST SOUTH MELBOURNE 3205 VIC...

Reviews: