background image

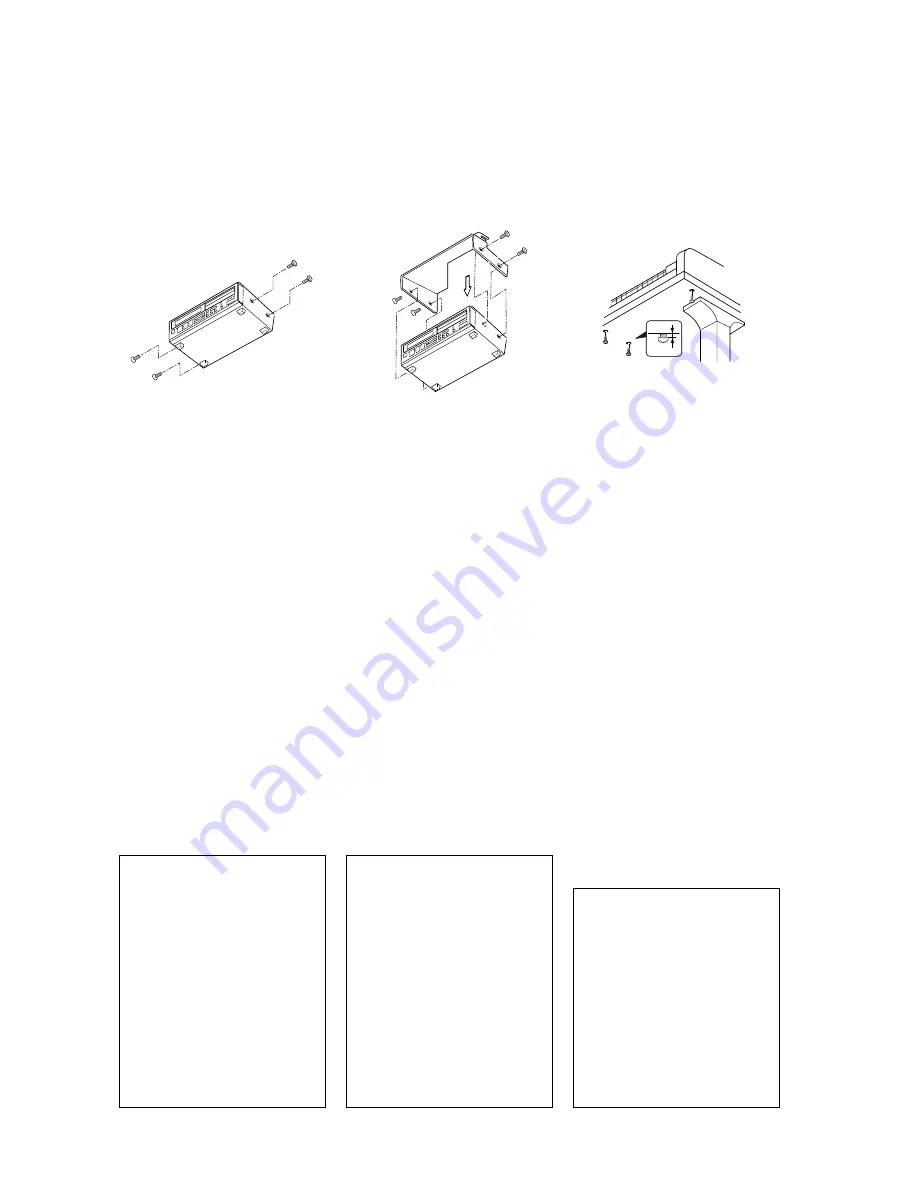
Mounting the Control Unit to the Grand Piano

Installation du boîtier de commande sur un piano à queue

Montieren des Steuergerätes an den Flügel

(1) Remove the four screws

from the sides of the Control
Unit.

(2) Place the metal suspension

bracket, included with the
Disklavier grand model, over
the Control Unit, then secure
the metal suspension bracket
to the Control Unit using the
same screws.

(3) Insert the three restraining

screws (attached) into the
marked nuts underneath the
treble side key bed, then
tighten the screws, leaving a
gap of about 5 mm between
head of the screw and piano
body.

(1) Retirer les quatre vis sur les

côtés du boîtier de
commande.

(2) Placer le support métallique

(fourni avec le Disklavier
pour piano à queue) sur le
boîtier de commande, puis
fixer le support métallique
au boîtier de commande en
utilisant les quatre vis à tête
conique.

(3) Introduire les trois vis de

fixation dans les écrous
marqués sous le clavier du
côtés des aigus, puis serrer
les vis en laissant un espace
d’environ 5 mm entre la tête
de la vis et le corps du piano.

(1) Entfernen Sie die vier

Schrauben von den Seiten des

Steuergerätes.

(2) Schieben Sie den mit dem

Disklavier gelieferten

Metallhalter über das

Steuergerät, und befestigen Sie

ihn mit den vier

Senkschrauben am Steuergerät.

(3) Drehen Sie die drei

Halteschrauben in die

markierten Muttern an der

Unterseite des Klaviaturbodens

auf der Diskantseite ein, und

ziehen Sie dann die Schrauben

so weit an, daß ein Abstand

von ca. 5 mm zwischen dem

Schraubenkopf und dem

Klaviaturboden bestehen

bleibt.

Notes:

1) Handle the metal

suspension bracket and the
Control Unit carefully to
avoid scratches.

2) Screws:

Restraining screws
(5 

×

 12) 3

BWH screws  (4 

×

 4) 4

3) When mounted correctly,

the Control Unit is angled
approximately 18˚ above
horizontal.

Remarques :

1) Manipuler soigneusement

le support métallique et le
boîtier de commande pour
éviter les rayures.

2) Vis :

Vis de retenue (5 

×

 12) 3

Vis BWH (4 

×

 4) 4

3) Lorsqu’il est monté

correctement, le boîtier de
commande est incliné
d’environ 18˚ sur
l’horizontale.

Hinweise:

1) Behandeln Sie den

Metallhalter und das
Steuergerät mit Sorgfalt,
um Kratzer zu vermeiden.

2) Schrauben:

Halteschrauben (5 

×

 12) 3

BWH-Schrauben (4 

×

 4) 4

3) Bei korrekter Montage ist

das Steuergerät um ca. 18˚
zur Horizontalen geneigt.

Summary of Contents for Disklavier Mark III Series

Page 1: ......

Page 2: ... being affected by the interference Utilize power outlets that are on different branch circuit breaker or fuse circuits or install AC line filter s In the case of radio or TV interference relocate reorient the antenna If the antenna lead in is 300 ohm ribbon lead change the lead in to co axial type cable If these corrective measures do not produce satisfactory results please contact the local reta...

Page 3: ... friendly We sincerely believe that our products and the production methods used to produce them meet these goals In keeping with both the letter and the spirit of the law we want you to be aware of the following Battery Notice This product MAY contain a small nonrechargeable battery which if applicable is soldered in place The average life span of this type of battery is approximately five years ...

Page 4: ...ssumed that unobstructed ventilation is required 7 Temperature considerations Electronic products should be installed in locations that do not significantly contribute to their operating temperature Placement of this product close to heat sources such as radiators heat registers and other devices that produce heat should be avoided 8 This product was NOT designed for use in wet damp locations and ...

Page 5: ...a vis et le corps du piano 1 Entfernen Sie die vier Schrauben von den Seiten des Steuergerätes 2 Schieben Sie den mit dem Disklavier gelieferten Metallhalter über das Steuergerät und befestigen Sie ihn mit den vier Senkschrauben am Steuergerät 3 Drehen Sie die drei Halteschrauben in die markierten Muttern an der Unterseite des Klaviaturbodens auf der Diskantseite ein und ziehen Sie dann die Schrau...

Page 6: ...teur D SUB en raccordant le câble 5 Glisser les fentes du support métallique contenant le boîtier de commande sur les vis mentionnées à l étape 3 6 Après avoir installé le boîtier de commande l enfoncer jusqu à l extrémité et serrer les trois vis pour fixer le support 4 Schließen Sie das Steuerkabel an den D SUB Anschluss auf der Rückseite des Steuergerätes an und ziehen Sie dann die beiden am Ste...

Page 7: ...Mark III Series Playback Models Operation Manual ...

Page 8: ...finest Before using your Disklavier piano please read this manual thoroughly and retain it for future reference There are two types of Mark III Playback pianos Playback models Playback models with Silent system This manual is designed to cover both models All functions and descriptions are common to both models except where marked for models with Silent system playback Trademarks Copyright Yamaha ...

Page 9: ... could lead to fire or electric shock hazard When moving the Disklavier to another location turn off the power remove the power plug from the AC outlet and remove all cables connected to external devices Cautions Turn off all audio devices when connecting to the Disklavier Refer to the user s guide for each device Use the correct cables and connect as specified Set the volume level on all the devi...

Page 10: ...th the and poles reversed Misaligning the poles of dry batteries can lead the dry batteries to be charged or shorted or it can cause them to heat up leak electrolyte or burst which in turn may result in a fire damage to nearby objects or in burns injury or other bodily harm Use only the designated batteries Do not use used batteries with unused batteries or different types of batteries together Th...

Page 11: ...ayback 36 Using an Optional Foot Switch or Foot Controller 36 Chapter 10 Advanced Ensemble Song Playback Tuning the Tone Generator TG Master Tune 38 Basic Operations Chapter 1 Setting Up Your Disklavier Items Supplied with the Disklavier 1 Connecting the Control Unit 1 Connecting the Power Cable 2 Using the Remote Control 2 Connecting Other Equipment 2 Basic Disklavier Terminology 3 Chapter 2 Name...

Page 12: ...isk Types 60 Formatting Disks 61 Converting Song Format 62 Converting Disk Type 63 Chapter 16 The Disklavier MIDI Start Stop Control of a MIDI Instrument with the Disklavier 65 Receiving Data from a MIDI Sequencer 66 Controlling the Disklavier in Real Time 68 Sending Song Data to a MIDI Instrument 69 Playing Back Import Files 70 Chapter 17 The Disklavier Personal Computers Connecting to a Personal...

Page 13: ...he control cable extending from the piano is firmly connected to the TO CONTROL CABLE FOR PIANO connector on the rear panel of the Control Unit Note The control cable should be connected to the Control Unit when the Disklavier is installed If however it is not carefully connect the control cable to the Control Unit s TO CONTROL CABLE FOR PIANO connector on the rear panel See step 4 in Mounting the...

Page 14: ... the remote control fails to work from a distance replace the batteries Replacement batteries should be UM 3 AA R6P or LR6 type Always replace both batteries If the remote control is not to be used for a prolonged period of time remove the batteries to prevent possible damage by battery leakage Important Be sure to read the section on Handling Batteries on page ii of Important for details on the s...

Page 15: ...I An acronym for Musical Instrument Digital Interface MIDI allows electronic musical instruments to communicate with each other The PianoSoft Disk Collection is a library of prerecorded song disks made by Yamaha for use with the Disklavier Series Many titles are available and among the many musical styles included are classical jazz and popular The disk includes songs for listening enjoyment piano...

Page 16: ... a PianoSoft or PianoSoft Plus song disk here 5 Floppy disk eject button Used to eject the disk from the floppy disk drive 6 PLAY PAUSE button Used to start and pause playback 7 STOP button Used to stop playback 8 DRIVE button Used to select a disk Toggles the floppy disk and Memory Disks 0 9 and A F 9 SONG SELECT REV FWD buttons In Stop mode Used to select songs In Play mode Used to fast preview ...

Page 17: ...buttons Used to select options and parameters and to adjust the volume i LED volume level indicators Indicates the playback volume level Also functions as a visual metronome Control Unit Rear Panel 1 TO HOST serial port Used to connect the Disklavier with a personal computer 2 HOST SELECT Used to select the host computer connected to the TO HOST connector 3 TO CONTROL CABLE FOR PIANO Used to conne...

Page 18: ... the AC power cable here 2 MAINS ON OFF switch Press to switch on off the Disklavier 3 AUX OUT L L R R Used to connect external audio equipment 4 AUX IN L L R R Used to connect external audio equipment 5 VOLUME knob Used to adjust the volume of the on board speakers and the sound output from the AUX OUT connectors Amplifier Panel 8 Foot Controller connector Mounted underneath Mounted underneath Mo...

Page 19: ...headphones 5 REVERB knob Used to adjust the amount of reverb for the digital piano tone generator Remote Control 1 Number keypad Used for direct song selection and to enter a start time for song playback 2 REPEAT button Used to select one of the Repeat functions ALL RPT or RND 3 A B button Used to enter A and B points for Segments A B and A Repeat modes 4 REV FWD buttons In Play mode Used to fast ...

Page 20: ...ed to select a disk Toggles the floppy disk and Memory Disks 0 9 and A F w TRANSPOSE buttons Used to transpose song playback transposes down transposes up and 0 resets the transposition value to 00 e TEMPO buttons Used to change the playback tempo decreases the tempo increases the tempo and 0 resets the tempo to 00 r VOLUME buttons Used to adjust the volume lowers the volume raises the volume Avai...

Page 21: ...of a disk Do not store or place disks near a television radio loudspeaker or any other device that generates a magnetic field Do not expose disks to extreme temperature or humidity The working temperature range for disks is between 4 C and 52 C 40 F to 125 F Do not use disks in a dusty dirty or smoky environment Remove the disk before you turn off the Disklavier Accidental Erasure Protection Flopp...

Page 22: ... the disk drive and the floppy disk Memory Disks The Disklavier has 16 Mbytes 1 Mbyte 16 Memory Disks of internal flash memory for storing song data They are numbered 0 to 9 and A to F Memory Disks are ideal for storing many songs especially when you want to program your Disklavier to automatically play back many songs with the Chain Play or Timer Play features See Chapter 13 Chain Play Playing Ba...

Page 23: ...ANDBY ON on the Control Unit 2 Set the MAINS switch to OFF Setting the MAINS switch to OFF is effectively the same as disconnecting the power cable from an AC wall outlet If the Disklavier is used regularly you only need to use the STANDBY ON button on the Control Unit If the Disklavier is not going to be used for a long period set the MAINS switch to OFF When the Disklavier is turned off wait at ...

Page 24: ...o select year month date hours minutes and seconds and use the NO and YES buttons to set a value Pressing both NO and YES simultaneously in each respective field sets the year to 1990 month and day to 1 and the hours minutes and seconds to 0 5 Press ENTER The date and time are stored in the internal calendar and the display returns to the current time display Calendar Memory The date and time that...

Page 25: ...edal data on off pedal data or continuous pedal data half pedal On off pedal data turns the pedals on and off It is indicated by angle brackets around the time display as shown below Song number Selected disk Current time Hours Minutes Minutes and seconds display Measures and beats display Angle brackets indicating on off pedal data Song Number The number of the selected song is displayed in two l...

Page 26: ... is replaced by the tempo display when tempo is being adjusted Piano Data Velocity Meters The velocity of the piano part notes as they are played back is indicated on the display as shown below For L R and Ensemble songs two meters will appear one for the left hand part and one for the right hand part as shown below Previous Next Display Indications The arrows that appear on the far right of a dis...

Page 27: ...o play back songs you need to first specify which disk you want to play back as the Disklavier has a total of 17 disks 1 floppy disk and 16 Memory Disks 1 Press DRIVE and specify the disk for playback Each press of the DRIVE button toggles the floppy disk and Memory Disks 0 to 9 and A to F Note When you insert a floppy disk into the floppy disk drive the letters Fd automatically appear on the left...

Page 28: ...of the piano part notes currently being played as shown Pausing Playback 1 Press PLAY PAUSE Playback stops and the PLAY PAUSE indicator flashes 2 Press PLAY PAUSE again to continue playback Stopping Playback Press STOP Playback stops and the song returns to the beginning Pressing STOP while in Pause mode cancels Pause mode PLAY PAUSE PLAY PAUSE STOP PLAY PAUSE ...

Page 29: ...ELECT buttons or number pad on the remote control Using the SONG SELECT Buttons Press SONG SELECT to select the previous song Press SONG SELECT to select the next song Using the Number Pad 1 To select a song from 1 to 9 press the corresponding number button To select song number 5 for example simply press 5 To select a song numbered 10 and above enter the first digit then within 2 seconds enter th...

Page 30: ...use mode fast forward and reverse allow you to quickly locate a desired position in a song Fast Forward and Reverse search faster than preview and review and the piano does not play Reverse can also be used to return a song to the beginning ready to play again 1 To fast forward a song that is currently playing press PLAY PAUSE to engage Pause mode then press SONG SELECT To reverse a song that is c...

Page 31: ...re adjusted simultaneously so it is a good idea to first balance the volume of the piano and XG tone generator See Balancing the Ensemble Volume TG Master Balance on page 21 The LED volume level indicators show volume levels in the manner shown below For example when two consecutive indicators are lit the volume level is between these two levels Note Make sure the VOLUME knob on the Amplifier is s...

Page 32: ...e Adjusting the Tone You can also adjust the tone using the BASS and TREBLE knobs on the Amplifier if necessary BASS knob Turning it clockwise increases and counterclockwise decreases the bass sound TREBLE knob Turning it clockwise increases and counterclockwise decreases the treble sound Turn the knobs until the desired tone is attained VOLUME X OUT R R L L R AUX IN BASS TREBLE MAINS Remote Contr...

Page 33: ...off 1 Play back an Ensemble song 2 Press the Selector until the BALANCE indicator lights The following display appears 3 Use the NO and YES buttons to adjust the volume of the internal XG tone generator TG Master balance can adjust the volume from 0 to 127 and OFF 0 mutes the sound of the internal XG tone generator OFF does not link with the internal XG tone generator This setting is shown in the ...

Page 34: ...Once transposed the transposition value is shown continuously on the display Flashes Changing the Tempo You can speed up or slow down the playback tempo Slowing down the playback tempo can be useful when practicing a difficult piano part These tempo settings remain in effect until the disk is ejected or the Disklavier is turned off To change the tempo use one of the following options a On the Cont...

Page 35: ...sklavier incorporates Yamaha s innovative Silent system in which a push of the SILENT button keeps the hammers from striking the strings effectively silencing the acoustic piano Sound information is sent to the digital piano tone generator and output through the built in speakers or stereo headphones With this Silent feature the Disklavier offers additional convenience for enjoying your Disklavier...

Page 36: ...l piano as desired to a level softer than what is possible on the acoustic piano Playback volume is adjusted using the VOLUME knob on the Silent Control Box The standard volume level is roughly the three o clock position At this setting the volume level of the digital piano is approximately the same as what the acoustic piano would be in normal mode Turn the knob clockwise to increase and counterc...

Page 37: ... the knob clockwise to increase and counterclockwise to decrease the reverb Reverb is off when the REVERB knob is turned fully counterclockwise Follow the procedure below to apply reverb to the digital piano sound in Silent or Quiet mode 1 Engage the Silent system 2 Press FUNC The FUNC indicator lights and the Function menu appears 3 Press until the c cursor is next to the Silent option then press...

Page 38: ...n then press ENTER The Silent menu appears 3 Press until the c cursor is next to the Key parameter then press NO to set the parameter to OFF Keyboard movement is now canceled To re enable keyboard movement press YES in the above display to set the Key parameter to ON Note This setting is saved when the Disklavier is turned off Note During playback in Silent or Quiet mode pedal movement of the left...

Page 39: ...edal use are played back in 32 note stereo sampling polyphony the number of notes beyond 32 are lost although these notes are minor notes that are barely audible 1 Press FUNC The FUNC indicator lights and the Function menu appears 2 Press until the c cursor is next to the Silent option then press ENTER The Silent menu appears 3 Press until the c cursor is next the Poly parameter then use the NO an...

Page 40: ...utlined in Tuning the Tone Generator TG Master Tune on page 38 Disengaging the Silent System Press the SILENT button so that the SILENT ON indicator goes out The Silent system is disengaged Note You may hear a small noise from the motor that drives the hammer shank stopper when the Silent system is engaged This does not indicate that there is anything wrong with the Disklavier SILENT ON ...

Page 41: ...epeat There are three Repeat modes ALL RPT RND as described below The functions differ slightly when a Memory Disk group is selected and when it is not selected See Chapter 13 Chain Play Playing Back Memory Disks in a Group for details on Memory Disk groups Flashes Remote Control REPEAT Remote Control PLAY Remote Control REPEAT REPEAT REPEAT ALL RPT RND Group selected Repeatedly plays back all son...

Page 42: ... B again Point B is memorized and the B of A B stops flashing Playback stops the song returns to point A and Pause mode is engaged 3 Press PLAY to play back the specified section Playback starts from point A continues up to point B and then stops The song returns to point A and Pause mode is engaged 4 To cancel Segment A B Repeat press REPEAT so that OFF flashes on the display Note The REPEAT butt...

Page 43: ...B of A B flashes on the display 2 When you want to return to point A press SONG SELECT Alternatively you may press PAUSE followed by SONG SELECT to return to point A In this case playback stops the song returns to point A and Pause mode is engaged 3 Press PLAY to start playback from point A 4 To cancel Segment A Repeat return to point A and in Pause mode press A B so that OFF flashes on the displa...

Page 44: ...can be set with the remote control only 1 Press SEARCH on the remote control The time counter on the display flashes 2 Enter the time that you want to search for For example to search for 2 56 first press 2 then 5 then 6 If the time value is less than 10 that is between 00 01 and 09 59 remember to press 0 first to set the first digit to zero If you enter a value higher than the entire song time th...

Page 45: ...ourself with the Disklavier playing the other 1 When an L R song is selected the PART indicators light as shown 2 To cancel the left hand part press PART L To cancel the right hand part press the PART R The corresponding PART indicator flashes to show you that the part has been canceled 3 To switch a part back on press the corresponding PART button again 4 A part can also be canceled by using the ...

Page 46: ...e keyboard when the Silent system is engaged Using the Built in Metronome You can sound the built in metronome to practice playing songs on the Disklavier With each beat of the metronome a digital click is produced by the Control Unit The click can be turned off In addition to the click the LED volume indicators function as a visual metronome On the first beat of each measure all the indicators fl...

Page 47: ...s time format you can sound the metronome along with song playback 1 Play back a song recorded using the measures and beats time format 2 Press METRONOME The METRONOME indicator lights and the metronome starts to click to the tempo of the song 3 To stop the metronome press METRONOME again Note This function cannot be used with songs recorded using the minutes and seconds time format Parameter 1 Cl...

Page 48: ...e metronome starts and the following display appears 2 Press the until the c cursor is next to the Vol parameter then use the NO and YES buttons to set the volume level The volume can be set between 50 and 127 Using an Optional Foot Switch or Foot Controller An optional Yamaha foot switch or foot controller can be used to operate various Disklavier functions Using a Start Stop Foot Switch Start st...

Page 49: ...er to Control the Tempo By connecting an optional Yamaha FC 7 controller pedal playback tempo can also be controlled The following table shows which functions can be controlled using the controller pedal Current Mode Pedal Down Pedal Up STOP PLAY PAUSE PAUSE PLAY PAUSE PLAYBACK PLAY PAUSE Tempo 100 See illustration See illustration below below ...

Reviews: