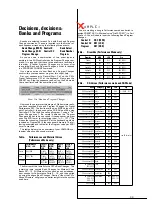
Yamaha CS1X Manual Download Page 26

25

noise for you. All you need to do to make it audible is set the
Volume for Layer1 to the maximum 127. Now the Rhodes
sound will assert itself in your arrangement thanks to this
little insider‘s trick, which can of course be used for other
tonal shades. The presence of a sound is especially governed
by its attack phase.

Organ sounds too run the risk of sounding too dull and can

often be lost in the battle for prominence in the live instru-
ment war. This can be avoided. The solution here is to use
add a harmonically rich component to your basic sound.

PERIMENT:

We will explain how this is done with the aid of Perfor-

mance TP116. Try gradually increasing the second Layer‘s
volume. With this you are blending in a digital sound, whose
sole purpose in life is to add a little transparency to your
organ sound. How much of this sound you add to the organ
is really a matter of personal taste. It is worth listening to this
partial tone in isolation to better understand what‘s going on.

A word about touch sensitivity: keep your sound‘s touch

sensitivity as low as possible. This way many sounds cut
through the mix better. A pad sound that you probably often
play with your left hand shouldn‘t really respond to touch at
all. Experience has shown that it is far more practical to con-
trol a pad sound‘s volume with a volume pedal or fader. That
way you have far better control of your sound‘s level. Also
don‘t forget to ‘compress’ your touch sensitivity values when
preparing Performances.

Another important step is to ensure that you sounds’ levels

relative to each other are OK, otherwise you will have to
constantly correct them during the performance. When set-
ting the levels, however, you should not simply rely on the
“Perf Level” value as a guide. Filter and effect settings will
also indirectly affect the overall volume of a Performance.
Therefore, keep listening to each sound against the other –
let your ears decide.
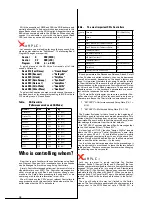
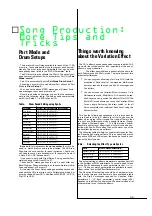
Split Performances

Musicians that don‘t work with “Keyboard Splits” are an

endangered species. The advantages are clear: you can play
several sounds spread across 61 keys without having to
switch Performances. This is how it‘s done: -

The programming effort required here is minimal and can

be mastered effortlessly, even by beginners. Simply call-up
the “Note Limit” function and determine the lower (LIMIT
LOW) and upper (LIMIT HIGH) end points for the relevant
Layer. As a rule of thumb you will usually only split two
sounds across the keyboard, a pad for your left and another
sound for your right hand. A little tip: always stick to the
same split point, e.g. middle C (C3). If you do need to use dif-
ferent keyboard splits once in a while, you should make a
note of it in the display (e.g. “Pad/Pno-F3”).

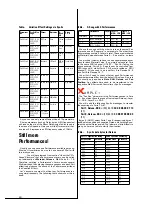
Set out bellow are four Performances that we have put

together to demonstrate the most important aspects of
sound shaping for live performance.

A M P L E :

Performances TP117-120 contain typical live performance

split sounds. The split point is always at C3. The sound
assigned to the upper part of the keyboard can be played
from this point onwards. We have programmed a combina-
tion of pad and E-piano sounds for our first example (Split-
1), the second consists of a CP70 piano as well as an organ
sound (Split-2). You can change the sounds used quickly if
you wish using Bank/Program changes. Pay attention also to
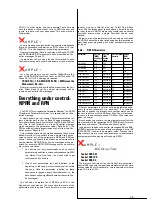
the effect settings. Now let‘s look at the purpose of controller
“Assign2”. As we already know, it is often necessary to
change the volume levels of your sound during live perfor-
mance, either manually or with a foot pedal. Let‘s say you
decide that your pad sound is way too loud. This is the trap
spilt sounds fall into: if you change your volume with the
Master Volume control, all your split sounds will be quieter
and not just the pad sound. This can be a real nuisance, but
never fear, there is a solution:

A M P L E :

A particularly elegant solution can be found in the use of

Knob6. In Performances TP117/119 it is programmed to con-
trol the volume of your left hand sound only, independently
of the right hand sound, i.e. only Layer1‘s level is affected. To
be exact, you can only use the knob to decrease the level;
turning it clockwise has no effect. If however you want to be
able to increase the level as well you need to ensure that the
Layer‘s volume is not set to the maximum 127. As you can
see, when using modulation you need to take all the corre-
sponding parameters into account.

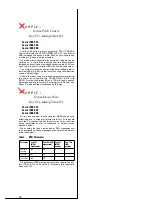
Another dicey subject is the transposition of sounds during

a live performance. A piano sound especially benefits from
this ability as even 61 keys aren‘t always enough to fully
exploit a piano‘s tonal possibilities. To begin with you can
work with the CS1x‘s Shift and PART/LAYER keys to trans-
pose an entire octave by up to +/-3 octaves. Once again, this
is more tricky with split sounds, where you would usually
only want to transpose a single sound and not the entire Per-
formance.

A M P L E :

Here too you can make good use of the “Assign2” control-

ler. Turning Knob6 clockwise in Performances 118/120 trans-
poses the left hand sound up by an octave, whilst the right
hand sound remains unaffected.

Summary of Contents for CS1X

Page 1: ......

Page 2: ...ed to help fully exploit all the possibilities the CS1x has to offer We would also like to thank YAMAHA Corporation Japan SY Division for their support in realising the BLUE BOOK We are convinced that...

Page 3: ...ider the BLUE BOOK as a guide to your practical work It is possible to learn about the underlying foundations of CS1x sound and song programming from the ground up so to speak We have prepared many ex...

Page 4: ...ces 25 Pulling out all the Stops 26 Song Production An Easy Start Songs in Performance Mode Six steps to success 27 The traditional approach Multi settings at the machine 28 Song Production The Basics...

Page 5: ......

Page 6: ...g sounds don t panic here too the CS1x is at home After all it contains all the GM XG sounds If you have not yet come across these sounds why not press the MULTI key You can now try out the most impor...

Page 7: ...a SMF EXTRAPF MID and then transfer it to the CS1x see Sound Overview in the Appendix If necessary consult section Performance Bulk Dump A Performance is made up of four Layers You can assign two ent...

Page 8: ...back is just as easy Warning don t let yourself be irritated by the note about Bulk Dump Receive in the manual page 42 This function or one like it simply isn t available on your CS1x Data transmissi...

Page 9: ...8...

Page 10: ...ting in a some what fl at sound Now change the fi rst VCOs Detune setting to a negative value and the second to a positive one say 2 00 and 2 00 Feel free to experiment with other values Notice how th...

Page 11: ...here where fi ltering can affect the perceived stability of your sound Of course you may also use resonance with the fi lter wide open The following exam ple will illustrate how and when resonance may...

Page 12: ...n this particular kingdom a synthesizer rules alone Therefore feel free to sculpt your amplitude envelopes any which way you want Occasionally all that s required is to soften a sound s initial attack...

Page 13: ...y uses beyond the obvious lead sounds or imaginative sound collages An LFO with a square waveform can also be used to generate little sequencer like phrases such as fi fth or whole octave pitch jumps...

Page 14: ...0 will dem onstrate this nicely Pay particular attention to the Porta mento differences in the Poly and Mono modes Try varying the Portamento speed and observe how the CS1x reacts A little time and ef...

Page 15: ...a great help especially with the Multi mode s tricky effect assign ment E The next example will show just how and when the Amplitude LFO can be applied it doesn t always have to involve synth sounds...

Page 16: ...ynamics or rhythm The second function is all about tempo If you want to use the Arpeggiator with a drum machine or sequencer and wish to be able to react to any tempo changes or drifting set this to M...

Page 17: ...s been reached all the other Arpeggio types in the last X PERIMENT did This results in an unwanted shifting i e the Arpeggio s root note doesn t always fall exactly on the correct beat The following N...

Page 18: ...s during the fi rst four beats then drops during the second half at the same rate This is due to the Arpeggio Type Techno A The CS1x however boasts a second type SweepLine here too the Arpeggio automa...

Page 19: ...t So why not use the Arpeggiator to create an unusual effect A M P L E The following fi ve Performances really should convince you that this subject is seriously worth looking into So dial up the fi r...

Page 20: ...The Performances TP083 084 are really quite traditional With the fi rst you will hear a two bar Clavinet sequence You should keep your triggering chords held down for at least four beats on account o...

Page 21: ...note one after the other and listen to the gradual build up of a com plete drum kit groove We actually use this rhythm for the fi rst Arpeggiator Demo Trying out several variations should pay off too...

Page 22: ...e ASSIGN CTRL NO and press one of the Scene switches Now use the Up Down knob to fi nd the Foot Ctrl setting and you re done So what can be done with this Well let s say you have programmed a high Res...

Page 23: ...following example might give a pos sible answer to this question A M P L E You have selected Performance TP097 This is a classic lead sound which thanks to Scene morphing can be played very expressive...

Page 24: ...ve to carefully choose delay times that match the song tempo In practice you will end up having to re eval uate the Delay times constantly This little formula makes the process a lot easier This resul...

Page 25: ...course you can also use this effect simply as an additional LFO G Rotary Speaker The Rotary Speaker Leslie effect is based on the Doppler effect It is primarily used to liven up organ sounds through t...

Page 26: ...keyboard a pad for your left and another sound for your right hand A little tip always stick to the same split point e g middle C C3 If you do need to use dif ferent keyboard splits once in a while yo...

Page 27: ...0 5 2 2 3 19 7 6 2 24 12 7 1 3 5 28 16 8 1 1 3 31 19 9 1 36 24 Step 1 Layering sinewaves and determining Positions To begin with we have settled on four positions and chosen an appropriate Material vo...

Page 28: ...ttings are the same ones you can usually fi nd in other synthesizer s Multi Setup or Song Multi The setup bar precedes the actual song information You can of course alter all these settings in your se...

Page 29: ...eters but all Part parameters which can be set using System Exclusive messages or the Controllers see the following section and DATA LIST page 23 The following example will show how you can transfer t...

Page 30: ...g the relevant parameter handy If you are using only a few sequencer tracks for your com position you can use single Part Requests to get the Part data REQPART 1 16 This method has two advantages For...

Page 31: ...30...

Page 32: ...M P L E You have recorded the foundations of a song on your CS1x and now wish to pass on this embryonic composition to another musician so that he can develop your ideas or add further tracks Without...

Page 33: ...ver to make Multi settings an inte gral part of your song This is done by preceding the song information with one or two bars of Setup Data To some users this may seem a little unusual but once put in...

Page 34: ...Changes for Material Voice Banks 00 12 All Material voices can be used as indepen dent sounds for Performance Parts 5 16 and then called up using the above Bank Changes Section About the CS1x Sound St...

Page 35: ...e a particular Con troller data block as Setup Data for each track in each song There are two fi les on the Tutorial disk to demonstrate how SETUPPF Performance mode Setup Data Ch 1 5 16 SETUPXG Multi...

Page 36: ...r event i e the data stream will be signifi cantly smaller than with Sys Ex messages You will fi nd a complete list of NRPN and RPN in the Appendix of your manual You may notice that some of the param...

Page 37: ...RUM DECAY RATE with NRPN A value of between 80 and 100 will lend a punchy percussive edge to your snare By the way both Decay 1 and Decay 2 are controlled simultaneously this way A M P L E Drum Decay...

Page 38: ...a is that all values are given in hexadecimal Some sequencers insist on using decimal notation for Sys Ex input so some kind of conversion is necessary To this end you can utilise the table DATA LIST...

Page 39: ...H 64 looks like this F0 43 10 4C 08 00 1B 40 F7 hexadecimal 240 67 16 76 8 0 27 64 247 decimal By the way this Sys Ex message would have exactly the same effect on MIDI channels 5 16 in Performance mo...

Page 40: ...The CS1x effects have already been covered in detail Still we would like to take another look specifi cally at the use of effects in song production The effect possibilities are essentially the same f...

Page 41: ...Parts with Controller or Sys Ex messages A M P L E The Pan Seq parameter in the Performance used in Parts 7 8 contains these fi ne tune offset values Detune Layer 1 00 3 Layer 2 00 3 You will need the...

Page 42: ...Attention should however be paid to the Parts Receive channels which usually correspond to the Part number It may occasionally be useful to deviate from this when a single sequencer track is to contr...

Page 43: ...s available in all of the CS1x s modes with Performance Layers set the Pan parameter to Rndm one step below 63 with the Multi Parts use the following Sys Ex message F0 43 10 4C 08 nn 0E 00 F7 Substitu...

Page 44: ...up Data It is quite possible as in the above illustration that your sequencer doesn t show the Sys Ex messages in their entirety In this case you will need to right click the data block The 1 01 000 p...

Page 45: ...to be set up to send MIDI clock signals otherwise the all important Performance part will remain silent as the Arpeggiator uselessly waits for external timing signals You also should always take care...

Page 46: ...ll demonstrate Use of the Distortion Effect Real Time knob Control Fade Out using Master Volume Please load the Tutorial Disk song BLUE FUZZ MID Arrangement Blue Fuzz Chord Sequence MIDI Ch 1 This sou...

Page 47: ...sound image Fade Out As in the fi rst example the fade out is achieved with Sys Ex Master Volume messages The following applies here to play the sequence right through the end so that Master Volume is...

Page 48: ...Tempo 164 bpm TUTORPFM MID Bulk Dump ALL for 128 Tutorial Performances TUTRDEMO MID Analogue Workshop Demo sequence Load fi le TUTORPFM MID before playback SETUPPF MID Performance Mode Setup File SETU...

Page 49: ...Bank Additions No Cat Perf Name Ele No Cat Perf Name Ele 1 Pf Wurlitza 2 65 Fx Goldlox 3 2 Pf Radio 1 66 Fx Washout 4 3 Pf Dance Pn 1 67 Fx Chillin 2 4 Cp Air Hitz 2 68 Fx Scavenge 1 5 Cp The Bigg 2 6...

Page 50: ...the way there are differ ent ways of restoring the default settings you can set them manually transmit them via the KNOBPERR MID fi le Tuto rial Disk RESET or load a Performance bank that contains th...

Page 51: ...50...

Page 52: ...Off 27 Local off 41 M M Gain 24 M Width 24 Material Voices 6 31 40 Mickey Mouse 18 MIDI Clock 15 MIDI messages 32 MIDI Thru 41 MIDI Thru function 27 Mono Poly 13 morphing 22 Multi 28 32 Multi settings...

Page 53: ...ate Milano Italy YAMAHA Hazen Electronica Musical S A Jorge Juan 30 28001 Madrid Spain YAMAHA Music Belgium Keiberg Imperiastraat 8 B 1930 Zaventem Belgium YAMAHA Music Nederland Kanaalweg 18G NL 3526...

Reviews: