background image

Front and Rear of Unit

Rear Panel

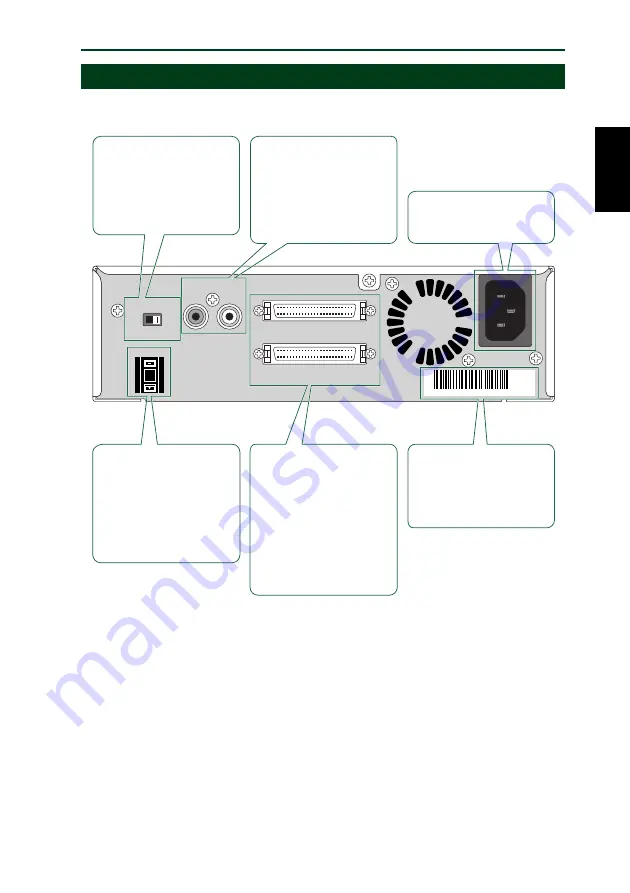
The CRW2100SX drive’s rear panel features the following:

SCSI

CDR  ID

AC   IN

SER. NO.

st2

❋❋❋❋❋❋❋❋

TERMINATOR

ON

OFF

LINE OUT
R

L

SCSI

1

Serial number sticker

This consists of 3 letters 
and 7 digits.  You may 
need to refer to this number 
when requesting User 
Support services. (P.11)

AC IN socket

Connect the included 
power cable here. (P.20)

TERMINATOR switch

This enables the drive’s 
built-in SCSI termination.  
Switch this to “ON” if your 
drive is the last device on 
the SCSI chain.  Otherwise, 
switch it to “OFF.” (P.13)

LINE OUT (L/R)

To listen to audio CDs with 
your drive, connect these to 
the line-level input (LINE IN) 
of your stereo equipment 
using a standard stereo 
phono cable (sold 
separately). 

CDR ID selector switch

The drive’s SCSI ID number 
is shown in the switch’s 
window.  Press the button 
above the window to 
decrement the SCSI ID 
number, or the button 
below the window to 
increment it. (P.12) 

SCSI connectors

Connect either of these to 
your computer’s SCSI card 
using the  SCSI cable.  The 
other connector can be 
used as a pass-through 
when daisy-chaining more 
SCSI devices to it.  It can 
be left vacant if your drive 
is the last device on the 
SCSI chain and is 
terminated. (P.20)

8

Summary of Contents for CRW2100SX Series

Page 1: ......

Page 2: ... with the requirements listed in FCC Regulations Part 15 for Class B digital devices Compliance with these requirements provides a reasonable level of assurance that your use of this product in a residential environment will not result in harmful interference with other electronic devices This equipment generates uses radio frequencies and if not installed and used according to the instructions fo...

Page 3: ... Ausgang an der Linse der Laser Abtasteinheit Lesemodus 0 7mW kontinuierlich Schreibmodus Max 38mW für 166ns Zyklusmin 86 6ns Classe du produit laser Classe 1 Caractéristiques de la diode laser Longueur d onde 780 787 nm Durée des impulsions et sortie maximum depuis la lentille du bloc capteur optique Mode de lecture 0 7mW continue Mode de gravure max 38mW pour 166ns cycle min 86 6ns Clase de prod...

Page 4: ......

Page 5: ...i English OWNER S MANUAL ...

Page 6: ...erwise there is an increased risk of personal injury electrical shock damage to the device or fire Please take particular care if small children are present Do not expose the device to rain use it near water or in damp or wet conditions or place containers on it that contain liquids which might spill into any openings Otherwise there is an increased risk of electrical shock fire or personal injury...

Page 7: ...ays remove the disc from the tray before transporting the device Otherwise written data may be destroyed When cleaning the device never use benzene paint thinners detergents or chemical impregnated wiping cloths Also do not place vinyl plastic or rubber objects on the device Otherwise the device may be damaged or its front panel may become discolored Use a soft dry cloth to wipe the device Do not ...

Page 8: ... Yamaha does not bear any responsibility for any outcome as a result of using this device 4 Reproduction of this manual either in part or in full is expressly forbidden Precautions for Transportation Before transporting the device always put it in its original box If the device is transported without adequate packing the internal components may be damaged and cause the device to malfunction Copyri...

Page 9: ...ll other trademarks are the property of their respective companies Introduction 1 Features of the CRW2100SX Drive 1 Before Use 3 System Requirements 3 Supported Discs 5 Tools 6 Front and Rear of Unit 7 Front Panel 7 Rear Panel 8 Setup Flowchart 9 Windows Users 9 Macintosh Users 10 Setup Procedures 11 Serial Number 11 SCSI Settings 11 Setting Up The CRW2100SX Drive 14 Operation 24 Loading a Disc 24...

Page 10: ...n the disc you create can be displayed by a CD player that is compatible with CD TEXT Wide compatibility Compatibility assurance data obtained through exchange of technical data with major disc manufacturers ensures compatibility with discs from a very wide range of manufacturers 700MB discs are also supported High fidelity audio The CRW2100SX supports extracting digital audio data at up to 40X sp...

Page 11: ...ethod the disc rotation speed will be so adjusted as to keep a constant data transfer rate at any portion of the disc In other words the disc rotation speed will vary in CLV writing In contrast CAV Constant Angular Velocity method uses a constant disc rotation speed at any portion of the disc whereas the data transfer rate will vary Because CAV method has an advantage to largely increase the data ...

Page 12: ...nstalled yet A SCSI card to connect SCSI devices including the CRW2100SX drive to your computer Make sure it has an internal bus connector Yamaha recommends any of Adaptec s AHA 2940 series cards PCI slot n For details about how to install the SCSI card refer to the documentation that came with it Operating System OS Windows 95 Windows 98 Windows 98 Second Edition Windows NT4 0 with Service Pack 3...

Page 13: ... onto a disc avoiding writing errors related to buffer underrun a condition where writing is disabled due to under performance of the data transfer rate to the writing speed Also note that the image file is useful to write multiple discs with the same content For Macintosh computers OS Mac OS 8 or later CPU PowerPC G3 300MHz or faster RAM 32MB 64MB or more recommended CD ROM drive n Many Apple Mac...

Page 14: ...CD RW drive that bears the High Speed CD RW logo or by a device e g CD ROM drive that supports CD RW n 10X speed writing is enabled with Full CAV method In order to write erase or read these discs using a CD R RW drive a drive bearing the High Speed CD RW logo must be used When using a CD ROM drive to read these discs the drive must be capable of reading CD RW discs If these discs are used in a CD...

Page 15: ... audio is written in 16 bit resolution at a sampling rate of 44 1kHz for a 79 minutes disc Data CD Up to 700 megabytes of computer data is stored in standard ISO9660 format for a 700MB disc Video CD These hold movies in which the video and audio data has been compressed using MPEG 1 technology Tools Phillips Screwdriver You will need to use this when removing the cover of your computer and install...

Page 16: ...ou can connect stereo headphones to this stereo mini jack and listen to audio CDs loaded in the drive Headphone volume control Adjust this control to set a suitable volume level when listening to an audio CD using the headphone jack Slide the knob to the left to decrease the volume and to the right to increase it Eject button Press this button when you need to open or close the tray P 24 Power swi...

Page 17: ...in Otherwise switch it to OFF P 13 LINE OUT L R To listen to audio CDs with your drive connect these to the line level input LINE IN of your stereo equipment using a standard stereo phono cable sold separately CDR ID selector switch The drive s SCSI ID number is shown in the switch s window Press the button above the window to decrement the SCSI ID number or the button below the window to incremen...

Page 18: ...t up the CRW2100SX drive Install the CD writing software Purchase a SCSI card Install the SCSI card Recommended models Adaptec AHA 2940 series PCI Read this manual and insert the SCSI card into the appropriate PCI slot on the computer For details about how to install the software refer to the documentation that came with it Start using the CRW2100SX drive Use the drive to create audio CDs to back ...

Page 19: ... slot on the computer Start using the CRW2100SX drive Use the drive to create audio CDs to back up data on your hard disk or for whatever purpose suits your needs 1 Set the switches at the rear of the drive P 12 13 2 Connect the SCSI and power cables then switch the drive on P 18 20 Use the Apple System Profiler and check that the drive is recognized correctly Does your Macintosh have a built in S...

Page 20: ...mber when requesting Customer Support services In the box below the following diagram write down the 10 character serial number consisting of 3 letters followed by 7 digits Serial number 3 letters and 7 digits Serial No SCSI Settings Before connecting your CRW2100SX drive to your computer you need to set up the drive using the switches located at the rear of the unit You ll need to set the followi...

Page 21: ...ally be assigned an ID number from 0 to 6 Press the top or bottom button of the CDR ID selector switch to decrement or increment the SCSI ID number as shown below Press to decrement SCSI ID number SCSI ID number Press to increment SCSI ID number n The SCSI ID number for each device on the chain must be unique Make sure the CRW2100SX drive s SCSI ID number is not the same as that of any other devic...

Page 22: ... The SCSI terminator switch should be set to ON if your CRW2100SX drive is the last device on the SCSI chain If it is not the last device on the chain the TERMINATOR switch should be set to OFF Computer Hard disk drive unterminated CRW2100SX Terminator ON SCSI card n By factory default the Terminator switch is set to ON ...

Page 23: ...omputer and to secure the SCSI card in its slot n For details about how to install the SCSI card refer to the documentation that came with it and your computer Connecting the drive You will need to connect your CRW2100SX drive to your computer s SCSI card using a SCSI cable You will also need to connect the included power cable between the drive and an electrical outlet Verifying the Hardware Inst...

Page 24: ...eiving an electric shock and or short circuiting and damaging components including the CRW2100SX drive 2 Remove the outer casing of the computer If you need to remove screws in the process make sure you don t lose them n The method for removing the casing can vary depending on the manufacturer For details refer to the documentation that came with your computer ...

Page 25: ...y have built up inside your body Drain any static charge You can permanently damage equipment if you touch it while there is any static charge in your body 4 Locate a free slot for the SCSI card and use a Phillips screwdriver to remove the screw holding the slot s blanking plate Remove screw Remove blanking plate Free slot ...

Page 26: ...t is seated firmly in the slot Then secure the card by replacing the screw used for the blanking plate Replace screw Insert SCSI card 6 Attach the outer casing of the computer and any screws that were removed Then reconnect the computer to the electrical outlet but do not power it up yet ...

Page 27: ...Setup Procedures 18 Connecting the Drive 1 Connect one end of the SCSI cable to your SCSI card SCSI card connector Connect SCSI cable ...

Page 28: ...ctor The connector of your SCSI card may vary You will need to purchase a SCSI cable with connectors suitable for both your drive and your SCSI card The following are the most common types of SCSI connector D sub half pitch 50 pin pin type as found on CRW2100SX Half pitch 50 pin Centronics ...

Page 29: ...or may be used SCSI connector Connect SCSI cable 3 Connect the D shaped end of the included power cable to the AC IN socket at the rear of your CRW2100SX drive Connect the other end of the cable to an electrical outlet Electrical plugs sockets vary according to country region Power cable AC IN socket Electrical outlet ...

Page 30: ...the LED on the front panel blinks in green attempting reading disc information P 32 Power ON Always power up the devices in your SCSI chain before powering up your computer This will ensure that they are recognized by the computer s operating system Do not disconnect any devices in your SCSI chain while the computer is on ...

Page 31: ...System icon Select the Device Manager tab and double click on CDROM If the drive has been correctly installed it should be listed as shown below Similarly double click on SCSI controllers and the SCSI card should be listed as shown below if it has been properly installed n For details about how to use the operating system refer to the documentation that came with it n If there is a or mark etc nex...

Page 32: ...this setting This is a screen shown in the Windows 98 Second Edition environment 4 Install the CD writing software n For details about how to install and use the software refer to the documentation that came with it Macintosh Users To check that the CRW2100SX drive is recognized correctly you will need to use the Apple System Profiler 1 When your CRW2100SX drive and computer have powered up instal...

Page 33: ...ose the tray n Do not push or pull the tray using excessive force Doing so can damage the drive or the disc Instead always use the Eject button to open or close the tray Ejecting a Disc 1 2 1 Open the tray by pressing the Eject button on the CRW2100SX drive s front panel 2 Remove the disc from the tray 3 Press the Eject button to close the tray n It may not be possible to eject the disc tray while...

Page 34: ...y only as a last resort Malfunctions may occur if you do this too frequently 1 Power down the computer and the CRW2100SX drive 2 Find a pin like tool with a diameter of 2mm or less to fit through the Manual Eject hole on the drive s front panel n A straightened large paper clip is ideal for this purpose 3 Push the tool gently into the Manual Eject hole until the spring loaded mechanism ejects the ...

Page 35: ...orrectly If the system has started up normally you will be able to see the CRW2100SX drive and SCSI card listed in Control Panel System Device Manager tab The drive will be listed as Yamaha CRW2100S when you double click on CDROM and the SCSI card will be listed when you double click on SCSI controllers P 22 When you power up your computer you can access the machine s hardware SCSI BIOS settings b...

Page 36: ...y does not come out Is the CRW2100SX drive powered up Some CD writing applications will lock the disc tray once loaded In which case use the eject command from within the application Alternatively read the manual that came with the application The disc keeps being ejected Has the disc been placed on the disc tray correctly The drive does not operate correctly Is the disc compatible with the CRW210...

Page 37: ... encounter errors even if you are using a 32X speed or faster CD ROM drive Therefore before attempting high speed writing directly from another CD ROM drive you should check that it is possible to do so by choosing to test before writing The Buffer Underrun error message is displayed Try the following Lower the writing speed setting Create an image file of the CD on the computer s hard disk Defrag...

Page 38: ...nify the beginning and end points of a session They are not part of the data but contain information about the session itself Basically a session consists of a lead in data and a lead out Track at Once TAO This mode is used when writing data to a disc one track at a time More tracks can be added later if there is enough space left on the disc This is why Track at Once mode is sometimes referred to...

Page 39: ...k 4 Session 1 Session 2 Example CD EXTRA Packet Writing This mode is used when writing to a track of a disc using small blocks of data called packets in a manner similar to a floppy disk This mode is useful when making small incremental backups of data You will need to use software that specifically supports packet writing such as Adaptec s Direct CD 1 2 3 4 5 6 7 8 Packet Same as writing to flopp...

Page 40: ... Drives web site Please check this information regularly Determining the firmware version of the CRW2100SX drive in Windows 95 98 98 Second Edition Go to Control Panel System Device Manager tab double click on CDROM then double click on YAMAHA CRW2100S SCSI ID number When updating the CRW2100SX drive s firmware you will need to enter its SCSI ID number You can check the number here This is a scree...

Page 41: ... with disc Ready no disc Tray operation opening closing Tray fully opened Reading disc information TOC Initial access in writing Writing test mode Writing Reading Playing Power saving combined with the computer s power saving Failure Indicator Messages Lit Lit Blinking constant Out Blinking constant Blinking constant Blinking constant Blinking Fast constant Flashing inconstant Blinking Fast consta...

Page 42: ...V CD RW 2X 4X 8X CLV 10X 4X 10X Full CAV Reading 40X max Full CAV Note DATA 40X max CD DA 40X max in audio extraction CD DA 1X only in audio play Video CD 10X max Session closed disc 40X max Session unclosed disc 12X max CD R 1X 2X 4X 8X 12X 16X 12X 16X Partial CAV writing Write Once discs specified in Orange Book Part II Ver 3 1 Note Use a high speed writing compatible CD R disc for 8X or faster ...

Page 43: ...r Size 2 048 2 352 bytes Interface SCSI 3 Ultra SCSI Installing style Horizontal Disc Loading Type Front auto loading tray loading Audio Out Line Out Frequency Range 20 20 000Hz Output Level 700m Vrms Voltage Rating 100 240V 10 AC Current Draw 0 4 A Power Consumption 20W when writing or reading 10W standby during disc spindown 7W sleep combined with the computer s power saving Operating Environmen...

Page 44: ...50 ICES 003 EN60950 EN60825 EN55022 EN55024 EN61000 3 2 EN61000 3 3 AS NZ 3548 IEC60950 IEC60825 Japan s Legal Requirements for Electrial Appliances and Materials VCCI Details Information Technology Equipment Class 1 Laser Product Class B Computing Device Information Technology Equipment Class B Computing Device Information Technology Equipment Class 1 Laser Product Class B Information Technology ...

Page 45: ...control 7 High Speed CD RW disc 5 J jitter value 1 2 L lead in 29 lead out 29 LED 7 32 LED Indicator 32 LINE OUT L R 8 Loading a Disc 24 M Manual Eject hole 7 25 Multisession 29 P packet 30 Packet Writing 30 paper clip 25 Partial CAV 2 Phillips Screwdriver 6 Power switch 7 Pure Phase Laser System 1 2 R Rear Panel 8 Running OPC 1 2 S SCSI card 17 SCSI driver 26 SCSI ID number 12 SCSI connectors 8 2...

Page 46: ......

Page 47: ...693 5111 FAX 61 3 9699 2332 SINGAPORE MALAYSIA THAILAND PHILIPPINES INDIA VIETNAM CAMBODIA MYANMAR INDONESIA and IRAN Yamaha Electronics Asia Pte Ltd 138 Cecil Street 05 02 03 Cecil Court Singapore 069538 SINGAPORE TEL 65 223 3992 FAX 65 223 9810 TAIWAN Yamaha KHS Music Co Ltd 11F No 150 Tun Hua North Rd Taipei TAIWAN R O C TEL 886 2 2713 8999 FAX 886 2 2713 8666 URL http www yamahakhs com JAPAN Y...

Page 48: ......

Reviews: