background image

–11–

E

INSPECTION AND REPAIR

ENG

NOTE:

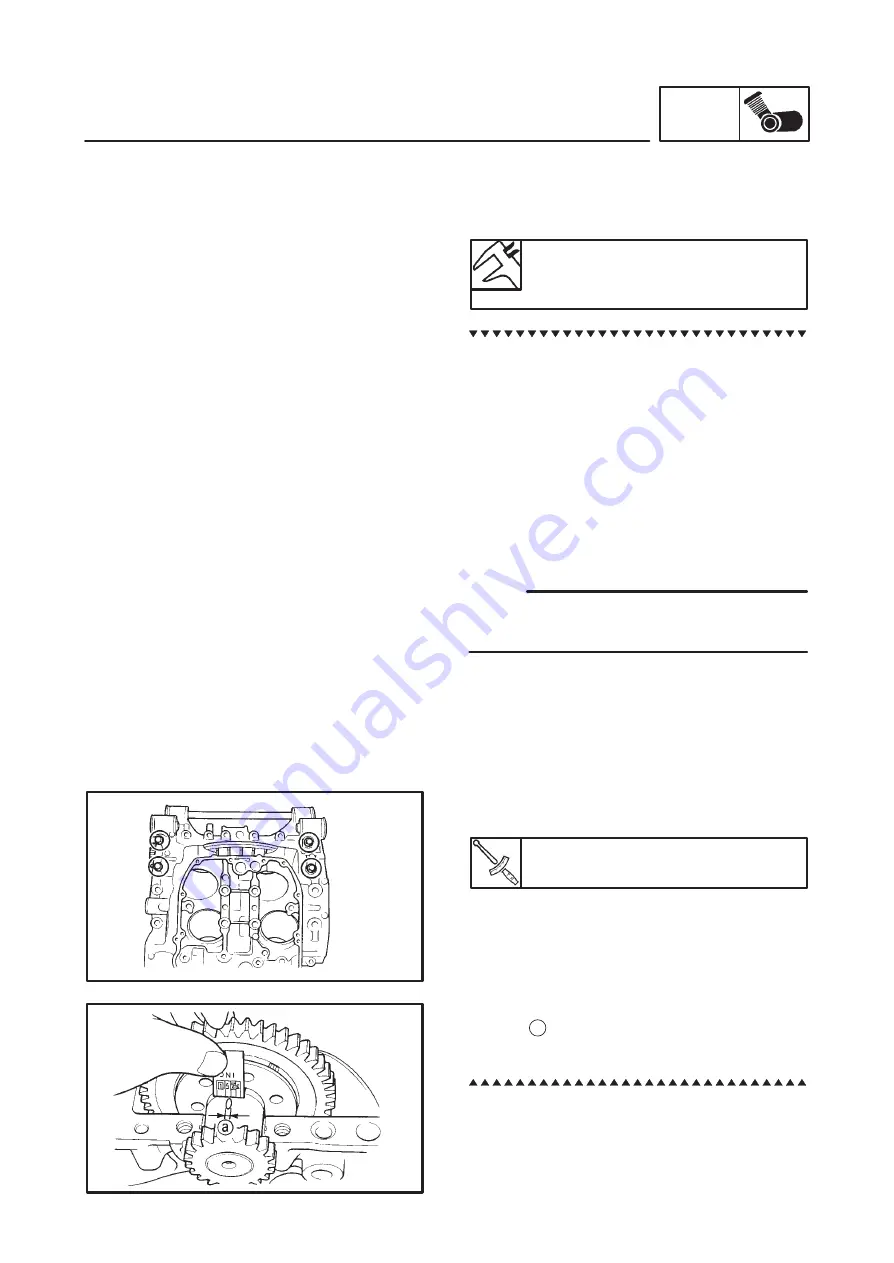
BALANCER SHAFT
1. Measure:

S

Oil clearance (balancer shaft bearing)
Out of specification 

 Replace bearing.

Oil clearance:

0.020 

 0.048 mm

(0.0008 

 0.002 in)

Measurement steps:

F

Clean the bearings, balancer shaft and bear-
ing portions of the crankcase.

F

Place the crankcase (upper) on a bench in an
upside down position.

F

Install the upper half of the bearings and the
balancer shaft into the crankcase (upper).

F

Put a piece of Plastigauge

 on each balanc-

er shaft journal.

F

Install the lower half of the bearings into the
crankcase (lower) and assemble the crank-
case halves.

Do not move the balancer shaft until the oil
clearance measurement has been completed.

F

Tighten the bolts to specification in the tight-
ening sequence cast on the crankcase.

Bolt (crankcase-M8):

24 Nm (2.4 m

S

kg, 17 ft

S

lb)

F

Remove the crankcase (lower) and lower half
of the bearings.

F

Measure the compressed Plastigauge

width 

a

 on each balancer shaft journal. If oil

clearance is out of specification, select a re-
placement bearing.

Summary of Contents for 3JPM

Page 1: ......

Page 2: ......

Page 3: ...ry Service Manual together with the following manual VMX12 86 SERVICE MANUAL 2EN ME1 VMX12 91 SUPPLEMENTARY SERVICE MANUAL 2EN AE1 VMX12 93 SUPPLEMENTARY SERVICE MANUAL 2EN AE2 VMX12 96 SUPPLEMENTARY SERVICE MANUAL 1995 by Yamaha Motor Co Ltd 1st Edition July 1995 All rights reserved Any reprinting or unauthorized use without the written permission of Yamaha Motor Co Ltd is expressly prohibited ...

Page 4: ...pply to this model This policy is intended to provide the customer with the most satisfaction from his motorcycle and to conform with federal environmental quality objectives Yamaha Motor Company Ltd is continually striving to improve all models manufactured by Yamaha Modifications and significant changes in specifications or procedures will be forwarded to all Autho rized Yamaha dealers and will ...

Page 5: ...anic with an easy to read handy reference that contains com prehensive explanations of all disassembly repair assembly and inspections A set of particularly important procedure 4 is placed between a line of asterisks with each proce dure preceded by IMPORTANT FEATURES Data and a special tool are framed in a box preceded by a relevant symbol 5 An encircled numeral 6 indicates a part name and an enc...

Page 6: ...specifications appearing in the text 10 Filling fluid 11 Lubricant 12 Special tool 13 Torque 14 Wear limit clearance 15 Engine speed 16 Ω V A Illustrated symbols 17 to 22 in the exploded dia grams indicate the types of lubricants and lu brication points 17 Apply engine oil 18 Apply gear oil 19 Apply molybdenum disulfide oil 20 Apply wheel bearing grease 21 Apply lightweight lithium soap base greas...

Page 7: ...NUMBER 1 SPECIAL TOOLS 2 SPECIFICATIONS 3 GENERAL SPECIFICATIONS 3 MAINTENANCE SPECIFICATIONS 3 ENGINE 3 ELECTRICAL 4 PERIODIC INSPECTION AND ADJUSTMENT 5 ENGINE 5 ENGINE OIL REPLACEMENT 5 ENGINE OVERHAUL 7 INSPECTION AND REPAIR 7 CRANKSHAFT AND CONNECTING ROD 7 BALANCER SHAFT 11 MIDDLE GEAR SERVICE 13 CHASSIS 14 SHAFT DRIVE 14 ...

Page 8: ......

Page 9: ...ing au thority in your state FRAME SERIAL NUMBER The frame serial number 1 is stamped into the right side of the steering pipe Starting serial number 2EN 042101 EUR The first three digits of these numbers are for model identifications the remaining digits are the unit production number ENGINE SERIAL NUMBER The engine serial number 1 is stamped into the crankcase Starting serial number 2WE 050101 U...

Page 10: ...jjj YS jjjjj YK jjjjj ACC jjjjj P N 90890 jjjjj For US CDN Except for US CDN SPECIAL TOOLS The proper special tools are necessary for com plete and accurate tune up and assembly Us ing the correct special tool will help prevent damage caused by the use of improper tools or improvised techniques The shape and part number used for the special tool differ by country so two types are provided FOR ENGI...

Page 11: ... Main air jet M A J Jet needle J N Needle jet N J Pilot jet P J Pilot air jet P A J 1 Pilot screw P S Pilot outlet P O Bypass 1 B P 1 Bypass 2 B P 2 Bypass 3 B P 3 Valve seat size V S Starter jet G S 1 Starter jet G S 2 Throttle valve size Th V Fuel level F L Engine idling speed Vacuum pressure at idling speed 1FK 02 USA 2WF 02 California 3LR 01 EUR 152 5 USA California 150 EUR ø2 0 5EZ43 1 USA 5E...

Page 12: ...cturer Output Brush overall length Limit Commutator diameter Wear limit Mica undercut Starter switch Model manufacturer Amperage rating Coil winding resistance Constant mesh type SM 13 MITSUBA 0 65 kW 12 5 mm 0 49 in 5 0 mm 0 20 in 28 mm 1 10 in 27 mm 1 06 in 0 7 mm 0 03 in MS5D 191 HITACHI 100 A 3 9 4 7 Ω at 20_C 68_F Thermostatic switch Model manufacturer 2EL USA 47X California EUR NIHON THERMOS...

Page 13: ...ain bolt 1 with gasket Drain the crankcase of its oil 5 If the oil filter is to be replaced during this oil change remove the following parts and rein stall them Replacement steps F Remove the oil filter 1 using the oil filter wrench 2 Oil filter wrench YU 38411 90890 01426 F Apply engine oil to the O ring 3 of the new oil filter Make sure the O ring 3 is positioned correctly F Tighten the oil fil...

Page 14: ... 5 0 US qt Periodic oil change 3 5 L 3 1 lmp qt 3 7 US qt With oil filter replacement 3 8 L 3 3 lmp qt 4 0 US qt Recommended oil classification API Service SE SF and SG type or equivalent e g SF SE SF SE CC SF SE SD etc SDo not add any chemical additives Engine oil also lubricates the clutch and additives could cause clutch slippage SDo not allow foreign material to enter the crankcase 8 Install S...

Page 15: ...ation Replace bearing Oil clearance 0 020 0 038 mm 0 0008 0 0015 in Measurement steps Do not interchange the bearings and con necting rod They must be installed in their original positions or the correct oil clear ance may not be obtained causing engine damage F Clean the bearings main journals and bear ing portions of the crankcase F Place the crankcase upper on a bench in an upside down position...

Page 16: ...e bolts to specification in the tight ening sequence cast on the crankcase Bolt Crankcase M10 40 Nm 4 0 mSkg 29 ftSlb With a washer F Remove the crankcase lower and lower half of the bearing F Measure the compressed Plastigauge width a on each main journal If oil clearance is out of specification select a replacement bearing 4 Measure SOil clearance crank pin Out of specification Replace bearing O...

Page 17: ...denum disulfide grease to the bolts threads and nut seats SMake sure the Y marks on the connecting rods face the left side of the crankshaft SMake sure that the letters on both components align to from a perfect character F Tighten the nuts Nut 36 Nm 3 6 mSkg 25 ftSlb Tighten to full torque specification without pausing Apply continuous torque between 3 0 and 3 8 mSkg Once you reach 3 0 mSkg DO NO...

Page 18: ...en the bearing size for J1 is Bearing size of J1 Crankcase J1 Crankweb J1 6 1 5 Yellow BEARING COLOR CODE 1 Blue 2 Black 3 Brown 4 Green 5 Yellow 6 Pink 7 Red Example 2 Crank pin bearing F If P1 on the connecting rod is 4 and 2 on the crankweb then the bearing size for P1 is Bearing size of P1 Connecting rod P1 Crankweb P1 4 2 2 Black BEARING COLOR CODE 1 Blue 2 Black 3 Brown 4 Green 5 Yellow 6 Pi...

Page 19: ...nto the crankcase upper F Put a piece of Plastigauge on each balanc er shaft journal F Install the lower half of the bearings into the crankcase lower and assemble the crank case halves Do not move the balancer shaft until the oil clearance measurement has been completed F Tighten the bolts to specification in the tight ening sequence cast on the crankcase Bolt crankcase M8 24 Nm 2 4 mSkg 17 ftSlb...

Page 20: ...earing Selection of bearings Example F If J5 on the crankcase is 6 and 2 on the balancer shaft then the bearing size for J5 is Bearing size of J5 Crankcase J5 Balancer shaft No 6 2 4 Green BEARING COLOR CODE 1 Blue 2 Black 3 Brown 4 Green 5 Yellow 6 Pink 7 Red ...

Page 21: ...3 0 m kg 22 ft lb A SHIMS 0 10 mm 0 004 in B GEAR LASH 0 05 0 12 mm 0 002 0 005 in A SHIMS 0 15 mm 0 006 in 0 30 mm 0 012 in 0 50 mm 0 020 in C 110 Nm 11 0 m kg 80 ft lb STAKE MIDDLE GEAR SERVICE 1 Universal joint 2 Dust seal 3 Housing 4 O ring 5 Bearing 6 Collapsible collar 7 Bearing 8 Middle drive shaft 9 Middle driven pinion gear 10 Spring seat ...

Page 22: ...Nm 2 3 m kg 17 ft lb 42 Nm 4 2 m kg 30 ft lb 110 Nm 11 0 m kg 80 ft lb 9 Nm 0 9 m kg 6 5 ft lb E SIZES 4 A FINAL GEAR OIL B CAPACITY 0 2 L 0 18 lmp qt 0 21 US qt C TYPE SAE 80 API GL 4 HYPOID GEAR OIL D GEAR LASH 0 1 0 2 mm 0 004 0 008 in E SIZED 5 E SIZES 2 E SIZES 3 130 Nm 13 0 m kg 94 ft lb 23 Nm 2 3 m kg 17 ft lb CHASSIS SHAFT DRIVE 1 Dust cover 2 Bearing housing 3 Ring gear stopper shim 4 Rin...

Reviews: