background image

Quic

k Guide

CVP-305/303/301 Owner’s Manual

25

Operations in the Basic Displays

To start with, you should know a little about the basic displays that appear in the Quick Guide. There are 
three basic displays:

Main display  

See below.

File selection display  

See below.

Function display  

page 26

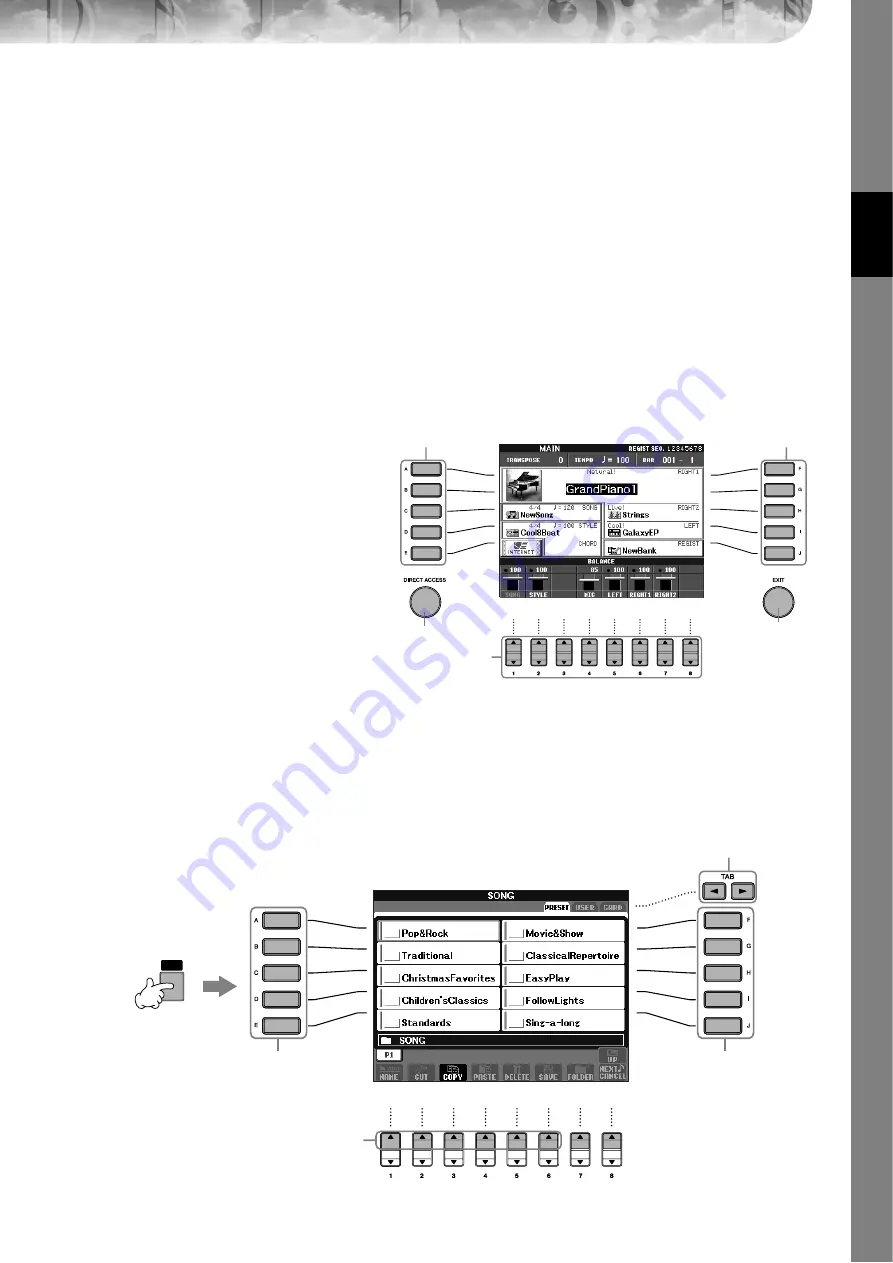
Operation of the Main Display

The Main display shows the basic settings and important information for the instrument (It is the same display that 
appears when the instrument is turned on.).You can also call up display pages related to the displayed function from 
the Main display.

n

About information in the Main display

See page 59.  

1

[A]–[J] buttons

The [A]–[J] buttons correspond to the settings 
indicated next to the buttons.
For example, press the [F] button, and the Voice 
(RIGHT 1) selection display will appear in the 
display.

2

[1

π

π

π

π†

]–[8

π

π

π

π†

] buttons

The [1

π†

]–[8

π†

] buttons correspond to the 

parameters which are indicated above the but-
tons. (On CVP-301, open the volume balance 
display by pressing the [BALANCE] button.)
For example, pressing the [1

π

] button will 

increase the Song (page 34) volume.

3

[DIRECT ACCESS] and [EXIT] buttons

Here’s a convenient way to return to the Main 
display from any other display: Simply press the 
[DIRECT ACCESS] button, then the [EXIT] button.

Operation of the File Selection Display

In the File Selection display, you can select the Voice (page 28)/Song (page 34)/Style (page 44), etc.
In the example here, we’ll call up and use the Song Selection display.

1

2

3

3

1

SONG

SELECT

1

3, 5

2

4

3, 5

Summary of Contents for 301

Page 1: ......

Page 2: ...rely believe that our products and the production methods used to produce them meet these goals In keeping with both the letter and the spirit of the law we want you to be aware of the following Batte...

Page 3: ...f the instrument or if any unusual smells or smoke should appear to be caused by it immediately turn off the power switch disconnect the electric plug from the outlet and have the instrument inspected...

Page 4: ...ears consult a physician Do not place the bench in an unstable position where it might accidentally fall over Do not play carelessly with or stand on the bench Using it as a tool or step ladder or fo...

Page 5: ...ction for Organolgy Kunitachi College of Music The following instruments shown in the displays of the CVP 305 303 301 are on display at the Hamamatsu Museum of Musical Instru ments balafon gender kali...

Page 6: ...perfectly in tune Transporting If you move to another location you can transport the Clavinova along with other belongings You can move the unit as it is assembled or you can disassemble the unit down...

Page 7: ...assistant Technology 42 Playing Accompaniment with the Auto Accompaniment Feature Style Playback 44 Playing Mary Had a Little Lamb with the Auto Accompaniment Feature 44 Calling Up Ideal Setups for Ea...

Page 8: ...to the Internet 166 Accessing the Special Clavinova Website 167 Operations in the Special Clavinova Website 167 Scrolling the Display 167 Following Links 168 Entering Characters 168 Return to the Pre...

Page 9: ...ng a Microphone Connecting the Clavinova Directly to the Internet Using Your Instrument with Other Devices Appendix Using Creating and Editing Songs Reference Using Creating and Editing Voices Appendi...

Page 10: ...or optimum piano performance no matter what settings you ve made from the panel Now you can enjoy performing and practicing with authentic grand piano sounds and response instantly Playing Other Instr...

Page 11: ...indicate the notes you should play when you should play them and how long you should hold them down Recording Your Performances page 41 The Clavinova lets you easily record your own performances and...

Page 12: ...button P 35 L REW FF buttons P 128 STYLE CONTROL M ACMP ON OFF button P 45 N OTS LINK button P 50 O AUTO FILL IN button P 47 P INTRO I II III buttons P 46 Q MAIN VARIATION A B C D buttons P 47 R BREA...

Page 13: ...uttons P 73 PIANO Setting p PIANO button P 28 REGISTRATION MEMORY q REGIST BANK button P 122 r FREEZE button P 123 s 1 8 buttons P 121 t MEMORY button P 121 Pedals u Left pedal P 29 v Sostenuto pedal...

Page 14: ...rd lights up The shape of the plug and outlet dif fer depending on locale CVP 305 CVP 303 CVP 301 CAUTION Hold the cover with both hands when opening or clos ing it Do not release it until it is fully...

Page 15: ...e power off Press the POWER switch to turn the power off The screen and the power indicator turn off 6 Closing the key cover CVP 305 CVP 303 Grip the metal rim at the top of the panel and close the ke...

Page 16: ...usic rest slightly then turn it back slowly CVP 301 1 Pull the music rest toward yourself as far as it will go 2 Raise the two metal supports at the rear of the music rest 3 Gently lower the music res...

Page 17: ...ones to one of the PHONES jacks located on the bottom left of the instrument Two sets of standard stereo headphones can be connected If you are using only one pair of headphones you can plug them into...

Page 18: ...ation display FUNCTION I UTILITY TAB OWNER 2 Press the 4 5 button to select a language CAUTION Do not hang anything other than the headphones on the hanger Otherwise the Clavi nova or the hanger may b...

Page 19: ...can adjust the contrast of the display by turning the LCD CONTRAST knob located to the left of the display Adjusting the Brightness of the Display CVP 305 303 Adjust the brightness of the display 1 C...

Page 20: ...play that first appears when the power is turned on 1 Call up the operation display FUNCTION I UTILITY TAB OWNER 2 Press the I OWNER NAME button and call up the Owner Name dis play Refer to page 67 fo...

Page 21: ...tion of data If a floppy disk is inserted while the power is on the disk is automatically accessed since the instrument checks whether the disk has data Be sure to remove the floppy disk from the disk...

Page 22: ...d cannot be removed because it is stuck do not try to force it but instead try re inserting the card completely into the slot and attempt to eject it again CVP 301 Before removing the SmartMedia card...

Page 23: ...active mini man ual complete with sound demonstrations and text showing what it can do for you 1 Press the HELP button to call up the language selection display 2 Press the 6 7 buttons to select the d...

Page 24: ...e vious display press the J button When the Demo has more than one screen Press a button corresponding to the screen number 1 Press the 7 8 buttons in the Demo display to call up the specific Demo men...

Page 25: ...ns The A J buttons correspond to the settings indicated next to the buttons For example press the F button and the Voice RIGHT 1 selection display will appear in the display 2 1 8 buttons The 1 8 butt...

Page 26: ...lder When the drive contains more than ten Songs the display is divided up into several pages The page indica tions are shown at the bottom of the display Press one of the 1 6 buttons to select a page...

Page 27: ...the category CONTROLLER A B C E D 3 Press the TAB button to select the KEYBOARD PANEL tab 4 Press the A button to select the 1 INITIAL TOUCH 4 5 5 Press the 1 2 button to select touch sensitivity for...

Page 28: ...k Function The convenient Piano Lock function lets you lock the piano so that you don t inadvertently change the settings by pressing another button on the panel Once locked the CVP stays in the piano...

Page 29: ...ding on the selected Voice n The depth of the left pedal effect can be adjusted page 91 Setting the touch sensitivity of the keyboard You can adjust the touch response of the instrument how the sound...

Page 30: ...ou continuously increase or decrease the value You can also use the DATA ENTRY dial to adjust the value To reset the tempo press the TEMPO but tons simultaneously n About the Tempo display The number...

Page 31: ...t see page 73 n The Voice type and its defining characteristics are indicated above the Preset Voice name For details on the characteris tics see page 72 VOLUME Determines the level of the metronome s...

Page 32: ...al application However the sheer number of Voices may seem overwhelm ing at first To easily recall your favorite Voice there are two methods Save your favorite Voice to the USER display in the Voice S...

Page 33: ...ts are categorized as GM XG GM2 1 Press the PART SELECT RIGHT 1 button to call up the Voice selection display 2 Press the 8 UP button to call up the Voice categories 3 Press the 2 button to display pa...

Page 34: ...elected Song shown in the display Playing a Preset Song The preset Songs are categorized and contained in appropriate folders You can also select the file by using the DATA ENTRY dial then press the E...

Page 35: ...n until it clicks into place CVP 301 Carefully insert the card into the slot slowly pushing it all the way in until it is fitted in place 2 Press the SONG SELECT button to call up the Song selection d...

Page 36: ...AB buttons to select the VOL VOICE tab 4 Press the MIXING CONSOLE button until MIXING CONSOLE SONG CH1 8 is shown at the top of the dis play 5 Press the E J button to select VOLUME 6 To raise the leve...

Page 37: ...he music nota tion 2 Change the following settings as desired Changing the size of the music notation Press the 7 button to change the size of the music notation Displaying only right hand part left h...

Page 38: ...nt This disables display of the left hand key range KEY SIGNATURE This lets you enter key signature changes in the middle of a song at the stopped position This menu is useful when the selected Song c...

Page 39: ...and the keyboard This lets you adjust the volume balance between Song playback and the sound you play on the keyboard 1 Press the BALANCE button to call up the volume balance display 2 To adjust the S...

Page 40: ...m Back Repeat edly A B Repeat 1 Select a Song page 34 2 Press the SONG PLAY PAUSE button to start playback 3 Specify the repeat range Press the REPEAT button at the starting point A of the range to be...

Page 41: ...sing the Quick Recording feature This is an effective practice tool allowing you to easily compare your own performance to the original song you are practicing You can also use it to practice duet pie...

Page 42: ...ceptionally easy to play the backing parts along with Song playback n Before using performance assistant technology To use the performance assistant technology the Song must contain chord data If the...

Page 43: ...G SELECT 3 Press the SONG PLAY PAUSE button to start playback REC STOP PLAY PAUSE 4 Play the keyboard Playing the left and right hand together method 1 Playing the left and right hand together method...

Page 44: ...ecreate the sound of a full band or orchestra even if you re playing by yourself The Auto Accompaniment sound is made up of the rhythm patterns of the Styles The Styles of the instrument cover a wide...

Page 45: ...n Chord Fingerings There are seven different fingering methods you can use to specify chords page 98 1 Press the STYLE SELECT button to call up the Style selection display STYLE SELECT 1 3 4 3 4 2 2 P...

Page 46: ...one of the INTRO I III buttons before starting Style playback and press the STYLE CONTROL START STOP button to start Style playback Synchro Start This lets you start playback as soon as you play the k...

Page 47: ...ress the BREAK button during Style playback To Finish Playing Start stop Styles stop as soon as the STYLE CONTROL START STOP button is pressed Ending This is used for the ending of the Song Each prese...

Page 48: ...NTRO MAIN ENDING etc lamps Green The section is not selected Red The section is currently selected Off The section contains no data and cannot be played Holding the LEFT part Voice Left Hold This func...

Page 49: ...h to use you can have One Touch Setting automatically select the appropriate Voice for you Not only does this instantly call up all the settings Voices effects etc that match the current Style it also...

Page 50: ...k function lets you automatically have One Touch Settings change when you select a different Main section A D To use the OTS Link function press the OTS LINK button n Setting the timing for OTS change...

Page 51: ...Simultaneously press the buttons to move the cursor to the first record BEAT This is the time signature registered to each Record TEMPO This is the assigned tempo setting for the record Notice that th...

Page 52: ...OVER lamps The SIGNAL lamp lights to indicate that an audio signal is being received Make sure to adjust the INPUT VOLUME so that this lamp is light The OVER lamp lights when the input level is too hi...

Page 53: ...this to adjust the key of the Song if it is too high or low Transposing the Song key up Press the TRANSPOSE button Transposing the Song key down Press the TRANSPOSE button Resetting the transposition...

Page 54: ...harmony vocals to your voice If the Song contains this data the current chord name will be displayed in the Main display during Song playback letting you easily check whether the Song contains chord...

Page 55: ...Select the one most suited to your purpose Changing the Key Transpose See below Displaying the Music Score on the Instrument and the Lyrics on TV CVP 305 page 56 Making Announcements Between Songs CVP...

Page 56: ...long FUNCTION G VIDEO OUT Making Announcements Between Songs CVP 305 303 This function is ideal for making announcements between your singing performances When singing a song several effects are usual...

Page 57: ...g the selected feature appears Use the TAB buttons to select different pages if the there are addi tional pages The P1 P2 etc tabs appear 5 Press the EXIT button to return to the previous display The...

Page 58: ...play prompting you to press the appropriate button 2 Press the button corresponding to the desired setting display to instantly call up that display Refer to the separate Data List for a list of the d...

Page 59: ...isplayed in the CHORD segment see 3 below On the CVP 305 303 pressing the C button calls up the Song Selection display page 34 3 Style name and related information current chord name Displays the curr...

Page 60: ...ction display appears when you press one of the buttons shown below From here you can select Voices Styles and other data File Selection Display Configuration Location drive of data Data files and fol...

Page 61: ...e by using the DATA ENTRY dial then press the ENTER button to execute 4 Press the EXIT button to return to the previous display 2 3 4 1 3 3 3 This display shows the Voice files in a folder The next hi...

Page 62: ...matting a SmartMedia card A new SmartMedia card or one which has been used with other devices may not be immediately usable with the CVP If the SmartMedia card inserted in the instrument s card slot c...

Page 63: ...ile Selection display 2 Select the appropriate tab USER CARD etc to which you want to save the data by using the TAB buttons 3 Press the 6 SAVE button to call up the file naming display 4 Enter the fi...

Page 64: ...ition among the files in alphabetical order Restrictions for protected Songs Commercially available song data may be copy protected to prevent illegal copying or accidental erasure They are marked by...

Page 65: ...onfirm the file selection To cancel the Cut operation press the 8 CANCEL button 5 Select the destination tab USER CARD etc to which the file is to be pasted by using the TAB buttons 6 Press the 4 PAST...

Page 66: ...s the 7 OK button to confirm the file folder selection To cancel the Rename operation press the 8 CANCEL button 5 Input the name characters of the selected file or folder page 67 The renamed folder fi...

Page 67: ...ge page 57 the following different types of characters are available CASE Alphabet capital letters half size numbers half size marks half size case Alphabet lowercase letters half size numbers half si...

Page 68: ...e button 2 5 6 and 7 button for a while or press it repeatedly until the desired number is selected Converting into Kanji Japanese language When the input hiragana characters are shown in reverse disp...

Page 69: ...for the respec tive item MIDI SETUP USER EFFECT MUSIC FINDER and FILES FOLDERS SYSTEM SETUP Restores the System Setup parameters to the original factory set tings Refer to the separate Data List bookl...

Page 70: ...select it the factory programmed settings for the respective item will be restored This is the same results as on page 69 Restoring the Factory programmed Settings Independently by Item 5 Save your f...

Page 71: ...e copied by using the TAB buttons 8 Press the 4 PASTE button to paste the file folder 1 Insert connect the backup media desti nation such as a SmartMedia card or USB storage device 2 Call up the opera...

Page 72: ...cial effect sounds are assigned to individual keys letting you play the sounds from the keyboard Organ Flutes This authentic organ Voice lets you use the Sound Creator to adjust the various footages a...

Page 73: ...mple with the piano Voice Playing Two Voices Simultaneously Right 1 and 2 parts You can simulate a melody duet or combine two similar Voices to create a thicker sound Refer to page 74 for Voice select...

Page 74: ...6 Play the keyboard 7 Press the PART ON OFF RIGHT 2 button again to turn it off For the selected part the Voice name is highlighted in the Main display Quickly selecting Voices for Right 1 and 2 parts...

Page 75: ...he Voice selection display for the Left part 4 Press the TAB button to select the PRESET display 5 Press one of the A J buttons to select a Voice 6 Play the keyboard 7 Press the PART ON OFF LEFT butto...

Page 76: ...other instruments or CD music 1 Call up the operation display FUNCTION A MASTER TUNE SCALE TUNE TAB MASTER TUNE 2 Use the 4 5 buttons to set the tuning Press the 4 or 5 s and buttons simultaneously t...

Page 77: ...is scale was devised by the famous Greek philosopher and is created from a series of perfect fifths which are collapsed into a single octave The 3rd in this tuning are slightly unstable but the 4th an...

Page 78: ...ento Portamento is a function that cre ates a smooth transition in pitch from the first note played on the keyboard to the next The porta mento time the pitch transition time can be set via the MIXING...

Page 79: ...ON OFF and the LEFT part on off status Keep in mind that Trill works when you hold down two notes on the keyboard simultaneously last two notes if more than two notes are held and it plays those notes...

Page 80: ...n It determines the level of the harmony echo notes generated by the Harmony Echo effect SPEED This parameter is only available when Echo Tremolo or Trill is selected in Type above It determines the s...

Page 81: ...ster the edited settings as part of the Song data SET UP then save the Song See the SONG CREATOR CHANNEL display SETUP item explana tion on page 152 About Parts See below Instantly setting all parts t...

Page 82: ...brightness of the sound for each part by adjusting the cutoff frequency page 91 PORTAMENTO TIME Portamento is a function that creates a smooth transition in pitch from the first note played on the key...

Page 83: ...e to be replaced 6 Use the 4 6 buttons to select the Voice for replacing the XG selected in step 5 Several different Revoice settings are available by using the F G I but tons for conveniently calling...

Page 84: ...lay press the F button to set SONG AUTO REVOICE to ON Effect Type Selecting an Effect type 1 3 Same operation as in the Basic Procedure on page 80 In step 2 select the EFFECT tab 4 Press the F TYPE bu...

Page 85: ...well as its variation parameter To select the standard type of parameters press the B button To select its variation parameter press the E button Effect Block Effect applicable parts Effect characteri...

Page 86: ...n to call up the display for saving your original effect 14 Use the 3 6 buttons to select the destination for saving the effect The maximum number for effects that can be saved differs depending on th...

Page 87: ...es The Clavinova possesses a high grade five band digital EQ With this function a final effect tone control can be added to the output of your instrument You can select one of the five preset EQ setti...

Page 88: ...same time 8 Adjust the Q bandwidth and the FREQ center frequency of the band selected in step 7 Bandwidth also called Shape or Q Use the 1 button The higher the value of Q the narrower the band width...

Page 89: ...he relevant setting display For information on the available parameters see the Editable Parameters in the SOUND CREATOR Displays on page 90 4 As necessary use the A B buttons to select the item param...

Page 90: ...n you release a key SUSTAIN SAMPLE CVP 305 303 Adjusts the depth of sustain sampling for the damper pedal STRING RESONANCE CVP 305 Adjusts the depth of string resonance Portamento Time The Portamento...

Page 91: ...cts the function to be assigned to the left pedal For details on the pedal functions see page 182 2 8 but tons RIGHT 1 RIGHT 2 LEFT etc Determines whether the assigned function is effective or not for...

Page 92: ...ibrato A quavering vibrating sound effect that is produced by regu larly modulating the pitch of the Voice DEPTH Determines the intensity of the Vibrato effect Higher settings result in a more pronoun...

Page 93: ...1 Select the desired Organ Flutes Voice to be edited page 31 DSP TYPE Selects the DSP effect category and type Select a type after select ing a category VARIATION Two variations are provided for each...

Page 94: ...n the SOUND CREATOR ORGAN FLUTES displays on page 95 4 If you select the EFFECT EQ tab display use the A B buttons to select the parameter to be edited 5 Use the A D F H and 1 8 buttons to edit the Vo...

Page 95: ...ing the D button between 16 and 5 1 3 16 1 Determines the basic sound of the organ flutes The longer the pipe the lower the pitch of the sound Hence the 16 setting determines the low est pitched compo...

Page 96: ...can also disable this feature by the operation in the relevant display as explained below For example if you want to change the Voice yet keep the same Harmony effect set the HARMONY ECHO parameter t...

Page 97: ...ng arrangements combined with perfect playability The resulting accompaniment exactly follows the chords of the player As a result your chord changes and colorful harmo nies are instantly transformed...

Page 98: ...og nizes the various chord types which are listed on the separate Data List booklet and can be looked up using the Chord Tutor function page 48 FINGERED ON BASS Accepts the same fingerings as the Fing...

Page 99: ...ate channel button again Playing the chords in free tempo without Style playback You can have the accompaniment chords sound without playing back the Style by setting ACMP ON OFF to on and SYNC START...

Page 100: ...the section s for playing Voices RIGHT 1 2 and LEFT Split Point L separates the two sections for playing Voices LEFT and RIGHT 1 2 These two settings can be set to the same note as in the default or t...

Page 101: ...etting is called up at the next measure after you press a MAIN VARIATION button Synchro Stop Window This determines how long you can hold a chord before the Synchro Stop function is automatically canc...

Page 102: ...Finder page 50 is a convenient feature that calls up pre programmed panel settings for Voices Styles etc that match the song or type of music you want to play The records of the Music Finder can be s...

Page 103: ...s at the top of the Music Finder display TEMPO Set the range of the tempo you want to use in your per formance by using the 1 2 TEMPO but tons GENRE Select the desired music genre by using the 5 6 GEN...

Page 104: ...elete from the FAVORITE display 2 Press the H DELETE FROM FAVORITE button Editing Records You can create a new record by editing the currently selected record The newly created records are automatical...

Page 105: ...NEW RECORD button The record is added to the ALL display If you ve entered the record to the FAVORITE display in step 4 above the record is added to both the ALL display and the FAVORITE display Overw...

Page 106: ...ER CARD follow the instructions below 1 Call up the operation display FUNCTION I UTILITY TAB SYSTEM RESET 2 Press the I MUSIC FINDER button to call up the Music Finder USER CARD tab display 3 Use the...

Page 107: ...e as desired or you can create a new Style from scratch Step Recording See page 111 This method is like writing music notation on paper since it allows you to enter each note or individually and speci...

Page 108: ...l play back from the next repetition letting you overdub new material to the loop while hearing previously recorded material When creating a Style based on an existing internal Style overdub recording...

Page 109: ...nger from the J button 8 Call up the display for selecting sections etc by pressing the EXIT button 9 Use the 3 4 buttons to select the section page 107 to be recorded 7 8 5 6 5 Limits on the recordab...

Page 110: ...E RHY CLEAR but ton from the display where the recorded channels are shown and press the appropriate key CAUTION The recorded Style will be lost if you change to another Style or you turn the power o...

Page 111: ...Creator it cannot be changed This is because the length of the Style is automati cally fixed depending on the selected section For example if you create a Style based on a section of four measures len...

Page 112: ...e channel for which you wish to replace the pattern by using the A D and F I buttons Call up the Style Selection display by pressing the same button again Select the Style containing the pat tern you...

Page 113: ...et tings for each channel in the Style data Making Style File Format Settings PARAMETER See page 117 For playback of your created Style you can decide how notes will be con verted and sounded for the...

Page 114: ...EXECUTE button to actually enter the edits for each display After the operation is completed you can execute the edition and this but ton changes to UNDO letting you restore the original data if you r...

Page 115: ...he specified ORIGINAL BEAT value is 8 Beat the Swing parameter will selectively delay the 2nd 4th 6th and 8th beats of each measure to create a swing feel The settings A through E produce different de...

Page 116: ...s the I SAVE button to call up the Style Selection display to save your data Save the data in the Style Selection display page 63 2 3 1 4 5 CAUTION The edited Style will be lost if you change to anoth...

Page 117: ...ed depending on the chord changes you make during your performance This basic Style data that you create with the Style Creator is referred to as the Source Pat tern Note Transposition This parameter...

Page 118: ...rmally in the Style Creator you can hear your original Style in process with the Source Pat tern However there is a way to hear it played by a specific chord and root To do this set NTR to Root Fixed...

Page 119: ...lowers the third and sixth intervals in the scale by a semitone When the chord changes from a minor to a major chord the minor third and flatted sixth intervals are raised by a semitone Other notes ar...

Page 120: ...at sound are automatically shifted to the set range RTR Retrigger Rule These settings determine whether notes stop sounding or not and how they change pitch in response to chord changes STOP The notes...

Page 121: ...on press the I CANCEL button 4 Enter or remove the checkmark in the box of the item to determine whether the item should be registered or not by pressing the 8 button 5 Press one of the REGISTRATION M...

Page 122: ...y In general Registration Memory data Bank files is compatible among the models CVP 309 307 305 303 301 However the data may not be perfectly com patible depending on the speci fications of each model...

Page 123: ...a panel setup page 66 5 Press the 8 UP button to return to the REGISTRATION BANK Selection display Disabling Recall of Specific Items Freeze Func tion Registration Memory lets you recall all the panel...

Page 124: ...ST SEQUENCE FREEZE VOICE SET TAB REGISTRATION SEQUENCE 3 If you intend to use a pedal to switch Registration Memory settings specify here how the pedal will be used to advance or to reverse through th...

Page 125: ...quence no matter which display is called up except for the dis play in step 3 above Saving the Registration Sequence Settings The settings for the Sequence order and how Registration Sequence behaves...

Page 126: ...with the Preset Songs page 34 Playing Back Songs Before Practicing page 34 One handed Practice with the Guide Lamps page 38 Practicing with the Repeat Playback Function page 40 Recording Your Perform...

Page 127: ...ton four times for a 4 4 time signature while the instrument is in Synchro Start standby mode and the Song playback starts automatically at the tempo you tapped Fade In The FADE IN OUT button can be u...

Page 128: ...sure number or Phrase Mark number Repeat Playback Chain Playback 1 Call up the operation display FUNCTION B SONG SETTING 2 Set the parameters related to the Repeat Playback by using the H I buttons Th...

Page 129: ...playing 5 Press the SONG PLAY PAUSE button to start playback 6 Play chords along with the Song The chord name is indicated in the Main display To return to the Main dis play press the DIRECT ACCESS bu...

Page 130: ...lect the VOLUME 6 Adjust the volume balance of each channel by using the 1 8 buttons 7 You can save the volume settings to the Song in the Setup operation of the SETUP page 152 Make sure to checkmark...

Page 131: ...en you sing along with a Song playback using a connected microphone the instrument automatically adjusts the timing of the Song playback to match your vocal performance CVP 305 303 To use the practice...

Page 132: ...back continues Vocal CueTIME CVP 305 303 This function lets you practice singing with the proper pitch Song playback pauses waiting for you to sing When you sing with proper pitch Song playback contin...

Page 133: ...play back only one particular channel muting all other chan nels press and hold down one of the 1 8 buttons correspond ing to the desired channel To cancel solo playback press the same button again Th...

Page 134: ...e selection display page 74 page 75 Recording Styles 1 Select a Style page 45 2 Set the tempo for recording by pressing the TEMPO buttons as necessary Using Registration Memory panel setups Press one...

Page 135: ...he Song Selection display for saving your data then save the data in the Song Selection display page 63 Multi Track Recording A Song consists of 16 separate channels With this method you can record da...

Page 136: ...ten to your newly recorded performance Press the SONG PLAY PAUSE button to playback the performance you just recorded 7 To record another channel repeat steps 2 through 6 Setting all of the 9 16 chan...

Page 137: ...lt the RIGHT 1 part is assigned to each of the channels 1 8 Nor mally the keyboard parts should be recorded to the channels 1 8 About Style parts As the default each of the Style parts is assigned to...

Page 138: ...g 4 Select the appropriate tab by using the TAB buttons For recording melodies Select the 1 16 tab For recording chords Select the CHORD tab 5 If you select the 1 16 tab in step 4 press the F button t...

Page 139: ...the G button to select 2 Press the H button to select Tenuto 3 Press the I button to select normal note type 4 Press the 6 button to select the quarter note length 5 Play the keys C3 D3 E3 F3 G3 and A...

Page 140: ...ss the EXIT button to exit from the Step Record display If you want you can also edit already recorded Songs in the same manner page 148 11 Press the I SAVE button to call up the Song Selection displa...

Page 141: ...Record display G button Determines the velocity loudness of the note to be entered H button Determines the gate time note length of the note to be entered I button Determines the note type to be ente...

Page 142: ...lling up the Step Record display 1 Press the G button to select 2 Press the H button to select Tenuto 3 Press the I button to select normal note type 4 Press the 5 button to select the half note lengt...

Page 143: ...ote length 16 Play the F3 key on the keyboard as specified in the example 17 Press the SONG STOP button to move the cursor to the beginning of the Song 18 Press the SONG PLAY PAUSE button to hear the...

Page 144: ...ect the Voice for recording after calling up the Step Record display 1 Press the H button to select Normal 2 Press the I button to select normal note type 3 Press the 7 button to select the eighth not...

Page 145: ...ess the 7 button and successively press the 5 button After you press the 5 button release the keys 8 Press the SONG STOP button to move the cursor to the beginning of the Song 9 Press the SONG PLAY PA...

Page 146: ...here apply to step 7 of the Basic Operations for Step Recording on page 138 1 Make sure the STYLE CONTROL AUTO FILL IN button is set to OFF then press the STYLE CONTROL MAIN VARIATION A button 2 Pres...

Page 147: ...t you can also edit already recorded Songs in the same manner page 148 13 Press the F EXPAND button to convert the input chord change data into the Song data 14 Press the I SAVE button to call up the...

Page 148: ...Select the appropriate tab by using the TAB buttons and edit the Song Re Recording a Specific Section Punch In Out REC MODE page 149 This lets you re record a specific section of a Song Editing Channe...

Page 149: ...button to call up the Song Selection display for saving your data then save the data in the Song Selection display page 63 PUNCH IN settings PUNCH OUT settings REC CAUTION The recorded Song data will...

Page 150: ...the operation with the exception of the SETUP menu display is com pleted this button changes to UNDO letting you restore the original data if you are not satisfied with the Operation results The Undo...

Page 151: ...lts you should set the Quantize size to the shortest note value in the channel For example if eighth notes are the shortest in the channel you should use eighth note as the Quantize size Settings The...

Page 152: ...ts 3 Checkmark the selected item by pressing the 8 button SOURCE 1 Selects the channel 1 16 to be mixed All MIDI events in the selected channel are copied to the destination channel SOURCE 2 Selects t...

Page 153: ...the parameter to be edited 2 Use the 4 5 buttons to edit the parameter value The DATA ENTRY dial can also be used To actually enter an edited value simply move the cursor away from the parameter To r...

Page 154: ...udes the note number which corresponds to the key which was played plus a velocity value based on how hard the key is played and the gate time value the length of a note Ctrl Control Change Settings t...

Page 155: ...on on page 148 From this display you can edit recorded System Exclusive events which do not belong to a specific channel such as tempo and beat time signature The opera tions here are basically the sa...

Page 156: ...up the lyrics editing display Operations are the same as in the section Entering Characters page 67 2 Press the I SAVE button to call up the Song Selection display for saving your data then save the d...

Page 157: ...e pages Singing Along with Song Playback Karaoke or Your Own Performance page 52 Connecting a Microphone page 52 Singing with the Lyrics Display page 53 Convenient Functions for Karaoke page 53 Adjust...

Page 158: ...1 2 buttons Or you can re select the Vocal Harmony type by pressing the 8 RETURN button to return to the Vocal Harmony selection display 6 Use the 3 5 buttons to select the parameter page 159 you wan...

Page 159: ...alue the more feminine the harmony voice becomes The lower the value the more masculine the voice LEAD PITCH CORRECTION When Correct is selected the pitch of the lead vocal is shifted in precise semit...

Page 160: ...eyboard is played This is effective when the Har mony mode page 163 is set to VOCODER or CHORDAL L63 R C L R63 A setting of L63 R pans the sound hard left while C is at cen ter and L R63 is at hard ri...

Page 161: ...he Clavinova features a high grade three band LOW MID and HIGH digital equalizer function for the microphone sound Hz Adjusts the center frequency of the corresponding band dB Boosts or cuts the level...

Page 162: ...er lets you determine which notes are used to control the harmony BAL This lets you set the balance between the lead vocal your own voice and Vocal Harmony Raising this value increases the volume of t...

Page 163: ...r LEFT is set to ON and if chord data exists in the song the mode is automatically set to CHORDAL In all other cases the mode is set to VOCODER VOCODER The harmony notes are determined by the notes yo...

Page 164: ...he I MIC SETTING button to call up the MICROPHONE SET TING display 3 Press the TAB button to select the TALK SETTING tab display 4 Use the A B buttons to select the item parameter page 165 to be set 5...

Page 165: ...TH This sets the depth of the chorus effects applied to the micro phone sound TOTAL VOLUME ATTENUA TOR This determines the amount of attenuation to be applied to the overall sound excepting the microp...

Page 166: ...ction example 1 Connecting by cable using a modem without router Connection example 2 Connecting by cable using a modem with router Connection example 3 Wireless connection The special Clavinova websi...

Page 167: ...of the instrument press the EXIT button Operations in the Special Clavinova Website Scrolling the Display When the size of the web page is too large to be shown at one time in the browser display of...

Page 168: ...ll up the link destination You can also select and call up links by using the DATA ENTRY dial and pressing the ENTER button Entering Characters This section explains how to enter characters within the...

Page 169: ...nter a line break 5 Press the 1 OK button to actually enter the characters To cancel the operation press the 2 CANCEL button Return to the Previous Web Page To return to a previously selected web page...

Page 170: ...l folder Download Destination The download destination depends on the use of storage media as described below When a SmartMedia card is inserted to the instrument during purchase The downloaded data i...

Page 171: ...the 8 UP button in the File Selection display Saving Bookmarks of Your Favorite Pages You can bookmark the page you re viewing and set up a custom link so the page can be instantly called up in the f...

Page 172: ...okmark press the 7 EXECUTE button or press the 8 CANCEL button to cancel 5 To return to the browser press the 8 CLOSE button Opening a Bookmarked Page 1 Press the 6 BOOKMARK button to call up the Book...

Page 173: ...171 4 Changing names Changes the name of the selected bookmark Pressing the 4 CHANGE but ton calls up the display for entering characters For details on entering characters see page 168 5 Delete Dele...

Page 174: ...ecify any desired page on the special Clavinova website to be the Home page 1 Open the page you wish to set as your new Home page 2 Press the 5 SETTING button to call up the Internet Setting dis play...

Page 175: ...all up the Internet Setting display 2 Press the TAB buttons to select the desired display 3 Select the desired item by pressing the 1 UP DOWN button 4 To call up the relevant Edit display press the 2...

Page 176: ...6 Character entry keys This setting lets you select the character order of the virtual keyboard for entering char acters When this is set to Alphabetical the keys are in alphabetical order When this i...

Page 177: ...key length WEP key These settings are available only when Encryption above is enabled These set the type and length of the encryption key 2 3 4 5 1 1 Proxy server Proxy port Non proxy server Determin...

Page 178: ...l settings you have made in the Internet Settings displays except for the cookies and bookmarks including those related to Internet connec tion 1 Press the 5 SETTING button to call up the Internet Set...

Page 179: ...ns another web page Modem A device which connects and allows data transfer between a conventional telephone line and a computer It converts the digital signals from the computer to analog audio for se...

Page 180: ...on These jacks are located on the underside jacks panel of the instrument AUX OUT Jacks Standard phone jacks of L L R and R When these are connected you can use the instru ment s MASTER VOLUME control...

Page 181: ...r instrument can be con nected to these jacks allowing the sound of an external instrument to be reproduced via the instrument s speak ers Connect the output jacks LINE OUT etc of an external synthesi...

Page 182: ...Details on the pedal functions are listed below 4 Use the 2 8 buttons to set the details of the selected functions The available parameters differ depending on the function selected in step 3 Details...

Page 183: ...notes up or down by using the pedal This can only be set to the right pedal or the pedal connected to the instrument s AUX PEDAL jack MODULATION Applies a vibrato effect to notes played on the keyboa...

Page 184: ...us One Touch Setting SONG STYLE MIC LEFT RIGHT1 RIGHT2 These specify the part s that will be affected by the pedal HALF PEDAL POINT You can specify how far down you should press on the pedal until the...

Page 185: ...CE Take care not to confuse the two terminals and the corresponding cable connectors Be careful to connect the proper plug in the proper direction Explanations on the USB TO DEVICE terminal follow in...

Page 186: ...y explains about how to connect and use them Compatible USB storage devices Up to two USB storage devices such as a floppy disk drive hard disk drive CD ROM drive flash memory reader writer etc can be...

Page 187: ...instrument freezing or hanging up While the instrument is accessing data such as in the Save Copy and Delete operations do NOT unplug the USB cable do NOT remove the media from the device and do NOT t...

Page 188: ...the recording contains the actual sounds of the piano and your speakers reproduce them Copying files from a computer hard disk to a USB storage device Files contained on the hard disk of a computer c...

Page 189: ...bout how strong when was it pressed and when was it released Then each piece of information is changed into a number value and sent to the tone generator Using these numbers as a basis for sound gener...

Page 190: ...a is to be sent over which MIDI channel when transmitting MIDI data page 194 The Clavinova also allows you to determine how the received data is played back page 195 System Messages This is data that...

Page 191: ...h greater functionality and open ended expandability for the future The Clavinova is capable of dis playing lyrics when an XF file containing lyric data is played SMF is the most common format used fo...

Page 192: ...T dis play Press one of the A J buttons to select a MIDI template To use the templates already saved to the USER display or to edit them Press the TAB button to select the USER display Press one of th...

Page 193: ...izes with an external MIDI clock instead of the instru ment s internal clock This template should be used when you wish to set the tempo on the MIDI device connected to the instrument MIDI Accord 1 MI...

Page 194: ...When this is set to an external device MIDI USB 1 or USB 2 the Tempo is indicated as Ext in the Main display TRANSMIT CLOCK Turns MIDI clock F8 transmission on or off When set to OFF no MIDI clock or...

Page 195: ...his manual KEYBOARD The received note messages control the Clavinova s keyboard performance EXTRA PART 1 5 There are five parts specially reserved for receiving and playing MIDI data Normally these pa...

Page 196: ...split point settings When several channels are simulta neously set to ON the chord type is detected from merged MIDI data received over the channels The operation procedure is basically the same as th...

Page 197: ...bly been set to some thing other than Equal changing the tuning system of the keyboard Make sure Equal is selected as the Scale in the Scale Tune display page 76 There is a slight difference in sound...

Page 198: ...ise depending on the Harmonic Content and or Brightness settings in the FIL TER page of the Mixing Console display page 82 The sound is distorted or noisy The volume may be turned up too high Make sur...

Page 199: ...e data The order for calling up Registration Memory settings is not shown on the Registration Sequence setting display The bank containing the Registration has not been selected Select the appropriate...

Page 200: ...melody to Track 1 page 131 The Guide lamps do not light during Song playback even after pressing the GUIDE button Make sure to turn on the Guide lamps page 131 Any notes outside of the 88 key range ca...

Page 201: ...strument s display contents as expected e g the dis play contents may not fit on the screen the characters may not be completely clear or the colors may be incor rect The microphone input signal canno...

Page 202: ...ands at least 10 cm from either end of the main unit when posi tioning it 5 Fix the main unit 1 Center the main unit to produce equal clearance on the left and right sides Have a Phillips head screw d...

Page 203: ...embly please check the following 1 Insert the pedal cord plug into the pedal connector 2 Attach the cord holders to the side panel as shown then clip the cord into the holders 1 With the rear panel on...

Page 204: ...l brackets using two 4x12 mm thin screws 3 Secure the bottom of the rear panel to the pedal box using four 4x20 mm tapping screws 4 Mount the main unit Be sure to place your hands at least 10 cm from...

Page 205: ...r Rotate the adjuster until it comes in firm contact with the floor surface After completing the assembly please check the following 1 Insert the pedal cord plug to the pedal connector from the front...

Page 206: ...rear panel to the side panel brackets using two 4x12 mm thin screws 3 Secure the bottom of the rear panel to the pedal box using four 4x20 mm tapping screws 4 Mount the main unit Be sure to place your...

Page 207: ...Rotate the adjuster until it comes in firm contact with the floor surface After completing the assembly please check the following 1 Insert the pedal cord plug to the pedal connector 2 Attach the cor...

Page 208: ...Accesso ries page 210 1 Remove the three backing papers from the adhesive tape in the case and fit the floppy disk drive into the case 2 Fold the USB cable inside the case as shown 3 Attach the drive...

Page 209: ...fect Blocks Reverb Chorus DSP 6 Micro phone 1 Effect Types Reverb Chorus DSP Reverb 35 Preset 3 User Chorus 30 Preset 3 User DSP 1 183 Preset 3 User DSP2 4 105 Preset 10 User Master EQ 5 Preset 2 User...

Page 210: ...panish Italian 5 Languages English German French Spanish Italian Direct Access YES Piano Button incl Piano Lock YES Transpose Keyboard Song Master Scale Type 9 USB Connection USB to HOST Computer YES...

Page 211: ...19 196 Contrast 19 CONTROLLER 90 Cool 72 COPY 64 CUT 65 D Damper Pedal 29 DELETE 65 Demo 23 Demo Voice 33 Direct Access 58 DOC Disk Orchestra Collection 191 Drums 72 DSP 78 DSP DSP VARIATION 78 E EDI...

Page 212: ...ne CVP 305 303 52 MICROPHONE SETTING CVP 305 303 160 MIDI 188 MIDI Settings 192 MIDI Templates 192 MIXING CONSOLE 80 MONO POLY 78 MULTI FINGER 98 Multi track recording 133 Music Finder 50 Music Rest 1...

Page 213: ...usic Braces 17 SINGLE FINGER 98 SMF Standard MIDI file 191 Song 34 SONG CH 1 8 9 16 81 Song channels 137 Sostenuto Pedal 29 SOUND 91 Sound Creator 89 sound effects 33 Speaker setting 18 SPLIT POINT 10...

Page 214: ...Lane Music Publishing Company Inc and Chrysalis Music International Copyright Secured All Rights Reserved Chim Chim Cher ee from Walt Disney s MARY POPPINS Words and Music by Richard M Sherman and Ro...

Page 215: ...r from the Paramount Picture BREAKFAST AT TIFFANY S Words by Johnny Mercer Music by Henry Mancini Copyright 1961 Renewed 1989 by Famous Music Corporation International Copyright Secured All Rights Res...

Page 216: ...Blue Sky Rider Songs All Rights for E C Music Ltd Administered by Unichappell Music Inc All Rights for Blue Sky Rider Songs Administered by Irving Music Inc International Copyright Secured All Rights...

Page 217: ...tions that do not significantly contribute to their operating temperature Placement of this product close to heat sources such as radiators heat registers and other devices that produce heat should be...

Page 218: ...is being affected by the interference Utilize power outlets that are on different branch circuit breaker or fuse circuits or install AC line filter s In the case of radio or TV interference relocate r...

Page 219: ...ens Gata 1 Box 30053 S 400 43 G teborg Sweden Tel 031 89 34 00 DENMARK YS Copenhagen Liaison Office Generatorvej 6A DK 2730 Herlev Denmark Tel 44 92 49 00 FINLAND F Musiikki Oy Kluuvikatu 6 P O Box 26...

Page 220: ......

Reviews: