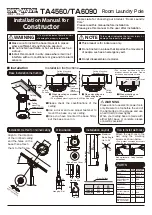
background image

1032932K-5/15

=

=

Round Bar & 

Square Bar

Factory Bar

Round Bar 

& Square 

Bar with 

16” (41cm)

crossbar 

spreads.

40 LbS. 

(18.1k) 

PeR bIke

Weight Limits

- OR -

30 LbS 

(13.6k) 

PeR bIke

2 bIke 

MAX

This product is covered 

by yAKIMA’s

“love It Till you leave It” 

limited lifetime Warranty


K e e P   T h e s e   I N s T R u c T I O N s !

If yOU NeeD fURTheR 

TechNIcAL ASSISTANce OR 

RePLAceMeNT PARTS:

Please contact your dealer or call 

us at (888) 925-4621

Monday through friday, 7:00am to 

5:00pm Pacific time.

befORe dRIvING AWAy:

CHECK THE REAR WHEEL.

Tighten the strap if needed.

Off-ROAd 

dRIvING

is not 

recommended 

and could 

result in 

damage to 

your vehicle 

or your bike.

CHECK THE FRONT WHEEL.

If it is loose or it moves, be sure 

levers are tightened and wheel 

is centered!

CHECK THE HEX KEY AND THE 

OBLONG KNOBS.

If they are loose, lighten them.

If there is 

contact, check 

wheel setting.

CHECK FRONT WHEEL 

ATTACHMENT TO 

BICYCLE FRAME.

MAKE SURE YOUR 

TIRES ARE FILLED 

TO RECOMMENDED 

PRESSURE FOUND ON 

THE TIRE.

dO NOT OveRTIGhTeN 

The sTRAP!

dO NOT TRANsPORT 

bIcycles WITh ATTAched 

bAby seATs, PANNIeRs, 

Wheel cOveRs, full bIKe 

cOveRs OR MOTORs.

Attachment hardware can loosen over time. Check 

before each use, and tighten if necessary. 

Failure to obey load limit can result in property 

damage, personal injury, or death.

To obtain a copy of this warranty, 

go online to www.yakima.com

or email us at 

[email protected]

or call (888) 925-4621

WARNING

Summary of Contents for KingCobra

Page 1: ...R USE IF YOU DO NOT UNDERSTAND ALL OF THE INSTRUCTIONS AND CAUTIONS OR IF YOU HAVE NO MECHANICAL EXPERIENCE AND ARE NOT THOROUGHLY FAMILIAR WITH THE INSTALLATION PROCEDURES YOU SHOULD HAVE THE PRODUCT...

Page 2: ...nt on the crossbar If round continue to for Factory crossbars use MIGHTYMOUNTS See below Do you have round square or factory crossbars Remove embedded nut in oblong knob Push hex bolt into top of knob...

Page 3: ...p with the red button toward you Lift the tab on the end cap while pushing Push until the tab goes into the hole The strap may need to go on first depending on the bike to bar fit Fold hoops down Plac...

Page 4: ...eel spokes Insert the strap end behind the red tab Tighten the strap by repeatedly lifting the red tab If the wheel is still loose in the tray slide the strap in the tray until it rests against the ri...

Page 5: ...age to your vehicle or your bike Check the front wheel If it is loose or it moves be sure levers are tightened and wheel is centered Check the Hex key and the oblong knobs If they are loose lighten th...

Page 6: ...nt pour en contr ler l tat l ajustement et l usure Vous devez donc lire attentivement toutes les instructions et tous les avertissements accompagnant votre produit Yakima avant de l installer et de l...

Page 7: ...r es ou profil es Enlever l crou log dans le fond du bouton en cuvette Enfoncer un boulon hexagonal par le dessus du bouton en faisant bien p n trer sa t te POUR EMPLOYER DES COLLIERS MIGHTYMOUNT ON P...

Page 8: ...Soulever la patte de la garniture d extr mit du profil tout en poussant Pousser jusqu ce que la patte entre dans le trou Il est possible qu il faille enfiler la sangle d abord selon les particularit...

Page 9: ...e le levier rouge SERRER la sangle en relevant le levier rouge plusieurs fois BOUCLER LA SANGLE Ne pas appuyer la sangle contre la valve du pneu Si la roue avant a du jeu ou si l on ne peut pas amener...

Page 10: ...R L CROU AILETTES ET LES BOUTONS EN CUVETTE Les serrer au besoin Si la roue touche v rifier le r glage de la but e V RIFIER LE SERRAGE DE L AXE DE LA ROUE AVANT S ASSURER QUE LES PNEUS SONT GONFL S LA...

Page 11: ...DO CON LOS PROCEDIMIENTOS DE INSTALACI N HAGA INSTALAR EL PRODUCTO POR UN PROFESIONAL EN UN GARAGE RECONOCIDO O UN TALLER DE CARROCER A OREJUELA 1X RIEL DE RUEDAS 1X TORNILLO LARGO 1X BROCHE SNAPAROUN...

Page 12: ...ne travesa os redondos cuadrados o de f brica Quite la tuerca incorporada en la perilla oblonga Empuje el tornillo hexagonal por la parte superior de la perilla hasta introducirlo completamente USUARI...

Page 13: ...nte la orejuela del casquete de extremo empujando Empuje hasta que la orejuela entre en el agujero La correa podr a tener que ir primero dependiendo del ajuste entre bicicleta y travesa o Baje las ani...

Page 14: ...e los rayos de la rueda Inserte el extremo de la correa detr s de la orejuela roja AJUSTE la correa levantando repetidamente la orejuela roja Si la rueda todav a est floja en el riel deslice la correa...

Page 15: ...a VERIFIQUE LA TUERCA HEXAGONAL Y LAS PERILLAS OBLONGAS Si est n flojas aj stelas Si hay contacto verifique el reglaje de la rueda VERIFIQUE EL AJUSTE DE LA RUEDA DELANTERA CON EL CUADRO DE LA BICICLE...

Reviews: