XYZ Printing da Vinci Jr. WiFi Pro User Manual Download Page 2

P 2

da Vinci  

Jr. WiFi Pro

Please retain all original packaging material when shipping your 

product for warranty purposes. Shipping without original packaging 

materials may cause product damaged during the shipment and may 

cause chargeable service fees. 

9

Please carefully read the contents of the product 

instruction manual before using this product.

The purpose of this user manual is to help users understand and use the da Vinci Jr. WiFi Pro 3D printer correctly. 

It contains the operating instructions, maintenance information and application skills of the da Vinci Jr. WiFi Pro 3D printer. 

To learn more about the latest news of the da Vinci Jr. WiFi Pro 3D printer, please contact local dealers or visit the official 

website of XYZprinting: http://www.xyzprinting.com

Trademarks

All trademarks and registered trademarks are the property of their respective owners.

Editions

New editions of this manual incorporate new and changed material different from previous editions. Minor corrections and 

updates may be incorporated into reprints of the current edition without releasing additional announcements or documenta-

tion regarding the updated version. The User Manual is for user reference only. If you need to obtain the latest information, 

you are welcomed to visit the XYZprinting website: www.xyzprinting.com

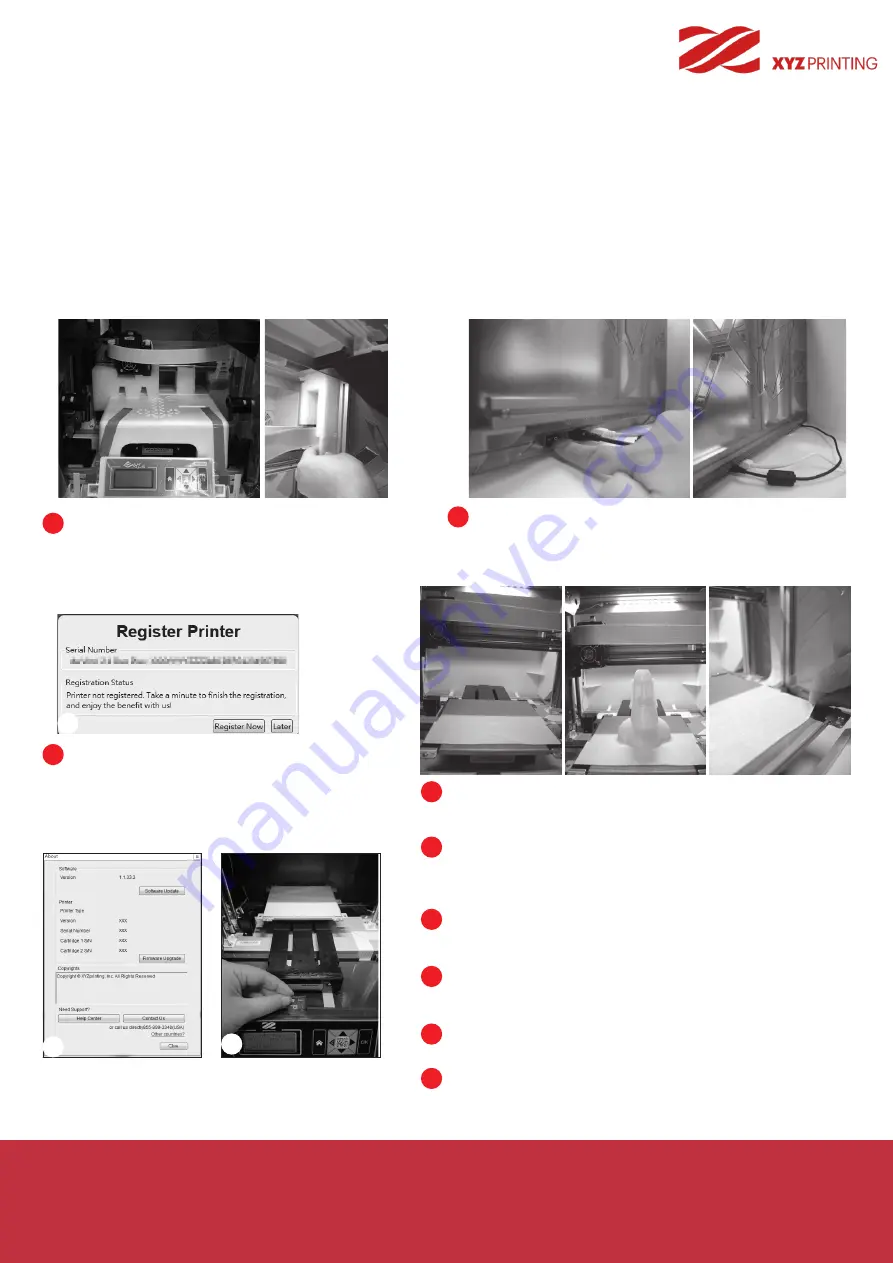
Before using this printer, please first remove the 

fixed materials from the extruder module and 

print bed. Switching on the printer's power without 

removing these fixed materials may damage the 

machine.

Registration via XYZmaker Suite before your first 

print is strongly recommended. When registered 

with XYZprinting, you will receive latest technical 

supports and updates. To register, simply click 

"Register Now" to begin.

You may use XYZmaker Suite to initiate manual updates to the 

printer firmware and software. When using the printer for the first 

time, we recommend connecting to the Internet and performing 

manual update once to obtain the latest resources.

The optimal room temperature for printing is 15-32 

C (60-90 

F). 

Printing quality may be affected if room temperature is higher or 

lower.
If you need more detailed technical support and program

resources, visit the website:  

https://support.xyzfamily.com/en-GB/Help
Before operating the printer, insert the SD card in the SD card port 

to make sure that the printing program is able to run properly.

Before you start printing, please affix the bed tape on the print 

bed. The bed tape may be removed after printing is complete. (Bed 

tape can be reused.)

Before launching XYZmaker Suite, connect the PC to the 

printer by using the USB cable. For a better user

experience, it is strongly advised to follow the proper

procedure for using the product.

2

3

4

5

5

1

6

7

8

8

3

Summary of Contents for da Vinci Jr. WiFi Pro

Page 1: ...Vinci Jr WiFi Pro da Vinci Jr WiFi Pro User Manual Product Overview Unboxing Software Introduction Accessories Installation Functions Selective Module Product Specification Maintenance and Support De...

Page 2: ...visit the XYZprinting website www xyzprinting com Before using this printer please first remove the fixed materials from the extruder module and print bed Switching on the printer s power without remo...

Page 3: ...he specified parts of the machine and should not be used for the cleaning of other parts to prevent damaging the machine Do not place the printer in humid or dusty environment such as bathrooms and hi...

Page 4: ...SD card that came with the printer into your computer or download the latest XYZmaker Suite from the official Website and install it on the computer Be sure to remove the fixing tapes at the back of t...

Page 5: ...n all in one 3D design software application that provides a comprehensive range of 3D tools for XYZprinting s 3D printers Software Introduction 1 Open the XYZmaker and build the model on the operating...

Page 6: ...irmation you can click PRINT or SAVE 1 Open the XYZprint software and choose DASHBOARD and select the 3D printer that is connected 2 Import your favorite 3D files Import File New File Save File 3 Clic...

Page 7: ...ube movement area and then insert it into the extruder module To finish the installation insert the guide tube downward firmly Note Please insert the guide tube B into the tube remover A which assist...

Page 8: ...all the sensor chip Please note the direction of the mounting hole on the chip to attach the chip correctly Insert the spool ring from both sides of the new filament spool Tighten the spool ring with...

Page 9: ...OR MODE Description Sample print from SD card Features such as filament replacement module replacement and print bed calibration Settings such as language display and energy saving The firmware and pr...

Page 10: ...nu Home Menu Maps of Functions CHANGE SPOOL USER FILAMENT STATISTICS BUZZER SYSTEM VERSION LANGUAGE SPOOL STATS ENERGY SAVE WIRELESS INFO AUTO LEVEL LEVELING INFO RESTORE DEFAULT NOZZLE STATS HELP HOM...

Page 11: ...Wait for the extruder to heat up and unload filament Press OK and pull out the filament Confirm that the filament is flowing out from the extruder If the filament flows out press OK to exit LOAD FILA...

Page 12: ...heets of copy paper cannot be passed Note Select the direction of the module or the print bed to be moved Note X AXIS left and right movement of the extruder module Y AXIS front and back movement of t...

Page 13: ...e print bed levelness data and contact our customer service to inform the measurement data 1 2 3 UTILITIES A 0317 0320 0313 B 0318 0323 0308 C 0312 0300 0440 OK TO RETURN CALIB FAILED OK TO CONTINUE P...

Page 14: ...lease it Connect the flat cable to the new extruder module Be sure to insert the flat cable in the right direction Lightly press the spring around the feed hole and remove the filament guide tube Inse...

Page 15: ...injuries Press the spring around the feeding path and pull out the guide tube Do not detach the white flat cable above the nozzle Insert the feeding path cleaning pin into the feeding path as far as i...

Page 16: ...enabled The printing mode helps to improve printing quality with slower printing speed You may switch off the function if necessary To change the setting of auto level You may switch the display lang...

Page 17: ...NOZZLE INFO shows nozzle information and lifetime If you want to change setting please press OK MONITOR MODE shows the temperature of the extruder See below for the working temperature for the parts i...

Page 18: ...insert the filament back and enjoy printing Use the UNLOAD FILAMENT function to loosen and remove the filament 1 3 2 CHANGE SPOOL LOAD FILAMENT UNLOAD FILAMENT B Screwdriver T10 for standard cleaning...

Page 19: ...ng module check if there are remaining filaments in the nozzle and remove them accordingly After removing the filament please select CHANGE NOZZLE Once the laser engraver module has been installed ope...

Page 20: ...ser engraving instructions please refer to the laser engraving manual Official website www xyzprinting com Align the laser engraver with the bracket and press it to fix the holder 1 2 CHANGE NOZZLE Pl...

Page 21: ...PAUSE Select PAUSE to pause the laser engraving process RESUME To cancel the pause and resume the printing select RESUME A screen will appear to confi rm whether to resume the engraving process Selec...

Page 22: ...etwork s channel width needs to be set to 20 MHz for the printer to connect to it wirelessly Refer to the vendor instruction manual for more information The printer supports WEP WPA and WPA2 security...

Page 23: ...eless connection distance between your printer and the wireless networking device needs to be within 10 meters The connection quality will depend on the power of your networking device and the environ...

Page 24: ...der if the temperature settings exceed this recommended range Hang the spool on the filament spool holder prepared by yourself we recommend use the support bracket to avoid collapsing when printing Pr...

Page 25: ...as are not suitable storage environments for PLA We recommend properly sealing and stashing away unused PLA filaments A sugary smell is often generated when printing with PLA filaments giving yet anot...

Page 26: ...r Internal communication error Internal communication error Extruder storage error Unable to detect extruder Computer and printer connection error SD card error SD card error File format is not suppor...

Page 27: ...sed by falls or blows burnt circuits resulting from actions form the user broken or bent interface or pins or any other physical damage to the product caused by misuse Incompatibility issues anything...

Page 28: ...harmful interference to radio communications However there is no guarantee that interference will not occur in a particular installation If this equipment does cause harmful interference to radio or...

Reviews: