background image

User Manual da Vinci 2.0 Duo

P 20

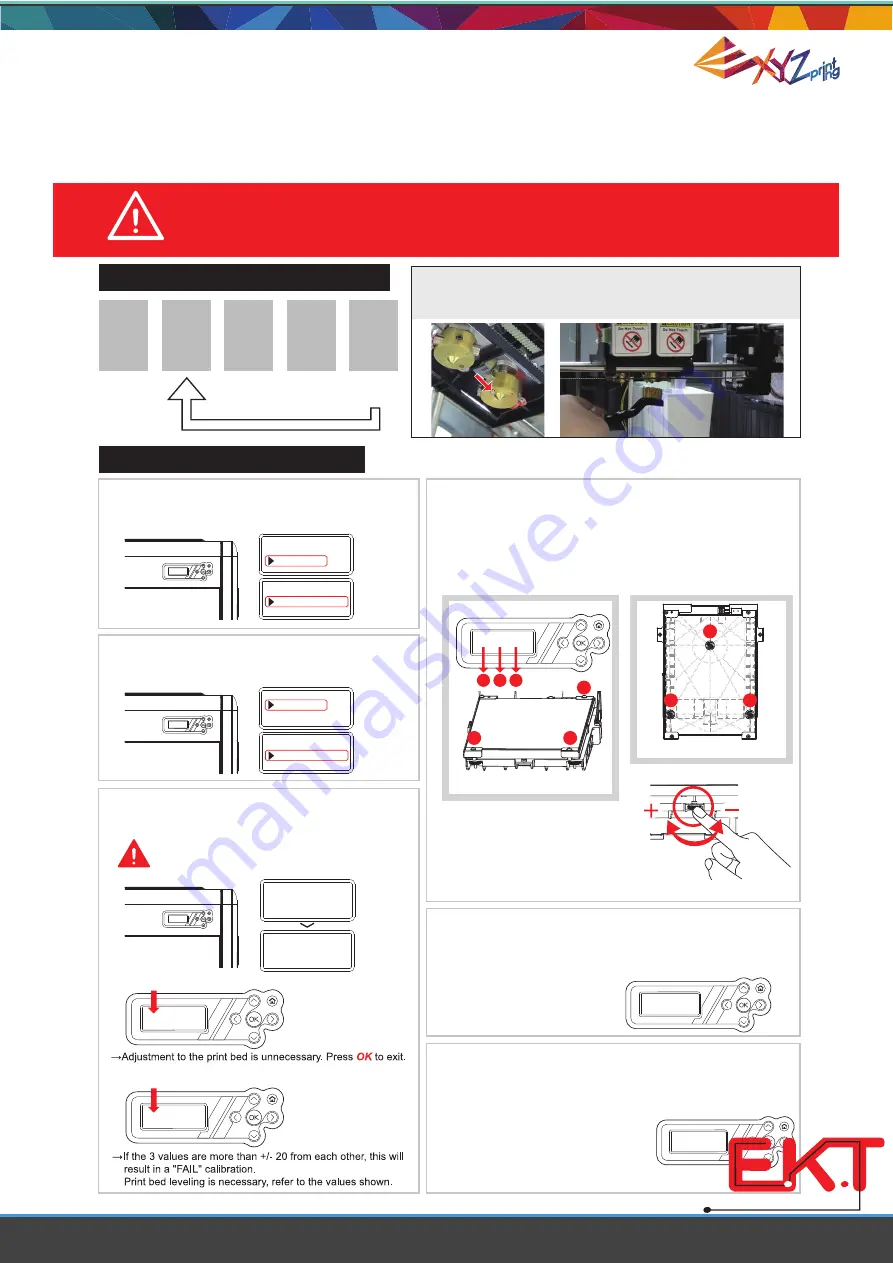
5-5 Print Bed Adjustment Instructions

2.

1. 4. 

UTILITIES
SETTINGS

INFO

DA VINCI 2

.

0 DUO

DA VINCI 2

.

0 DUO

SYSTEM VERSION

INFO

CARTRIDGE STATS

STATISTICS

UTILITIES

SETTINGS
INFO

CALIBRATE

BUILD SAMPLE

uTILITIES

jOG MODE

3.

CALIBRATE
IN PROGRESS

PLEASE WAIT

EXTRUDER HEATING
TEMPERATURE999

¢X

C

PLEASE WAIT

(Adjust the location of the screws)

5. 

1

3

2

1

A

B

C

2

3

This print bed has been factory calibrated before shipping.  Recalibration 

is necessary if there are print issues when starting to print or the nozzle 

gets too close to the print bed. When in doubt, it is recommended to con-

tact service center for more information.

Print bed adjustment flow chart

Perform again!

Step

1

2

3

4

5

Step

Step

Step

Step

Print bed adjustment steps

Click  INFO>SYSTEM VERSION  using the 

function keys to make sure your firmware is the 

latest.

Click  UTILITIES>CALIBRATE  using the 

function keys and select  Yes  to perform 

print bed measurement.

The printer starts automatic measurement. Wait 
for 2~3 minutes and verify the data shown.

Note: During the measurement process, the 

print bed and print module will be heated. 

Care should be taken during operation!

I.  If 

SUCCESS 

is shown.

II. If 

FAIL

 is shown.

Tip II. View the printer from the front 
when making adjustment

Use small dial turns to approximate the desired value

Rotate the screw to the 

left

 to

raise the bed (value increases)

Rotate the screw to the 

right

 to

lower the bed (value decreases)

Refer to the values for adjustment:

After adjusting the screw(s), please run "Calibrate" 

(see step 2). If the screen repeats "FAIL", please 

continue the steps for calibration. Until "

SUCCESS

" is 

shown on screen, press "OK" to complete the calibra-

tion. 

If the value shown is always 

ERR

,

ERR

,

ERR

follow the steps below to clean.

¡

 Reminder

A. Clean the surface of the print head using 

the copper brush. 

(Clean the contact point between the print head 
and print bed)

B. Wipe and clean the measurement 

points as shown on the print bed in step 4

C. Perform the calibration process again.

Note: 3 values shown on screen indicate the distance between 
the detect pin by the nozzle and the edge of the print bed. If 
any value is out of the range of 90 to 110, please adjust the 
value by turning the screw(s) under the print bed.

Tip I. Value set and corresponding thumbscrew:

(Location of the measurement points)

To clean the molted filament from nozzle thoroughly, it is 

recommended to activate  CLEAN NOZZLE  function to 

keep heating the extruders for better cleaning.

1

3

2

CALIBRATE

fail

+

245

,+

305

,+

315

[

OK

]

  TO RETURN

CALIBRATE

SUCCESS

     100

+

100

, +

100

,


+

100

[

OK

]

 TO SAVE

CALIBRATE

SUCCESS      100

+

100

, +

100

,


+

100

[

OK

]

 TO SAVE

CALIBRATE

fail

+

245

,+

305

,+

315

[

OK

]

  TO RETURN

CALIBRATE

fail

ERR,ERR,ERR

[

OK

]

  TO RETURN

w w w . e k t

2

. c o m

Electronics 

Katrangi

 Trading

Summary of Contents for da Vinci 2.0 Duo

Page 1: ...User Manual da Vinci 2 0 Duo P 1 da Vinci 2 0 Duo User Manual w w w e k t 2 c o m Electronics Katrangi Trading...

Page 2: ...0 Duo 3D Printer From the instruction it will show you how to use and maintain da Vinci 2 0 Duo 3D Printer properly If you would like to get the latest information about da Vinci 2 0 Duo 3D Printer pl...

Page 3: ...10 5 1 UTILITIES 11 5 1 1 CHANGE CART 12 5 1 1 1 INSTALL CARTRIDGE 12 5 1 1 2 LOAD FILAMENT 12 5 1 1 3 UNLOAD FILAMENT 14 5 1 2 HOME AXES 15 5 1 3 JOG MODE 16 5 1 4 BUILD SAMPLE 17 5 2 SETTINGS 18 5 3...

Page 4: ...hemicals or alcohol wipes to clean this device Do not disassemble or replace the printer cover with none XYZprinter covers Do not touch heated surfaces during or after operation Heated surfaces can ca...

Page 5: ...to this chapter please make sure read the Chapter 1 Important Safety Instruction is acknowledged carefully Attention Retain the box and packing material If the need arises It will be used to transpor...

Page 6: ...Slot a space for loading filament cartridge USB Port a port for connecting USB cable Power Switch a swtich for turning on off the power of the printer Power Connector a connector for connecting the po...

Page 7: ...User Manual da Vinci 2 0 Duo P 7 Chapter 3 Install and Set Up Parts name and Functions w w w e k t 2 c o m Electronics Katrangi Trading...

Page 8: ...the display panel the printer is powered on correctly Warning Make sure to set the power switch to the off position before inserting the power cord Make sure the power cord is properly connected Inco...

Page 9: ...er Function Description UTILITIES SETTINGS INFO MONITOR MODE Printer adjustment Change cartridge Sample printing Function settings The firmware and printer statistical information Monitor of extruder...

Page 10: ...extruder to the center for manual dripbox cleaning 5 1 UTILITIES Function Description CHANGE CART HOME AXES JOG MODE BUILD SAMPLE Loads unloads filament Moves the extruders and print bed to default ho...

Page 11: ...RTRIDGE 5 1 1 2 LOAD FILAMENT 1 Select the cartridge to be loaded For loading cartridge 1 please select CARTRIDGE1 3 Extruder should be heated to working temperature Pleasewaituntilfurtherinstructed 2...

Page 12: ...ent guide tube to the hole of the extruder 5 Pleasefollowinstructionsonthepaneland press OK tofinishthisprocess itisnormal that the filament color that first comes out is different from the filament c...

Page 13: ...OAD FILAMENT and OK 3 Extruder should be heated to working temperature Please wait until further instructed 4 Pull the filament out from the extruder as instructed and press OK Remove filament when pr...

Page 14: ...ion and select Yes extruders and print bed will be moved to default home positions 2 Wait until extruders and print bed stop moving 3 When the process is finished as instructed on the display panel pr...

Page 15: ...sted then press OK Options X AXIS Y AXIS Z AXIS 3 Press OK to complete the adjustment 2 Set a desired scale of the adjustment Use Upper Down button to adjust the scale of movement Use Left Right Butto...

Page 16: ...t bed has descended Cover a damp cloth on the print bed while cold for 2 3 minutes Then wipe the moistened glue from the print bed with the damp cloth gently 1 Select a sample to be printed 2 Select Y...

Page 17: ...ruders and printer when powered on Set the language displayed on the panel Available options English Japanese Apply default settings Default On Off English Function STATISTICS SYSTEM VERSION CARTRIDGE...

Page 18: ...last printing job of the printer 5 3 2 SYSTEM VERSION Firmware version can be found in this section 5 3 3 CARTRIDGE STATS Capacity and remaining level of the filament can be found in this section REM...

Page 19: ...TOR MODE You can get the temperatures of information via Monitor mode function EXTRUDER1 EXTRUDER2 Proper working temperatures is 210 C 410 F PLATFORM Proper working temperatures is 70 C 158 F w w w e...

Page 20: ...small dial turns to approximate the desired value Rotate the screw to the left to raise the bed value increases Rotate the screw to the right to lower the bed value decreases Refer to the values for a...

Page 21: ...ble applications or software for this printer A1 The packaged CD contains the XYZWare software After installation it will use an available internet connection and look for the latest release to perfor...

Page 22: ...User Manual da Vinci 2 0 Duo P 22 w w w e k t 2 c o m Electronics Katrangi Trading...

Page 23: ...User Manual da Vinci 2 0 Duo P 23 w w w e k t 2 c o m Electronics Katrangi Trading...

Page 24: ...User Manual da Vinci 2 0 Duo P 24 w w w e k t 2 c o m Electronics Katrangi Trading...

Page 25: ...B to the printer via a USB cable before activating XYZware For a better printing experi ence it is strongly advised to follow the the proper installation procedure If the PC NB is running MAC OS or Wi...

Reviews: