background image

NitraVis 70x IQ TS

Overview

 7

ba75952e03

05/2017

1.4

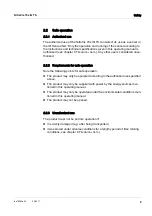
Structure of the sensor NitraVis 70x IQ TS

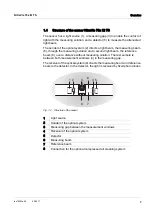
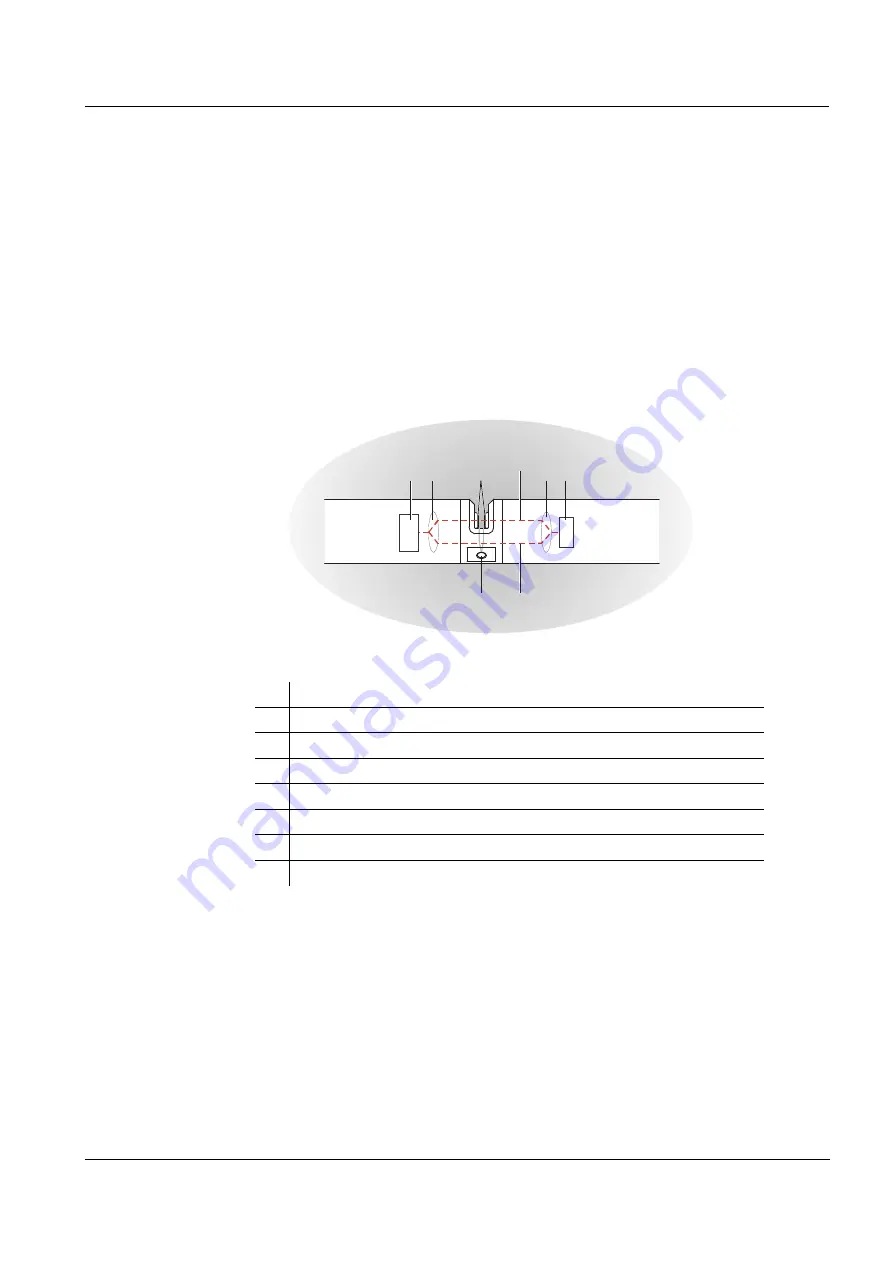
The sensor has a light source (1), a measuring gap (3) to enable the contact of 

light with the measuring solution, and a detector (5) to measure the attenuated 

light beam.
The sender of the optical system (2) directs a light beam, the measuring beam 

(6), through the measuring solution and a second light beam, the reference 

beam (8), over a distance without measuring solution. The test sample is 

between both measurement windows (3) in the measuring gap. 
The receiver of the optical system (4) directs the measuring beam and reference 

beam to the detector. In the detector, the light is received by fixed photo diodes.

Fig. 1-2 Structure of the sensor

1

Light source

2

Sender of the optical system

3

Measuring gap between the measurement windows

4

Receiver of the optical system

5

Detector

6

Measuring beam

7

Reference beam

8

Connection for the optional compressed air cleaning system

7

6

3

4

8

2

1

5

Summary of Contents for WTW NitraVis 700 Series

Page 1: ...OPERATING MANUAL ba75952e03 05 2017 NitraVis 701 IQ TS NitraVis 705 IQ TS OPTICAL SENSOR FOR NITRATE AND TOTAL SUSPENDED SOLIDS TSS ...

Page 2: ...2 ba75952e03 05 2017 NitraVis 70x IQ TS Copyright 2017 Xylem Analytics Germany GmbH Printed in Germany ...

Page 3: ...Requirements for safe operation 9 2 2 3 Unauthorized use 9 3 Commissioning 10 3 1 IQ SENSORNET system requirements 10 3 2 Scope of delivery of the NitraVis 70x IQ TS 10 3 3 Installation 11 3 3 1 Mounting the sensor 11 3 3 2 Mounting the shock protectors 13 3 3 3 Connecting the sensor to the IQ SENSORNET 14 3 4 Initial commissioning 16 3 4 1 General information 16 3 4 2 Sensor structure 17 3 4 3 Se...

Page 4: ...ic cleaning 37 5 2 4 Cleaning the measuring gap 38 6 Spare parts maintenance equipment accessories 39 7 What to do if 41 8 Technical data 44 8 1 Measurement characteristics 44 8 2 Application characteristics 45 8 3 General data 46 8 4 Electrical data 47 9 Indexes 48 9 1 Explanation of the messages 48 9 1 1 Error messages 49 9 1 2 Informative messages 51 9 2 Status info 52 10 Appendix Glossary 53 ...

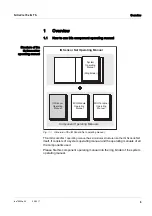
Page 5: ...ing manual has a modular structure like the IQ SENSORNET itself It consists of a system operating manual and the operating manuals of all the components used Please file this component operating manual into the ring binder of the system operating manual IQ Sensor Net Operating Manual System Operating Manual Ring Binder IQ Sensor Operating Manual MIQ Module Operating Manual MIQ Terminal Operating M...

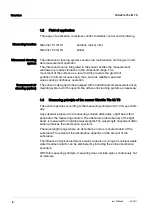
Page 6: ...ports the ultrasound cleaning system as necessary 1 3 Measuring principle of the sensor NitraVis 70x IQ TS The sensor operates according to the measuring principle of UV VIS spectrom etry Any substance present in a measuring solution attenuates a light beam that penetrates the measuring solution The attenuation absorbance of the light beam is measured for individual wavelengths The wavelength depe...

Page 7: ...t beam the reference beam 8 over a distance without measuring solution The test sample is between both measurement windows 3 in the measuring gap The receiver of the optical system 4 directs the measuring beam and reference beam to the detector In the detector the light is received by fixed photo diodes Fig 1 2 Structure of the sensor 1 Light source 2 Sender of the optical system 3 Measuring gap b...

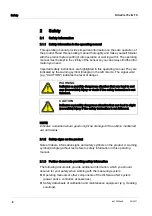
Page 8: ...s might be damaged if the actions mentioned are not taken 2 1 2 Safety signs on the product Note all labels information signs and safety symbols on the product A warning symbol triangle without text refers to safety information in this operating manual 2 1 3 Further documents providing safety information The following documents provide additional information which you should observe for your safet...

Page 9: ...ents for safe operation Note the following points for safe operation The product may only be operated according to the authorized use specified above The product may only be supplied with power by the energy sources men tioned in this operating manual The product may only be operated under the environmental conditions men tioned in this operating manual The product may not be opened 2 2 3 Unauthor...

Page 10: ...ope of delivery SensorNitraVis 70x IQ TS Sensor sleeve Shock protectors Operating manual DIQ S 28X Controller software Version 3 72 or higher DIQ S 182 Controller software Version 3 45 or higher MIQ MC3 Controller software Version 3 72 or higher MIQ MC2 Controller software Version 3 72 or higher MIQ TC 2020 XT Controller software Version 3 72 or higher DIQ S 28X Controller software Version 3 72 or...

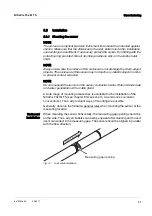
Page 11: ...nt contact corrosion NOTE Do not suspend the sensor on the sensor connection cable Risk of cable break and water penetration at the cable gland A wide range of mounting accessories is available for the installation of the NitraVis 70x IQ TS see chapter 6 SPARE PARTS MAINTENANCE EQUIPMENT ACCESSORIES Thus all prevalent ways of mounting are possible Generally observe the following general rules when...

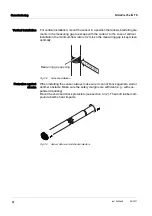
Page 12: ... rate is 0 2 m s so the measuring gap is kept clean optimally Fig 3 2 Vertical installation Protection against shocks When installing the sensor always make sure it cannot knock against a wall or another obstacle Make sure the safety margins are sufficient e g with sus pended mounting Mount the enclosed shock protectors see section 3 3 2 Their soft rubber com pound absorbs hard impacts Fig 3 3 Sen...

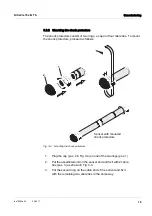
Page 13: ...otectors proceed as follows Fig 3 4 Mounting the shock protectors 1 Plug the cap pos 2 in Fig 3 4 on one of the two rings pos 1 2 Put the assembled unit on the sensor end and fix it with 2 cable ties pos 3 as shown in Fig 3 4 3 Put the second ring on the cable end of the sensor and fix it with the remaining two cable ties in the same way 1 3 2 Sensor with mounted shock protectors ...

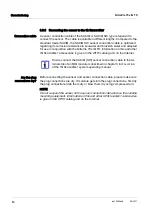
Page 14: ...ENSORNET accessories is given in the WTW catalog and on the Internet Are the plug connections dry Before connecting the sensor and sensor connection cable please make sure the plug connections are dry If moisture gets into the plug connections first dry the plug connections dab them dry or blow them dry using compressed air NOTE Do not suspend the sensor on the sensor connection cable but use the ...

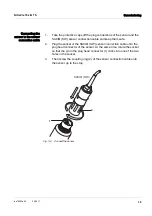
Page 15: ...sor and the SACIQ SW sensor connection cable and keep them safe 2 Plug the socket of the SACIQ SW sensor connection cable onto the plug head connector of the sensor At the same time rotate the socket so that the pin in the plug head connector 1 clicks into one of the two holes in the socket 3 Then screw the coupling ring 2 of the sensor connection cable onto the sensor up to the stop SACIQ SW 1 2 ...

Page 16: ...the factory The sensor is immediately ready to measure Use calibration after initial ommissioning On the basis of a reference measurement laboratory value check whether the default settings deliver sufficiently accurate measured values or whether you want to carry out a user calibration see section 4 3 CALIBRATION CAUTION Never look into the measuring window or put objects into the measuring windo...

Page 17: ...n the system under the designation NitraVis 70x IQ TS and the series number of the physical sensor Secondary sensor The sensor for the measurement of total suspended solids is the secondary sensor It registers on the system under the designation SolidVis 70x IQ and the series number of the physical sensor Sensor overlapping settings and functions Some settings and functions are sensor overlapping ...

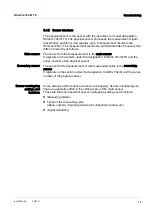
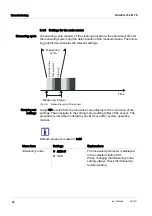
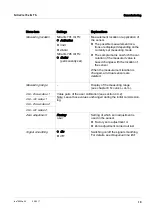
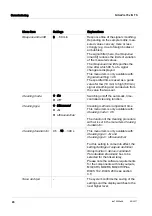
Page 18: ...out settings Using S switch from the measured value display to the main menu of the settings Then navigate to the setting menu setting table of the sensor The procedure is described in detail in your IQ SENSORNET system operating manual Default values are marked in bold Time Adjustment time Measurement Measuring cycle Measuring interval Cleaning Menu item Settings Explanations Measuring mode NO3 N...

Page 19: ... sensor When the measurement location is changed all virtual sensors are deleted Measuring range Display of the measuring range see chapter 8 TECHNICAL DATA Cal raw value 1 Value pairs of the user calibration see section 4 3 2 Note Leave those values unchanged during the initial commission ing Cal ref value 1 Cal raw value 2 Cal ref value 2 Zero adjustment Factory User Setting of which zero adjust...

Page 20: ...ff the automatic time controlled cleaning function Cleaning type Ultrasound Air Ultrasound air Cleaning methods adjustment time This menu item is only available with Cleaning mode On The duration of the cleaning procedure with air is set in the menu item Cleaning duration Air Cleaning duration Air 0 5 10 300 s This menu item is only available with Cleaning type Air and Cleaning type Ultrasound air...

Page 21: ...suring mode TSS Display of the measuring mode TSS total suspended solids measure ment Measuring range Display of the measuring range see chapter 8 TECHNICAL DATA Cal raw value 1 Value pairs of the user calibration for TSS measurement see section 4 3 2 Note Leave those values unchanged during the initial commission ing Cal ref value 1 Cal raw value 2 Cal ref value 2 Main sensor Information that the...

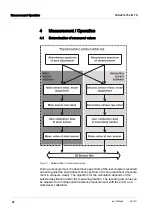
Page 22: ...ent the absorbance spectrum of the test sample is recorded and set against the stored absorbance spectrum of a zero adjustment measure ment in ultrapure water The algorithm for the calculation depends on the selected application and or the measuring location The resulting raw value can be adjusted to an independent reference measurement with the aid of a so called user calibration ...

Page 23: ...due to difficult sample matrix Damaged measuring windows Lacking quality of the zero adjustment e g due to contaminated ultrapure water The user calibration is not representative or erroneous 4 3 Calibration 4 3 1 Overview In the delivery condition the sensor is precalibrated and ready to measure see section 3 4 1 There are two types of calibration that are included into the calculation of the CAU...

Page 24: ...g chamber or on the measurement windows affect the measured values A Sensor check H2O dest determines the condition of the sensor By checking the sensor with the aid of the Sensor check H2O dest you can rapidly see any changes of the sensor and whether it needs to be cleaned or if any other actions have to be taken A Sensor check H2O dest should be carried out twice per year at regular inter vals ...

Page 25: ...r was thoroughly cleaned If the Zero adjustment is not successful the sensor is blocked for measurement A successful Zero adjustment is required for the determination of measured val ues Sensor check standard Use the Sensor check standard to check the sensor with a standard solution see chapter 6 SPARE PARTS MAINTENANCE EQUIPMENT ACCESSORIES During the check the recorded spectrum is compared to a ...

Page 26: ...orking point of the applica tion This method results in a single point calibration If the application has to cover a wide value range with high measuring accuracy both value pairs should be used for calibration When doing so the calibration value pairs should be determined and input at the limits of the application range as possible You obtain samples of different concentrations e g by taking two ...

Page 27: ...ut dimension and note it down In the case of fluctuating values carry out several measurements and average the individual raw values 7 Take a sample at the same time as the measurement and as close to the sensor as possible 8 Determine the reference value and note it down as a value pair together with the raw value 9 For a two point calibration Determine the second value pair step 6 to step 8 At l...

Page 28: ...econd value pair higher concentration or raw value of the single point calibration Cal ref value 2 0 00 5000 00 Reference value of the second value pair higher concentration or reference value of the single point calibration Display Meaning actions Measured value display Successful new valid calibration value pairs were entered for the sensor Calibration value pairs not accepted Sensor is blocked ...

Page 29: ...rage location of the Zero adjustment data The data of the sensor checks are not stored The data of the user zero adjustment are stored in the sensor Outlet A successful Sensor check H2O dest is the prerequisite for a valid user cali bration After each Sensor check H2O dest the sensor is evaluated A changed sensor evaluation proves that the cleaning was effective The steps of the sensor check or Ze...

Page 30: ...Operating error or defective sensor Sensor blocked for measurement Sensor check Standard OK Error 40 40 40 or 40 Operating error or defective sensor Zero adjustment Error OK After several zero adjustments Reset to Factory zero adjustment or last valid user zero adjustment After several sensor checks Cleaning the sensor Sensor check H2O dist Assessment number Rinse the measuring chamber with ultrap...

Page 31: ...ash ing invalid measured value 4 Confirm the maintenance condition with OK 5 Take the sensor out of the test sample 6 Remove the blind plug or unscrew the compressed air connection from the sensor 7 Thoroughly clean the sensor enclosure sensor sleeve and the com pressed air channels see section 5 1 MAINTENANCE To finish the cleaning procedure thoroughly rinse the entire sensor with ultrapure water...

Page 32: ...pure water or For Sensor check standard Fill the measuring chamber with standard solution see section 6 12 If there are any air bubbles on the measuring windows remove them by gently knocking on the sensor sleeve with a bar Carry out the intended sensor check or Zero adjustment directly after filling the sensor sleeve If you wait longer the result of the Sensor check Zero adjustment will be affect...

Page 33: ...tem continues to work with the old calibration data The maintenance condition however has to be switched off again in any case After starting the calibration with the OK key step 16 you can no longer cancel the calibration procedure 16 Confirm with OK The measurement is started After the end of the measurement the result appears With the Zero adjustment the result is entered in the calibration his...

Page 34: ...ful Error Sensor check standard not successful Possible cause wrong or expired standard 17 Confirm the calibration result with OK 18 Confirm the message After successful cal with OK The display returns to the measured value display The measured value flashes because the sensor is still in the maintenance condition 19 Pour away the ultrapure water or standard solution and remove the sensor sleeve 2...

Page 35: ... rinse the sensor with ultrapure water Accessories Sponge Plastic bristled brushes of different sizes Interdental brushes are suitable for the cleaning of the compressed air chan nels Flocked cleaning cards see accessories Lens tissues Wash bottle NOTE Never use any pressure washer steam blaster abrasives or metal brushes to clean the sensor Risk of damaging the sensor Contamination Cleaning agent...

Page 36: ...o adjustment should be carried out must run through all cleaning steps properly During the cleaning process always keep all surfaces moist to prevent already dissolved contamination and detergents from drying working wet on wet Finally thor oughly rinse off all remaining cleaning agents with ultrapure water Example 2 If the sensor from example 1 should be cleaned on site during a routine visual in...

Page 37: ...e cable and mounting parts Note Follow the instruction manual of the disinfectant reaction time 4 Remove the blind plug or unscrew the compressed air connection from the sensor 5 Clean the sensor with soapy water When doing so clean the area of the measuring gap and the compressed air channels very thoroughly The compressed air channels can be cleaned with the aid of interdental brushes and rinsed...

Page 38: ...essary leave the cleaning card in the measuring gap for a few minutes so the detergent can take effect Thoroughly rinse with ultrapure water the measuring gap and the surrounding areas moistened with detergent Then wipe the measurement window with a lens tissue The surface of the measurement windows must be free of streaks Protect the cleaned sensor against new contamination Contamination Cleaning...

Page 39: ...ith low concentration for 5 mm UVVIS SAC NOx sensors ST 1 481 077 Standard 2 with high concentration for 1 mm UVVIS SAC NOx sensors ST 2 481 078 Description Model Order no Compressed air cleaning set with 15 m compressed air hose to be connected to a valve module or Cleaning Air Box SET AP 481 075 Active valve module does not require a free relay output in the IQ SENSORNET sys tem MIQ CHV PLUS 480...

Page 40: ...er no Mounting set for horizontal installation with EH F 170 swing mounting assembly VIS Set EH 481 073 Set for the mounting of UVVIS SAC NOx sensors to the S 200 electrode floater VIS Set F 481 080 Flow through armature VIS FT 1 480 080 Information on other IQ SENSORNET accessories is given in the WTW catalog and on the Internet ...

Page 41: ...on 4 3 3 Zero adjustment still erroneous after several trials Contact service Unknown See log book Cause Remedy Erroneous user calibration Repeat user calibration Make sure the samples for comparison are rep resentative Substantial change of test sample sample matrix Carry out new user calibration Measurement windows dirty Clean the measurement windows Sensor setting wrong Check and if necessary c...

Page 42: ...r cleaning system Clean the measurement windows section 5 2 4 Check all components of the com pressed air cleaning system com pressor compressed air line sensor rinsing openings Substantial change of test sample sample matrix Carry out new user calibration Cause Remedy Measuring range exceeded Check process Foreign matter in the measuring gap Clean the measuring gap section 5 2 3 Erroneous user ca...

Page 43: ...ENSORNET cable towards the NitraVis 70x IQ TS too long volt age drop too great Install another power supply module in the vicinity of the sensor Electrical connection between power supply module and NitraVis 70x IQ TS is interrupted Check the cable connection step by step starting with the power sup ply module and replace any defec tive cable sections Check the contacts on the MIQ modules stack mo...

Page 44: ...width Lamp type Xenon flashlamp Photo diodes 256 NitraVis 701 IQ TS 1 mm NitraVis 705 IQ TS 5 mm Measuring location Measuring mode Measuring range Resolution Inlet NO3 0 0 300 0 mg L 0 1 mg L NO3 N 0 00 60 00 mg L 0 01 mg L Activation NO3 0 0 300 0 mg L 0 1 mg L NO3 N 0 00 60 00 mg L 0 01 mg L Outlet NO3 0 0 750 0 mg L 0 1 mg L NO3 N 0 0 150 0 mg l 0 1 mg L Measuring location Measuring mode Measur...

Page 45: ...asuring mode Measuring range Resolution Outlet TSS 0 0 900 0 mg L 0 1 mg L The quoted measuring ranges are nominal measuring ranges that are theoretically possible In practice real measuring ranges exist that are given by the limits of photometric determination The limits are significantly influenced by the light scattering due to solids and the absorption of accompanying substances sample matrix ...

Page 46: ... protection Ø 60 Ø 96 891 120 Socket SACIQ With shock protection 774 865 381 Approx 3 8 kg without shock protectors and without sensor connec tion cable Approx 4 8 kg with shock protectors but without sensor connection cable Sensor shaft Titan Grade 2 Center piece PEEK End cap PEEK Measurement window Sapphire Plug head connector housing POM Plug 3 pole ETFE blue Tefzel Protection ring POM 10 C 50 ...

Page 47: ...SI UL 61010 1 Certified to CAN CSA C22 2 61010 1 Nominal voltage Max 24VDC via the IQ SENSORNET for more details see chapter TECHNICAL DATA of the IQ SENSORNET system operating manual Power consumption 8 W maximum power consumption 3 5 W medium power consumption If the system is supplied with power via a MIQ WL PS o DIQ S 28X only the medium power consumption has to be taken into account Protectiv...

Page 48: ...ssages contain an internal error code starting with Information on the contents and structure of the log book and the structure of the message code is given in the LOG BOOK chapter of the IQ SENSORNET system operating manual The last three digits of the message code form the component code It identifies the component active component that caused the mes sage Module code Component 3A1 NitraVis 701 ...

Page 49: ...ltrapure water Repeat the zero adjustment EAM3Ax Meas range exceeded or undercut Check process EC33Ax User calibration erroneous Check raw value reference value pairs Set all values within the measuring range see operating manual Enter value pairs in ascending order EI1541 Operational voltage too low Check installation and cable lengths Follow installation instructions Power supply module s overlo...

Page 50: ...erflow optical measurement Execute zero ajustment ES5541 Failure optical measurement hardware Contact service ES6541 Failure optical measurement software Contact service ES7541 Failure optical measurement software BIOS Contact service Message code Message text ...

Page 51: ...d Make sure the sensor operates correctly IC4541 The last valid user zero adjustment was activated Make sure the sen sor operates correctly IC5541 Invalid user zero adjustment was replaced by last valid user calibration Caution Wrong measured values possible Carry out a new successful zero adjustment to make sure the sensor operates correctly IC6541 The invalid user zero adjustment was replaced by...

Page 52: ...ttings Service List of all compo nents menu see system operating manual by an automated query from a superordinate process control e g when connected to the Profi bus of the IQ Data Server see operating manual of the IQ SENSORNET soft ware pack Status Info NitraVis 70x IQ TS 0 1 2 3 4 5 6 7 8 9 10 11 12 13 14 15 1 0 0 0 0 0 0 0 0 0 0 0 0 0 0 0 general 0 0 0 0 0 0 0 0 0 0 0 0 0 0 0 0 internal 16 17...

Page 53: ...D O concentration Measured value The measured value is the special value of a measured parameter to be determined It is given as a combination of the numerical value and unit e g 3 m 0 5 s 5 2 A 373 15 K The measured value is determined from the raw value taking into account the data from a user calibration The measured value is displayed together with the raw value in the measured value display M...

Page 54: ...mple ready to be measured Ultrapure water H2O dist Ultrapure water is distilled or deionized water suitable for analysis purposes Zero adjustment Measuring and saving the absorbance spectrum of ultrapure water Defines the zero points in the spectrum for all wavelengths The light beam is not alleviated at the zero point The zero point influences the calculation of the raw value ...

Page 55: ......

Page 56: ...s buildings factories and farms In more than 150 countries we have strong long standing relationships with customers who know us for our powerful combination of leading product brands and applications expertise backed by a legacy of innovation Xylem Analytics Germany GmbH Dr Karl Slevogt Str 1 82362 Weilheim Germany Xylem Analytics Germany Sales GmbH Co KG WTW Dr Karl Slevogt Str 1 82362 Weilheim ...

Reviews: