background image

pg


|

75

chlorophyll content of grab-samples taken during a deployment has been analyzed in a laboratory. This 

determination can involve conducting the extractive analysis procedure described for chlorophyll in 

Methods 

for the Examination of Water and Wastewater

 or by carrying out an 

in situ

 measurement of chlorophyll using 

a commercial benchtop fluorometer. 

Pour the correct amount of clear deionized or distilled water into the calibration cup. Immerse the probe 

end of the sonde in the water. 

In the Calibrate menu, select BGA-PC/Chlor, then select Chl RFU. Select either a 1- or 2-point calibration. 

Enter 0 for first standard value and 16.4 for second standard value. 

Click Start Calibration. Observe the readings under Current and Pending data points. While stabilizing, 

click the Wipe Sensors button to activate the wiper to remove any bubbles. When data are Stable (or data 

shows no significant change for approximately 40 seconds), click Apply to accept this calibration point.

Next place the sensors in the Rhodamine WT standard. Click Proceed on the pop-up window. Observe 

the readings under Current and Pending data points. While stabilizing, click the Wipe Sensors button to 

activate the wiper to remove any bubbles. When data are Stable (or data shows no significant change for 

approximately 40 seconds), click Apply to accept this calibration point.

Click Complete. View the Calibration Summary screen and QC score. Click Exit to return to the sensor 

calibration menu, and then the back arrows to return to main Calibrate menu.

Rinse the sonde in tap or purified water and dry the sonde.

Blue-green Algae


This procedure calibrates BGA RFU or BGA μg/L. If the user has both units selected, then this procedure 

must be performed twice, once for each unit, to completely calibrate the parameter. 

For the 2-point calibration, one of the standards must be clear water (0 μg/L), and this standard must 

be calibrated first. The other standard should be in the range of the suspected BGA-PC content at the 

environmental site. Two general types of standards can be used: (a) phytoplankton suspensions of known 

BGA-PC content, and (b) dye solutions whose fluorescence can be correlated to that of BGA-PC. The user 

is responsible for determining the BGA-PC content of algal suspensions by using standard cell counting 

techniques. 

For option (b), we recommend using a 625 μg/L Rhodamine WT dye solution 

(for detailed instructions, see 

section 5.10)

, and the solution is used in the calibration steps below.

µg/L


– 1- or 2-point

This procedure will zero your fluorescence sensor and use the default sensitivity for calculation of 

phycocyanin-containing BGA in μg/L, allowing quick and easy fluorescence measurements that are only 

semi-quantitative with regard to BGA-PC. However, the readings will reflect changes in BGA-PC from site 

to site, or over time at a single site.

Pour the correct amount of clear deionized or distilled water into the calibration cup. Immerse the probe 

end of the sonde in the water. 
Summary of Contents for EXO Series

Page 1: ...Advanced Water Quality Monitoring Platform EXO User Manual Item 603789REF Revision A...

Page 2: ...e without notice Effort has been made to make the information in this manual complete accurate and current The manufacturer shall not be held responsible for errors or omissions in this manual Consult...

Page 3: ...Awake Sonde Activate Bluetooth Attach Sonde to Handheld 2 6 Field Cable 2 7 Bluetooth Wireless Communication 2 8 Install KOR Software Connect Sonde 2 9 USB 2 10 Bluetooth Link to PC 2 11 Data Collecti...

Page 4: ...re on Handheld 6 8 Depth Sensor Storage and Maintenance 6 9 Standard Optical Sensors Maintenance and Storage 6 10 Conductivity Temperature Sensor Maintenance and Storage 6 11 Dissolved Oxygen Sensor S...

Page 5: ...s PC or EXO Handheld Users communicate with the sonde via a field cable to an EXO Handheld Bluetooth wireless connection to a PC or EXO Handheld or a USB connection via communications adapter to a PC...

Page 6: ...0 Lower Battery Compartment Seal Battery Compartment Battery Cover Red LED Indicator Sonde Status Blue LED Indicator Bluetooth On Off Magnetic Switch for Power and Bluetooth Bulkhead Sensor Port Plug...

Page 7: ...rd sensor ports the EXO2 also has a bulkhead port for a central wiper or an additional sensor and an auxiliary port on top of the sonde This auxiliary port will allow the user to connect the EXO2 to o...

Page 8: ...Guard Weight 599472 599366 6 Pin Cable Connector Battery Cap Pressure Relief Valve O rings 599681 Red LED Indicator Sonde Status Blue LED Indicator Bluetooth Bulkhead Sensor Port Plug 599475 Sensor Gu...

Page 9: ...s all user interaction and provides powerful control over data collection Specifications Barometer Yes GPS Yes Microphone Yes Audio Speaker Yes Operating System Windows CE 5 0 Material Polymer rated t...

Page 10: ...Wi Fi Indicator is for future functionality not active yet Alphanumeric Keypad Shift Cable Connector Soft Keys 2 Menu Escape Navigation Arrows 4 Return Backspace Tab Power Brightness Daylight viewabl...

Page 11: ...en new data deviates from the average by more than a predetermined tolerance the number of data entries within the rolling average is reduced to a minimum count and the remaining values are flushed wi...

Page 12: ...l response times in the field may vary depending on application Sensor Accuracy Specifications To maintain accuracy specifications for EXO sensor we recommend that users calibrate sensors in the lab i...

Page 13: ...and salinity in depth calculations if a depth sensor is installed Temperature Thermistor The temperature sensor uses a highly stable and aged thermistor with extremely low drift characteristics The 1...

Page 14: ...ed voltage drop is then converted into a conductance value in milliSiemens millimhos To convert this value to a conductivity value in milliSiemens per cm mS cm the conductance is multiplied by the cel...

Page 15: ...The EXO2 intake openings are two small holes on the face of the sonde bulkhead Location of Depth Sensor Depth sensors are not on center When deploying the sonde vertically take care to ensure the sond...

Page 16: ...installed with at least 1 cm of water above the intake ports If a conductivity sensor is installed the depth will be compensated automatically for changes in the density of water as temperature and sa...

Page 17: ...gen present the lifetime of the signal is maximal as oxygen is introduced to the membrane surface of the sensor the lifetime becomes shorter Thus the lifetime of the luminescence is inversely proporti...

Page 18: ...not change significantly with time so that as long as each sensor is characterized with regard to its response to changing oxygen pressure the curvature in the relationship does not affect the ability...

Page 19: ...er The units of fDOM are quinine sulfate units QSUs where 1 QSU 1 ppb quinine sulfate and thus quinine sulfate is really a double surrogate for the desired CDOM parameter The EXO fDOM sensor shows vir...

Page 20: ...f a sample that reads 70 QSU This effect good linearity in colorless quinine sulfate solution but underlinearity in stained field samples is also exhibited by other commercially available fDOM sensors...

Page 21: ...d potential is reflective of a combination of the effects of all the dissolved species in the medium Users should be careful not to overinterpret ORP data unless specific information about the site is...

Page 22: ...e one for hydrogen ions and one as a reference The sensor is a glass bulb filled with a solution of stable pH usually 7 and the inside of the glass surface experiences constant binding of H ions The o...

Page 23: ...n underestimate of algae biomass when using a single channel chlorophyll sensor when blue green algaearepresent TheEXOtotalalgaesensor generatesamore accurate total biomass estimate of the planktonic...

Page 24: ...vivo fluorescence principle with no disruption of the cells required to obtain either spot readings or long term data The EXO sensor has an excellent detection limit as determined under laboratory co...

Page 25: ...nephelometric near IR turbidimeter non ratiometric This method calls for this sensor type to report values in formazin nephelometric units FNU FNU is the default calibration unit for the EXO sensor b...

Page 26: ...tries and the resulting detection of varying suspended sediment characteristics This effect is inherent in the nature of every turbidity sensor and as a result readings between different model turbidi...

Page 27: ...ery cover EXO1 Twist the blue battery cover counterclockwise to loosen lift up to remove Use included wrench to loosen if necessary Do not remove the screws on the sonde s electronics compartment EXO2...

Page 28: ...e to loosen Pull the probe straight out of the port and place on a clean surface Remove hydration caps or buffer bottles on probes Wipe dry with a clean lint free cloth 2 Clean port and install sensor...

Page 29: ...tandards required for calibration 1 Install remove sonde guard Install guard by threading it onto the sonde bulkhead threads Rotate the guard clockwise on the bulkhead to install Rotate it countercloc...

Page 30: ...h or 30 seconds after its last communication via the topside port The sonde also automatically awakens 15 seconds before its next scheduled logging interval LED Indicators Each sonde has two LED indic...

Page 31: ...gnetic activation area on the sonde s bulkhead identified by the illustrated magnet symbol on the label Simply hold the magnet within one 1 cm of the symbol until the LEDs activate EXO Handhelds and s...

Page 32: ...ns on the cable and the female connector on the sonde Press in the male 6 pin connector then screw down the retaining collar Attach the cable s strain relief to the sonde s bail with a carabiner The c...

Page 33: ...Activate sonde s Bluetooth Activate Bluetooth by holding a magnet at the magnetic activation area In addition to magnetic activation users can also activate Bluetooth by cycling power to the sonde rem...

Page 34: ...apter When complete the program will reside in the root Program menu not in a subfolder with the following icon Additionally a folder called National Instruments will be created however this informati...

Page 35: ...and the female connector on the USB SOA Then align the connector s six pins and jackets and press them firmly together so that no gap remains 2 Connect USB cable to SOA and PC Remove the protective ca...

Page 36: ...Wait for the computer to automatically install the device and its drivers Once the installation is complete the computer should indicate that the device is installed and ready to use The preferred Blu...

Page 37: ...nters screen 4 Confirm successful link Once the device has been added confirm that the device appears in Win XP Devices tab of the BT Devices window Win 7 Devices and Printers screen If the device is...

Page 38: ...elect your parameters and the SDI address The sonde s default address is zero 0 Click save Refer to Section 5 KOR Software for more details 2 Route cable Determine the sonde cable routing to the DCP a...

Page 39: ...l wires should be 18 24 AWG and are not included with the SOA 6 Insert wires into SOA Loosen the clamping screw with the supplied screwdriver insert the indicated wire into the terminal strip and tigh...

Page 40: ...battery or installed as part of a remote solar system Power the SOA through a 1 amp slow blow fuse for protection Remove the fuse until all wiring is completed When used with a solar system always en...

Page 41: ...f the flow cell Be careful not to bump or scrape the sensors on the sides of the flow cell Screw the sonde into the flow cell by turning the sonde clockwise until it is hand tightened into place do no...

Page 42: ...pg 42 This page intentionally left blank...

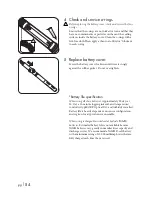
Page 43: ...ips head screwdriver Note The retaining screws are integrated into this panel and are not independently removable If replacement is necessary replace the entire assembly 2 Insert replace batteries Rem...

Page 44: ...eries 1 Power on awaken handheld With batteries installed press and hold the power button for one second The Bluetooth wireless indicator will then illuminate Next the splash screen will appear then b...

Page 45: ...If needed lightly grease the black rubber part of the connector with Krytox grease Press in the male 6 pin connector then screw down the retaining collar Attach the cable s strain relief to the sonde...

Page 46: ...wered on 1 Activate sonde s Bluetooth Users activate Bluetooth by holding a magnet at the magnetic activation area In addition to magnetic activation users can also activate Bluetooth by cycling power...

Page 47: ...board and graph Users can toggle between numeric dashboard and live graph views using a soft key The other soft key may be used to log information displayed on the screen Dashboard image at left live...

Page 48: ...sonde in continuous monitoring applications Use the Deploy menu for these applications 1 Capture data To capture spot sample files go to the Run menu and click the soft key below the Capture Data but...

Page 49: ...on the top side of the EXO Handheld Plug the other end of the USB cable into a port on your computer Allow a minute for Windows to recognize the Handheld as a removable drive before the Handheld show...

Page 50: ...al strength icon with green bars will appear If the bars are black then no GPS signal is found Turn on off GPS The GPS consumes battery power and can be turned off to conserve battery life To manage t...

Page 51: ...sed to manage sites this optional menu helps users create site detail that may be associated with files logged in the sonde Not available now future functionality Data This menu enables file transfers...

Page 52: ...rring the sensors into liquid the wiper can help remove any bubbles that may be trapped at the sensor faces Note Menu functionality is the same although visual display differences are found between KO...

Page 53: ...every parameter while Last Point records a single data set 1 point for every parameter Sample Interval This option corresponds to the refresh rate of the graph and dashboard 1 sample per second 1 Hz i...

Page 54: ...O optical dissolved oxygen from the list brings up a menu for the enabled parameters ODO sat and ODO mg L To change the enabled parameters go to the Options Units menu Click on a parameter to bring up...

Page 55: ...f a calibration process on probe is not working correctly Calibrating multiple sensors To calibrate multiple sensors of the same type concurrently install all the sensors in the sonde In the Calibrati...

Page 56: ...now For example a first sample logs at 11 32 31 and with a 15 minute logging interval the next sample will log at 11 47 31 Sync logging at next even interval For example a first sample logs at 00 00...

Page 57: ...interval to 2 and one wipe will occur every other sample If you have a short sampling interval such as 5 minutes and biofouling is not aggressive then you may not need to wipe the sensors prior to eve...

Page 58: ...rform advanced data analysis and post processing However note that this increased data in the logged file may more rapidly fill the internal memory of the data logger Adaptive Logging Adaptive or Even...

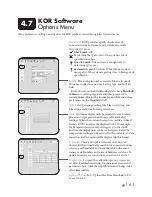
Page 59: ...lps users create site detail that may be associated with files logged in the sonde Not yet implemented in the first version s of KOR KOR is a dynamic software platform subject to additional developmen...

Page 60: ...e sonde Quick View Click a file in the list and then click the Quick View button to view the last 50 data points of the file Storage space The progress bar on the bottom will indicate memory usage on...

Page 61: ...ut setting and Time Zone and Time Format preferences Units Customize display units parameters for each sensor plus adjust wiper position and sonde cable and battery readings While the sonde and sensor...

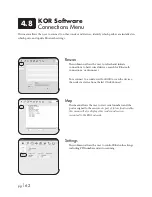
Page 62: ...ces search for Bluetooth connections or disconnect To reconnect to a sonde wait for KOR to scan the devices then select a device from the list Click Connect Map This menu allows the user to view seria...

Page 63: ...pg 63 KOR Software Help Menu This menu connects the user to documentation resources for using KOR software and the EXO products 4 9...

Page 64: ...rename other files This could damage KOR and affect system reliability Data files Templates binary data files data files and configuration settings are in the KOR EXO Data Files folder You can naviga...

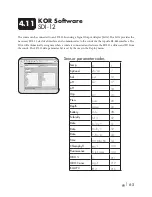
Page 65: ...cognize when a sonde is connected and retrieve the SDI 12 address and ID from the sonde The SDI 12 data parameter list is set by the user in the Deploy menu Sensor parameter codes Temp C 1 SpCond S cm...

Page 66: ...software Go the Calibrate menu in KOR software This menu s appearance will vary depending on the sensors installed in the sonde Select the sensor you are going to calibrate from the list Next select t...

Page 67: ...g In the Calibrate menu select Conductivity and then a second menu will offer the options of calibrating conductivity specific conductance or salinity Calibrating any one option automatically calibrat...

Page 68: ...libration Observe the readings under Current and Pending data points and when they are Stable or data shows no significant change for approximately 40 seconds click Apply to accept this calibration po...

Page 69: ...O and temperature sensors in a zero oxygen medium In the Calibrate menu select ODO then select either ODO sat or ODO mg L Click 2 Point for the Calibration Points Enter Zero Point as the value of the...

Page 70: ...ing data points and when they are Stable or data shows no significant change for approximately 40 seconds click Apply to accept this calibration point This process zeros the sensor with regard to curr...

Page 71: ...ta points and when they are Stable or data shows no significant change for approximately 40 seconds click Apply to accept this calibration point Rinse the sonde in water and dry the sonde Pour the cor...

Page 72: ...they are Stable or data shows no significant change for approximately 40 seconds click Apply to accept this calibration point Do not leave sensors in Zobell solution for a long time A chemical reactio...

Page 73: ...dings under Current and Pending data points While stabilizing click the Wipe Sensors button to activate the wiper to remove any bubbles When data are Stable or data shows no significant change for app...

Page 74: ...onized or distilled water into the calibration cup Immerse the probe end of the sonde in the water In the Calibrate menu select BGA PC Chlor then select Chl g L Select either a 1 or 2 point calibratio...

Page 75: ...ion Summary screen and QC score Click Exit to return to the sensor calibration menu and then the back arrows to return to main Calibrate menu Rinse the sonde in tap or purified water and dry the sonde...

Page 76: ...fluorescence from 0 100 This calibration procedure is recommended if you are also using grab samples to post calibrate in vivo algae readings Pour the correct amount of clear deionized or distilled w...

Page 77: ...sors button to activate the wiper to remove any bubbles When data are Stable or data shows no significant change for approximately 40 seconds click Apply to accept this calibration point Click Complet...

Page 78: ...ansfer 0 3 mL of the 1000 ppm solution to a 1000 mL volumetric and then fill the flask to the top graduation with 0 05 M sulfuric acid Mix well to obtain a solution that is 300 g L 300 QSU 4 Store the...

Page 79: ...Accurately transfer 5 0 mL of the solution prepared in the above step to a 1000 mL volumetric flask and then fill the flask to the volumetric mark with deionized or distilled water Mix well to obtain...

Page 80: ...ved in the Calibration Files folder on the computer not on the sonde All saved Worksheets can be accessed and viewed through the Data menu in KOR software Sample Worksheets ODO Gain The ODO gain is a...

Page 81: ...sensors Place approximately 0 5 in 1 cm of water deionized distilled tap or environmental in the bottom of the calibration cup Then place the sonde with all of its sensors into the cup and close it ti...

Page 82: ...ng surfaces and wipe away any contamination with a lint free cloth Without removing them from their grooves lightly grease each o ring with Krytox Replace any damaged o rings 2 Replace o rings If the...

Page 83: ...ckwise until free If necessary slide the sonde tool s larger opening over the end of the battery compartment and use it as a lever to break the compartment free Then slide off the battery cover Do not...

Page 84: ...the rubber gasket Do not overtighten Battery life specification When using alkaline batteries Approximately 90 days at 20 C at a 15 minute logging interval and temperature conductivity pH ORP Optical...

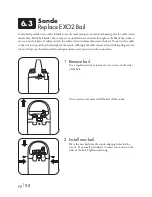
Page 85: ...rt with a clean and dry sonde Slide the sonde tool s smaller opening over the battery cap on top of the EXO2 Using the tool as a lever firmly turn the tool counterclockwise until the battery cap is lo...

Page 86: ...h a pressure relief valve to protect against catastrophic battery failure Significant water leakage into battery compartment requires that your instrument be inspected by the manufacturer or Authorize...

Page 87: ...the sonde Although the cable connector and locking ring are very robust always use the strain relief to mitigate unnecessary pressure on the connection 1 Remove battery cover Twist the battery cover c...

Page 88: ...il Do not use the cable connector to support the whole weight of the sonde Although the cable connector and locking ring are very robust always use the strain relief to mitigate unnecessary pressure o...

Page 89: ...g the Firmware submenu button KOR begins to search for connected sondes and sensors and loads the table with names serial numbers and current firmware versions 2 Select device and update To update a d...

Page 90: ...directions in section 6 18 for Connector Maintenance Wipe clean the HH s keypad lens and polymer case with a cloth soaked in clean water and a few drops of a dishwashing liquid that contains a degreas...

Page 91: ...head screwdriver Note The retaining screws are integrated into this panel and are not independently removeable If replacement is necessary replace the entire assembly 2 Insert replace batteries Remove...

Page 92: ...mall end of the USB cable into the port on the top side of the EXO Handheld Plug the other end of the USB cable into a port on your computer Allow a minute for Windows to recognize the Handheld as a r...

Page 93: ...ocated in the yellow plastic section between the bulkhead tube labeled area and the blue plastic battery cover The EXO2 depth ports are located on the metal bulkhead face itself in the largest open ar...

Page 94: ...rbidity Total Algae and fDOM require minimal maintenance Users should periodically inspect the optical surface at the tip of the sensor and wipe it clean with a non abrasive lint free cloth if necessa...

Page 95: ...t at top of channels and sweep the channels 15 20 times If deposits have formed on the electrodes use a mild solution of dishsoap and water to brush the channels If necessary soak in white vinegar to...

Page 96: ...er deionized distilled tap or environmental in the bottom of the calibration cup Insert the sonde and sensor into the cup and screw it on tightly to prevent evaporation More information in Short Term...

Page 97: ...ry Never use organic solvents to clean an EXO DO sensor As much as possible prevent scratches and damage to the sapphire sensing window Avoid getting fingerprints on the window If necessary wash with...

Page 98: ...ring Remove the o ring pinch the o ring out then roll it upwards over the threads and discard it Visually inspect the new o ring for nicks tears contaminants or particles discard damaged o rings Witho...

Page 99: ...individual sensor caps They cannot be used for other ODO sensors 5 Store sensor cap The sensor cap is shipped in a humidified container and should be consistently stored in a 100 humid environment Pri...

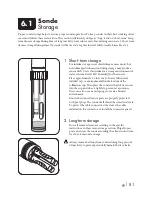
Page 100: ...ibration cup Insert the sonde and sensor into the cup and screw it on tightly to prevent evaporation More information in Short Term Sonde Storage section 2 Long term storage Remove the sensor from the...

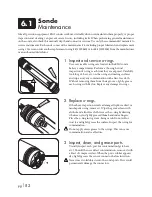
Page 101: ...nants remain or response time does not improve continue to the HCl soak 2 Soak in HCl solution Soak the sensor for 30 60 minutes in one molar 1 M hydrochloric acid HCl This reagent can be purchased fr...

Page 102: ...ing at the base of the sensor module Caution Always exercise extra care when using sharp or potentially harmful instruments 2 Remove and discard old sensor module To remove perform two motions simulta...

Page 103: ...prongs on the base of the head with the slots in the sensor body The sensor module is keyed to insert in only one orientation Once the module is aligned press it firmly into position until it clicks W...

Page 104: ...inch pounds While tightening gently and slowly rock the brush to ensure a tight fit against the D shaft Check snugness of wiper by gently rocking 5 degrees in either direction 2 Replace brush guard Lo...

Page 105: ...also apply a thin coat of Krytox grease to the male pins of the connectors when they appear dried out However it is better to apply too little grease than too much Too much grease can encourage contam...

Page 106: ...nse the guard with clean water and inspect 2 Soak to remove heavy biofouling Remove the antifouling sonde guard from the sonde If the guard is covered in a thick layer of filaments or barnacles soak t...

Page 107: ...oat of Krytox grease to the flat rubber mating surface on top of the connector When not in use always install the connector s plug 2 Male 6 pin connectors These connectors are located on field cables...

Page 108: ...f a small flat blade screwdriver under the lip of the ring and pry upward Pull ring out of groove Remove locking nut and replace with new locking nut Install new locking ring by prying up one edge wit...

Page 109: ...taining ring Repeat the same steps to remove the top of the flow cell from the flow cell tube 2 Clean flow cell Use water and a mild detergent and water to wipe clean the flow cell parts 3 Reassemble...

Page 110: ...pg 110 This page intentionally left blank...

Page 111: ...at left pH 4 00 7 00 10 00 Buffer Solutions 3821 3822 and 3823 pH 4 Ingredients Water Potassium Hydrogen Phthalate Red food coloring pH 7 Ingredients Water Potassium Phosphate Monobasic Sodium Hydroxi...

Page 112: ...ing gloves boots and apron Eyes May cause irritation Wear safety glasses with side shields or face shield Ingestion May cause an upset stomach Wear a mouth cover or face shield when there is splashing...

Page 113: ...ountries United States FCC Part 15 compliant Canada RSS compliant European Union EU CE compliant Australia CISPR 11 compliant New Zealand CISPR 11 compliant Bluetooth wireless technology and similar a...

Page 114: ...ent name EXO Sondes EXO1 and EXO2 and EXO Handheld Systems Model numbers 599501 xx 599511 xx 599502 xx 599512 xx 599150 Intentional Radiators EXO Sondes EXO1 and EXO2 contain the LMX Bluetooth module...

Page 115: ...erformance criteria for transducers with integrated or remote signal conditioning EN61000 3 2 2006 A1 2009 A2 2009 Electromagnetic compatibility EMC Part 3 2 Limits Limits for harmonic current emissio...

Page 116: ...rs 599090 xx 599100 xx 599101 xx 599102 xx 599104 xx 599118 xx 599800 599810 599870 xx 599040 xx 599008 xx EXOISE0x Intentional Radiators EXO Sondes EXO1 and EXO2 contain the LMX Bluetooth module Nemk...

Page 117: ...to be covered by this warranty To exercise this warranty write or call your local representative or contact Technical Support Send the product and proof of purchase transportation prepaid to the Autho...

Page 118: ...been completed We will contact the sender for instructions as to the disposition of the equipment Disposition costs will be the responsibility of the sender When service is required either at the user...

Page 119: ...authorized service center will remove this battery and properly dispose of it per service and repair policies Manufacturer We are committed to reducing the environmental footprint of our products Whil...

Page 120: ...com 603789REF A603789 A June 2012 Item Drawing Revision Date Wissenschaftlich Technische Werkstatten GmbH D 82362 Weilheim Dr Karl Slevogt Strasse 1 Germany Tel 0881 183 0 info wtw de www EXOwater com...

Reviews: